|
Info-Tech Systems Integrators Sdn. Bhd., the leading HR software vendor in Malaysia, introduces the Payroll Management System Cloud Portal. This cloud portal is designed to help you process the employee's salary for each month, print out their payslips, do the EPF, Bank and Income Tax submissions. The system includes leave functions that will help monitor employee's leave for the month and print out in the payslip.
(After purchasing the system) Info-Tech Systems (ITS) will be setting up the first Super User (Administrator) for your organization. A welcome mail will then be sent to the administrator's email ID which includes the log in credentials for the Payroll Management System cloud portal.
This manual will help you understand and know more about the different functionalities of the Payroll Management System Cloud Portal.
After purchasing the system, Info-Tech will set up the first super user (Administrator) for your organization and send a welcome mail to the super user's email ID. After that the login credentials will be sent to the registered email ID, and the super user needs to log in to the system and must perform the below required steps as the initial configurations of the " Super User ": -
To log in to the portal, type this URL/Web Link https://www.infotech-cloudhr.com.my to the address bar of your PC or mobile web browser.

Note: For those clients who will be using the system which is hosted ON PREMISE , the URL Link will be provided by Info-Tech implementation specialist who will be doing the installation on the client’s server.
Below is the login screen of the Info-Tech Cloud Portal:

This is where the super user or the administrator perform the initial configuration of the Payroll System Cloud system.
As the system Administrator (Super User), you would be able to create and setup the initial details needed to access the system:
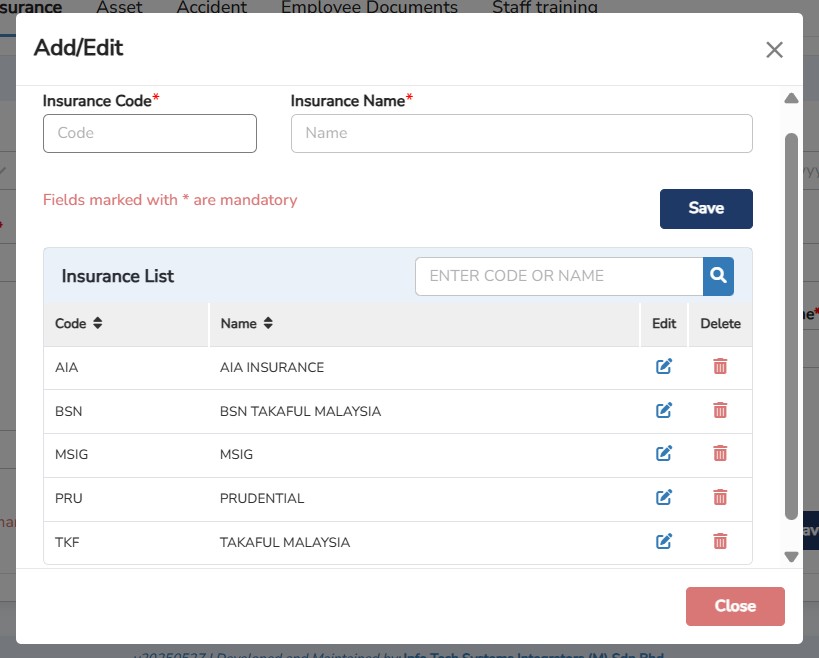
✓ Creating the Company
✓ Setting Up the User Access Rights
✓ Creating Users of the system
✓ Providing application Access to the employees
✓ Assigning the Approvers for each of the employees
Step
1: Go to
Administration
>
Company
> click
![]() (If there are more than one companies)
(If there are more than one companies)
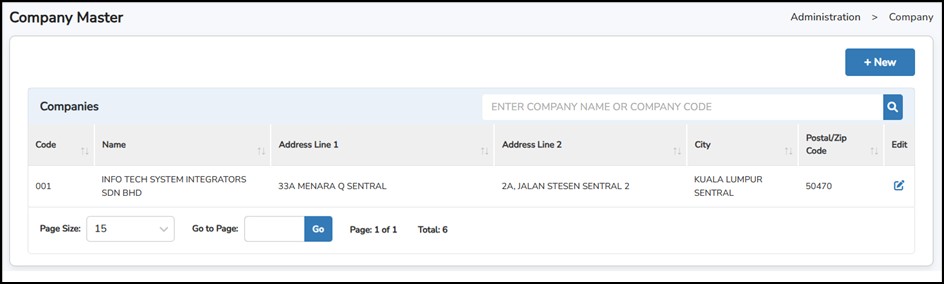
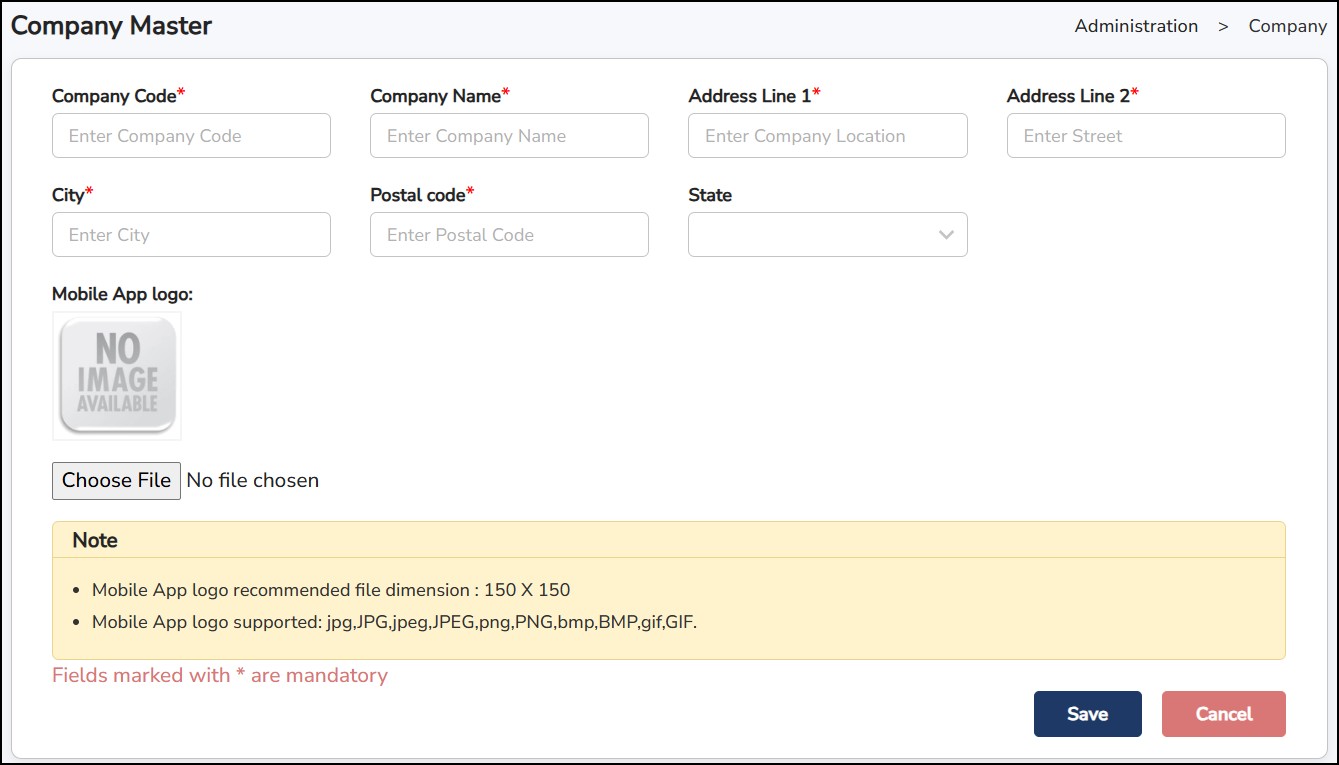
Step 2: Enter Company Code (Alphanumeric Max. 6 characters) > Full Company Name > Location > Street > City > Postal Code
Step
3: Click
![]() Recommended Size: 150 pixels x 150 pixels (File Size: Up to 1MB)
Recommended Size: 150 pixels x 150 pixels (File Size: Up to 1MB)
Step
4: Click
![]() once
done.
once
done.
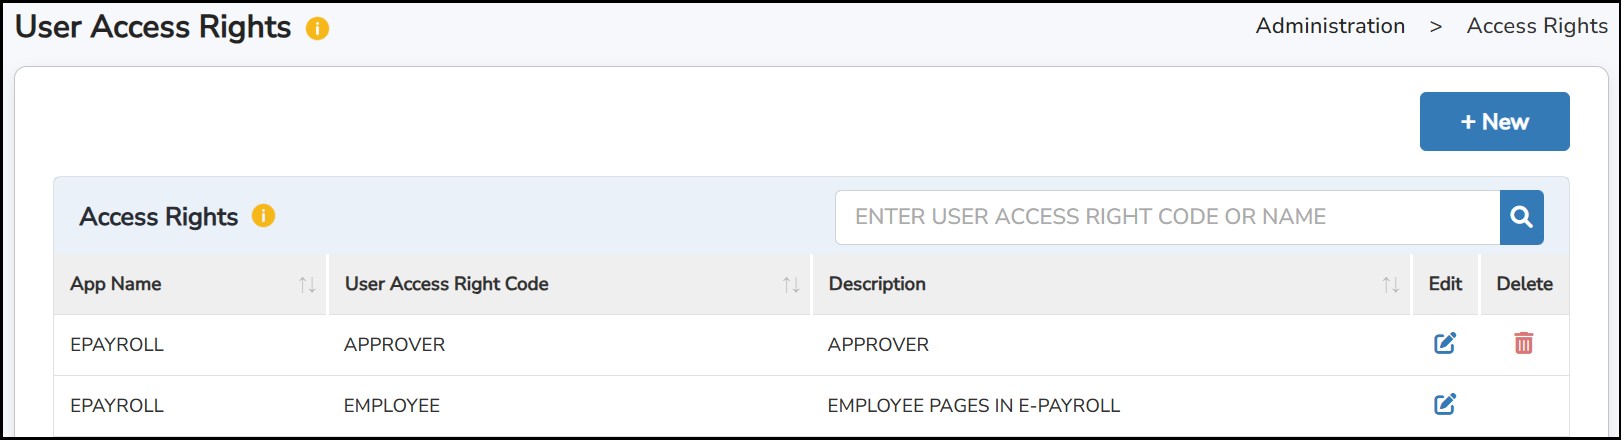
This is where you can assign the access rights of Supervisors, Approvers, or other users of the system. By default, the system has already created 3 roles:
ALL (Access to all the tabs for the respective software).
EMPLOYEE (can only view their own details and information).
APPROVER (additional access to approve/reject tabs).
To create a set of access rights for someone who needs special access to the system (e.g., HOD, Approver, Supervisor, etc.), this is the place to do it.
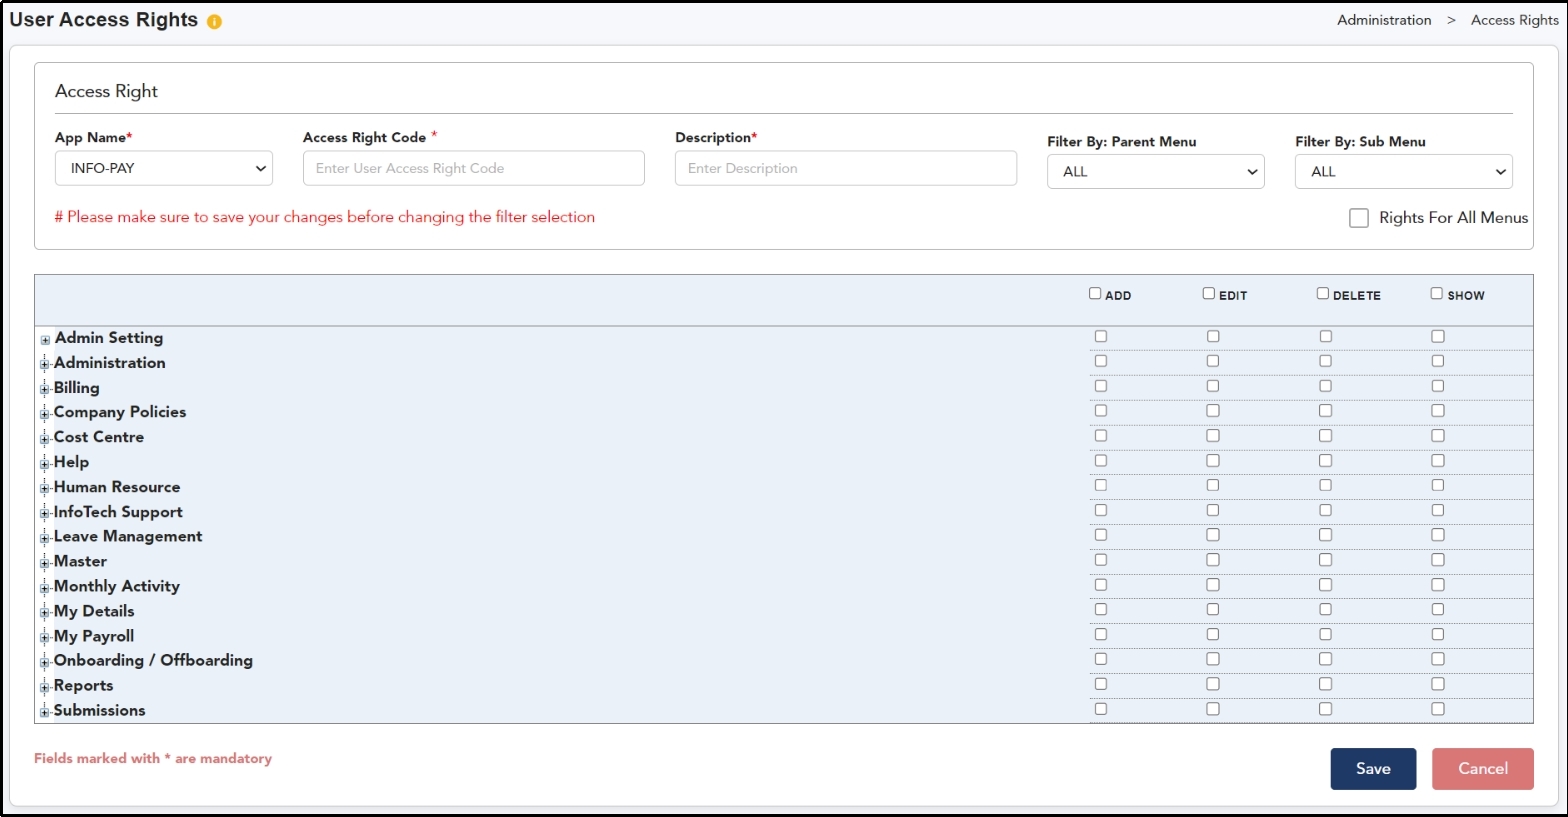
Step 1: Go to Administration > User Access Rights
Step
2: Click
![]() to create new Access
Rights
to create new Access
Rights
Step 3: Enter Access Right Code (Max. 15 characters) > Access Right Description (Max. 50 characters).
Step 4: Tick on the check box for the accessible function:
ADD : To allow the user to add new details.
EDIT : To allow the user to edit the existing details.
DELETE : To allow the user to delete the existing details.
SHOW : To allow the user to delete the existing details.
Step
5: Click
![]() once done.
once done.
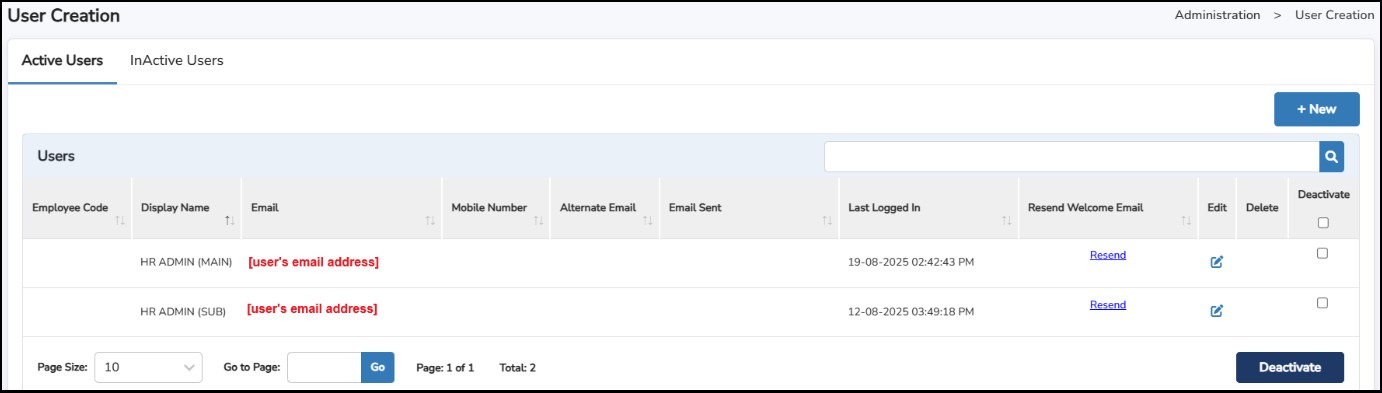
Step
1: Go to
Administration
>
User
Creation
>
Click
![]() to create a new
user.
to create a new
user.
Step 2: Under Create User tab, select
EMPLOYEE if the user is both an employee of the company and an administrator. When selected, the user profile will be linked from Master > Employee Basic Details and the details will be auto populated.
NONE if the user is not an employee of the company or needs a separate login. Then, enter their Display Name and Primary Email.
Note: The email must be unique, as the system does not allow duplicates. Mobile Number and Alternate Email ID are optional.
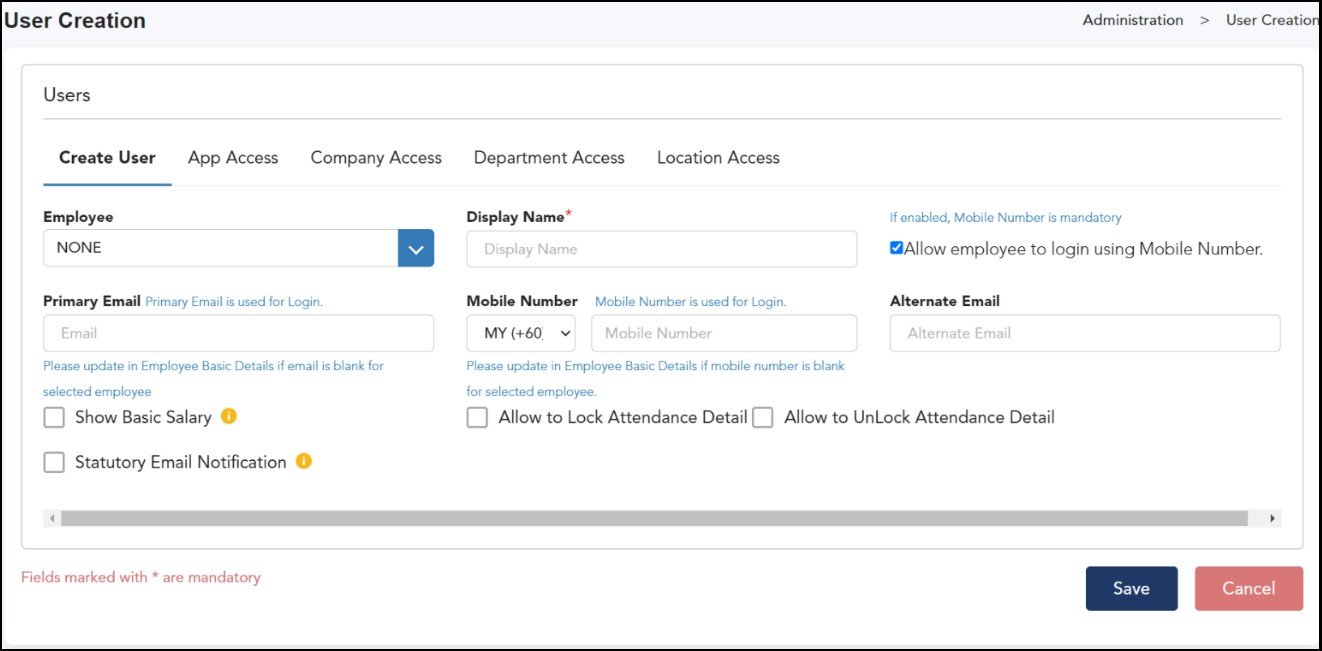
Allow employee to login using Mobile Number – To allow users to log in using their registered mobile number
Show Basic Salary – To allow user to view other employee's basic salary
Allow to Lock Attendance Detail & Allow to Unlock Attendance Detail – To allow user to lock/unlock TMS attendance transaction.
Statutory Email Notification – To allow user to receive the statutory e-mail notification.

Step 3: Go to App Access tab. Select the type of Access Right assigned for this user. These are based from the created rights under User Access Rights.
By default, there are mainly 4 selections: -
NO ACCESS = Not be able to log in and use the software at all.
EMPLOYEE = Standard access, allowing users to view personal information, such as payslips, attendance, leave, claims, etc.
APPROVER = Includes all the access of an EMPLOYEE, plus the ability to access a special page to approve or reject requests.
ALL = Complete and unrestricted access to all features and functions within the software.
This is also where the set of access rights that has been created in the User Access Rights will appear in the drop-down menu.
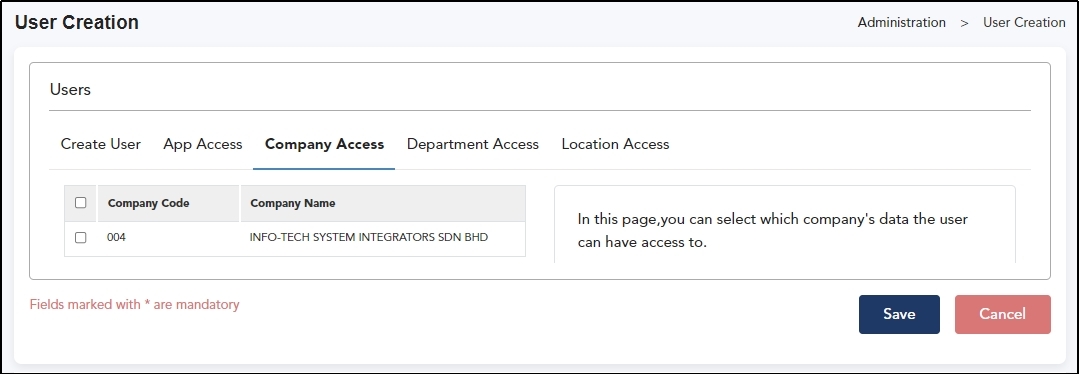
Step 4: Go to Company Access tab. Select which Company this user can access. If have more than 1 company, you can choose to allow this user either access to ALL company, or selected company only.
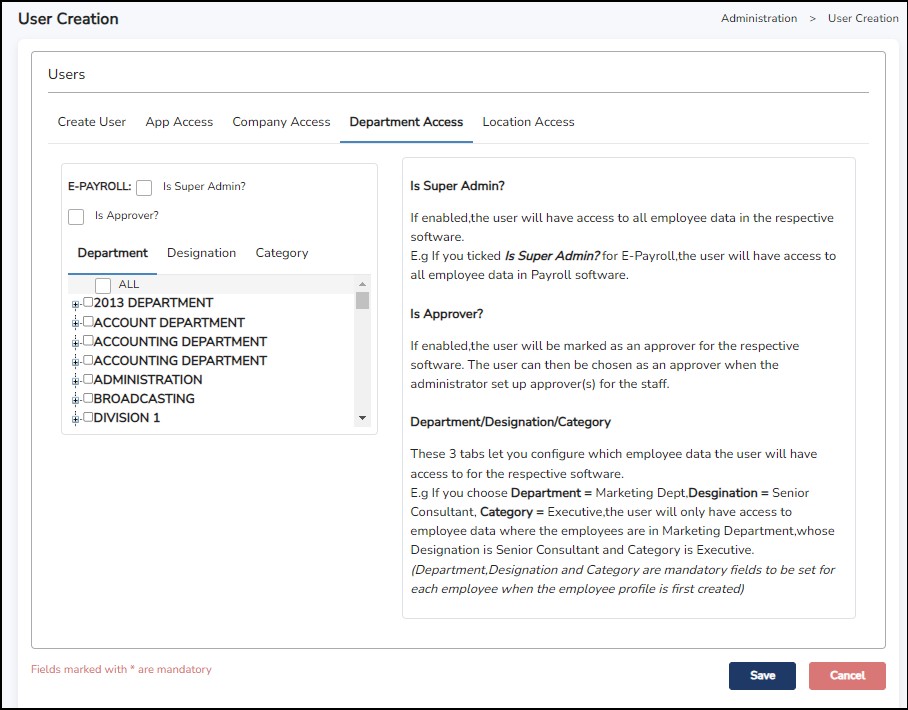
Step 5: Go to Department Access tab. Select which Department / Designation / Category that this user can access.
Is Super Admin? – If enabled, the user will have access to all employee data in the respective software.E.g. If you tick "Is Super Admin?" for E-Payroll, the user will have access to all employee data in the Payroll software.
Is Approver? – If enabled, the user will be marked as an approver for the respective software. The user can then be chosen as an approver when the administrator sets up an approver(s) for the staff.
Note: You can assign a Backup Officer who will have the authority to approve or reject requests on behalf of the acting approver.
Step
6: Click
![]() once done.
once done.
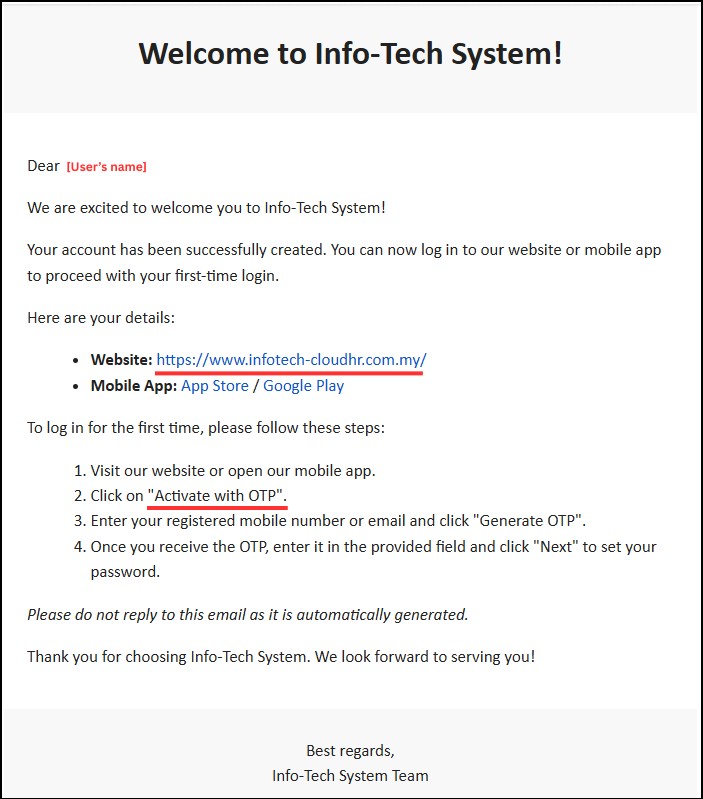
The user will then receive the notification/welcome email as below, indicating the account has been created. User will need to proceed to activate their account by clicking on the "Activate with OTP". Proceed with following the steps and set the 1st time password for the account.
This feature is where you can give the payroll access, (or other Info-Tech Cloud Applications) that you have purchased, to the employee(s).
The number of employees that you can give access to will depend on the number of licenses you have subscribed. This can only be done after you have entered the employee information into the cloud portal.
Note: Users created in User Creation will not appear on this page.
Step 1: Go to Administration > Employee Access.
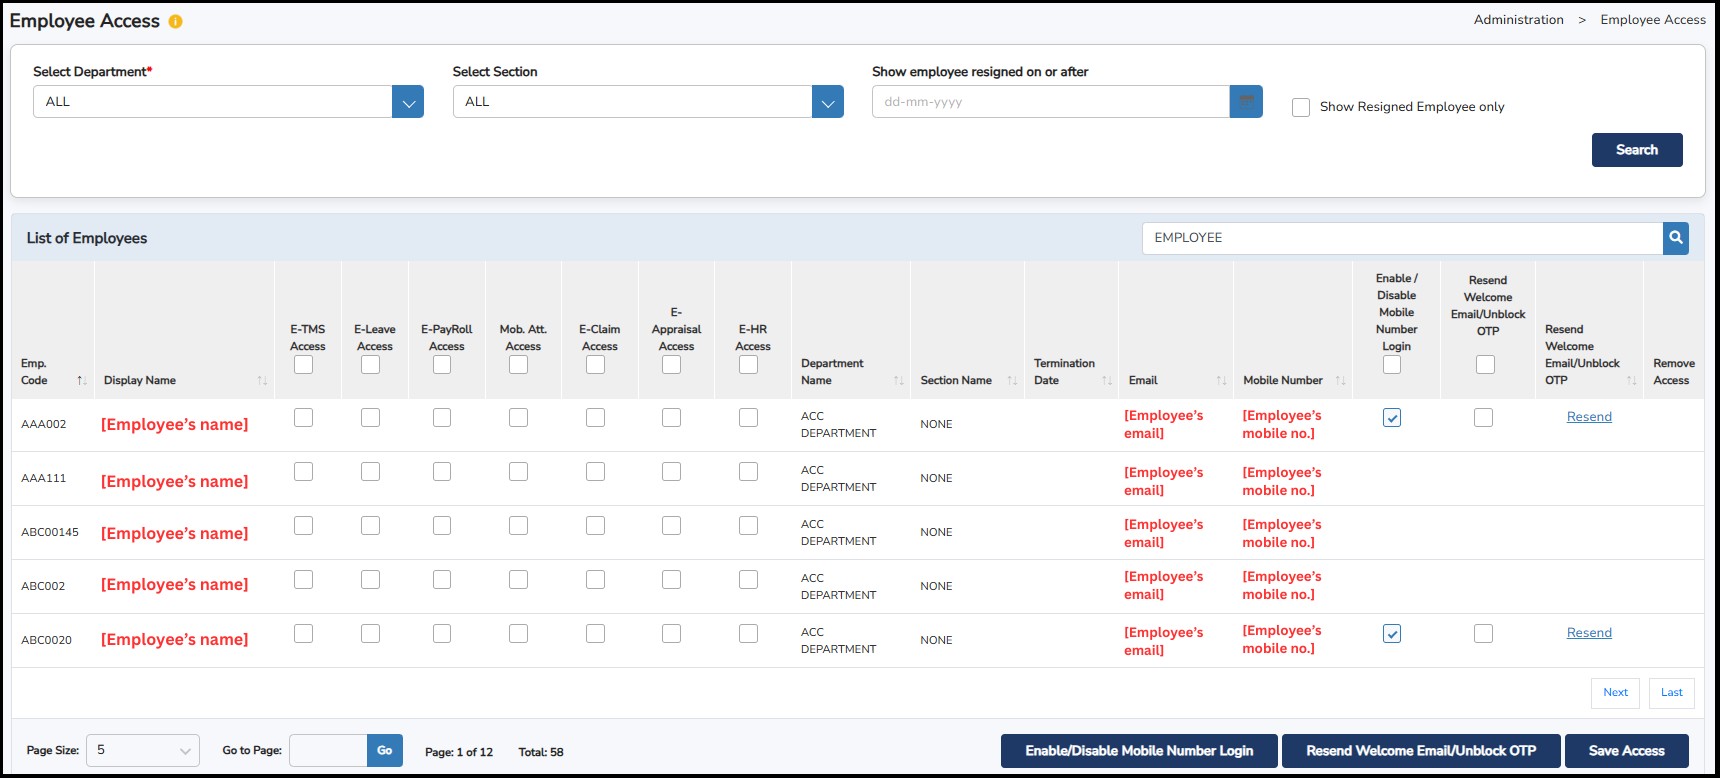
Step 2:
Tick on the required app access E-Payroll
> click
![]() once done.
once done.
**Note: To enable employees to log in using their mobile number, tick Enable/Disable Mobile Number Login.
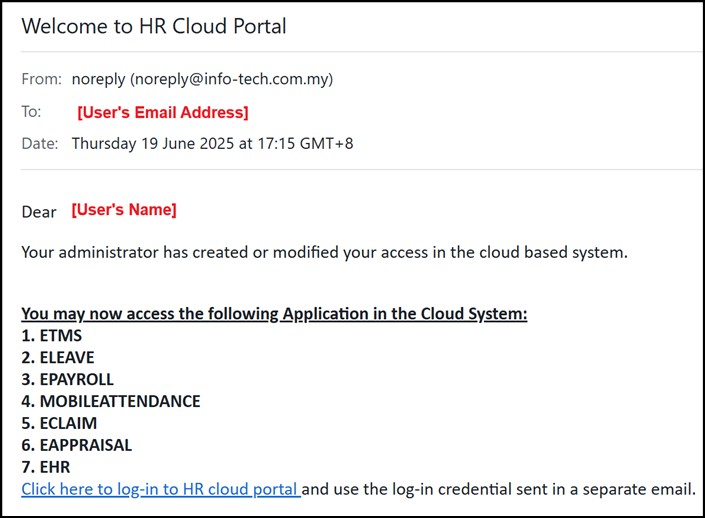
An automated email notification will be sent to the employee with the Login User Id and Password.
Once
saved, this window will indicate the date and time that the email
notification was sent to the employee’s registered email ID.Below
is the sample email notification:
To reset the password for an employee, you may click on the Reset / Resend button and an email notification will be sent to the employee’s registered email ID indicating the Login User ID and Password.
This feature will help you monitor the different activities done in the system by the user(s), approver(s) and employees.
Step 1: Go to Administration > Audit Log
Step
2: Indicate the
From
and
To
Dates
>
filter the search by selecting the specific
Page
,
Transaction
type
or
User
>
click on the
![]() button
button
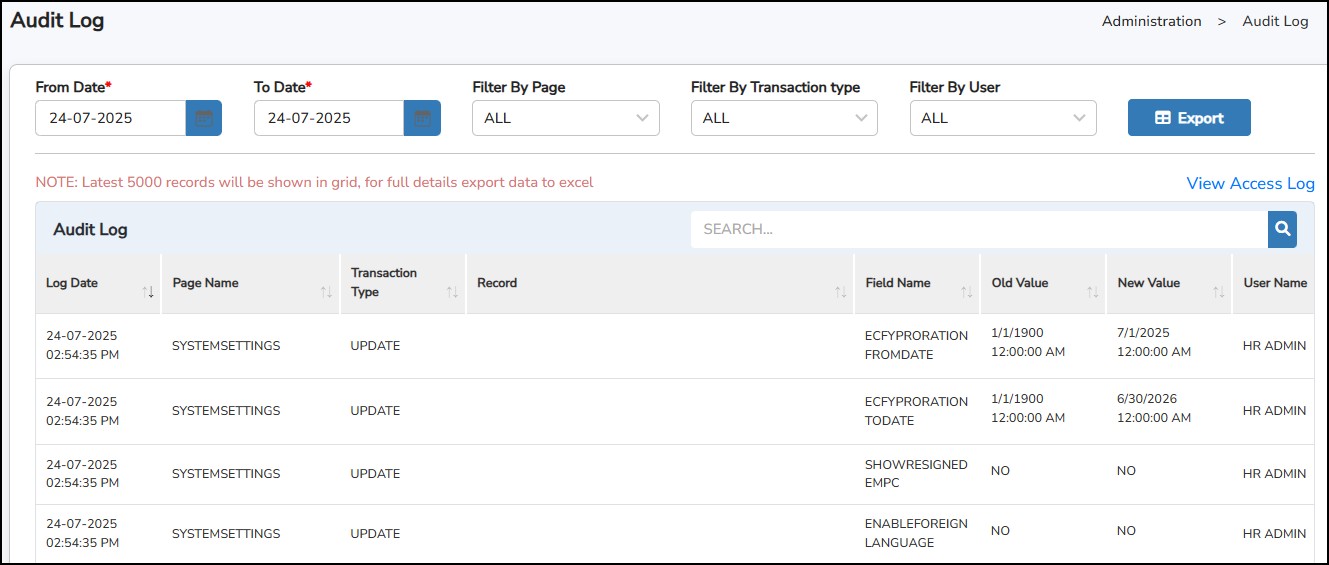
The transaction history will be listed down depending on the selected filter options.
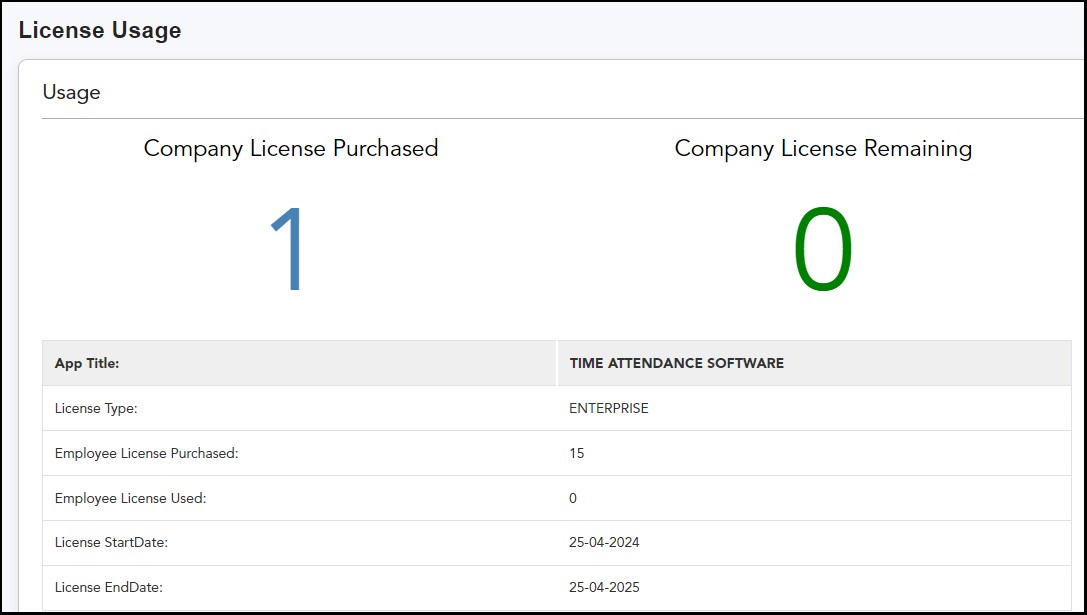
This section will show you the purchased license details, current usage and availability.
Step 1: Go to Administration > License Usage.
To enable employees to submit requests, you must first assign approvers for each employee within the system. No request can be submitted until an approver has been designated. If only one approver is required, select them under the Final Level Approver option.
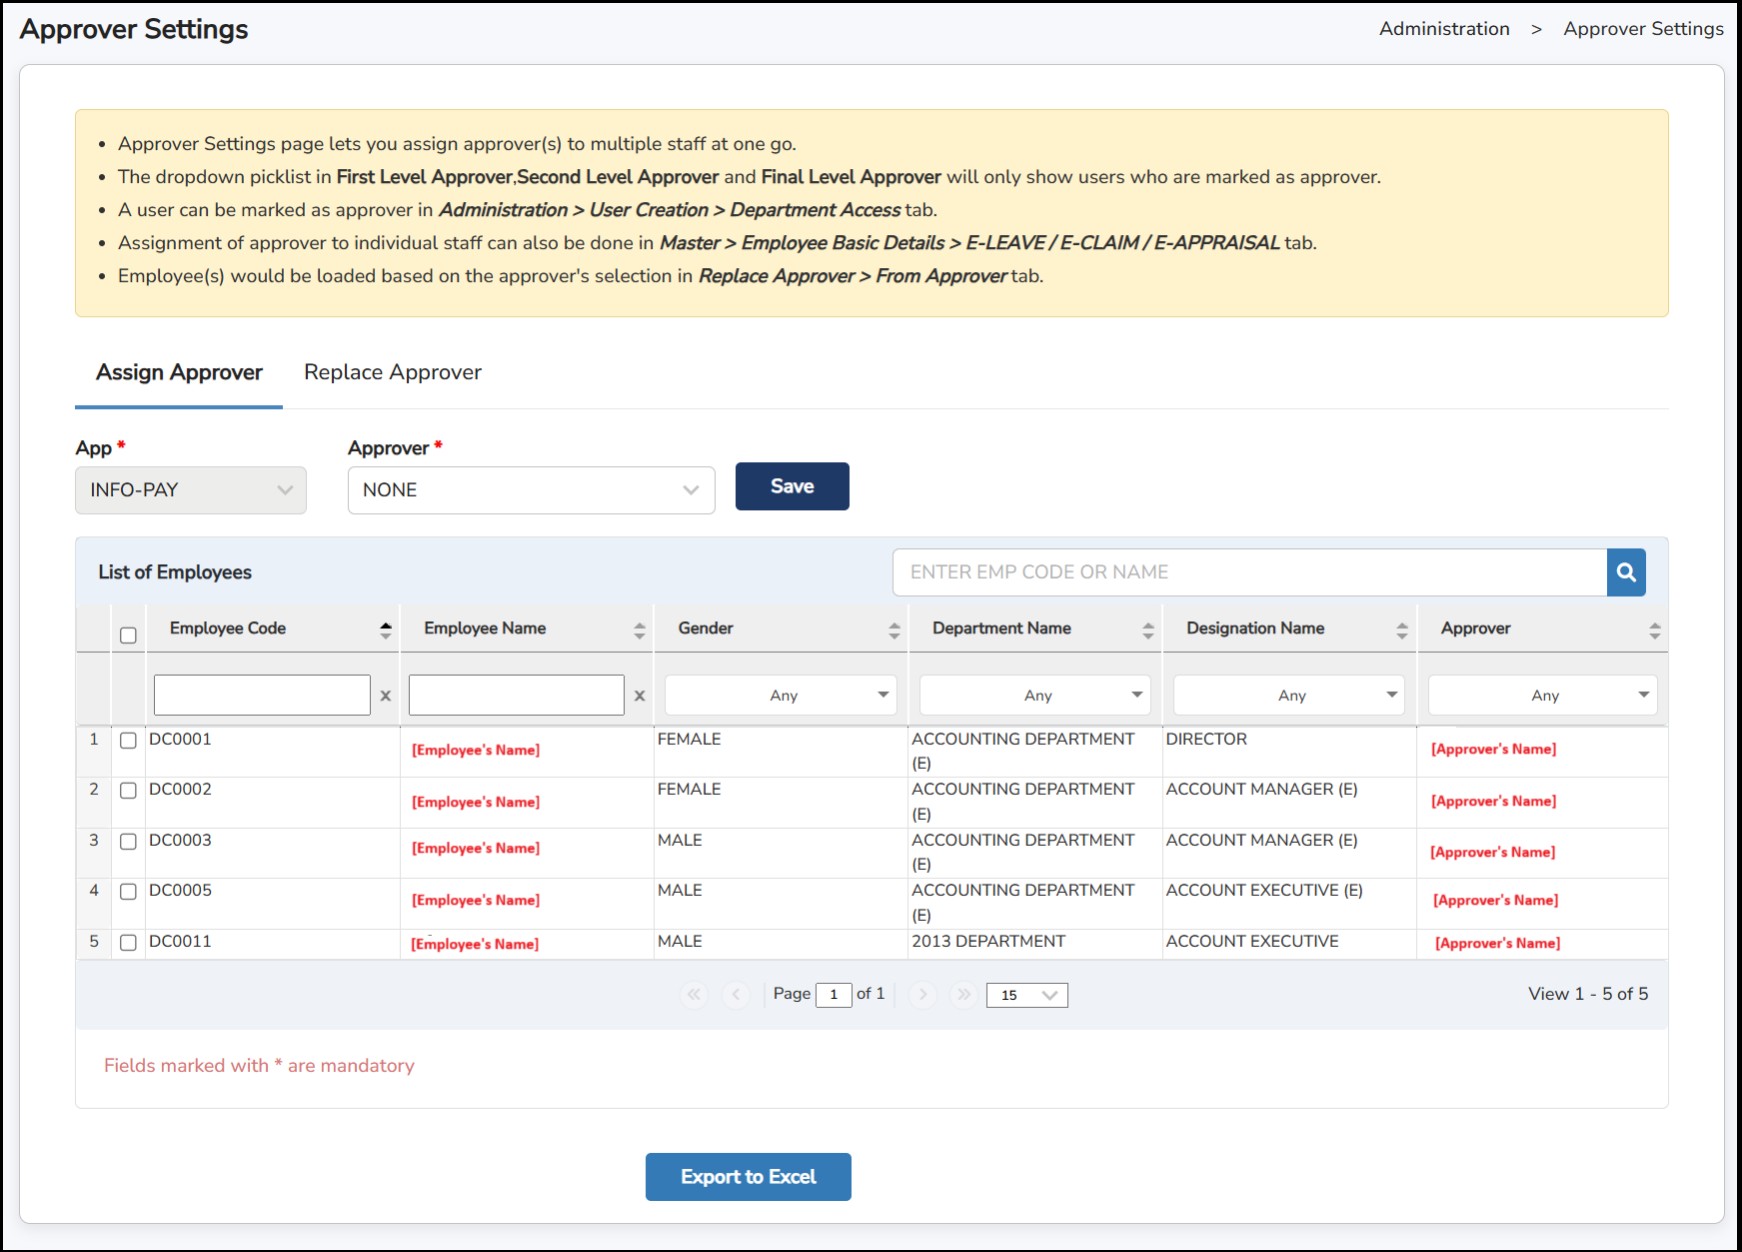
Step 1: Go to Administration > Approver Setting
Step
2:
Tick
on
the
specific
employee
(s)
>
select
the
Approver
from
the drop-down list > click
![]() once
done.Optionally,click
once
done.Optionally,click
![]() if you wish to export as an Excel file.
if you wish to export as an Excel file.
Step 1: Go to Administration > Approver Setting > Replace Approver
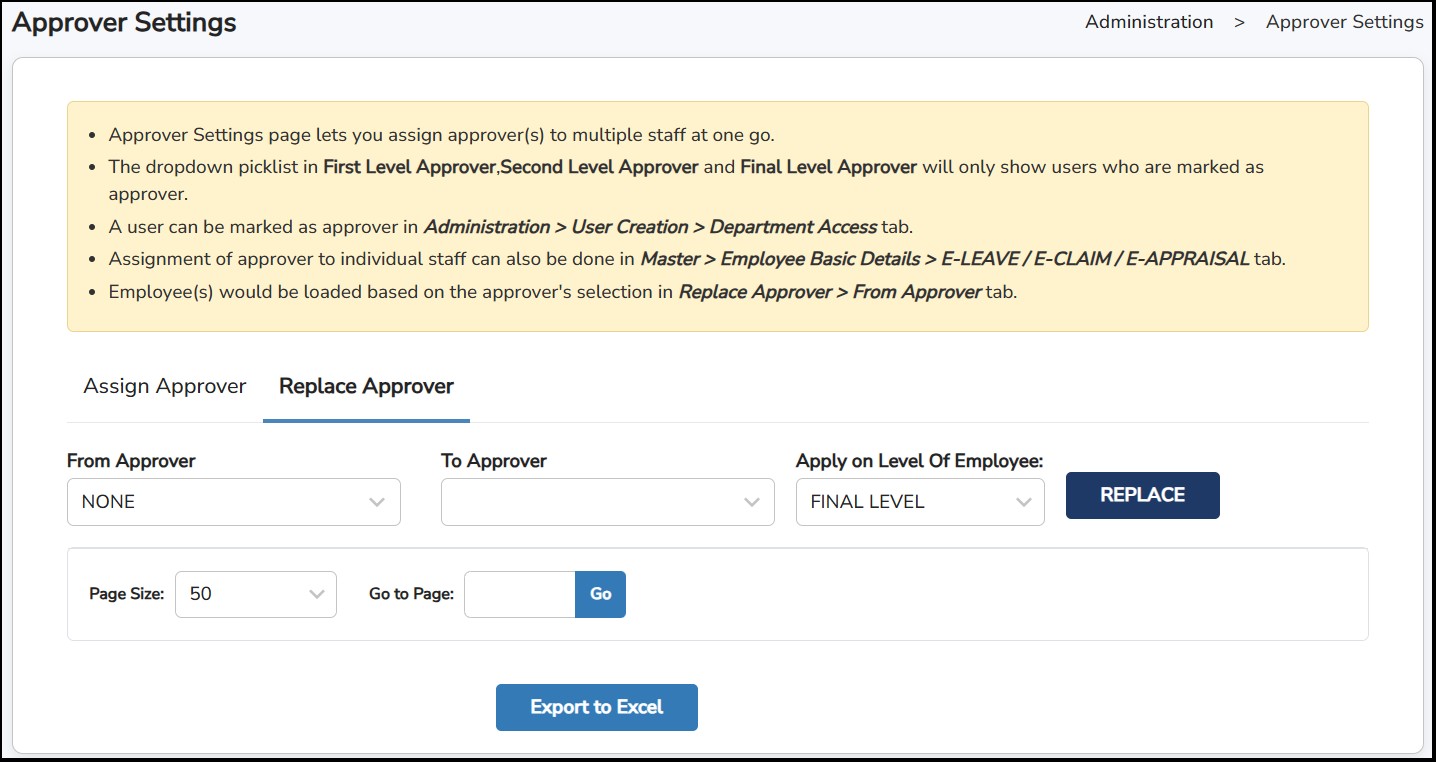
Step 2:Select From Approver and To Approver > click
![]() Once done.
Once done.
This is where you can track all the SMS that has been triggered by the system and sent out to the employees.

Step 1: Go to Administration > SMS Tracker.
Step 2: Select From and To Date > click
![]()
Step 3:You may check the Subject of the SMS and the status if it has been delivered successfully, failed or pending.
Email Settings
By default, all emails are sent from the INFO-TECH email server (e.g., "Welcome to HR Cloud Portal" email or password reset email). In some cases, the receiver's email server may treat emails from the INFO-TECH server as spam or junk, which can prevent them from being delivered to the inbox.
To enhance delivery consistency, this feature allows you to configure your company's own email server so that both the sender and receiver use the same server. This helps ensure smooth email delivery from Info-Tech HR Cloud without filtering issues.
Step 1: Go to Administration > Email & 2FA Settings
Step 2: Under Email Settings tab, tick on Enable custom mail server settings to allow you to enter your mail server details.
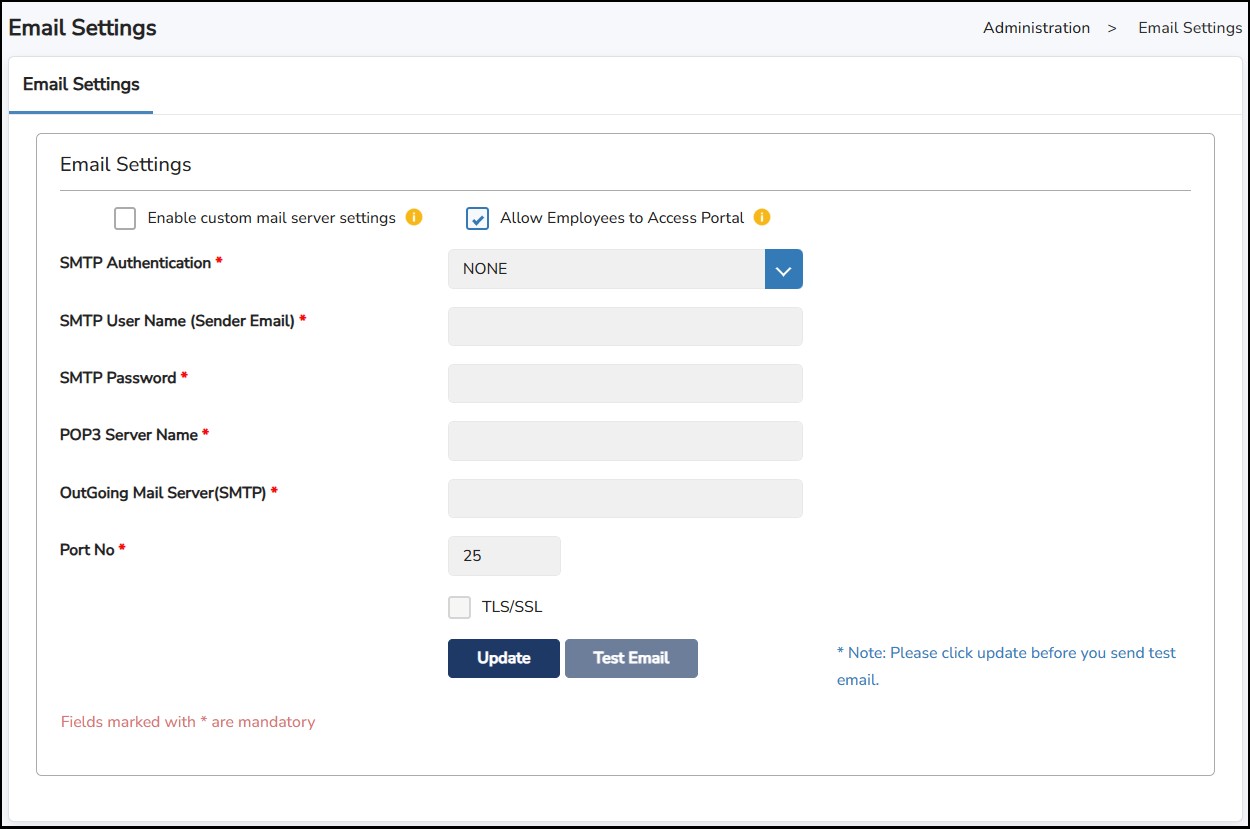
Step 3: Enter email server setting provided by your IT or email provider
• SMTP Authentication – Select from either NONE, LOGIN or PLAIN
• SMTP User Name (Sender Email) – Email address used to send emails
• SMTP Password – Sender Email’s password
• POP3 Server Name – Enter pop3 server name
• Outgoing Mail Server (SMTP) – Enter SMTP server name
• Port No – Enter Outgoing Mail port no.
• TLS/SSL – Tick if mail server has TLS/SSL
Step
4: Click
![]() to save the changes.
to save the changes.
Step
5: Click
![]() once updated to test if the receiver successfully receives the email.
once updated to test if the receiver successfully receives the email.
This is where you can back up the operation state, settings and the data stored in the system.
We have Automated Backup (which will be run automated by the system every day)
and Optional Backup (manual backup by clicking on the
![]() button.
button.
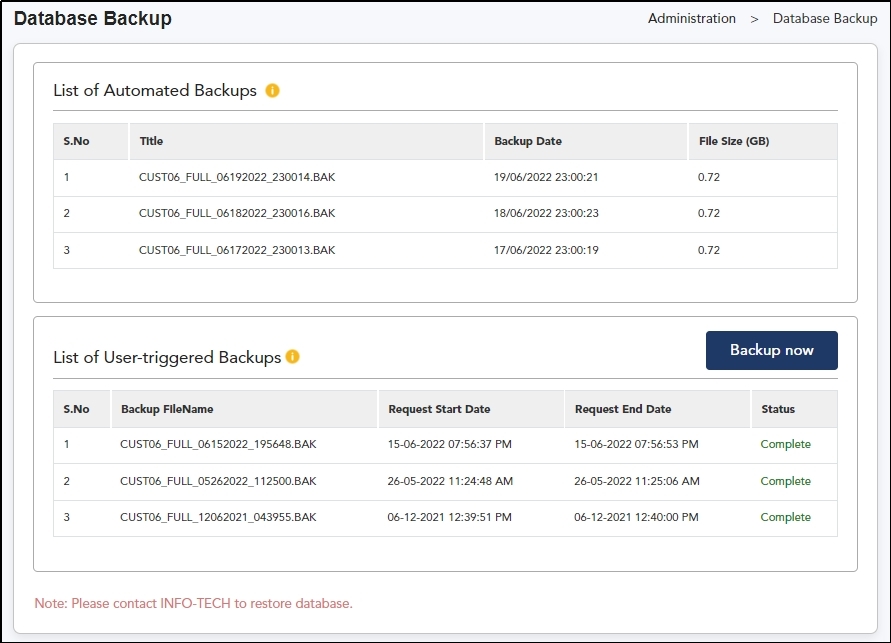
Step 1: Go to Administration > Database Backup
Step 2: Click
![]() to manually backup the database.
to manually backup the database.
A total of 6 backups will be retained. The oldest backup will be overwritten upon the creation of a new one. However, automated and user-triggered backups are maintained separately.
**Note : Please contact Info-Tech Support if you wish to download/restore the backed-up database.
This
is where you can monitor the status of delivery email to the intended
recipient. You may also resend the same email by click on the
![]() button.
button.
Step 1: Go to Administration > Email Tracker.
Step 2: Select From Date and To Date > click
![]()
![]()
Step 3: Click
![]() if the Status is shown as FAILURE.
if the Status is shown as FAILURE.
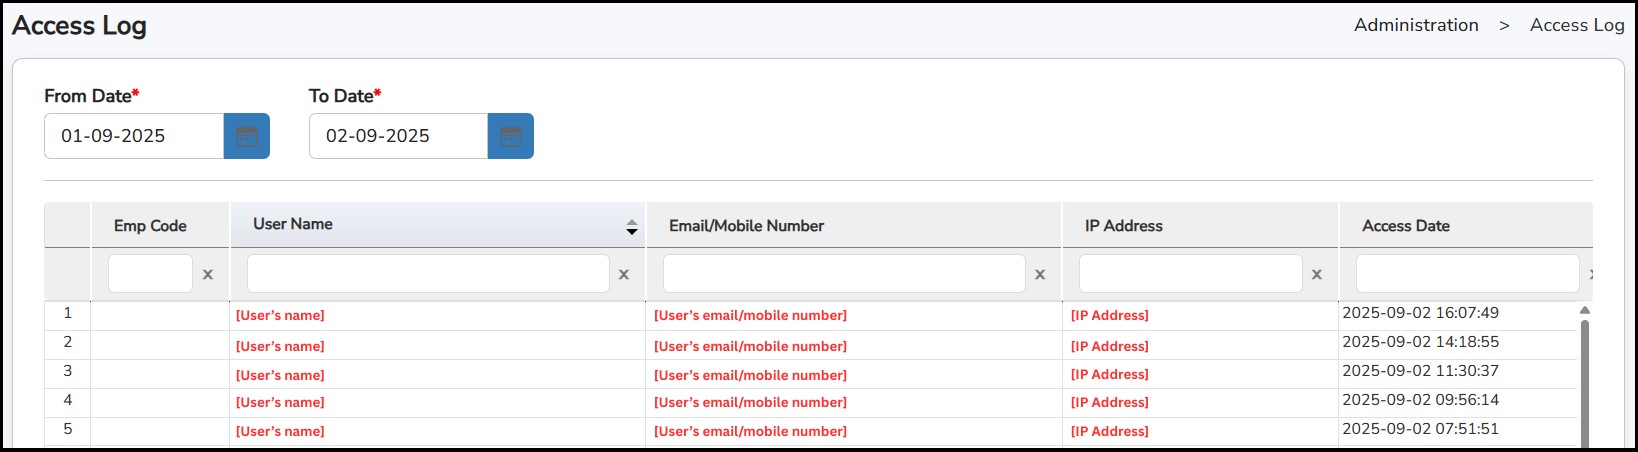
This is to view the users who access the system.
Step 1: Go to Administration > Access Log
Step 2: select From Date and To Date.
This is a page where you can view the latest updates if there are new enhancements added to the system.
Step 1: Go to Administration > View Latest Update

This is where you can enable the email notification to receive by ticking the box, select the Time Slot and enter the number of days to be reminded in the Reminder Notification (before "xx" days).
Step 1: Go to Administration > Notification settings
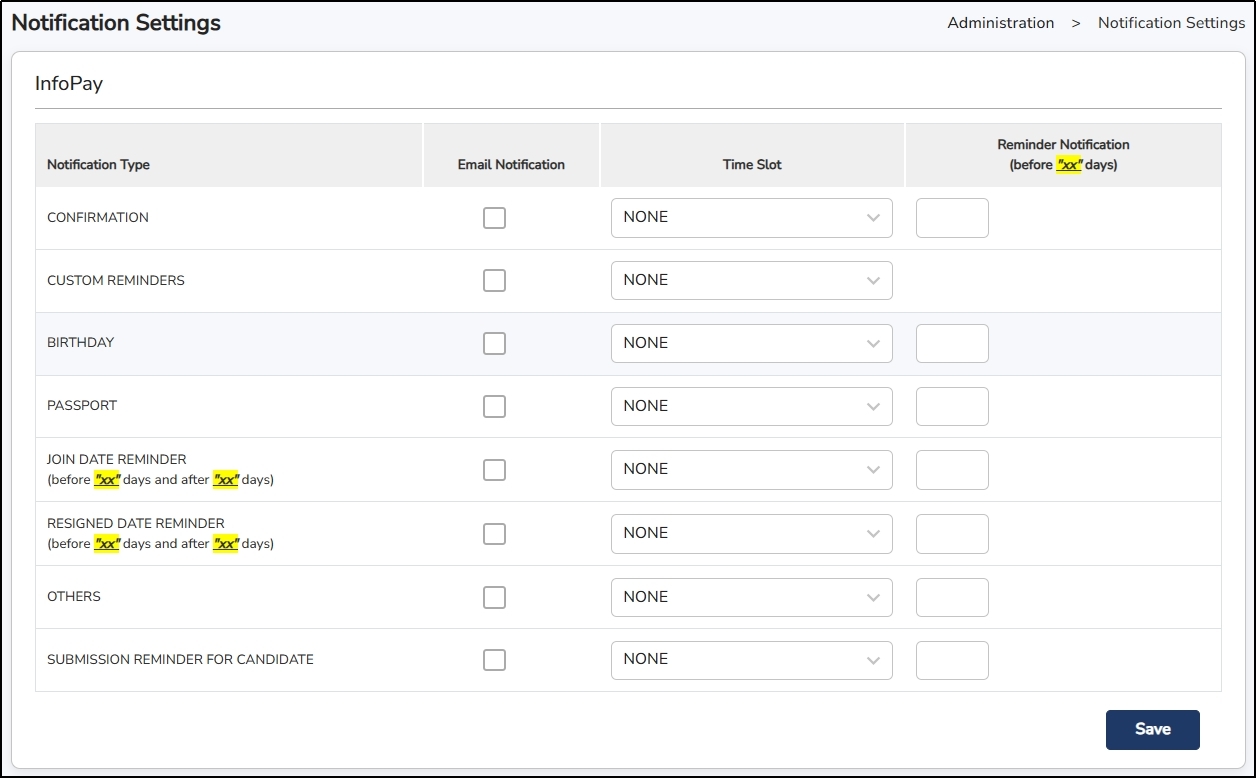
Step 2: Under Email Notification , tick on which Notification Type that you wish to receive.
Step 3: Choose the Time Slot . (Leaving it set to NONE will prevent you from receiving the notification.)
Step 4: Enter the number of days under Reminder Notification for when the notification should be sent out.
Step 5: Click
the
![]() button to save the setting.
button to save the setting.
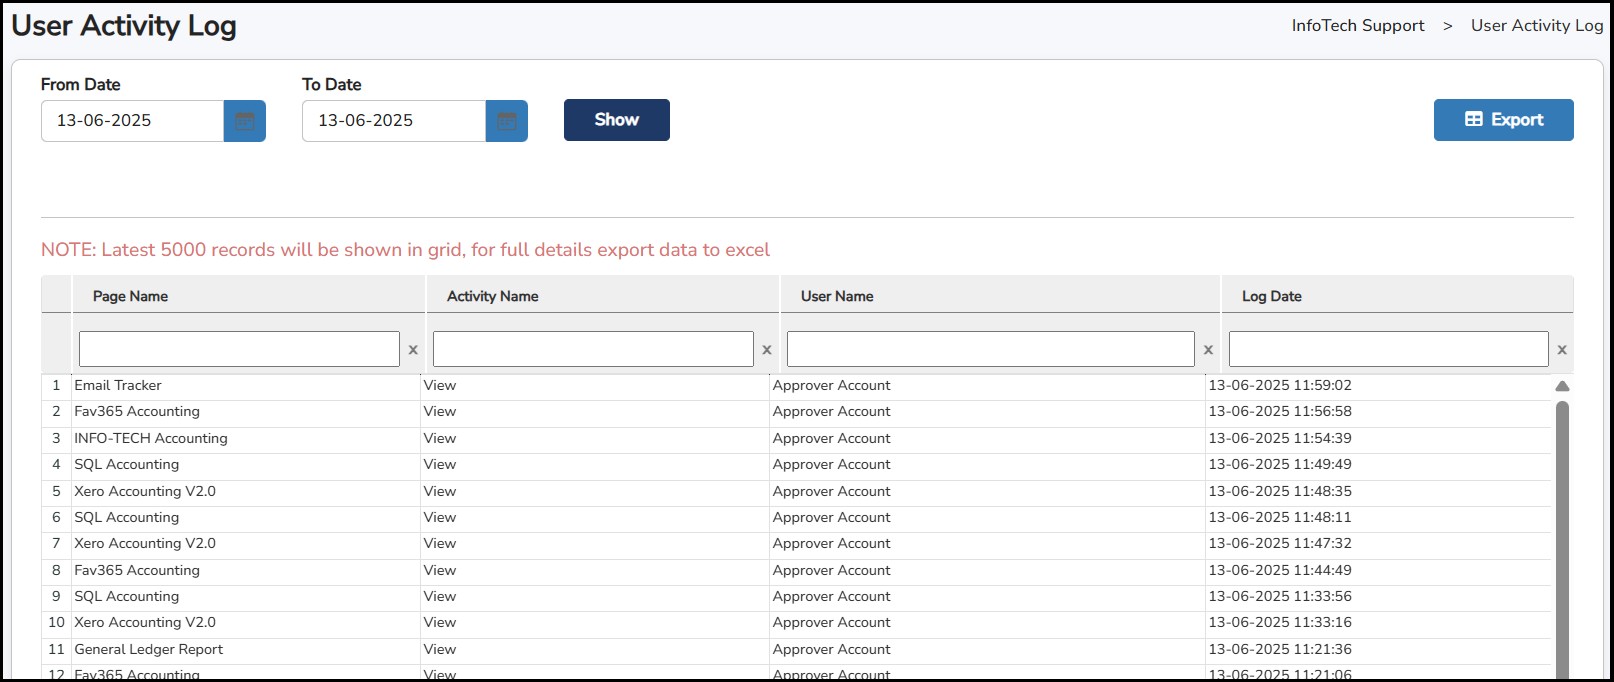
This is where you can view the activity done by users who can access the system.
Step 1: Go to Administration > User Activity Log
Step 2: Select From Date and To Date >click
![]()
Step 3:
click
![]() if you wish to export as an Excel file.
if you wish to export as an Excel file.
This is where you can check the tasks done by the system have been completed, pending or if there's any error.
Step 1: Go to Administration > Background Tasks
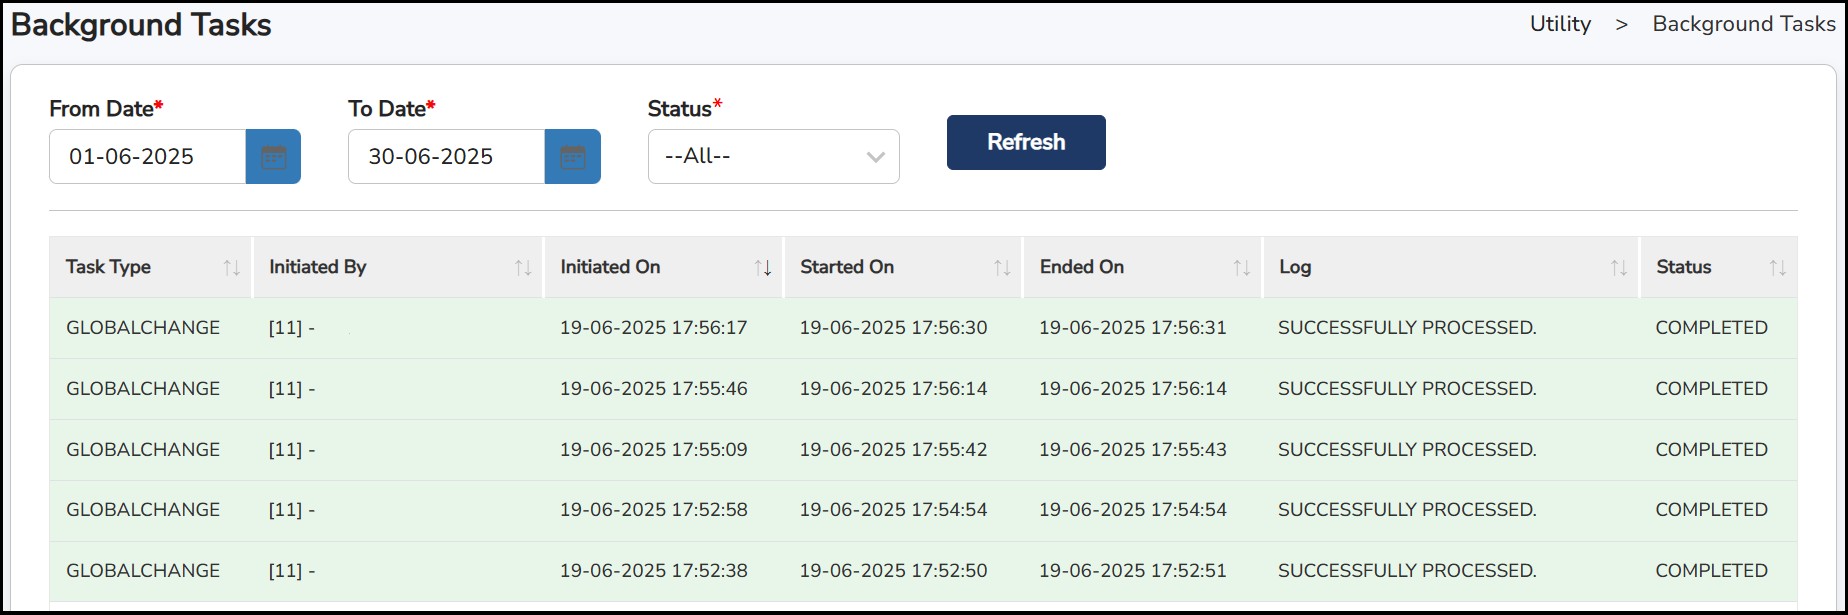
Step 2: Select From Date and To Date >click
![]()
This is where you can enter the employee's information, and payroll details and set up the cloud application access.
The screen below will list all existing employees in the system.
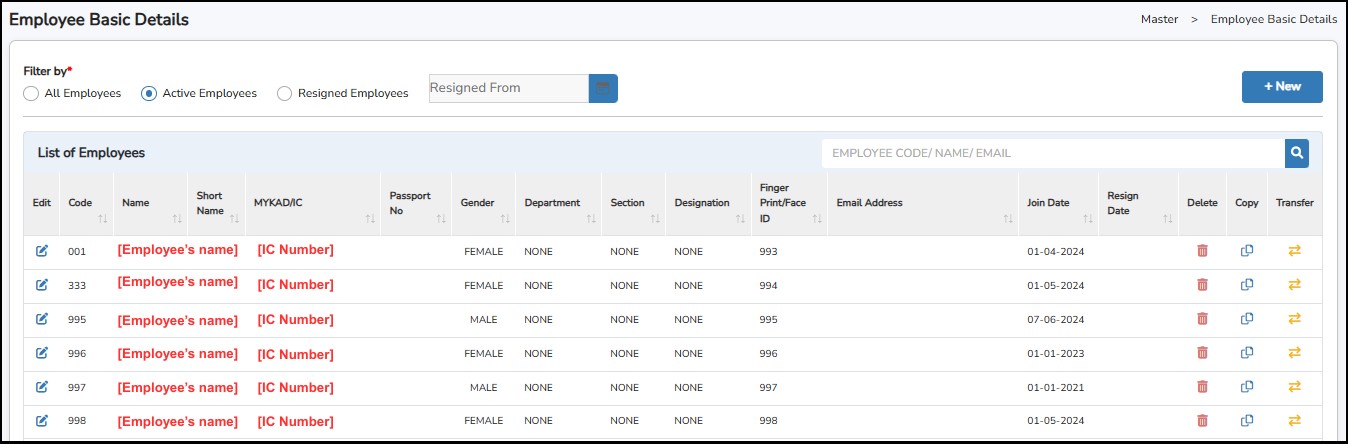
To filter the list of employees, you may select which group of employees to view: -
How to create new employee profile?
Step
1: Go to
Master
>
Employee
Basic
Details
> Click
![]()
Step 2:Click on the drop-down menu of Select App Access and tick on the system the employee can use (E-Payroll). The APP ACCESS ticked will automatically show on the tab of the page (General tab is common across all cloud systems)
Granting Access (E-Payroll)

Select App Access: Choose the respective module "E-Payroll"
After following the previous point, a new subtab will appear, fill in the respective tabs below -
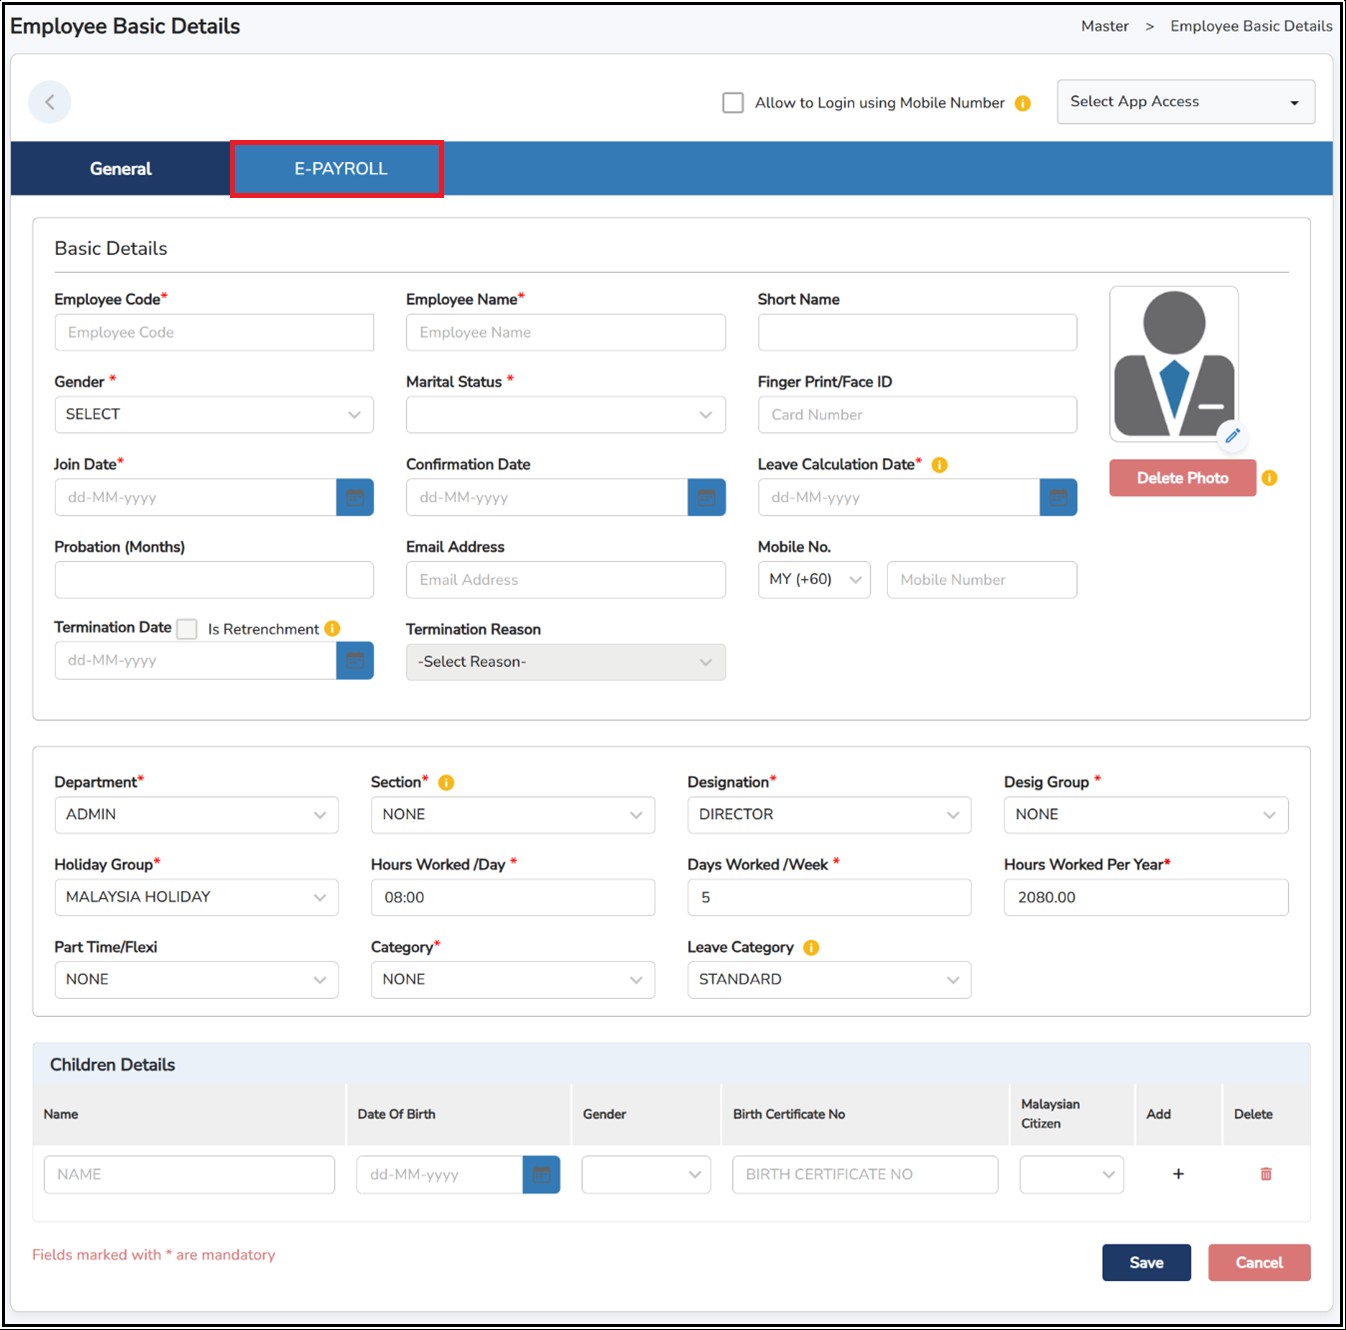
Step 3: Fill up the employee details as below: -
Basic Tab
This is where you enter the basic information of the employee.
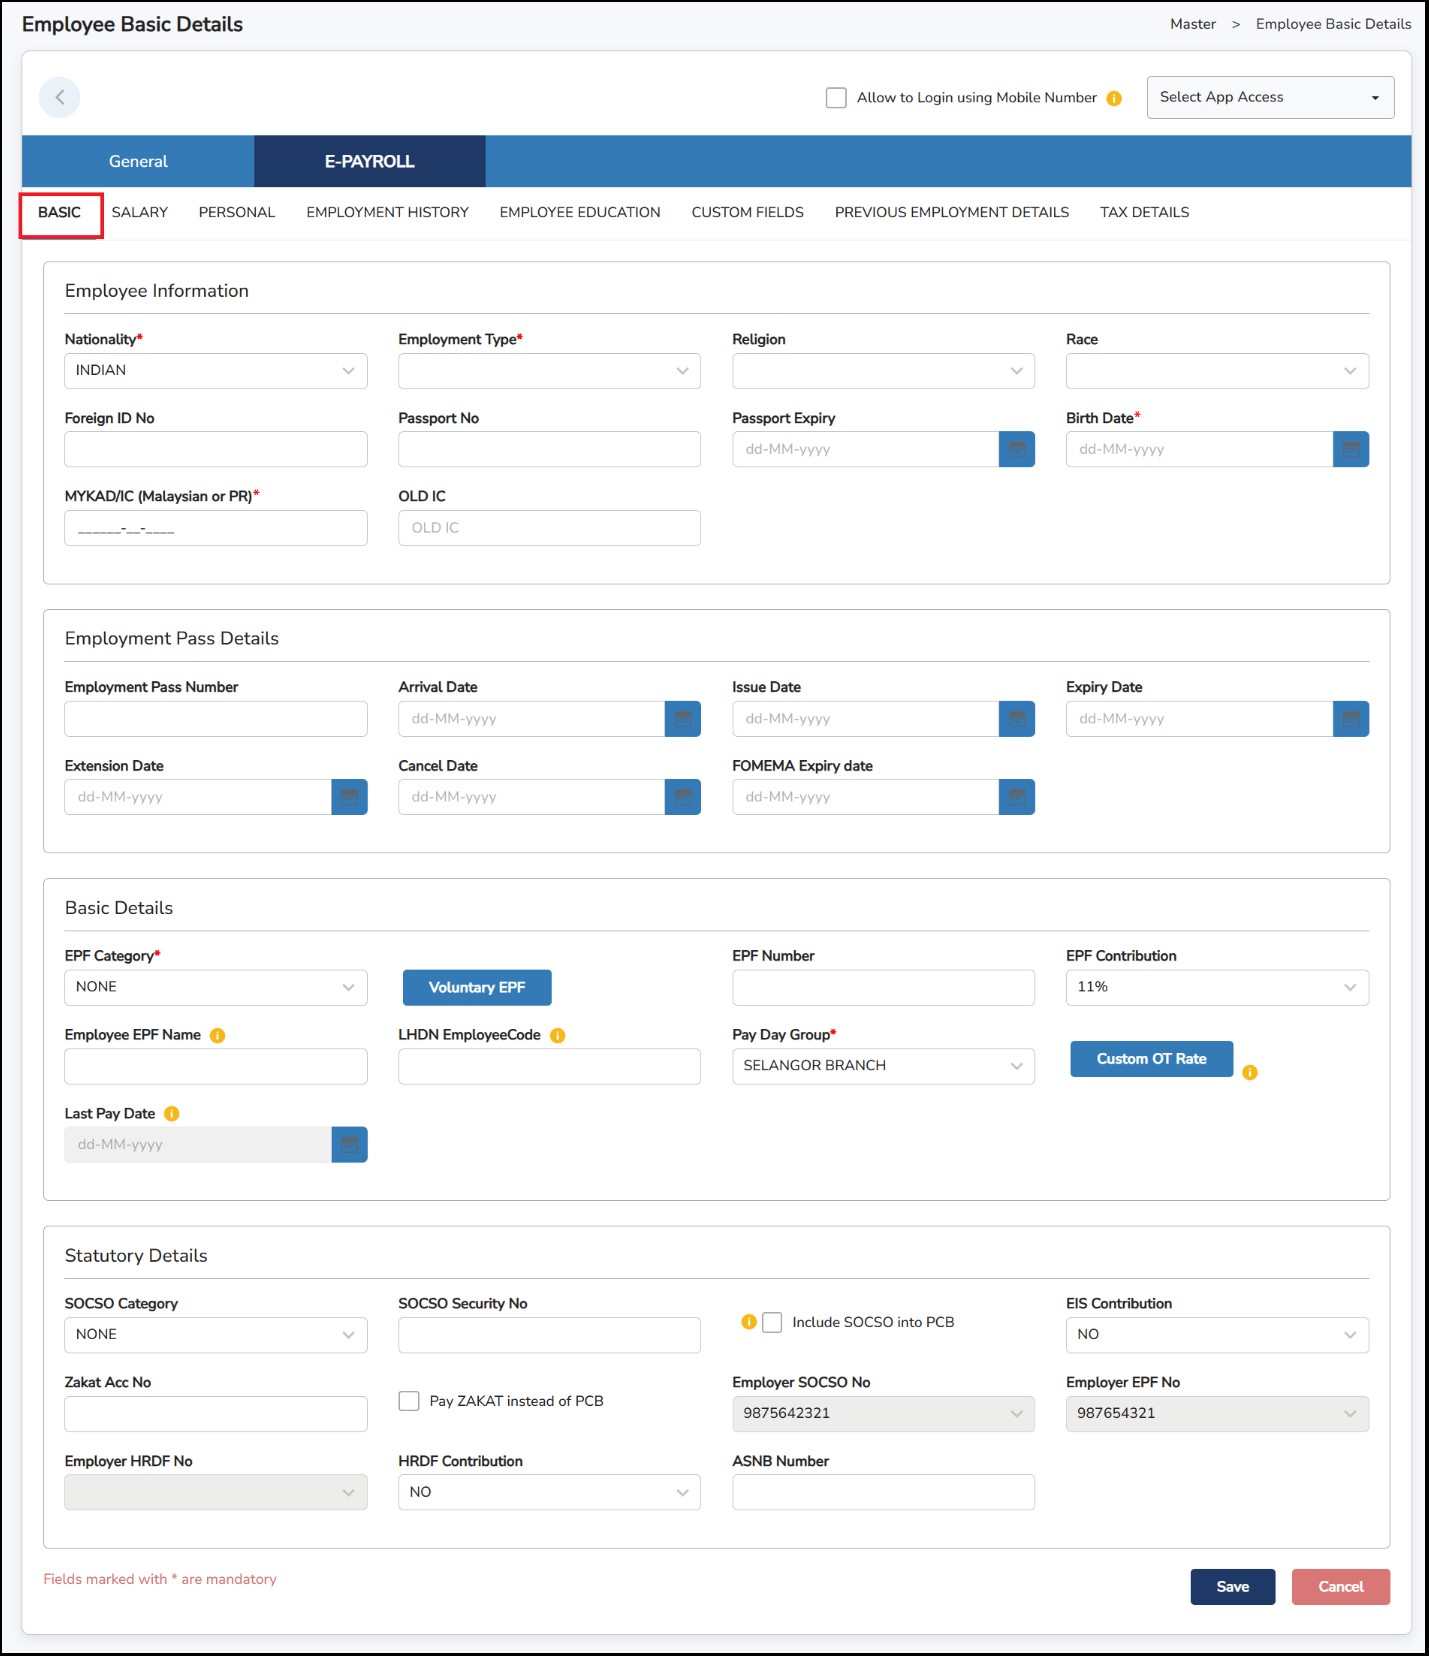
Employee Information
Employee Pass Details
This section will only appear if the employee's nationality selected is other than Malaysian. It is used to record information related to an employee’s employment pass. The details captured here are especially important for foreign employees who are required to hold valid permits to work in Malaysia.
Employment Pass Number – Enter the pass/permit number issued to the employee.
Arrival Date – Record the date the employee arrived in Malaysia.
Issue Date – Date when the employment pass was issued by the authorities.
Expiry Date – Date when the employment pass will expire.
Extension Date – If the pass is renewed or extended, record the new extension date here.
APPROVER – If the employment pass is cancelled before expiry, enter the cancellation date.
FOMEMA Expiry Date – Enter the expiry date of the employee's medical examination (FOMEMA)
Basic Details
EPF Category
None = Employee is not contributing the EPF
Malaysia/PR/Foreigner
Foreigner
Flexi = Flexible rate
Voluntary EPF =(Optional) Used to customize any additional EPF contribution by either the employee or the employer. Once entered, the contribution will be deducted automatically each month.
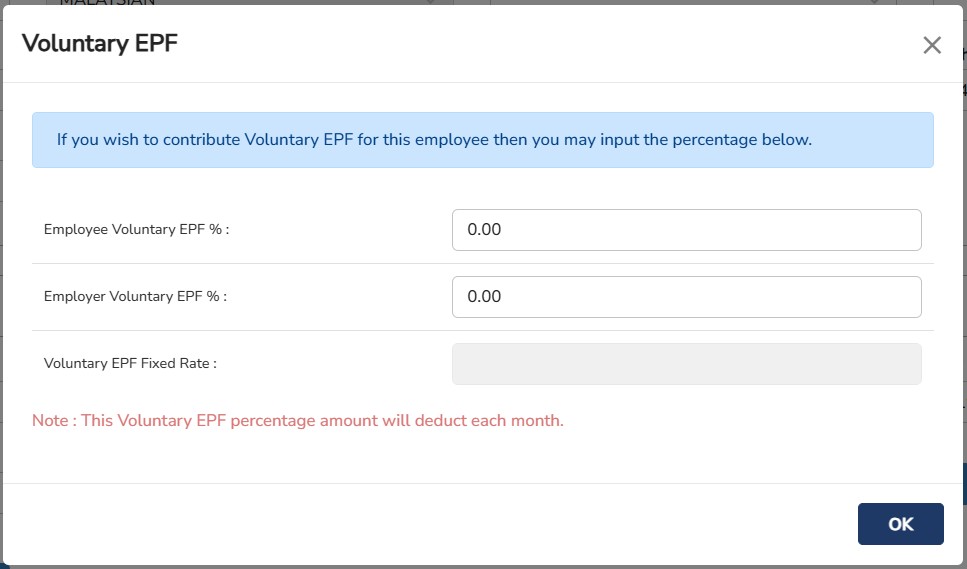
Employee Voluntary EPF % – Enter the additional percentage (%) of EPF contribution to be made by the employee.
Employer Voluntary EPF % – Enter the additional percentage (%) of EPF contribution to be made by the employer.
**Note: Only applicable for EPF category: Category 2 or Category 3
Voluntary EPF Fixed Rate – Enter the fixed amount of EPF contribution.
**Note: Only applicable for EPF category: Category 4
EPF Number – To put employee's EPF number.
EPF Contribution – Choose the percentage of the contribution for EPF, either 11% or 9%** and **EPF contribution 9% only applicable for payroll before July 2022.
Employee EPF Name – Name to be shown in the payroll related documents or information (i.e. EPF submissions, Bank Submissions, payslip). If empty, the Employee name will be shown instead.
LHDN Employee Code – This field is used to enter the Employee Code for PCB Online Submission, allowing only alphabets and numbers with a maximum of 10 characters (no special characters allowed).
Pay Day Group – Assign the Pay Day group created under Admin Setting.
Custom OT Rate– Custom OT Rate will override the default system OT calculation. You can either choose OT Fixed Rate or OT Custom Rate.
OT Fixed Rate: To define fixed rate in RM
OT Custom Rate: (To define custom multiplying OT rate
Last Pay Date – This will be enabled once you have entered the Termination date. You may indicate the date that the resigned employee will receive the last pay or salary.
Statutory Details
SOCSO Category
NONE = Employee is not contributing to the SOCSO.
Employment Injury Scheme and Invalidity Scheme = Employee
Employment Injury Scheme = Employee >= 60 years old
SOCSO Security No = Refer to the IC number for Malaysian employees or Social Security Foreign Worker (SSFW) number for foreign employees.
Include SOCSO into PCB = When enabled, SOCSO contributions will be considered in PCB calculations as a tax relief.
EIS Contribution = A dropdown selection.
Yes : Contributing to EIS
No : Not contributing to EIS
HRDF Contribution = A dropdown selection.
Yes : Contributing to EIS
No : Not contributing to EIS
ASNB Number = To input an employee's ASNB account number
Zakat Acc Nor = To input an employee's Zakat account number
Pay Zakat instead of PCB = To input an employee's Zakat account number
Salary
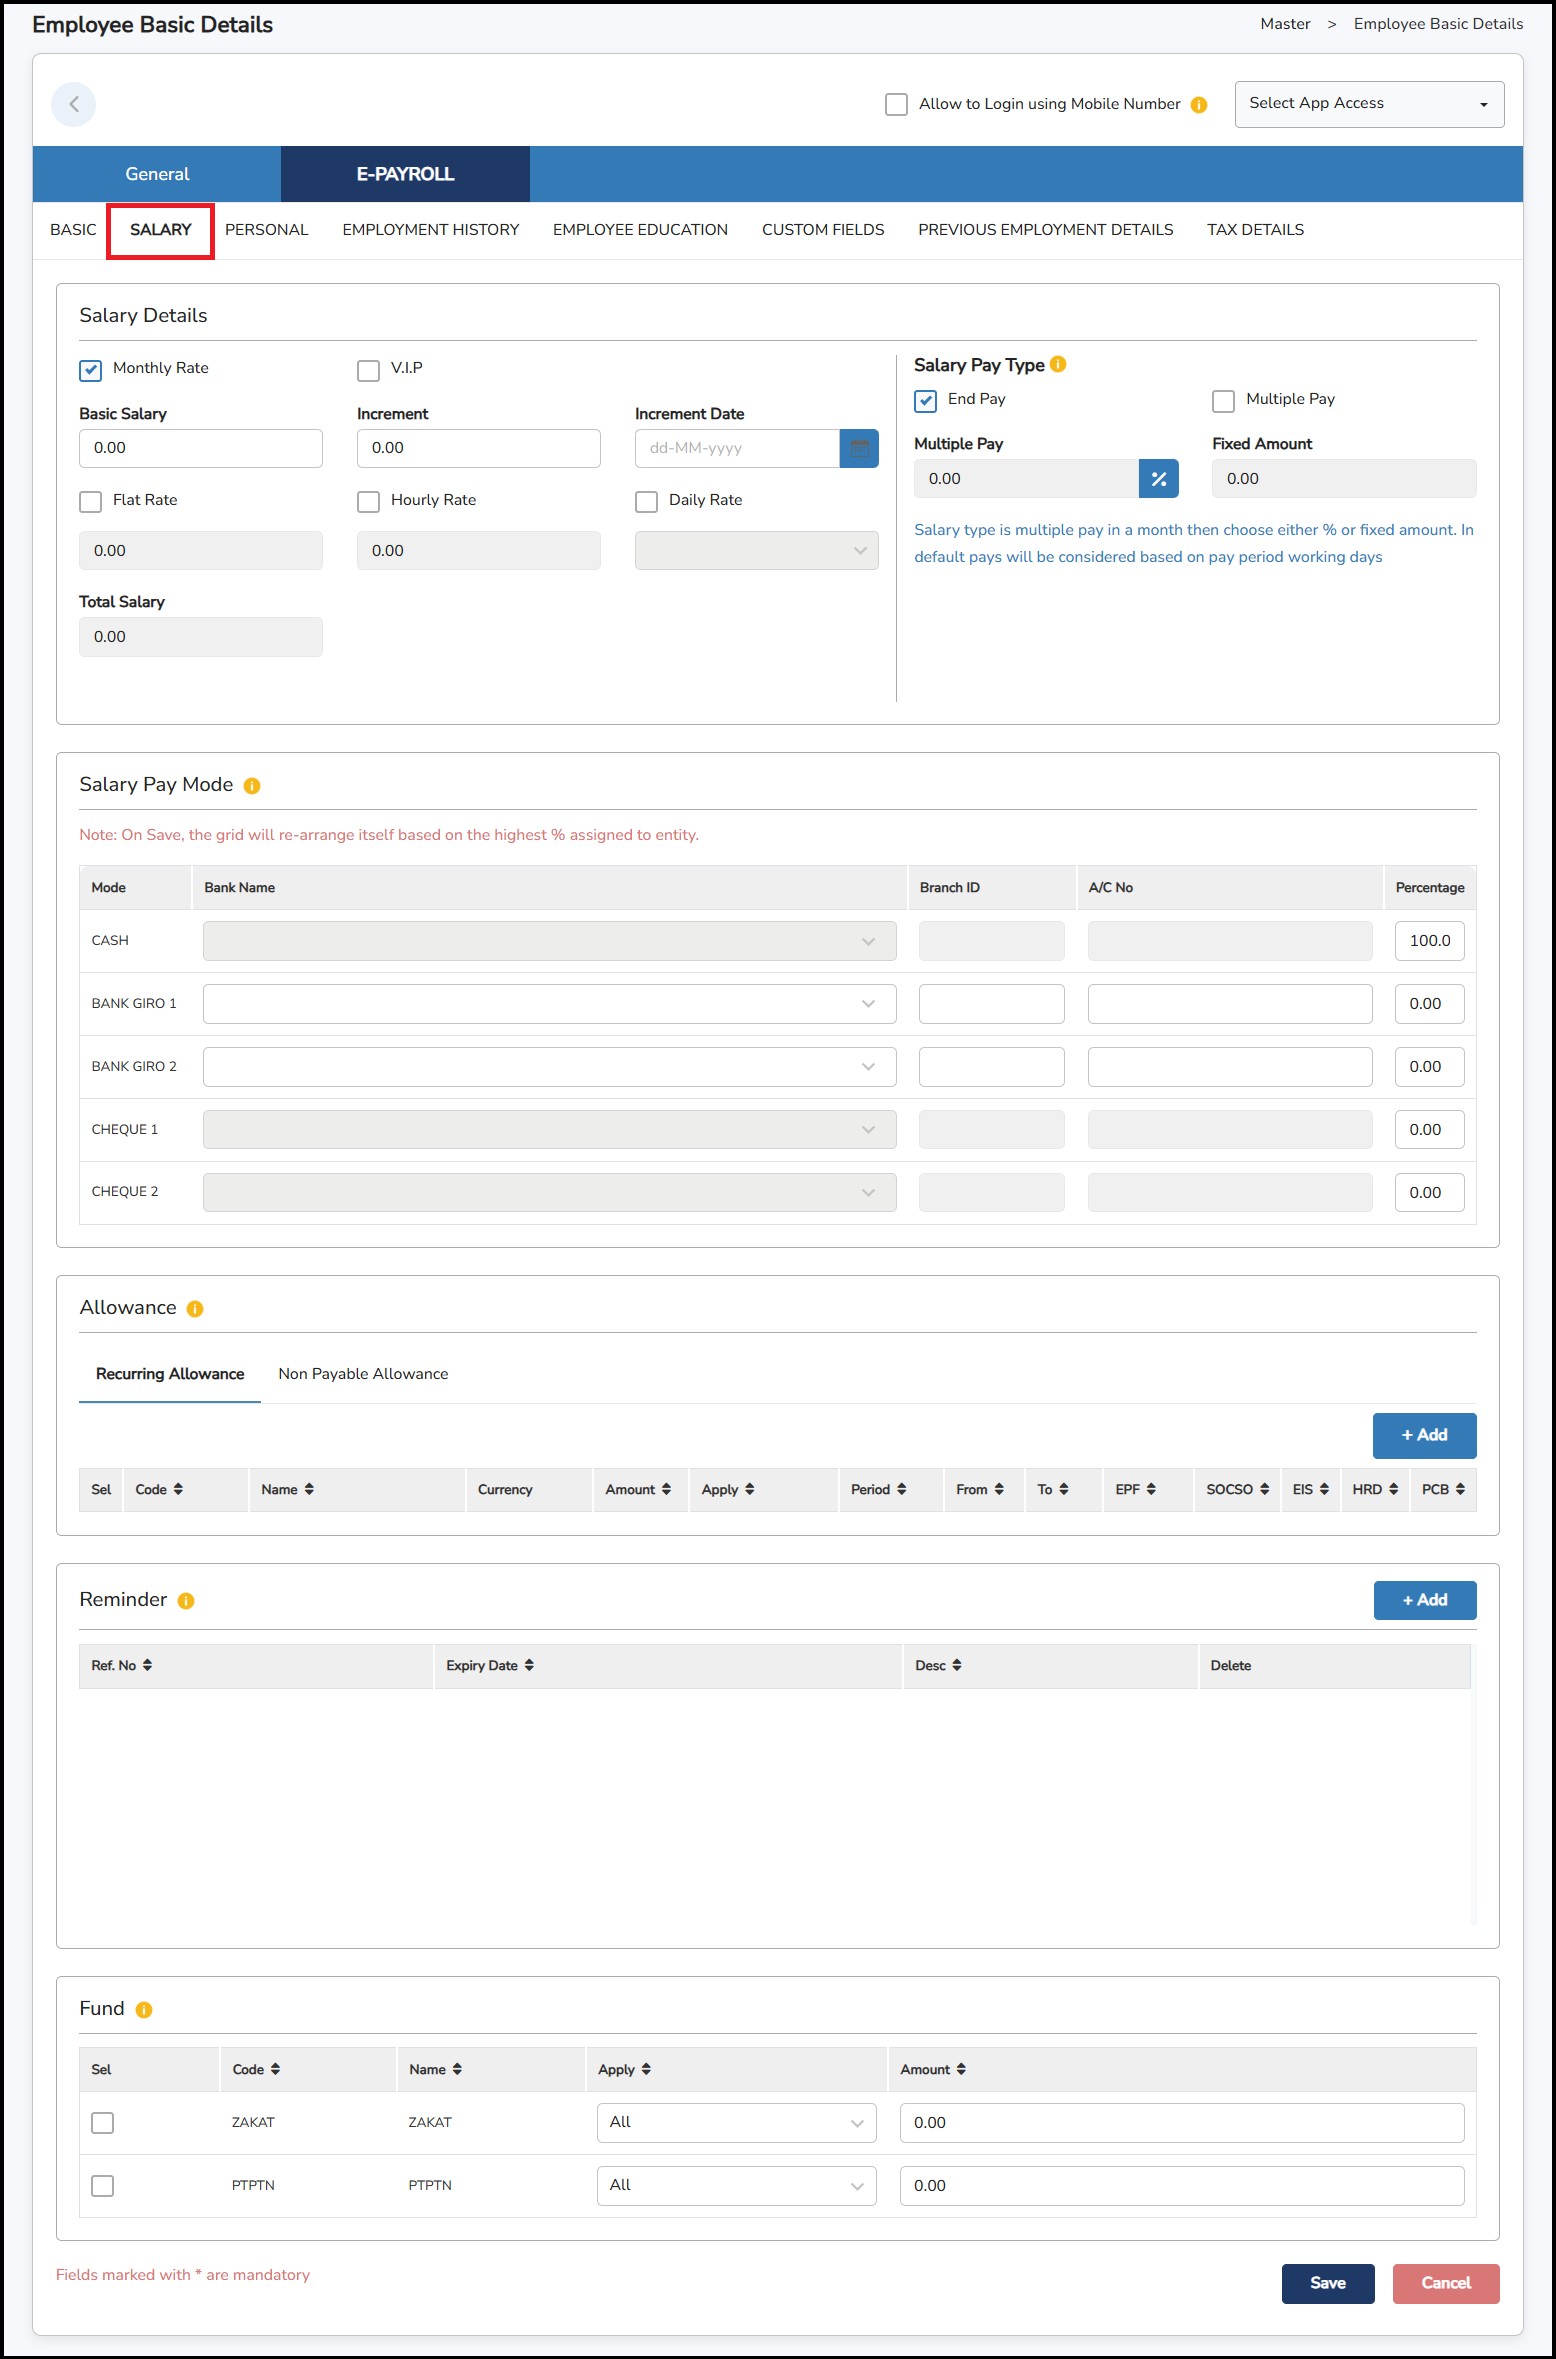
**Note: Only fixed allowances can be added in the allowance section. Variable allowances and system default allowances will not be listed.
Step
1: Click on the
![]() button > Tick on the allowance > Click
button > Tick on the allowance > Click
![]()
Step 2: Enter the amount will be added.
Step 3: Under Apply , select: -
Step 4: Under Period , select: -
Step 1: Tick on the necessary Fund.
Step 2: Select Apply column to select which period for the funds to be deducted.
Step 3: Enter a desired amount to be contributed under the Amount column.
Personal Tab
This tab is for Administrator/HR viewing record purposes. You may update the details accordingly to the fields provided.
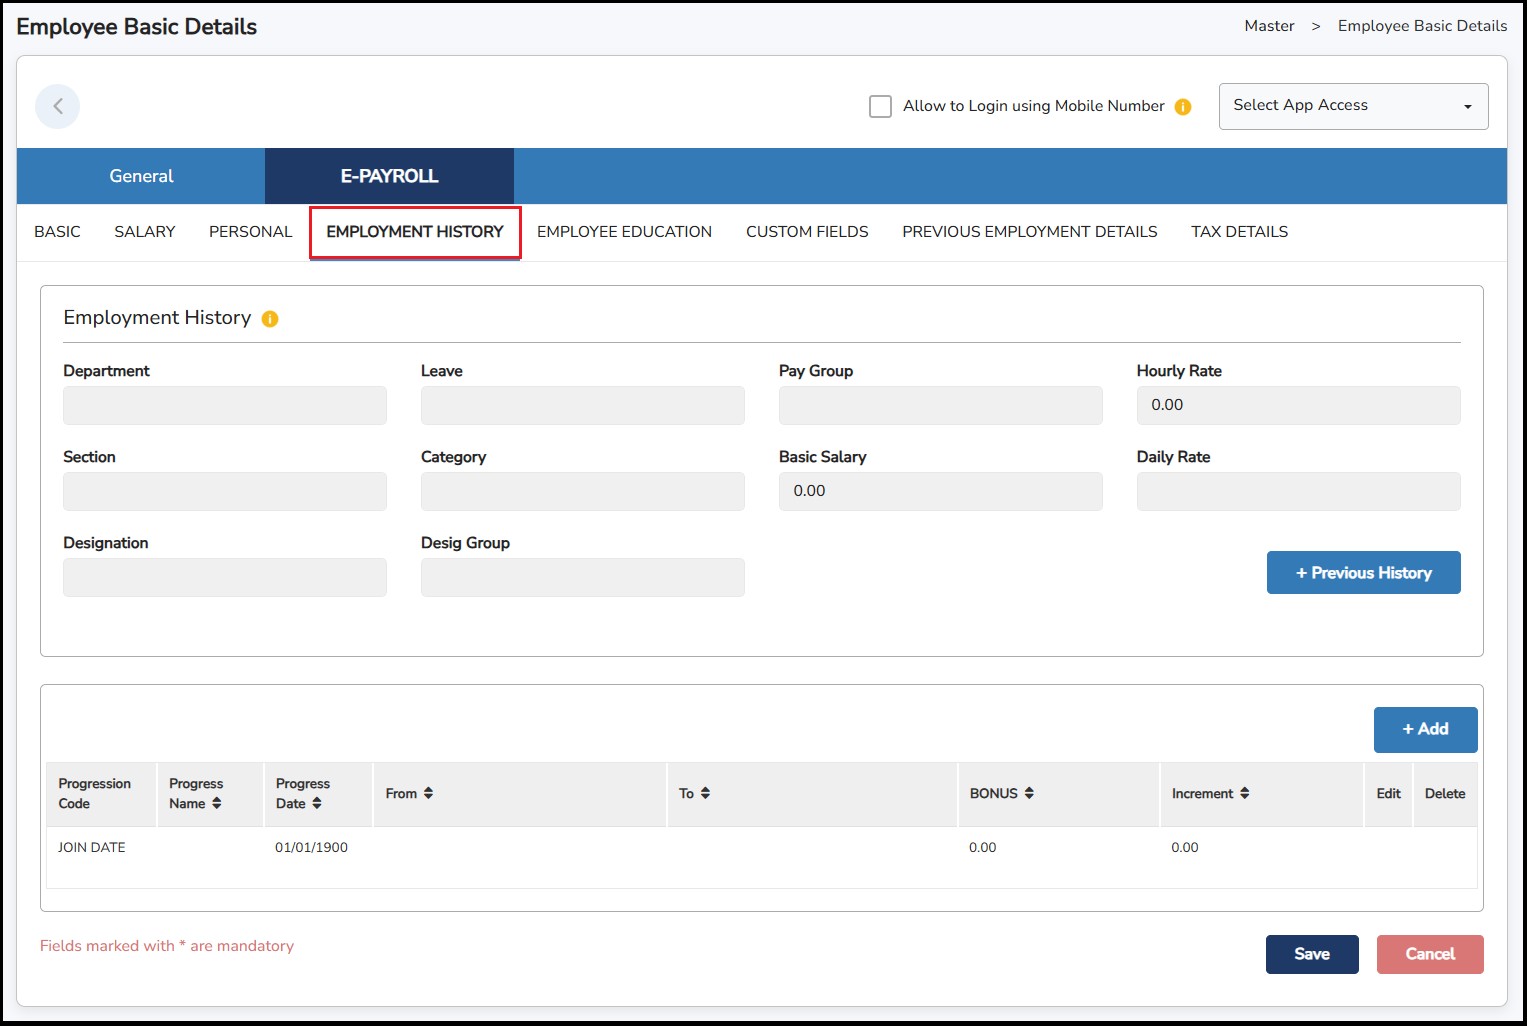
Employment History Tab
This
tab is to store the employment records of the employee. It will be
auto added in the table if there are any changes of the career
progression in the Employee Basic Details or can be added manually by
click on the
![]() button to add a new record.
button to add a new record.
Employee Education Tab
This tab is also for HR record purposes. Education Name and Country selection can be created under Master > Additional Master Setup.

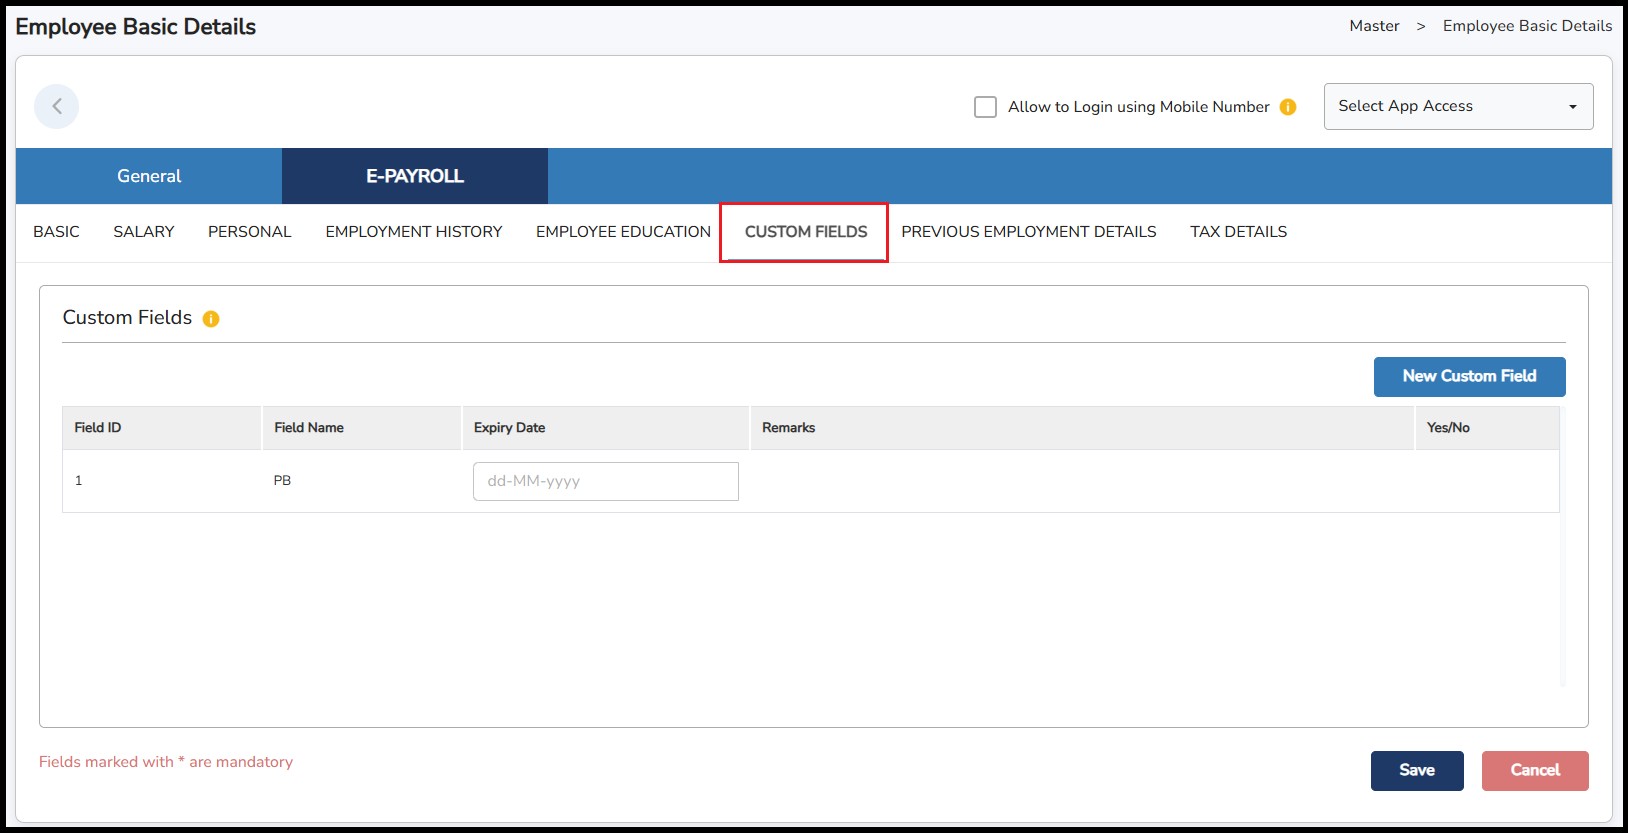
Custom Fields Tab
To specify extra information and add more reminder options for all employees.
Previous Employment Details Tab
This tab is important for you to enter the previous employment information within the same year (if any) for the system to calculate the PCB accordingly.
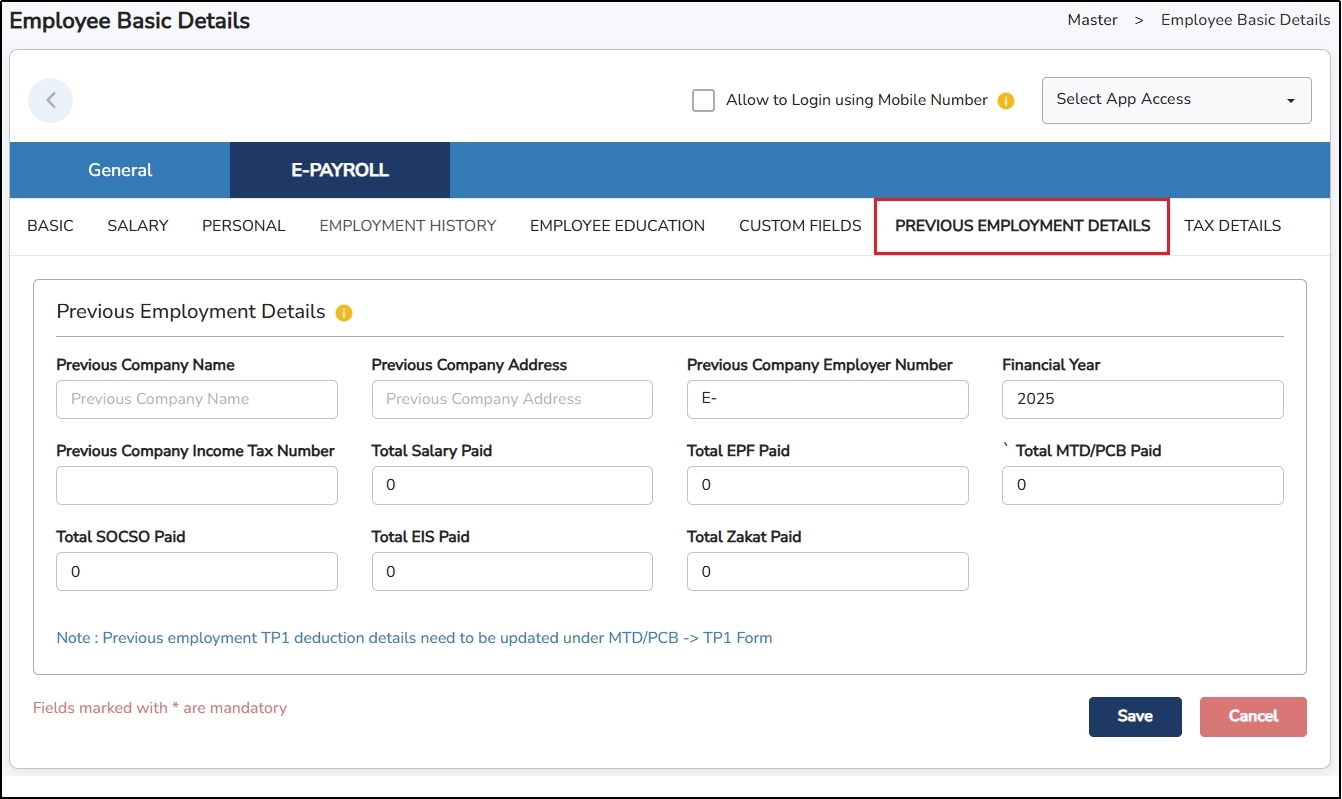
Enter all the amount that has been paid by the previous employer and the contribution paid by the employee.
Tax Details Tab
This tab is a must to be filled accordingly for all employee although they are not contributing to PCB.
This is where the system will determine if the employee will need to contribute and the rate to be calculated as well.
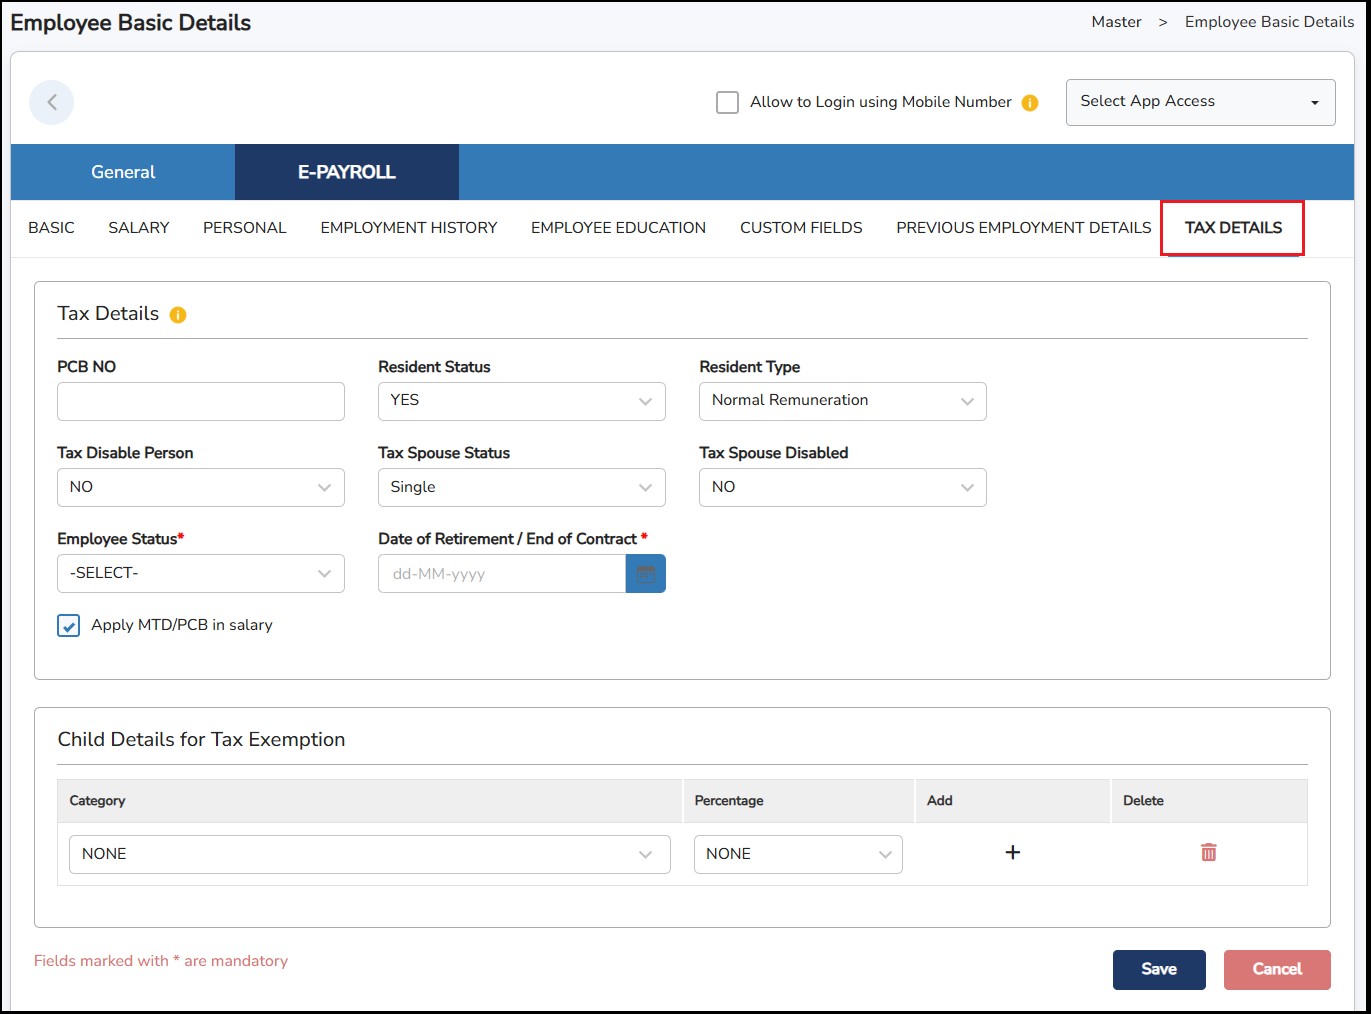
PCB No – Employee's PCB Number or Income Tax Number.
Tax Resident Status – Choose Yes or No.
Resident Type – You may choose which Resident Type belongs to your employee:
Normal Remuneration: Regular salary, wages, bonuses, etc.
Returning Expert Program (REP): Tax benefit for returning Malaysians.
Knowledge Worker at Specific Region (Iskandar): Tax benefit for skilled foreign workers in Iskandar.
Tax Disabled Person
Tax Spouse Status – Dropdown selection.
Tax Spouse Disabled
Employee Status – Requirement for CP8D submission.
Date of Retirement / End of Contract – Requirement for CP8D submission. This field is for entering the employees' expected last day of work with the company. This could be due to retirement, reaching the end of a fixed-term contract, or another reason for leaving.
Apply MTD/PCB in salary – Tick if PCB will be deducted from employee's salary, un-tick if PCB will be borne by the Employer.
Child Details for Tax Exemption
Category: Dropdown selection. You may select the appropriate selections for your child tax relief based on their age, education status, or disability.
NONE: No child tax exemption.
Percentage: After selecting the category, choose the tax exemption percentage that applies to your child. Options include:
NONE: No tax exemption for this child.
0%: Will not be claiming (0% tax reduction).
50%: Will be claiming 50% of tax.
100%: Will be claiming 100% of tax.
The Basic Master Setup is a function that needs to be completed before initiating the system setup and importing all relevant information, for example, Employee Details, Salary, calculations etc.
Step
1: Go to
Master
>
Basic
Master Setup
>
Department
> Click
![]()
Step
2: Enter the
Department
Code
and
Department
Name
> Click
![]() once done.
once done.

**Note : Code is up to 6 alphanumeric characters.
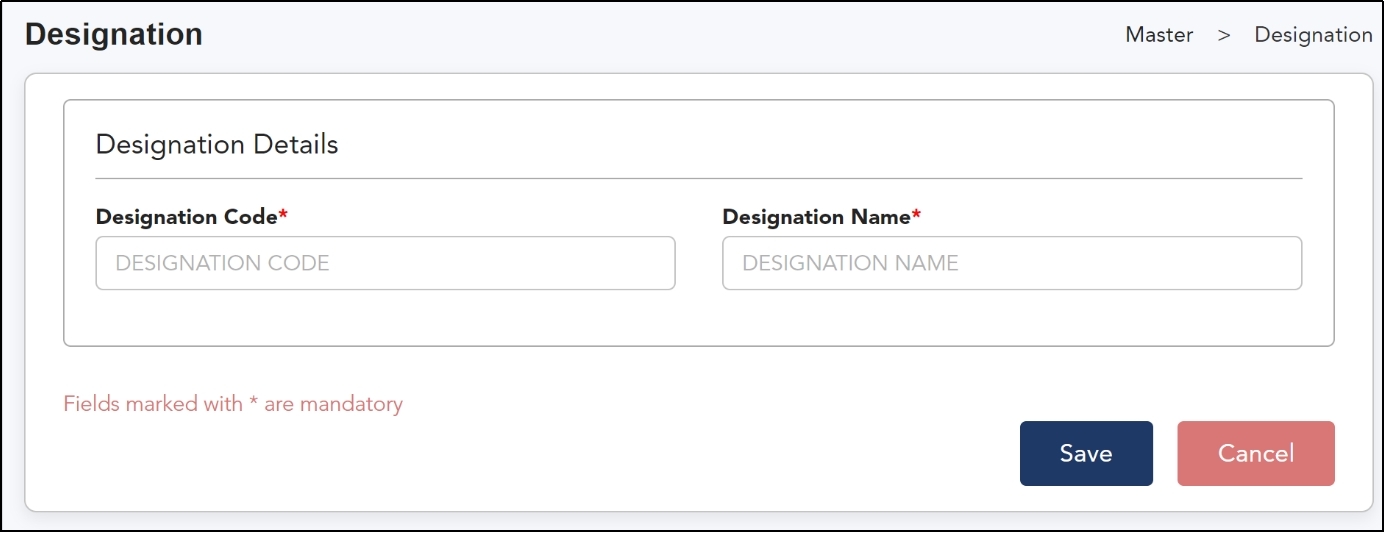
Use this feature to create your company's designations. A pre-defined list of designations will be available for you to use.
Step
1: Go to
Master
>
Basic
Master Setup
>
Designation
> Click
![]()
Step
2: Enter the
Designation
Code
and
Designation
Name
> Click
![]() once done.
once done.

**Note : Code is up to 6 alphanumeric characters.
Step
1: Go to
Master
>
Basic
Master Setup
>
Section
> Click
![]()
Step 2: Enter the Section Code , Section Name and choose the Department from
the
drop-down menu to which this
Section
belongs to > Click
![]() once done.
once done.

**Note : Code is up to 6 alphanumeric characters.
Step
1: Go to
Master
>
Basic
Master Setup
>
Category
> Click
![]()
Step
2: Enter the
Category
Code
and
Category
Name
> Click
![]() once done.
once done.

**Note : Code is up to 6 alphanumeric characters.
You may use this additional category to further categorize your employees.
Step
1: Go to
Master
>
Basic
Master Setup
>
Designation
Group
> click
![]()
Step
2: Enter the
Designation
Group Code
and
Designation
Group Name
> click
![]() once done.
once done.
**Note: Code is up to 6 alphanumeric characters.
This is where you can create different public holidays or holiday groups for your company under Master > Basic Master Setup > Holiday.
The first tab, Holiday, will list all the public holidays in Malaysia. This list is updated and published by Info-Tech at the end of every year.
You can also create a new public holiday if the holiday your company observes is not listed here.
Step
1: Go to
Master
>
Basic
Master Setup
>
Holiday
>
Holiday
tab
> Click
![]()
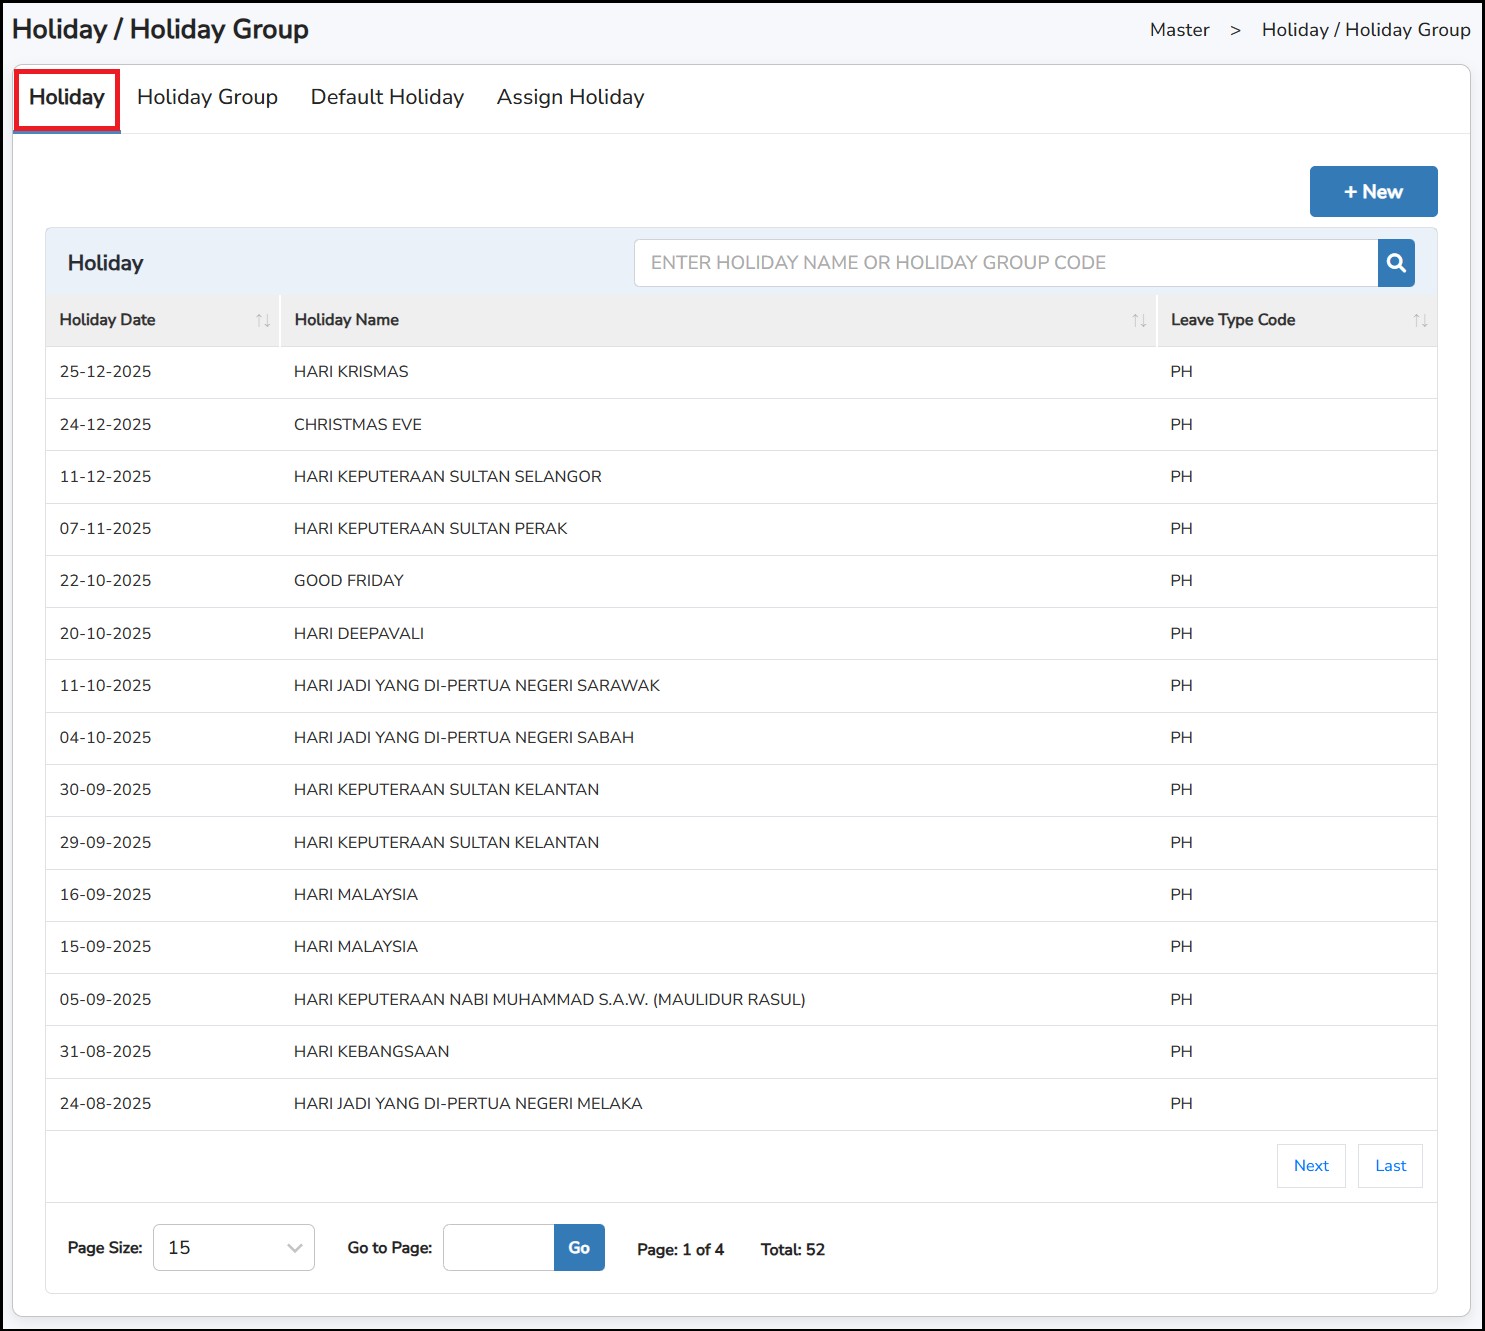
Step
2: Enter
Holiday
Date
and
Holiday
Name
> Click
![]() once done.
once done.

**Note : Tick on Replacement Date is a replacement of the actual holiday. (i.e., The actual holiday falls on Sunday (Rest Day) which will be replaced on the next day (Monday)).
What is the Holiday Group?
Used to assign a specific set of public holidays to a group of employees. For example, if certain employees follow the public holidays of another state (e.g., Kuala Lumpur, Johor, Penang), create a separate Holiday Group for each state and assign employees accordingly.
Step
1: Go to
Master
>
Basic
Master Setup
>
Holiday
>
Holiday
Group tab
> Click
![]()
Step 2: Enter the Holiday Group Code and Holiday Group Name .
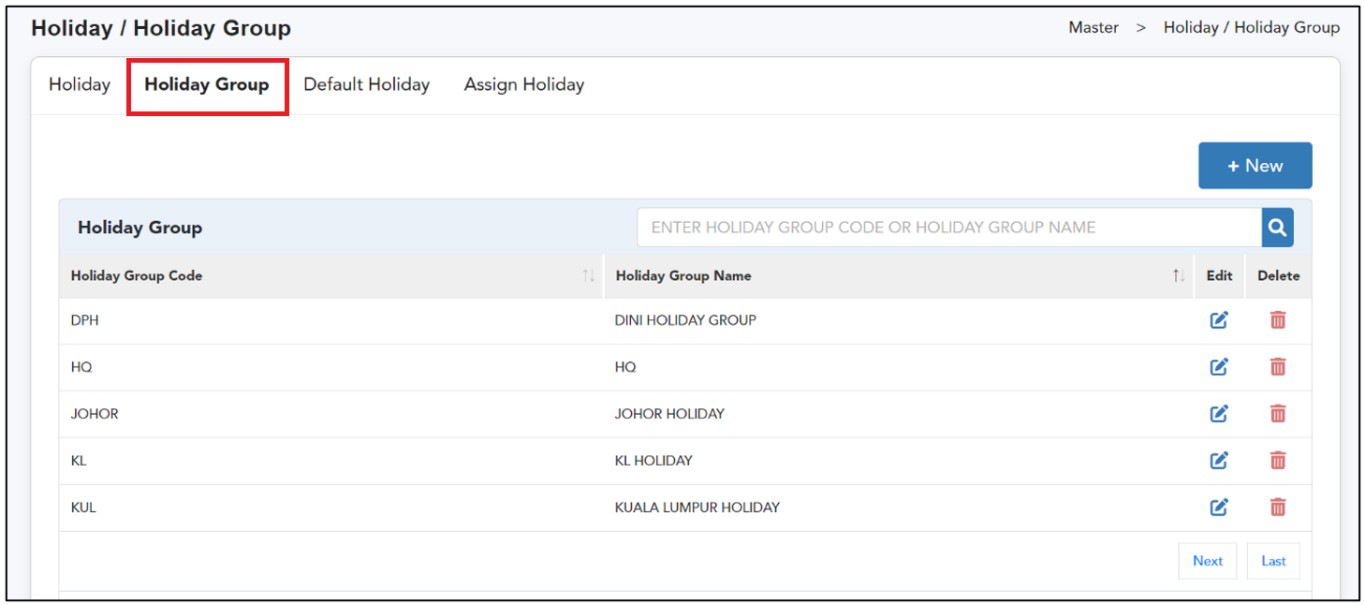
Step
3: Tick on the check box of the holidays which belongs to this
Holiday
Group
> Click
![]() once done.
once done.
Default Holiday
The purpose of this tab is to carry forward the existing holiday group to next year's holiday cycle.
Step 1: Go to Master > Basic Master Setup > Holiday > Holiday Group tab.
Step 2: Select the year.
Step 3: Tick the relevant Holiday Group
Step 4: Click
![]()

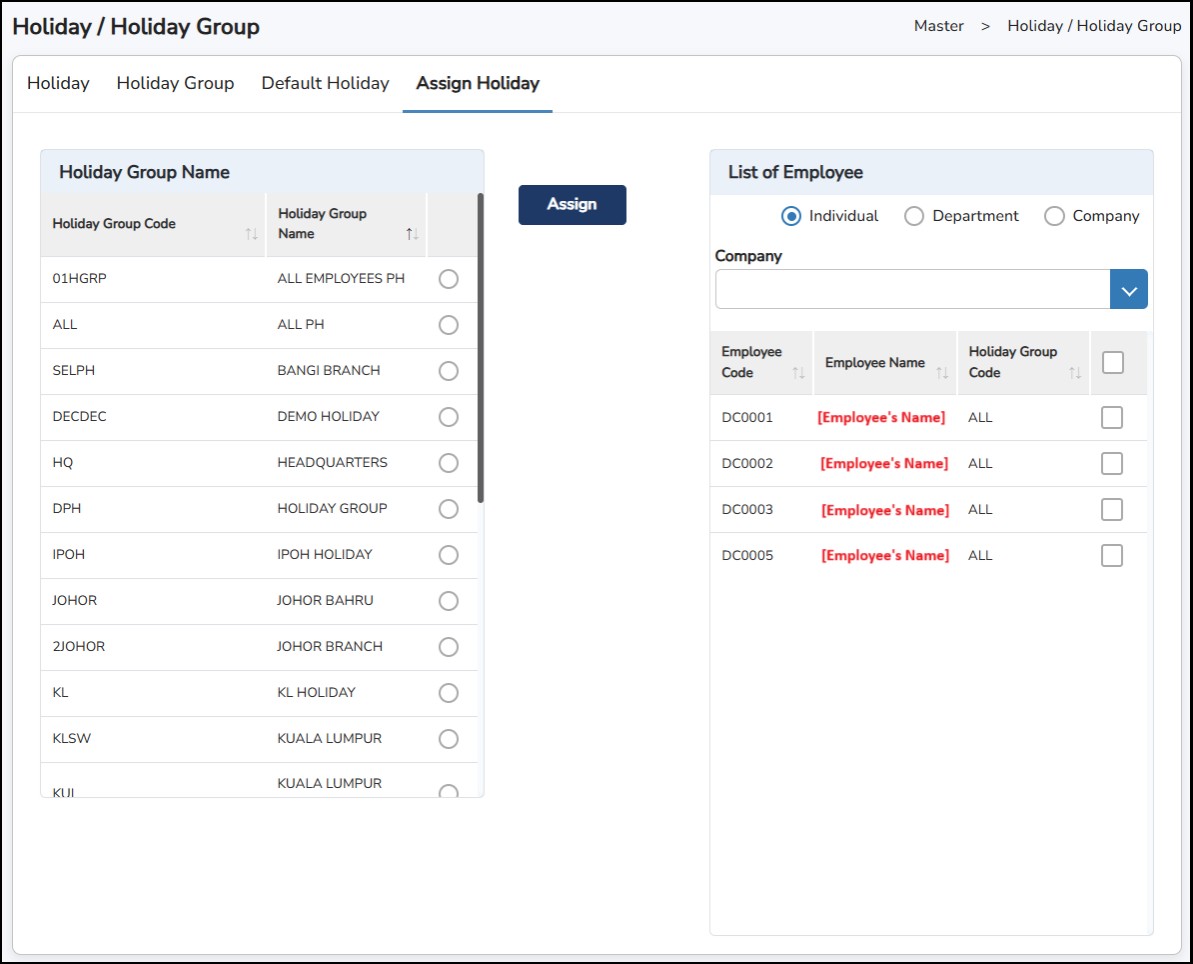
Assign Holiday to the employees
Step 1: Go to Master > Basic Master Setup > Holiday > Assign Holiday tab .
Step
2: Select the
Holiday
Group
created > Select the Individual/Department/Company
> tick on employees you want to assign > Click
![]()
This is where you can add/create the different banks of your employees that will be needed for the salary Bank GIRO.
Step
1: Go to
Master
>
Basic
Master Setup
>
Bank
> click
![]()
Step
2: Fill in all the mandatory details > click
![]() once done.
once done.

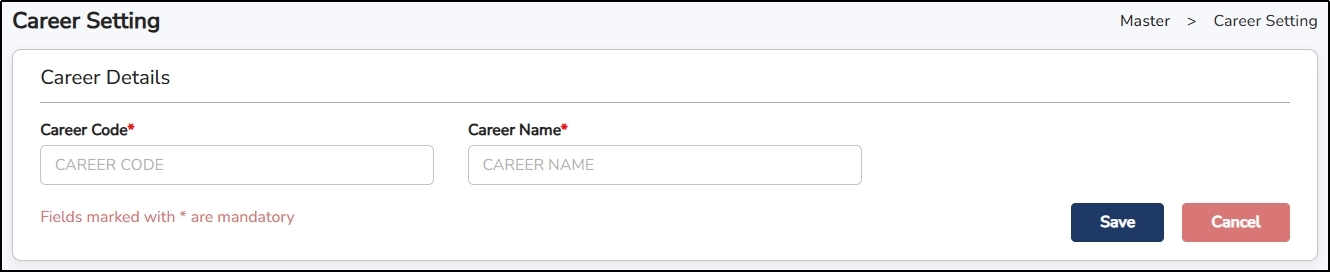
These are the different career description that will be used to record the history of changes in the employee’s career.
Step
1: Go to
Master
>
Basic
Master Setup
>
Career
Setting
> click
![]()
Step
2: Enter the
Career
Code
and
Career
Name
> click
![]() once done.
once done.
This function allows you to set up different currencies that the company may use to process payroll transactions, especially when employees are paid in foreign currencies.
Step
1: Go to
Master
>
Basic
Master Setup
>
Currency
> click
![]()
Step
2: Enter the
Currency
Code
and
Currency
Name
> click
![]() once done.
once done.

This is to fill in the previous record of income and remuneration details in the same current year. This section can be used when the company first started using the system. It allows you to enter accumulated balances for existing employees, such as salary, EPF, PCB, SOCSO, EIS, Zakat, and deductions.
For new employees, update their history under Profile > Previous Employment Details.
Step 1: Go to Master > Employee Opening Balance.
Step 2: Click
![]() to enter the value in each of the column.
to enter the value in each of the column.
Step 3: Click
![]() to save or
to save or ![]() to cancel.
to cancel.
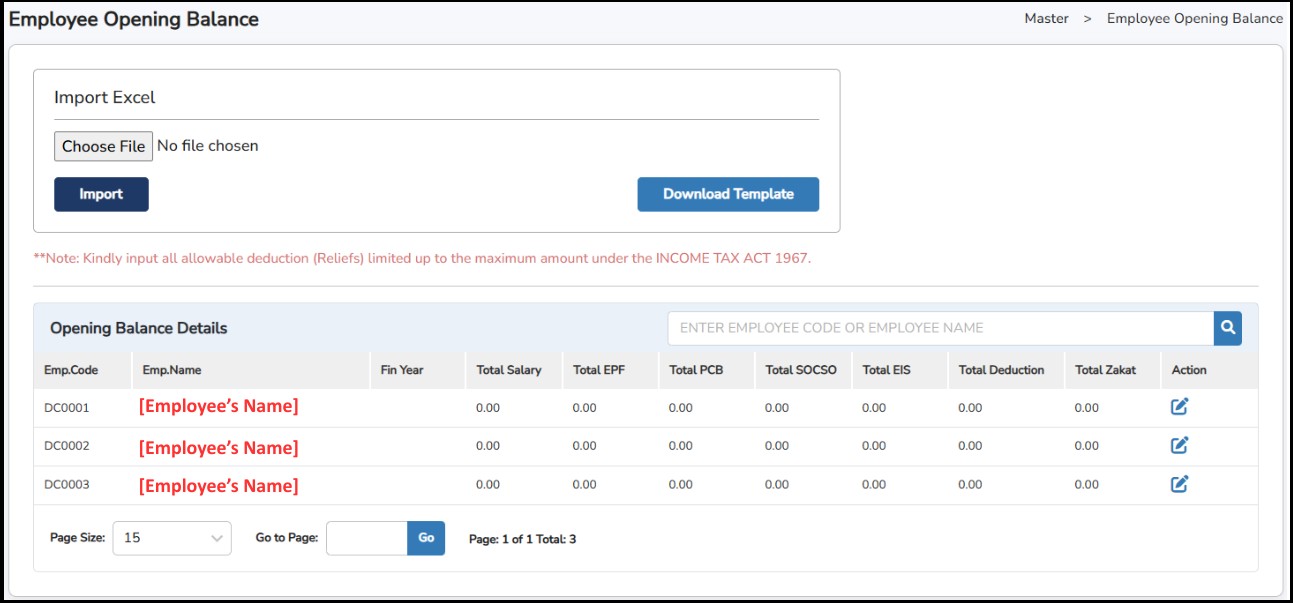
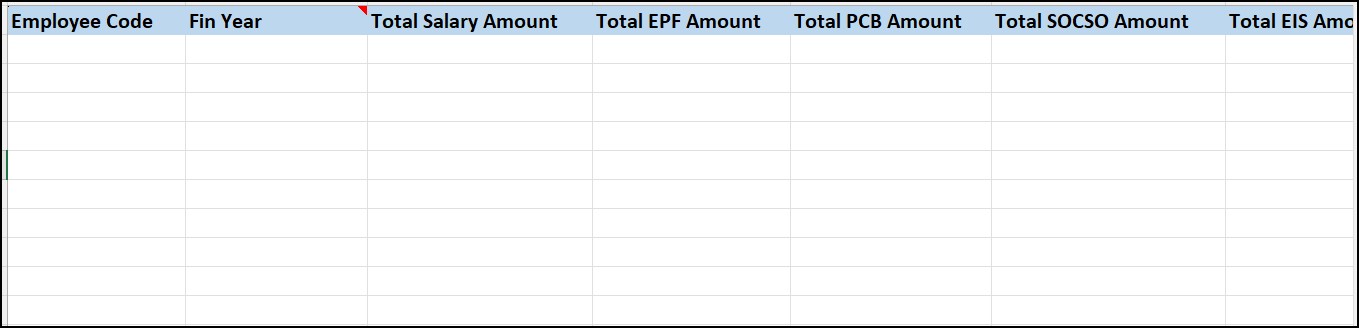
Alternatively, users may also upload remuneration details in the system by using a template.
Step 1: Click
![]() to download the template to fill in the remuneration details of the employees for multiple employees at once.
to download the template to fill in the remuneration details of the employees for multiple employees at once.
Step 2: Once done, click
![]() to choose the completed file .
to choose the completed file .
Step 3: Click
![]() for the details to be imported.
for the details to be imported.
Employee Opening Balance Template Sample
This page is used to enter any additional tax amount as instructed by LHDN.
Step 1: Go to Master > CP38 MTD Master
Step 2: Click
![]() to enter the CP38 Details.
to enter the CP38 Details.
Step 3: Select the employee from the list and select the Year.
Step 4: Select the Pay Period and enter the amount in the selected months
Step 5: Once done, click
![]() once done.
once done.

These are pre-defined settings in the system. In case those created by default in the system are not complete, you may create a new one.
Step
1: Go to
Master
>
Additional
Master
Setup
>
Race
>
Click
![]()
Step
2: Enter
Race
Code
and
Race
Name
> Click
![]() once done.
once done.

**Note : Code is up to 6 alphanumeric characters.
Step
1: Go to
Master
>
Additional
Master
Setup
>
Religion
> Click
![]()
Step
2: Enter
Religion
Code
and
Religion
Name
> Click
![]() once done.
once done.

**Note : Code is up to 6 alphanumeric characters.
Step
1: Go to
Master
>
Additional
Master
Setup
>
Nationality
> Click
![]()
Step
2: Enter
Nationality
Code
,
Nationality
Name
and choose the
LHDN
Nation
Code
from the drop-down menu accordingly > Click
![]() once done.
once done.

Step
1: Go to
Master
>
Additional
Master
Setup
>
Education
> Click
![]()
Step
2: Enter
Education
Code
and
Education
Name
> Click
![]() once done.
once done.

This is where you can create all types of Fund which will be deducted from employee’s salary. (i.e., PTPTN, Tabung Haji & etc)
Step
1: Go to
Master
>
Additional
Master
Setup
>
Fund
> Click
![]()
Step
2: Enter
Fund
Code
and
Fund
Name
.
Other information is optional (You enter the details in the
employee’s profile) > Click
![]() once done.
once done.

This is where you can create the different rates for the employees that is paid per day.
Step
1: Go to
Master
>
Additional
Master
Setup
>
Daily
Rate
> Click
![]()
Step
2: Enter Daily
Rate
Code
,
Daily
Rate
Name
and the
rate
(amount) per day > Click
![]() once done.
once done.

This is used for the Education information of the employee.
Step
1: Go to
Master
>
Additional
Master
Setup
>
Country
> Click
![]()
Step
2: Enter
Country
Code
and
Country
Name
> Click
![]() once done.
once done.

This is where you can update the address of your LHDN Branch located which the address later can be selected when generating the Government Submissions/Forms.
Step
1: Go to
Master
>
Additional
Master
Setup
>
LHDN Branch
> Click
![]()
Step
2: Enter
LHDN
Code
and
Address Line 1 until 3 > Click
![]() once done.
once done.
Alternatively, you may update the branches that you wish to amend by clicking on the
![]() button to which country you wish to update > Enter the address > Click
button to which country you wish to update > Enter the address > Click
![]()
The updated LHDN Branch will then appear in the applicable sections. Refer to the example below:
This is where you may create all kind of additions/deductions to the employee’s salary whether it will be displayed or not on the payslip.
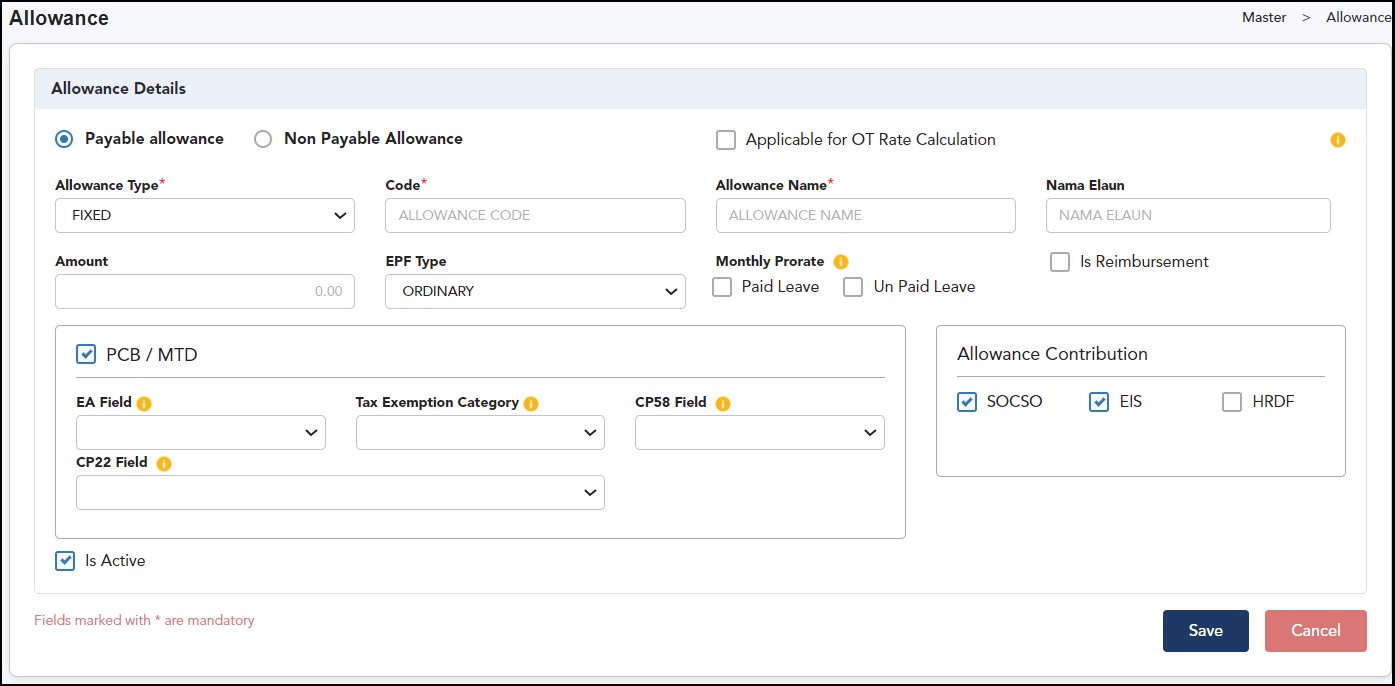
Step
1: Go to
Master
>
Allowances
Setup
> Click
![]()
Step 2: Fill up all the Allowance Details accordingly.
This is where you can download an Excel file template which you can fill up all your employee’s information to be filled in the Employee Basic Details.
Step 1: Go to Master > Import Staff Data

Step 2: Tick on
Basic Employee Profile
> (if you did not subscribe Info-Pay) or Complete Employee Profile (If you subscribed Info-Pay) > Click on the
![]() and an Excel file template will be downloaded to your computer.
and an Excel file template will be downloaded to your computer.
Step 3: Open
the file and fill up the details accordingly. Click on the
![]() to download the guideline on filling up the excel template.
to download the guideline on filling up the excel template.
Step 4: After completing the Excel template, return to the Import Staff Data page. Select either Basic or Complete Employee Profile,
depending on the template you downloaded, and click the upload button
![]()
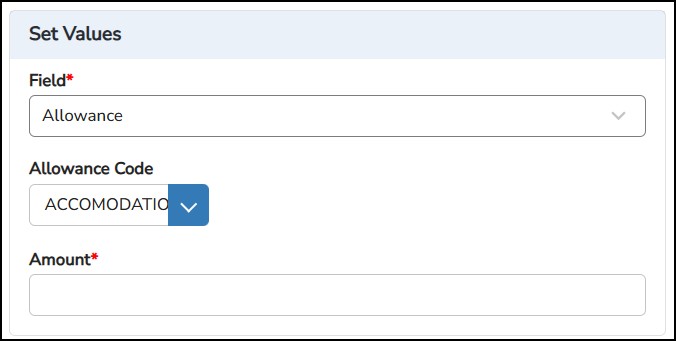
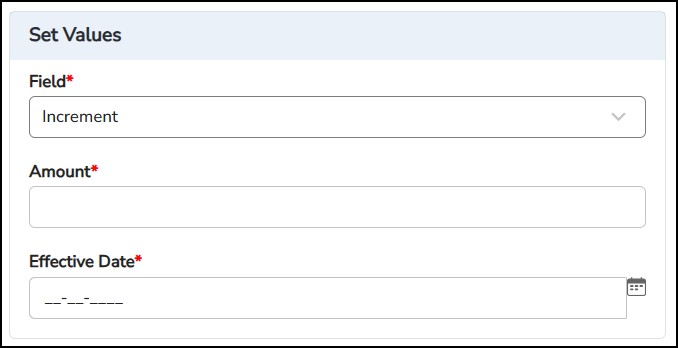
This feature allows you to do a bulk update on some of the employee’s information to be updated in Employee Basic Details.
Step 1: Go to Master > Staff Bulk Update
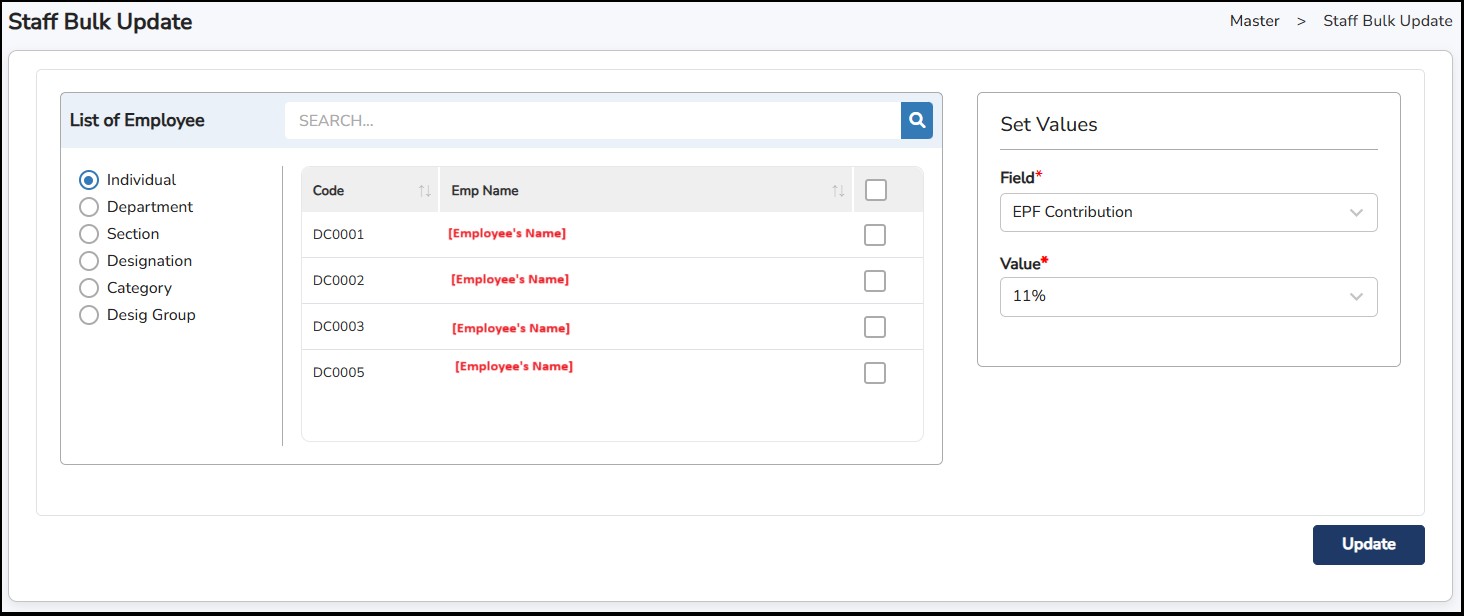
Step 2: Select employee(s)
Step 3: Under Set Values , choose the Field of the changes
Step 4: Choose the Value accordingly.
Step 5: Click
on the
![]() button to save.
button to save.
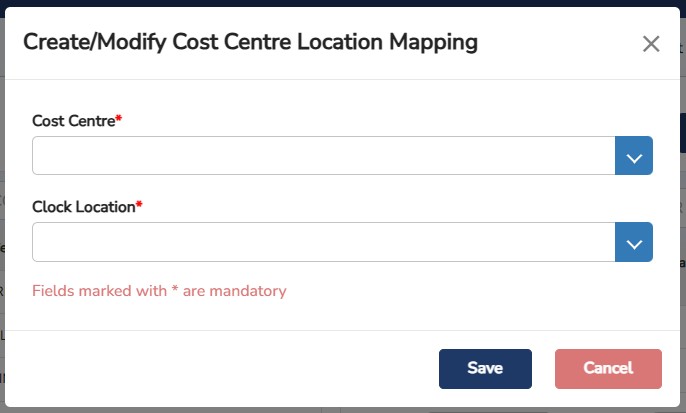
Cost Centre helps in deriving the project cost. The setting must be enabled first from Admin Setting > System Setting – General Settings tab. Enabling this will follow the Payroll Cost Centre.
You may map this Cost Centre to Project / Sub Project / Job,
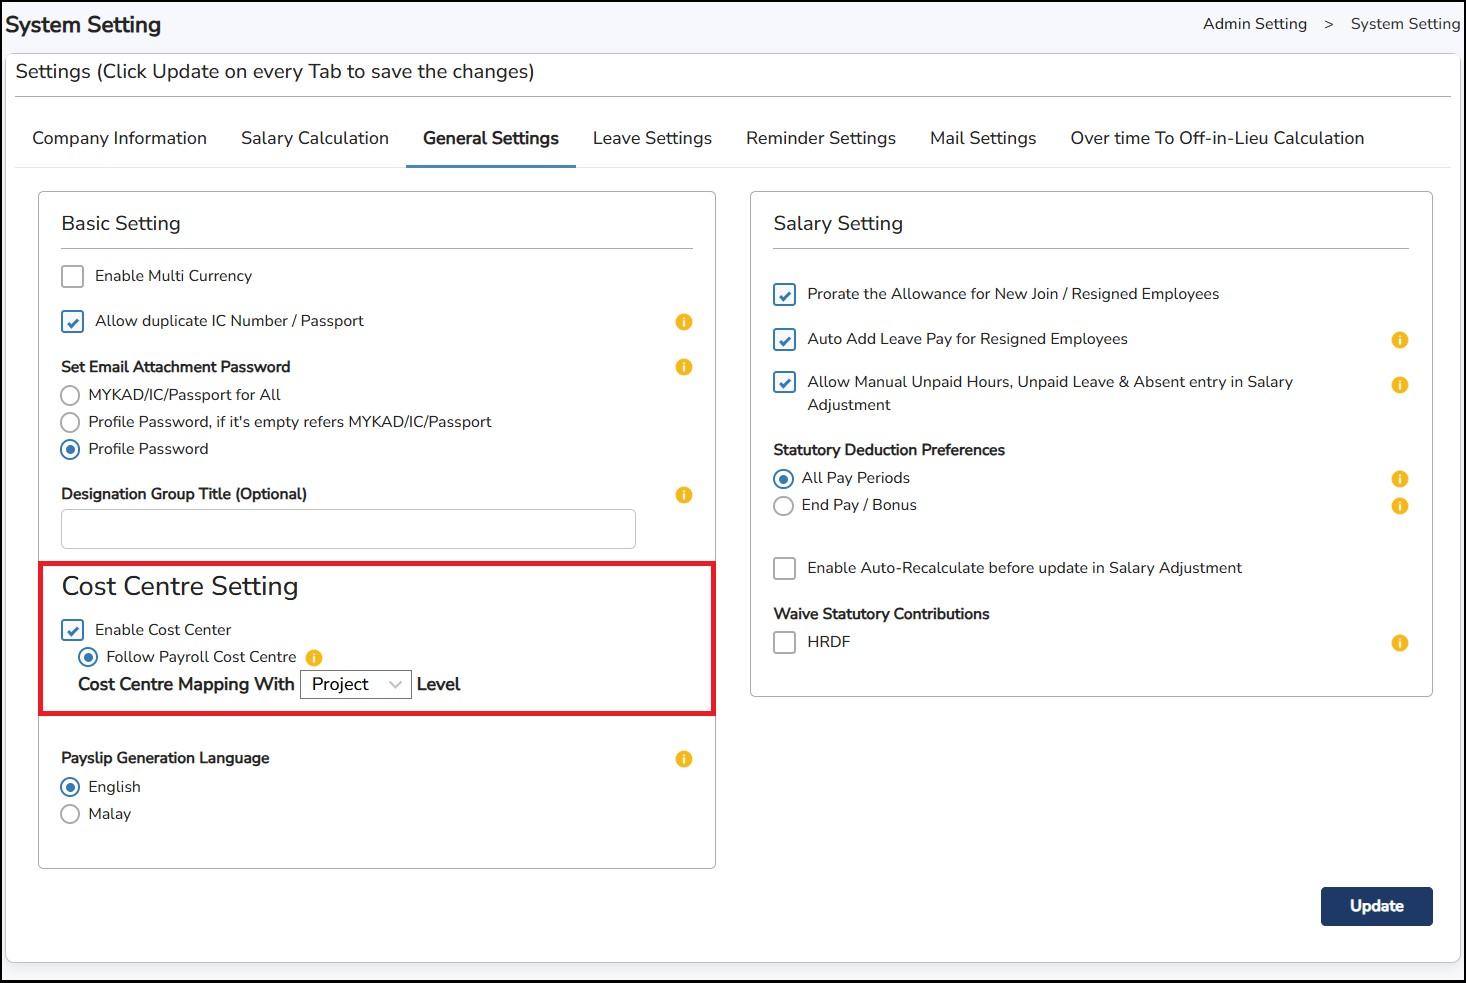
You can assign the same cost centre to multiple locations.
The default will be "MISCELLANEOUS (MISC)".
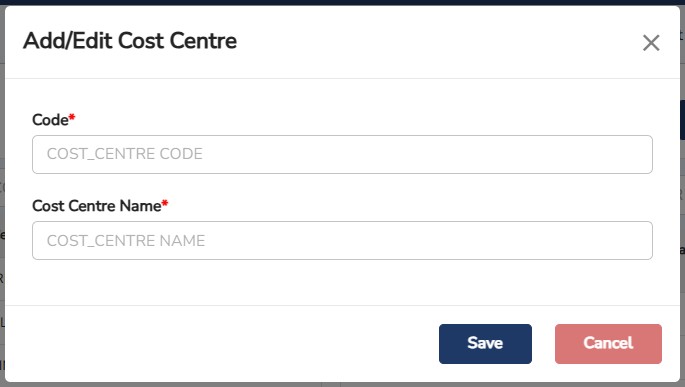
Step 1: Go to Cost Centre > Create and Map Cost Centre
Step 2: Click
![]() to create a new cost centre.
to create a new cost centre.
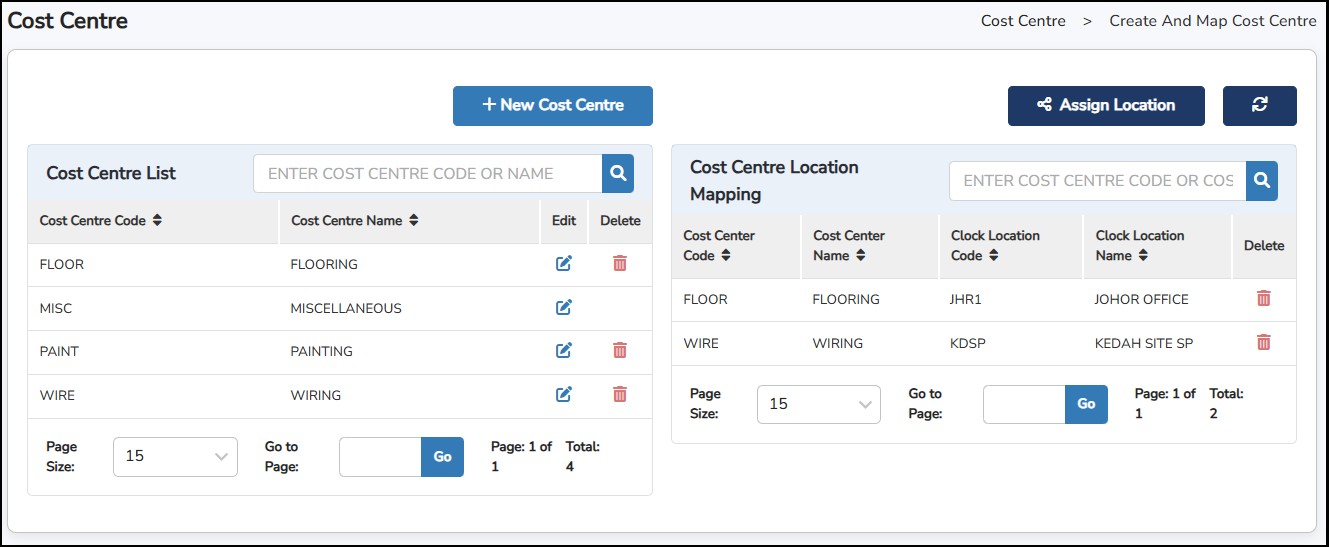
Step 3: Enter the Code and the Cost Centre Name.
**Note: Assign Location can only be applicable if employee's clock in using a reader. To get Clock Location, users may go to Info-TMS > Shift Settings > Clock Location - Shift.
Step 4: Click
![]() to assign the created Location with the Cost Centre.
to assign the created Location with the Cost Centre.
There are three types of Cost Centre
Percentage
Calculates the cost center value based on the percentages allocated for each cost center.
The total across all added cost centers must be 100%.
Cost centre can be added or updated from the 'Assign Cost Center' page.
Days Worked (Link from TMS - Project Cost)
The cost centre data is calculated based on information derived from Project Cost (Info TMS).
To obtain accurate attendance data, ensure that employee attendance details are properly linked in Info TMS.
The employee's salary is then calculated according to the details specified in Salary Adjustment.
Days Worked(Manual)
Calculating the cost centre values based on manually entered days.
The number of days must not exceed 31.
Recalculate the cost centre to assess the amount based on the selected settings for the employee.
Step 1: Go to Cost Centre > Assign Cost Centre to Staff
Step 2: Click
![]() to add the Cost Centre that you have created and it will be reflected in the list below.
to add the Cost Centre that you have created and it will be reflected in the list below.
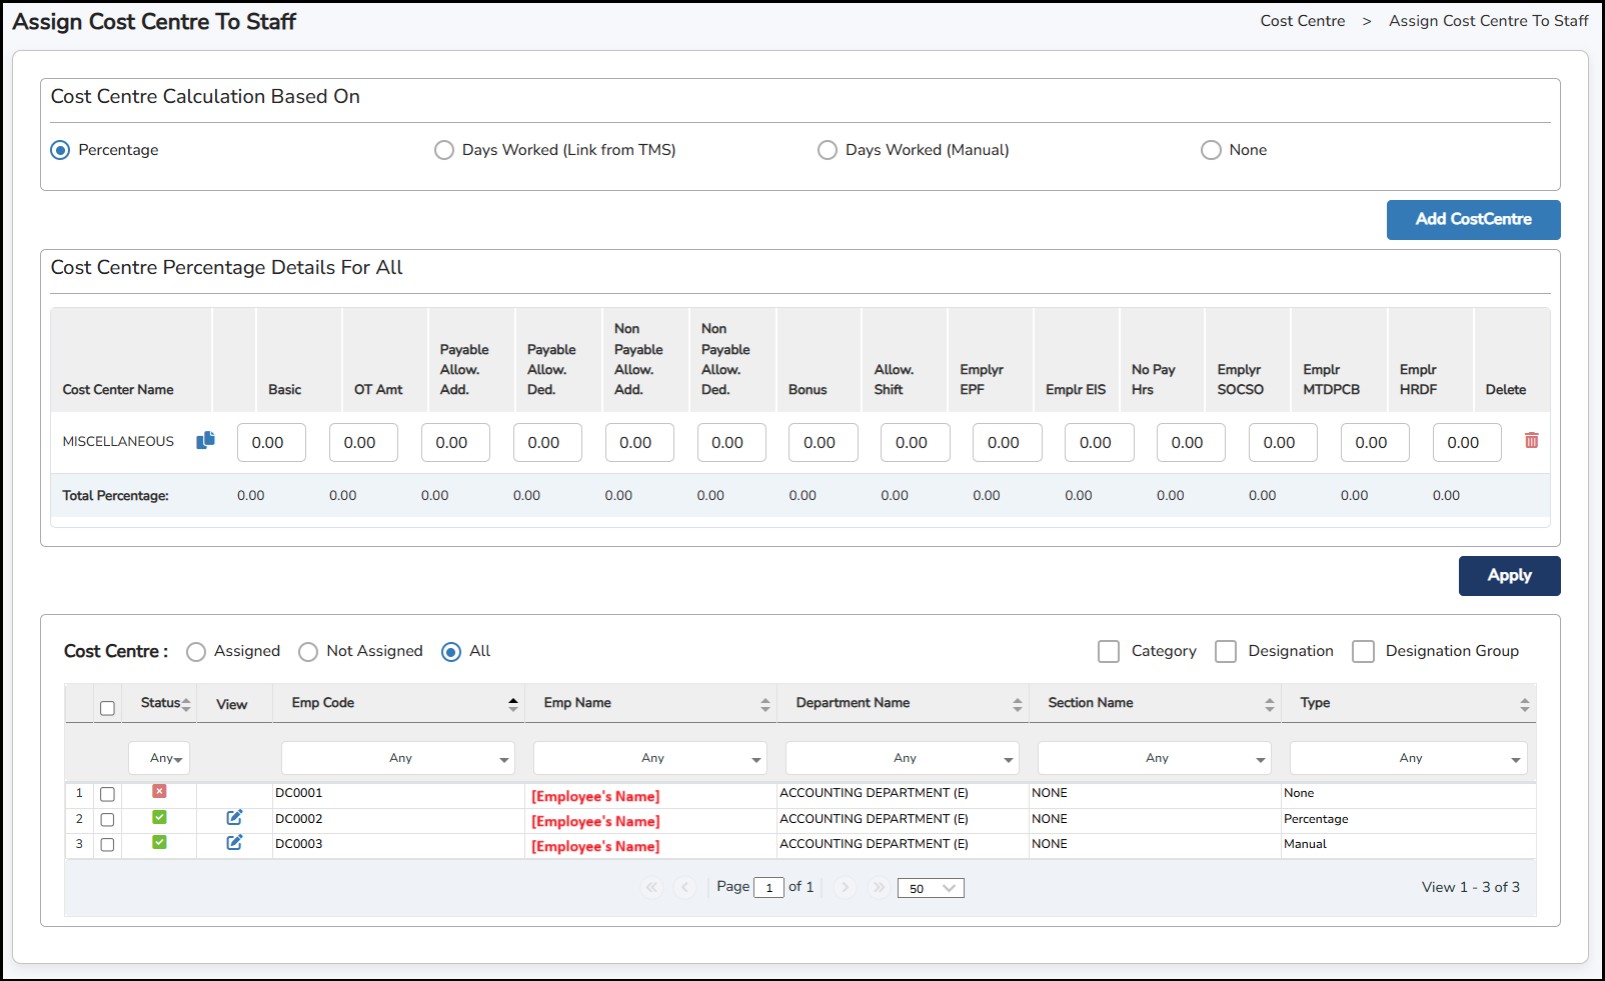
Step 3: You may fill in the details of the Cost Centre to be included
Step 4: Select the employees in the list
Step 5: Once done, click
![]() to the Cost Centre to assign the employees.
to the Cost Centre to assign the employees.
This is to manually amend the calculated amount. 'Is Match' indicates whether the total cost matches or does not match the basic salary.
Step 1: Go to Cost Centre > Cost Centre Adjustment
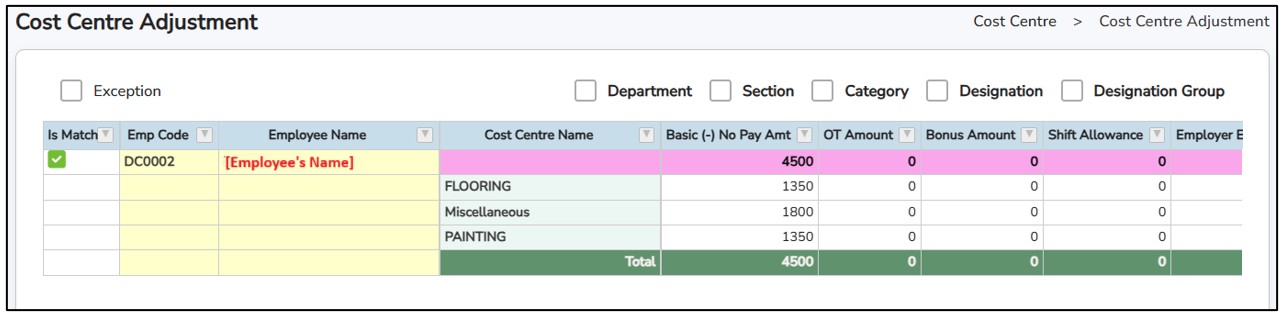
Note: Please ensure to initiate Payroll Initialize before Adjusting the Cost Centre assigned to the employees.
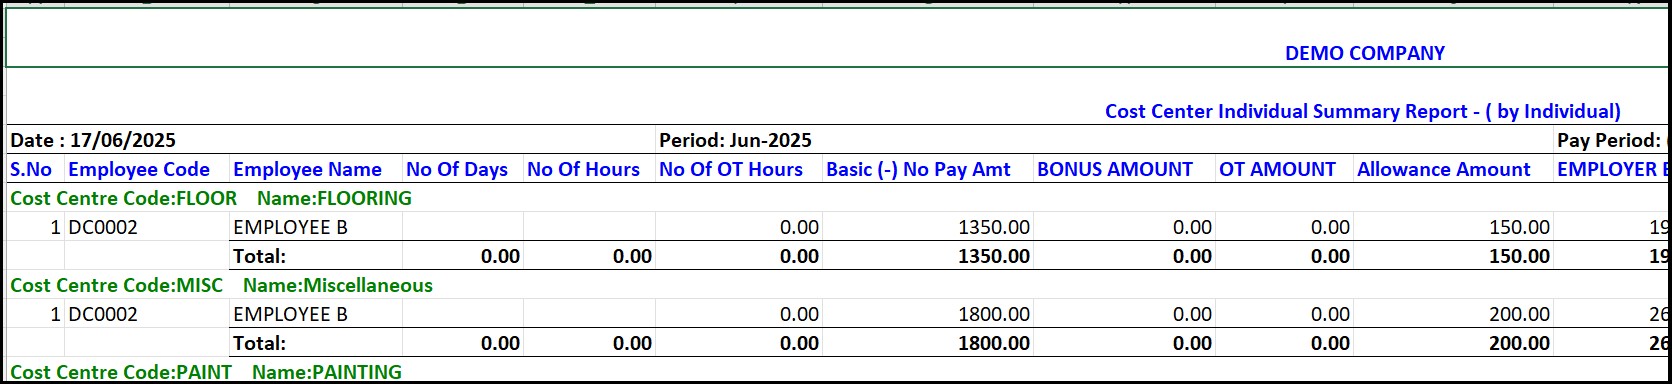
This is to view and export the Cost Centre report by different types.
Cost Centre Detail Report

Cost Centre Individual Summary Report

Cost Centre Summary Report

Cost Centre Individual Summary Report
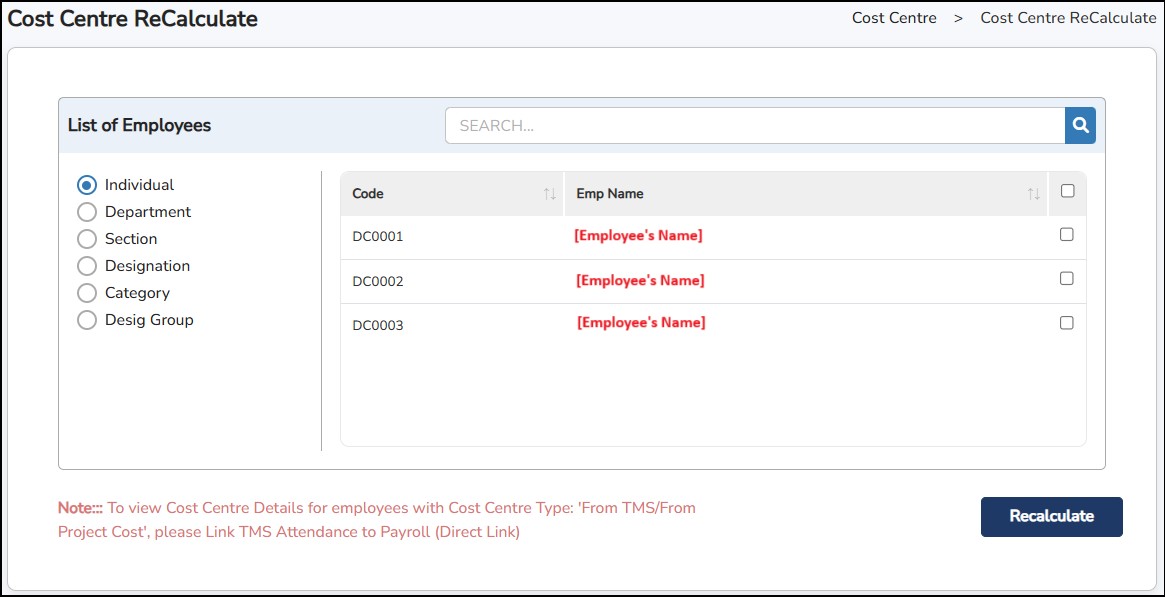
Recalculations must be carried out every time changes are made to the details of the Cost Centre.
Step 1: Go to Cost Centre > Cost Centre Recalculate
Step 2: Select the employees
Step 3: click
![]() to recalculate the changes.
to recalculate the changes.
This is where you can set up the employee's leave entitlement(s), record the leaves taken and produce the corresponding reports.
This feature is where the HR Administrator can apply for employee’s leave, credit Off-In-Lieu and Annual Leave by group/batch.
Step 1: Go to Leave Management > Batch Leave
Step 2: Select if you want to do batch application by Individual , by Department , by Section , by Designation , by Category or by Extra Classification
Step 3: Tick on the specific or ALL employee(s)
Step 4: Select the Apply Leave tab to do the batch leave application
Step 5: Enter the Start and End Date
Step 6: Select the Leave Type > enter the Remarks
Step
7: Click
![]()
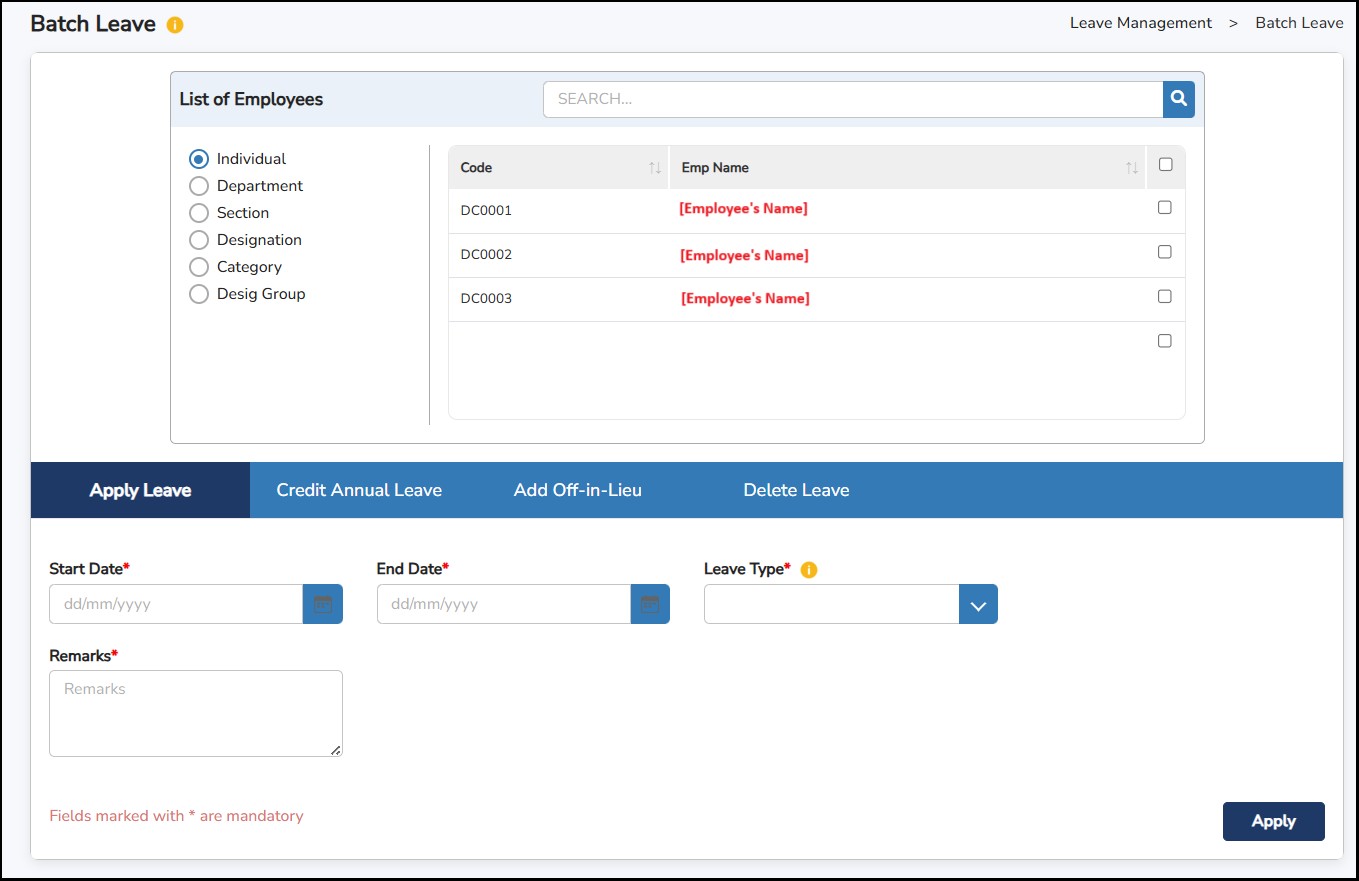
Step 8: Select Credit Annual Leave to credit/adjust annual leave balance by batch > enter the No. of Days > enter the Date (it should be within the leave cycle) > enter the Remarks
Step 9: Select Add Off-In-Lieu to credit off-in-lieu to the employees by batch > select whether Hourly or Daily > enter the No. of Days/Hours > enter the Expiry Date and Remarks
Step
9: Click
![]() once done
once done
This is where you can activate and set up the maternity leave eligibility of your female employees.
Step 1: Go to Leave Management > Maternity Leave Setting
Step 2: Click on the Activate / View button for the employee
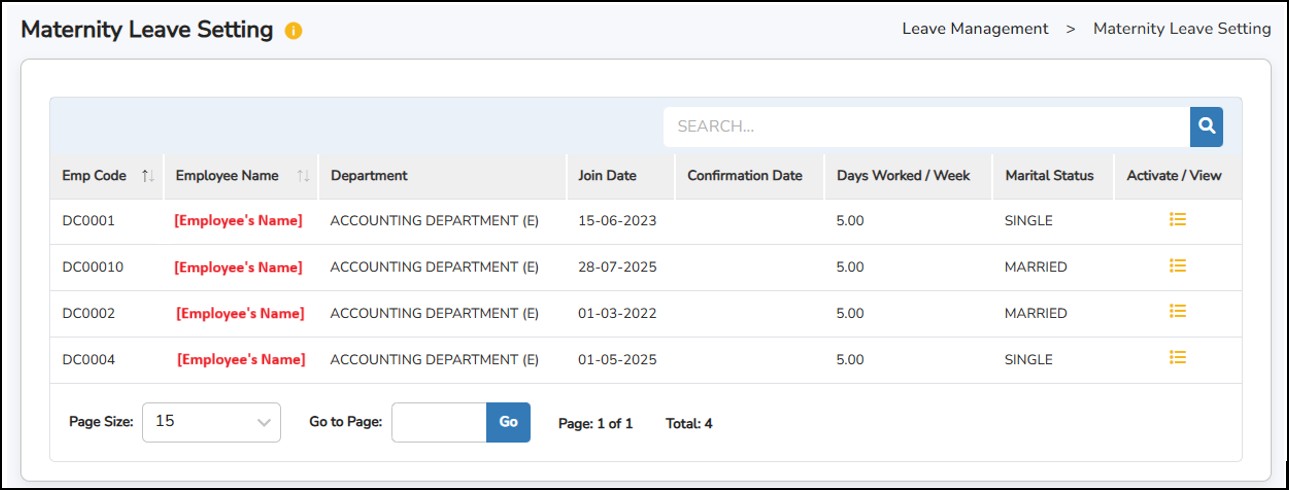
Step
3: Click on the
![]() button to create the maternity leave eligibility of the employee.
button to create the maternity leave eligibility of the employee.
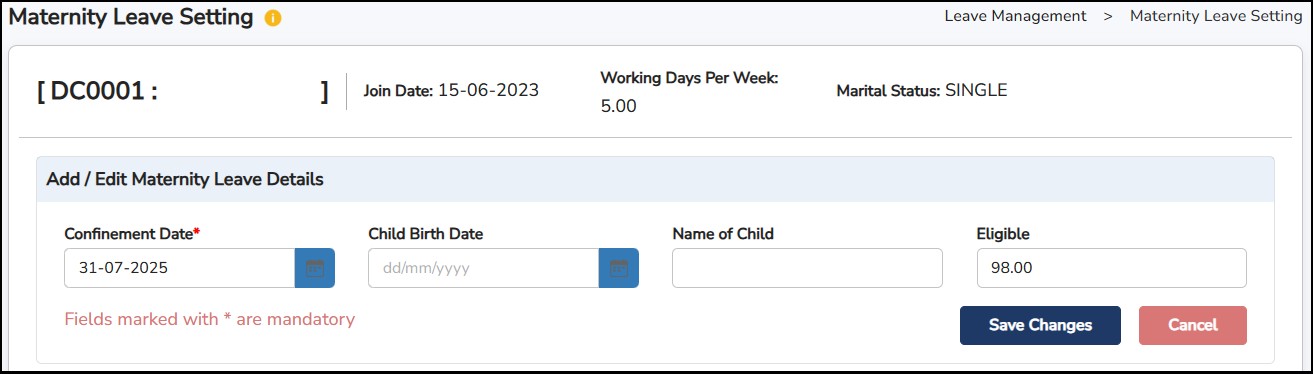
Step 4: Enter the Confinement Date when the employee wants to start using the leave.
Step 5: Child Birth Date and Child Name are optional.
Step 6: Enter the Eligible days – Minimum 98 days.
Step
7: Click
![]() once done
once done
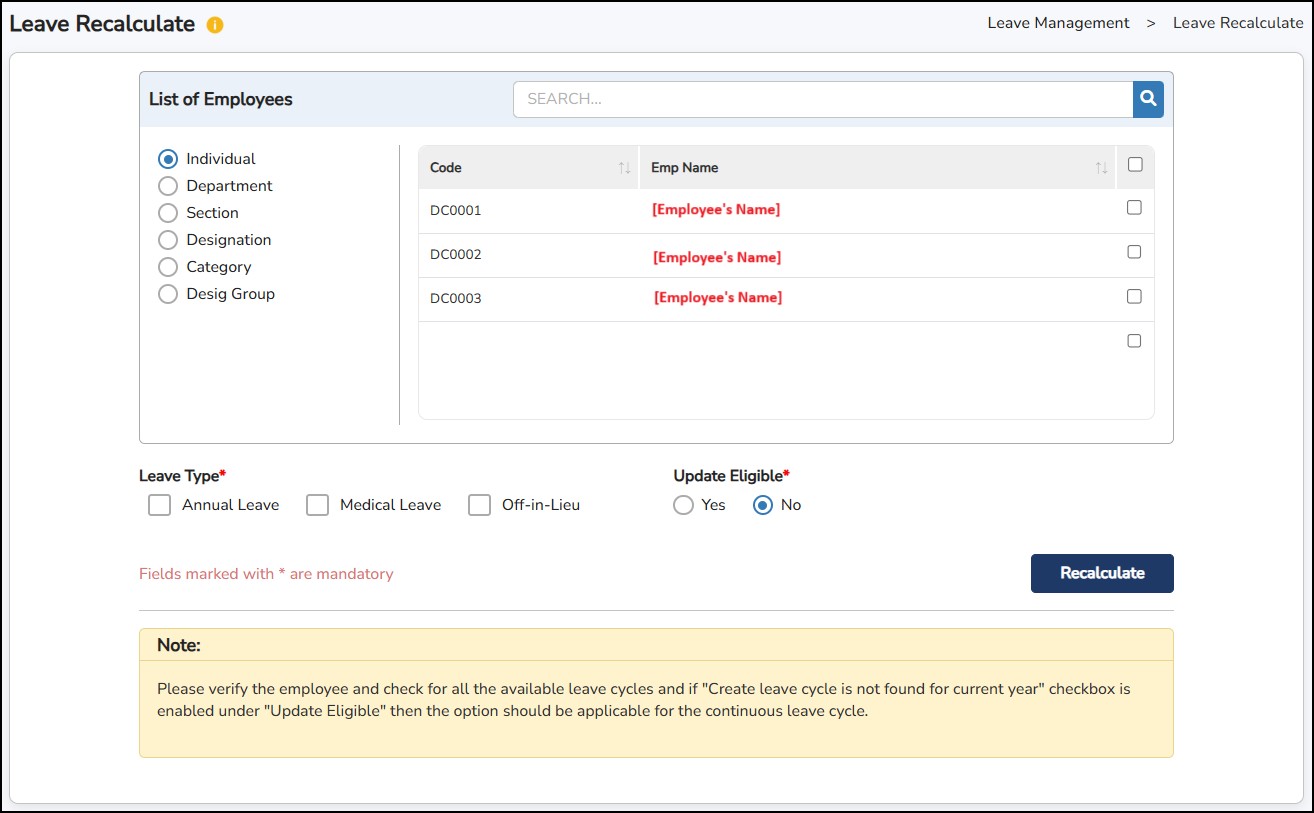
This is where you can recalculate the leave balances of the employee to show accurate leave details.
Step 1: Go to Leave Management > Leave Recalculate
Step 2: Select the employees you want to recalculate the leaves > select under the Leave Type which leave you want to recalculate (Annual, Medical, or Off-In-Lieu)
Step 3: Select YES/NO under the Update Leave Eligible if you want to recalculate the leave eligibility
Step
4: Click
![]()
This is where you can activate and set up the maternity leave eligibility of your male employees. Only married male employees will appear in this setting.
Note: You may now activate the paternity leave for employees who have two (2) or more spouses giving birth in the same year.
Step 1: Go to Leave Management > Paternity Leave Setting
Step 2: Click on the Activate / View button for the employee
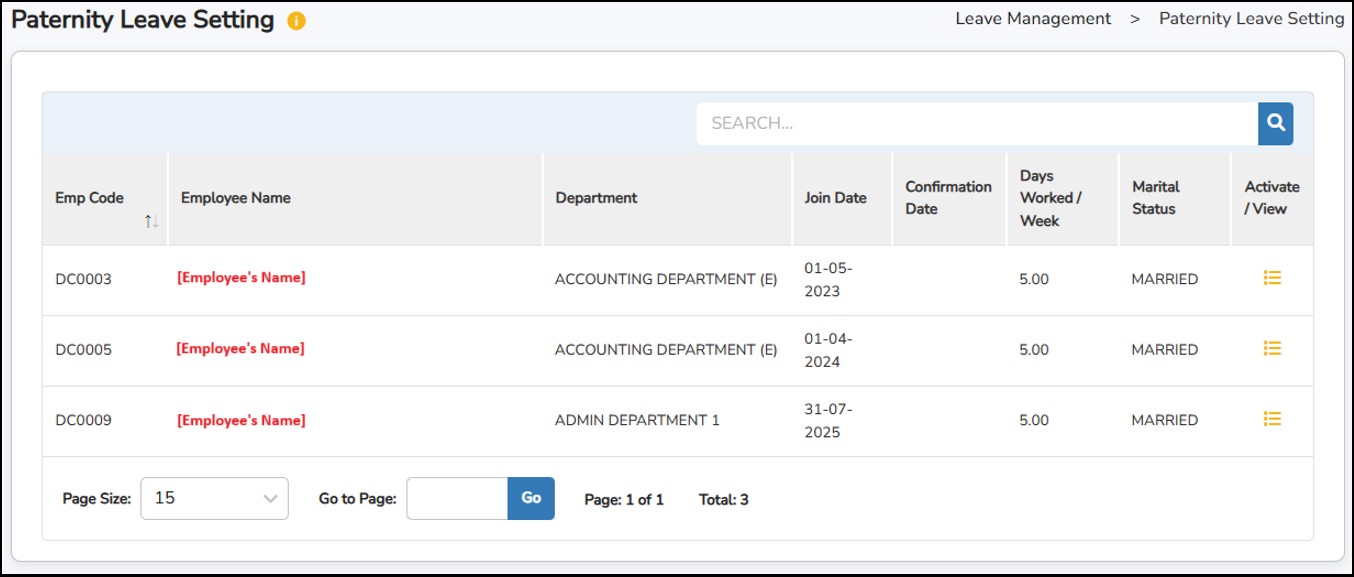
Step
3: Click on the
![]() button to create the maternity leave eligibility of the employee.
button to create the maternity leave eligibility of the employee.
Step 4: Enter the Confinement Date when the employee wants to start using the leave.
Step 5: Child Birth Date and Child Name are optional.
Step 6: Eligible days will auto-populate as 7 days. You may increase the number.
Alternatively, if the employee is eligible for more than one Paternity Leave, you may repeat Step 2 until Step 5. If the Confinement Date falls within the previous Paternity Leave period, a prompt will appear. You will have the options to:
Combine the Eligible Days from the previous Paternity Leave with the new Paternity Leave; or
Separate the Eligible Days and keep the default 7 days for the new Paternity Leave.
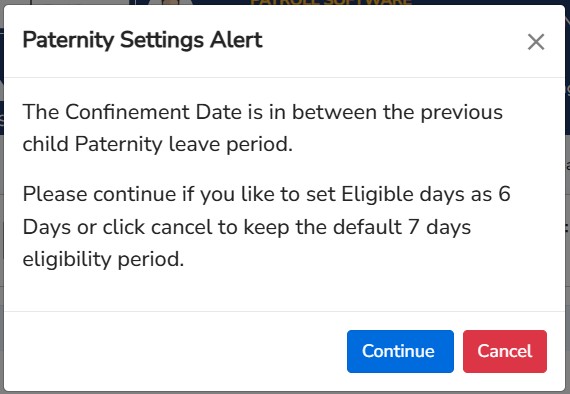
If you choose Continue, the system will combine and adjust the eligible days (e.g., 6 days + 1 day = 7 days).
If you choose Cancel, the system will keep the default 7-day eligibility period for the new Paternity Leave.
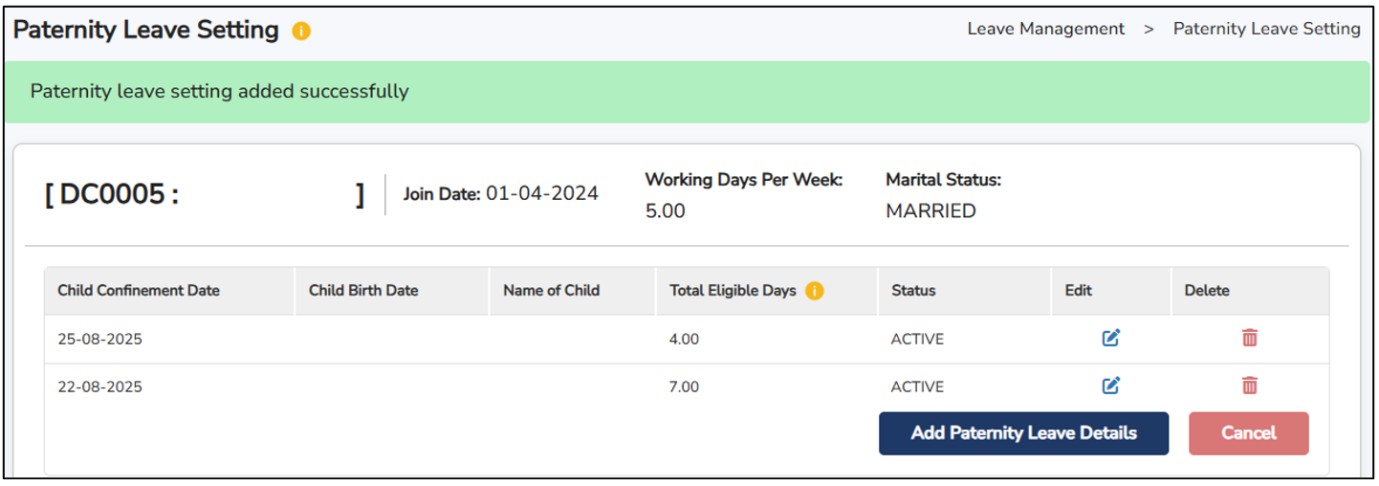
Step
7: Click
![]() once done
once done
This is where you can close the current leave cycle of the Annual Leave and Medical Leave of your employee(s) and open the New Year cycle. This is also where you can bring forward the leave balances according to the condition that you will select.
Before doing this process, you would need to make sure that the leave records a re-updated and the leave balances are correct.
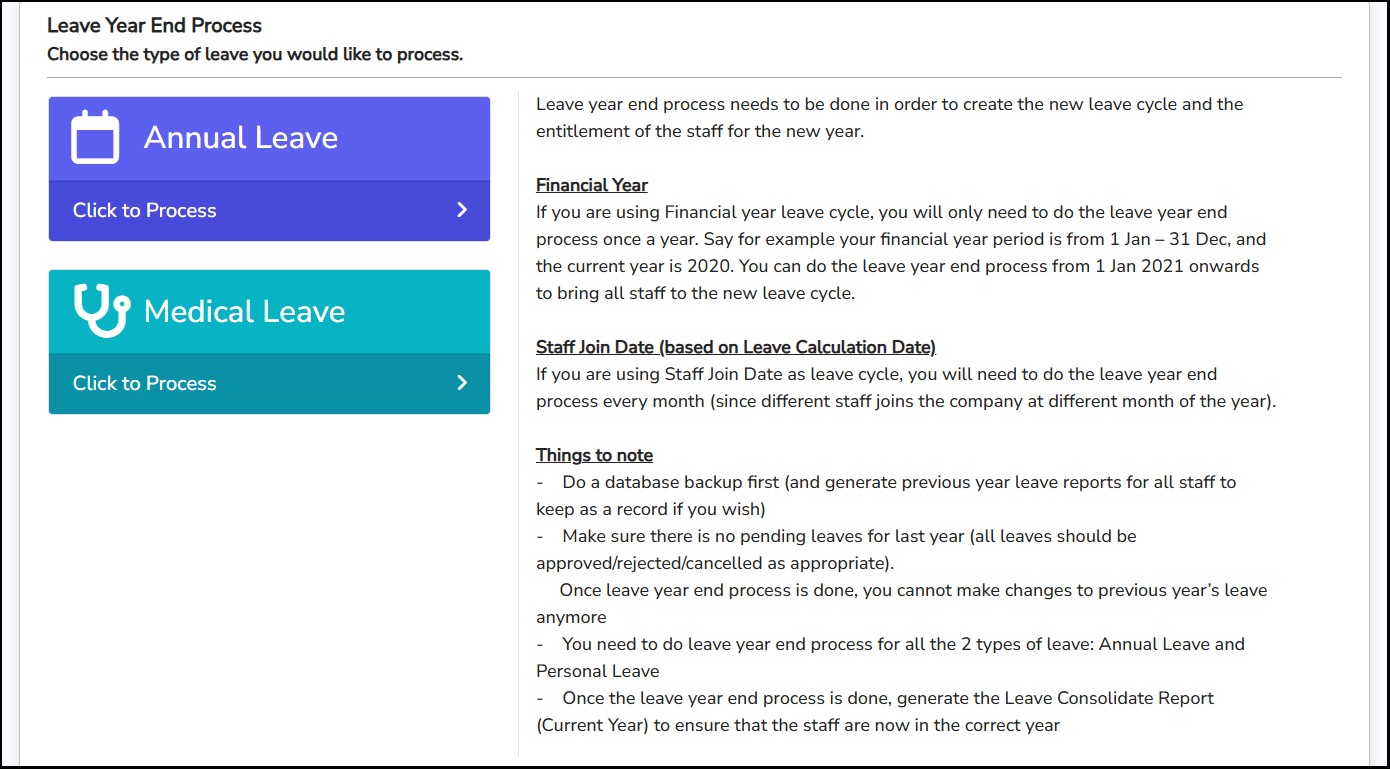
Note: The system will display an error message if the Leave Year-End Process is initiated while leaves are pending approval.
When to perform Leave End Year Process for Annual Leave?
Leave Cycle - Financial Year: Run this process once a year after December 31st. Ensure all leave requests until December 31st have been approved or rejected, with no pending requests remaining.
Leave Cycle - Leave Calculation Date: Run this process once a month after the last day of the month. Ensure all leave from previous months has been approved or rejected, with no pending requests remaining.
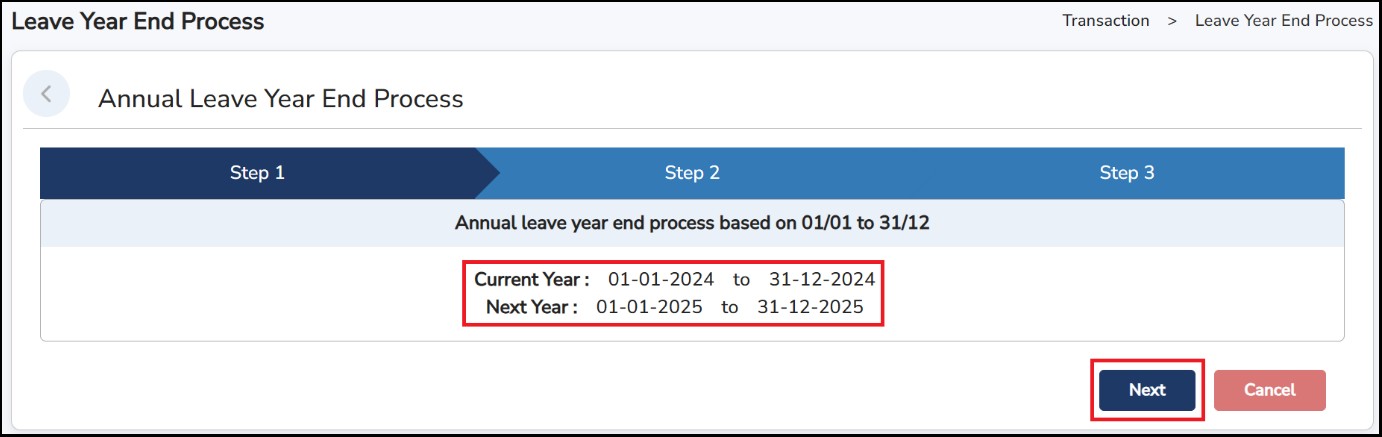
Step 1: Go to Leave Management > Leave Year End Process > Annual Leave
Step
2: Make sure
Next
Year
date is correct > Click
![]() to continue
to continue

Step 3: Select the Carry Forward option as below: -
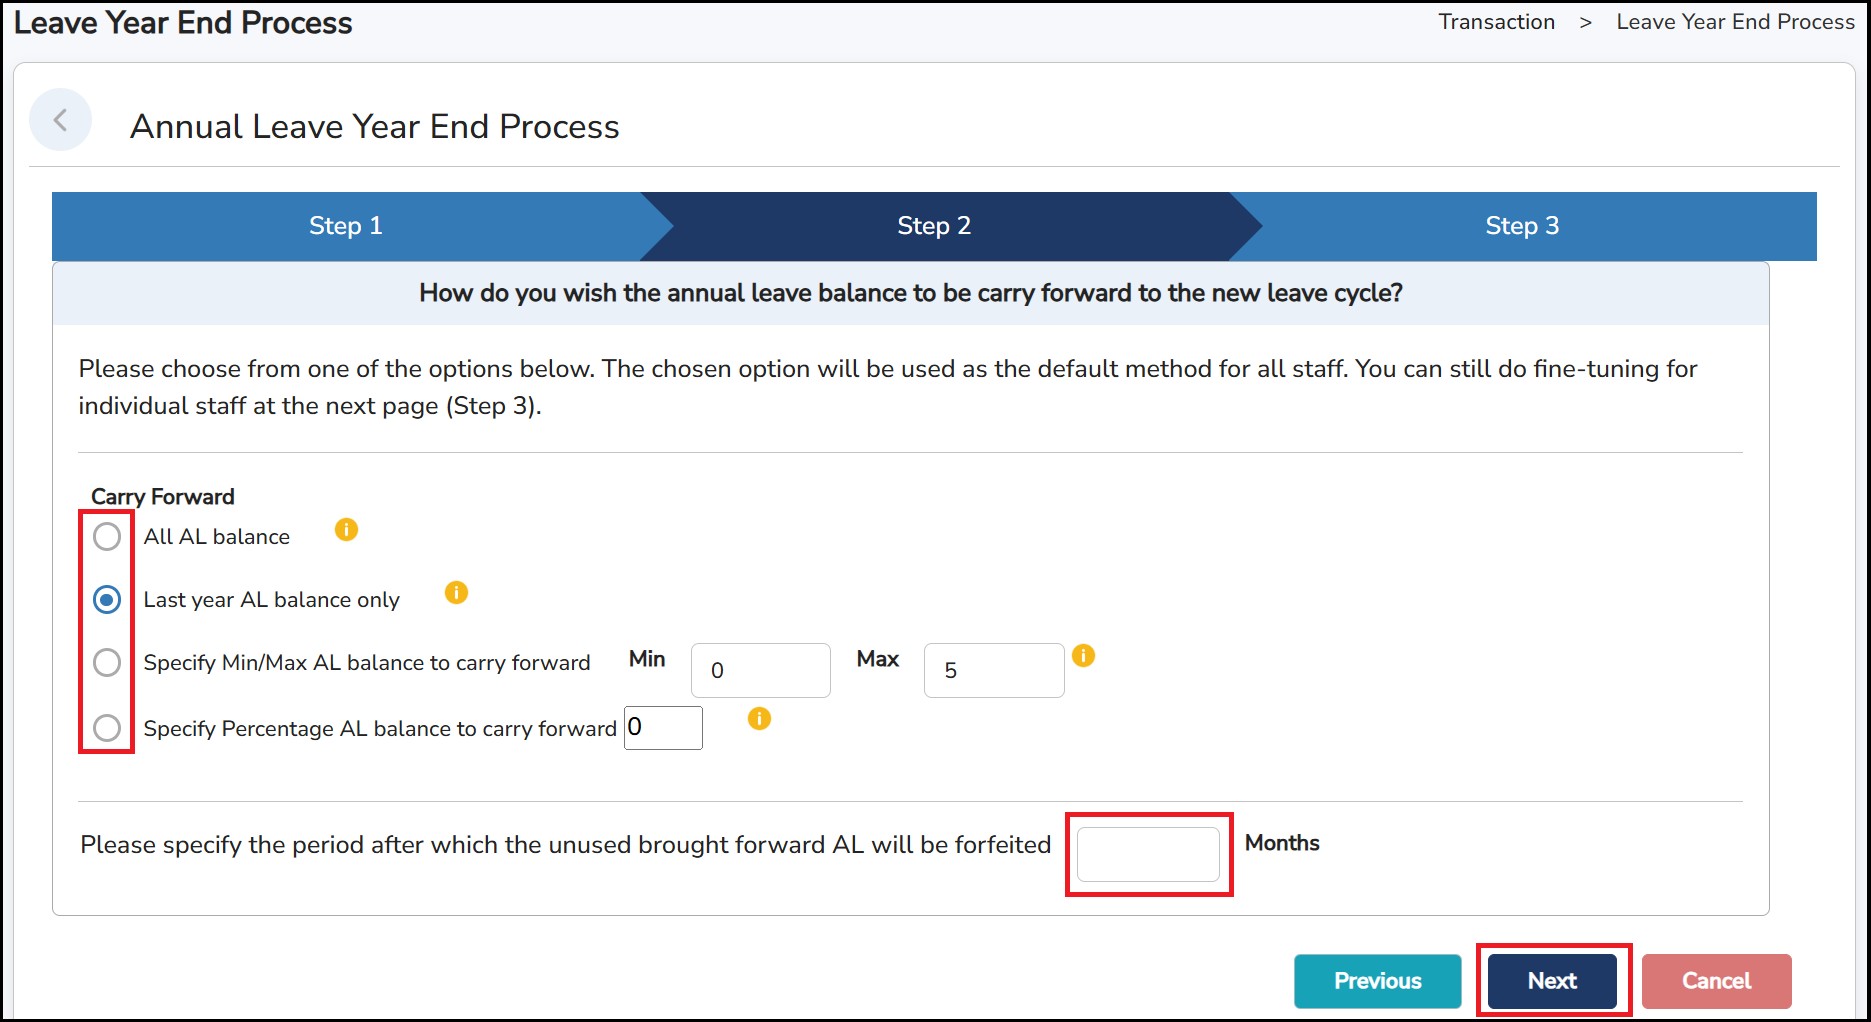
Step 4: Enter umber of expiry month(s) for the leaves that will be carried forward (if any)
Step
5: Click
![]() to continue
to continue
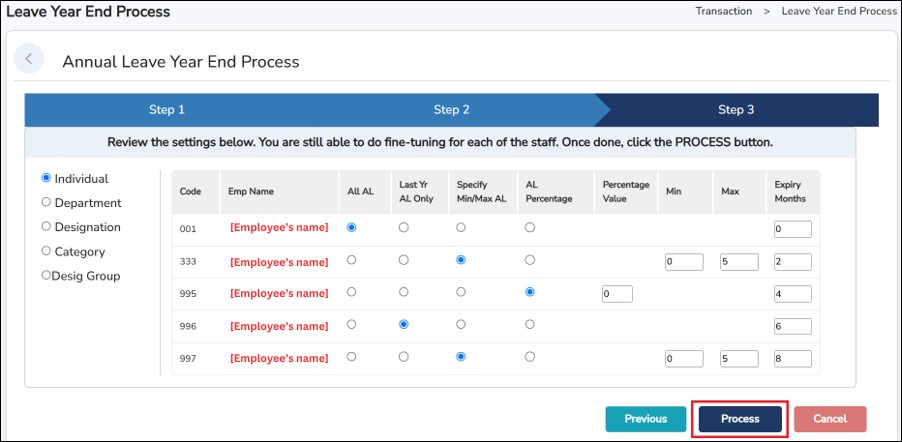
Step 6: Review the employee’s AL carry forward configuration settings or modify them to separate another special configuration.
Step 7: Click Process to complete it.
Leave Year End Process for Medical Leave
Since the Medical Leave balances will not be carried forward to the next cycle, this process is only to make sure the leave cycle for Medical Leave is closed and new cycle will be created.
Step 1: Go to Leave Management > Leave Year End Process > Medical Leave
Step 2: Make sure Next Year date is correct > Click Process ML
Step 3: A message will show “ ML Year End Process completed successfully in the status bar.
AL & ML Cycle Rollback
AL & ML Rollback is to reverse the initiated Leave Year End Process if there's any discrepancies of the Leave taken/balances of the employees.
Step 1: Go to Leave Management > Leave Year End Process > Click
![]() or
or
![]() to initiate the rollback action.
to initiate the rollback action.
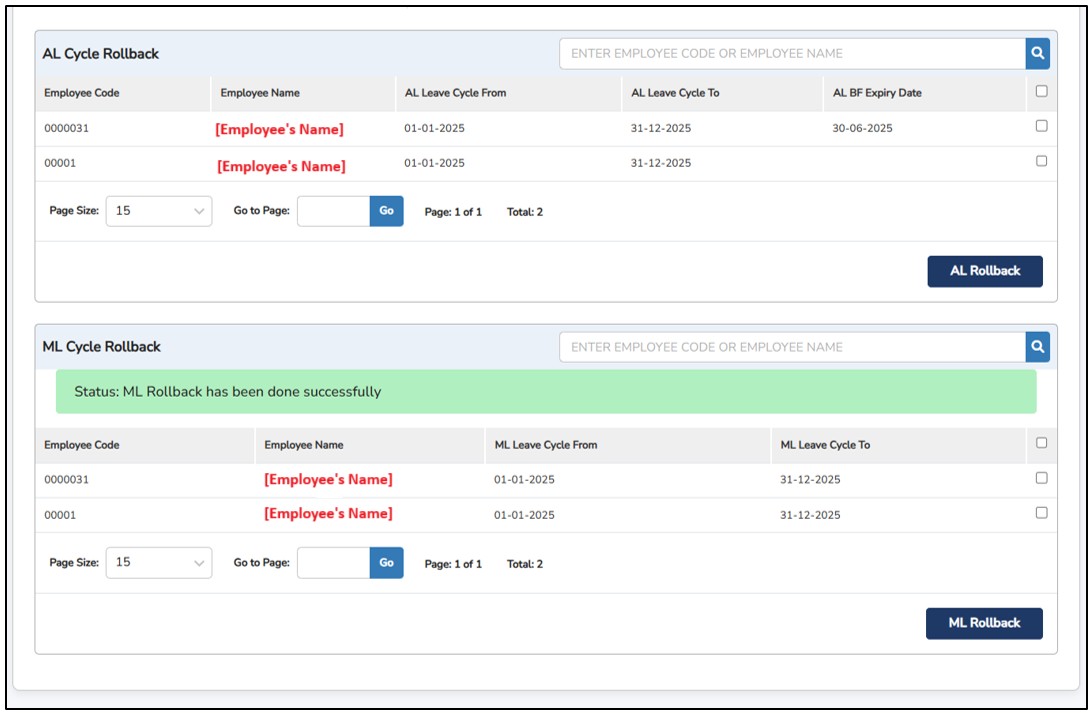
A prompt message will appear for you to cancel the rollback action or proceed.
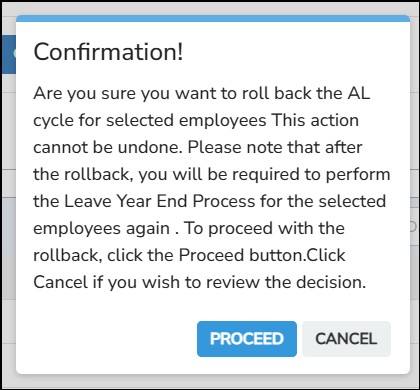
Once proceed with the rollback action, you will need to initiate the Leave Year Process again.
This feature will allow you to credit Off-In-Lieu to the employees.
Step 1: Go to Leave Management > Off-In-Lieu Setting
Step 2: Select the employee from the drop-down list
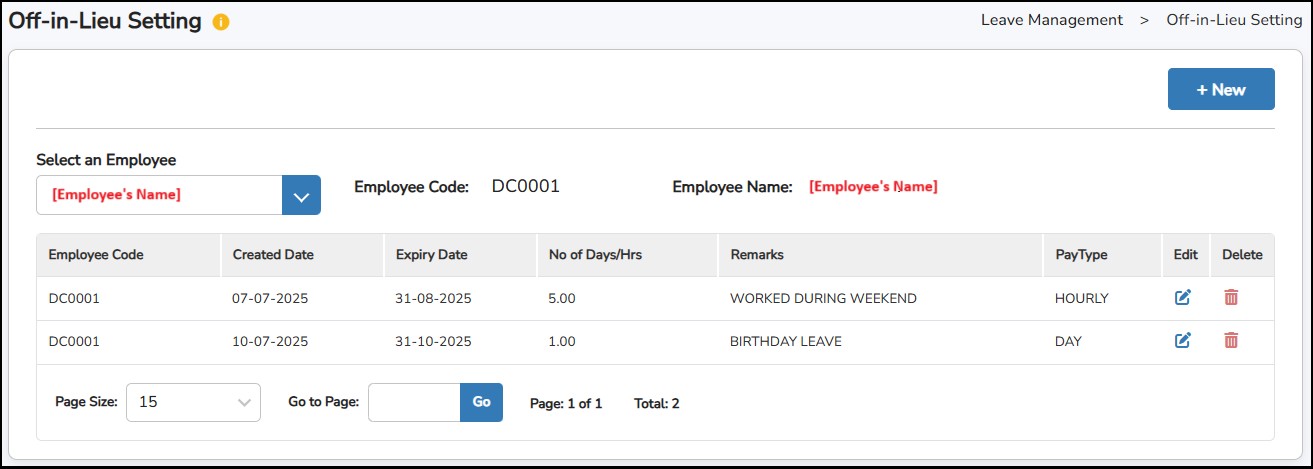
Step
3: Click
![]() to add Off-In-Lieu > select if the
Leave
Type
is
Hourly
or
Daily
> Enter the no. of days or hours > Enter the expiry date >
Enter the remarks
to add Off-In-Lieu > select if the
Leave
Type
is
Hourly
or
Daily
> Enter the no. of days or hours > Enter the expiry date >
Enter the remarks
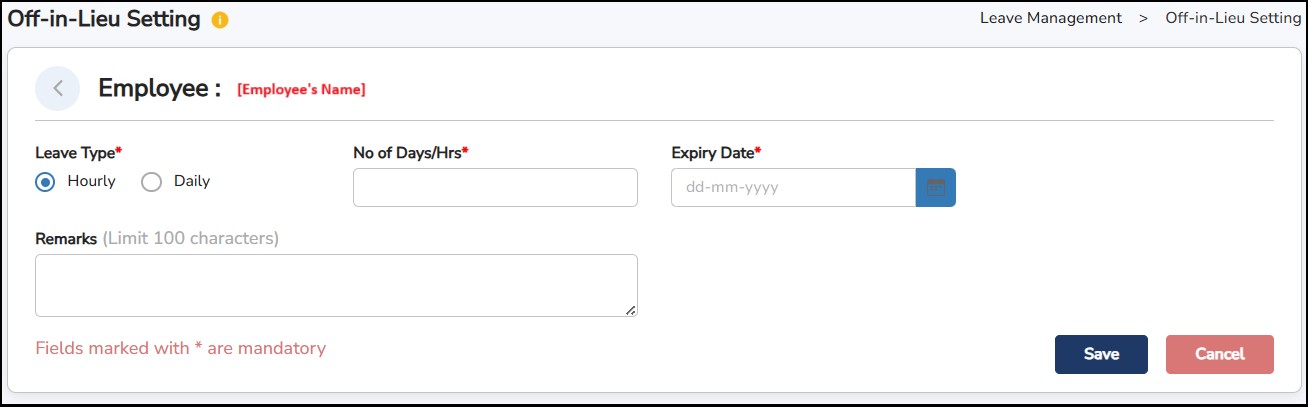
Step
4: Click
![]() once done
once done
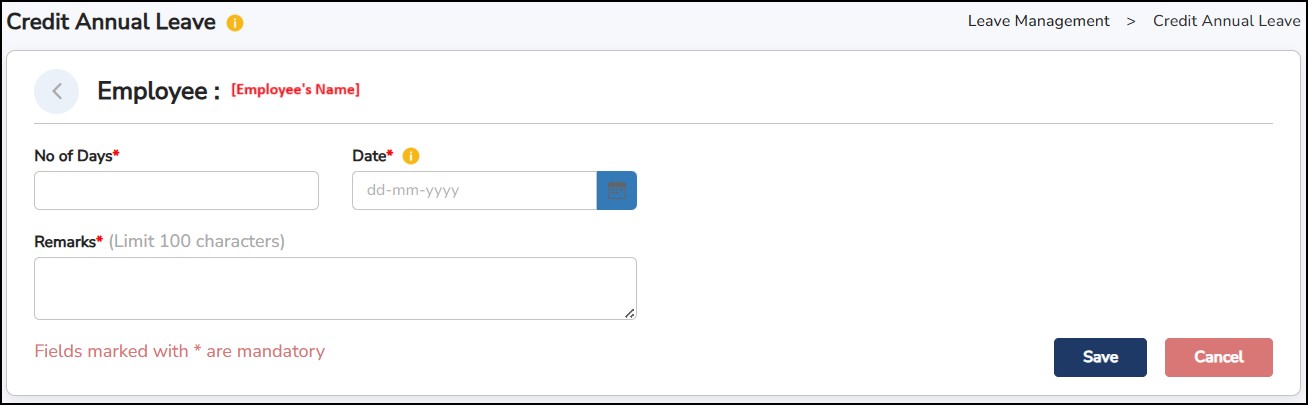
This feature will allow you to add leave days or adjust the employee's Annual Leave.
Step 1: Go to Leave Management > Credit Annual Leave
Step
2: Select from the drop-down list the employee > click
![]()
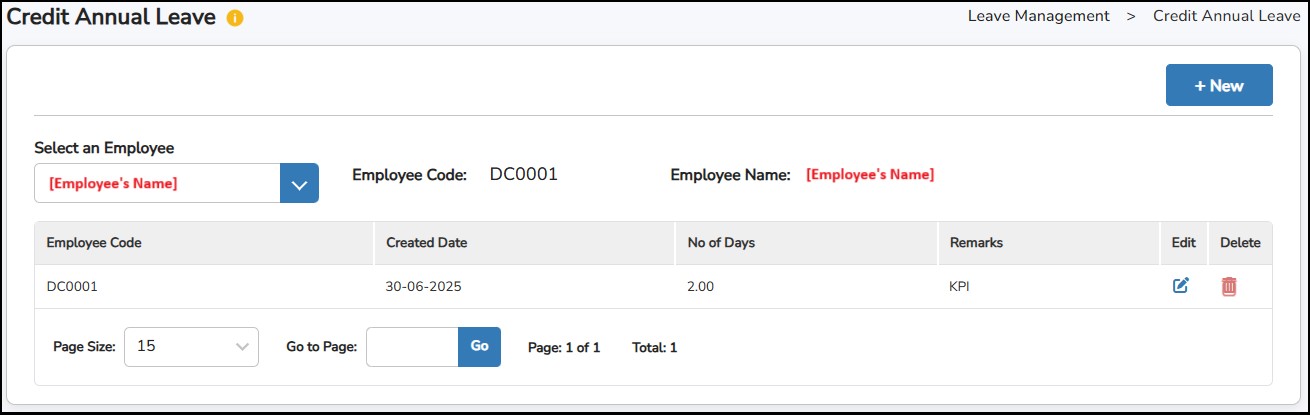
Step 3: Enter the number of days Select the Date for the annual leave to be credited
Step 4: Select the Date for the annual leave to be credited
Step
5: Click
![]() once done.
once done.
This is where you can set up the different entitlements for the employees.
Step
1: Go to
Leave
Management
>
Leave
Category
> click
![]()
Step
2: Enter
Category
Code
>
Category
Name
> click
![]()

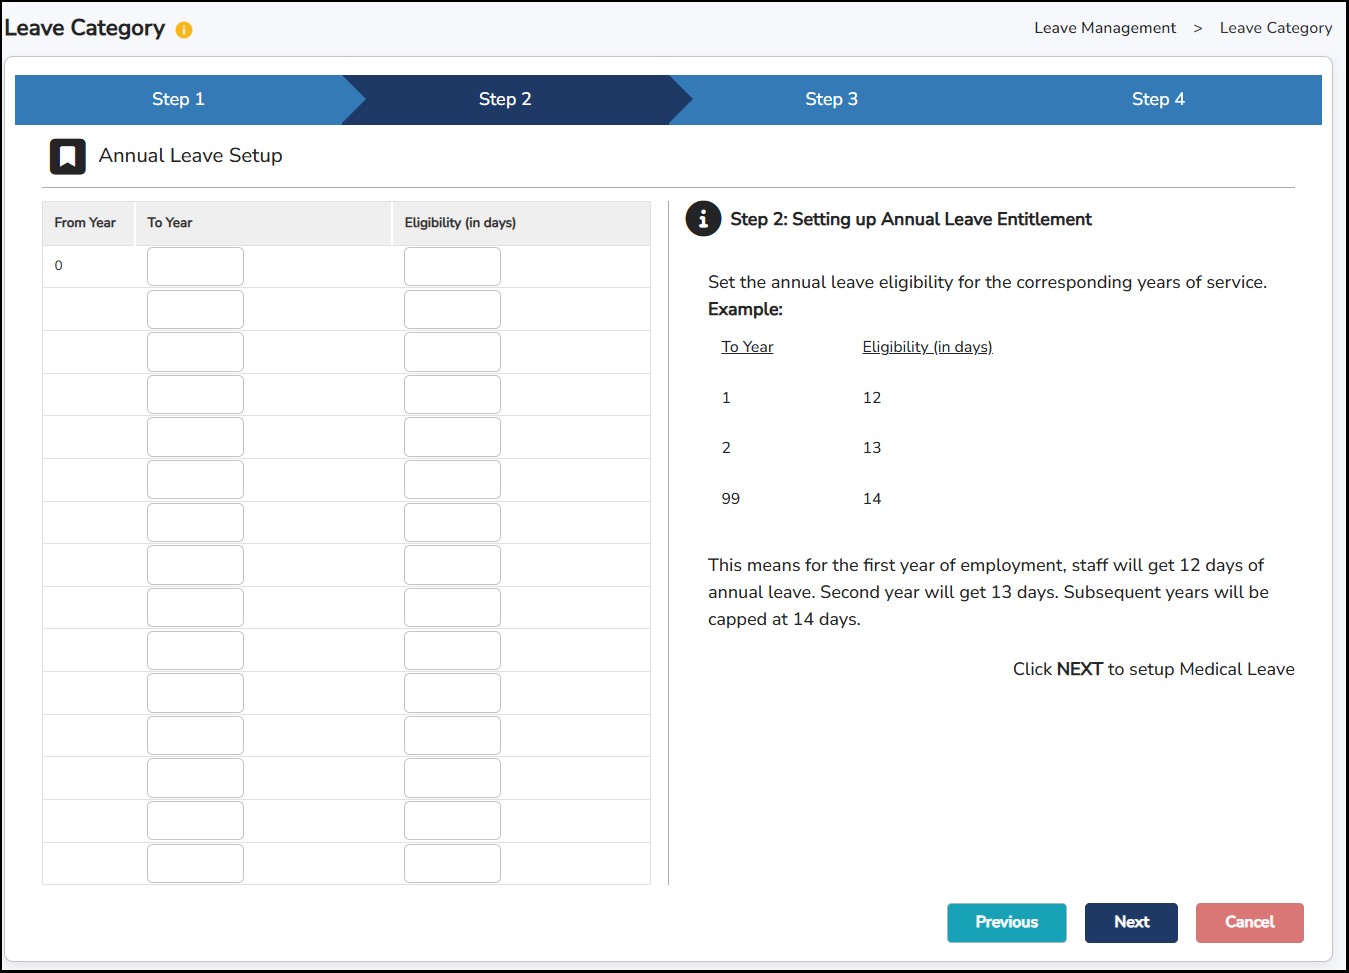
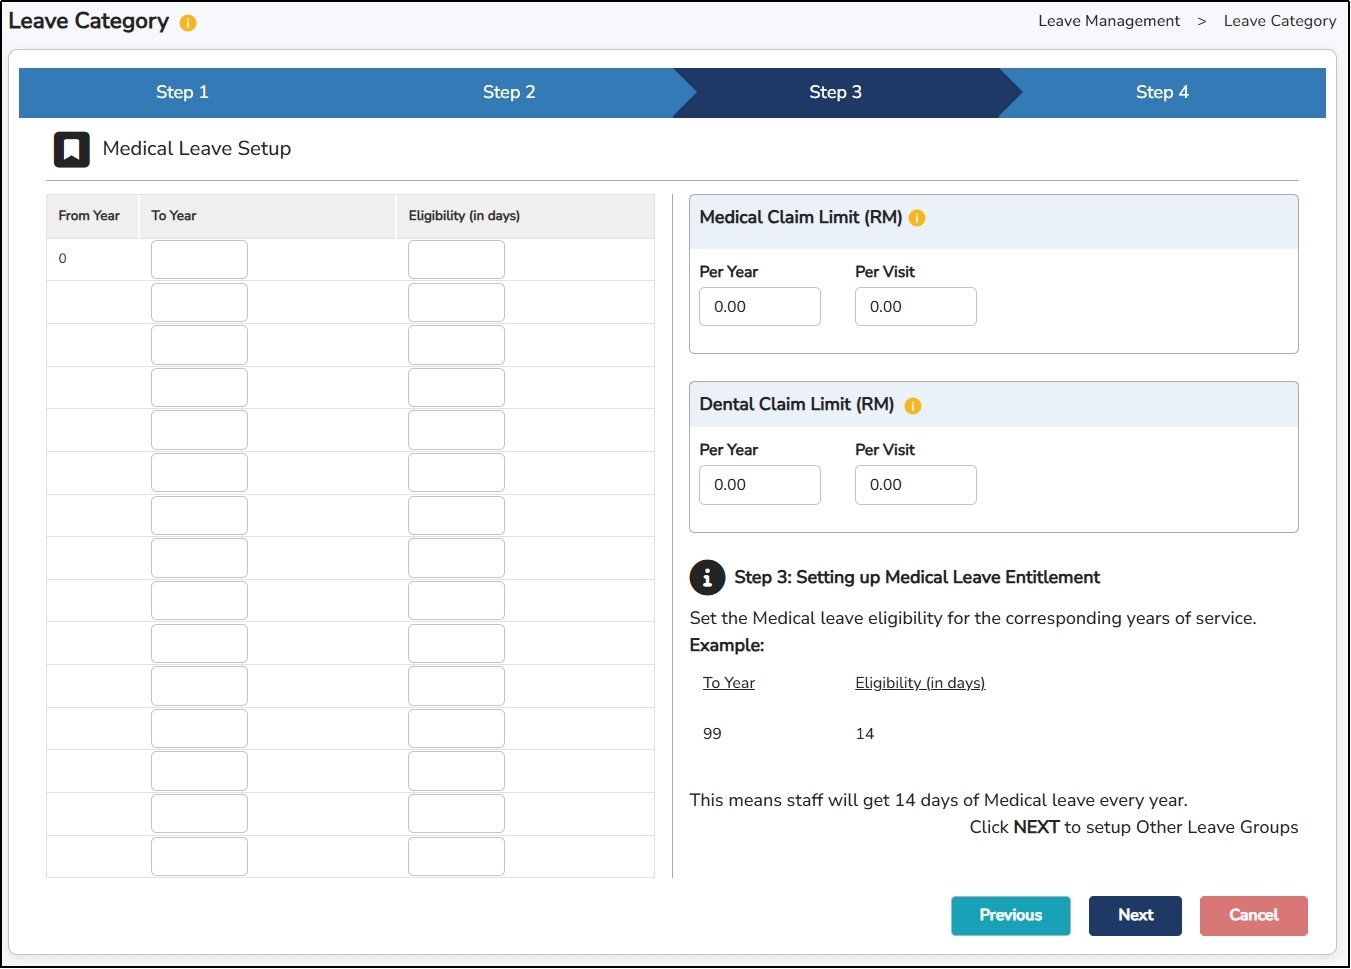
Step 3: Set up the Annual & Medical Leave entitlement > Enter the leave entitlement for EACH year of service under Year and the corresponding number of Eligible Days
Step
4: Click
![]()
Step
5: Enter the
Medical
&
Dental
Claim
Limit
(if any) -
Per
Year
&
Per
Visit.
Click
![]()
Step 6: Tick on the Leave Group that the employee is entitled to > Enter the Eligible Days for the other leave entitlements.

Per Incident – This option is only available for the Compassionate Leave Group. When enabled (ticked), employees will be entitled to apply for leave based on eligibility for each incident instead of being limited to a yearly quota.
Step
7: Click
![]() once done.
once done.
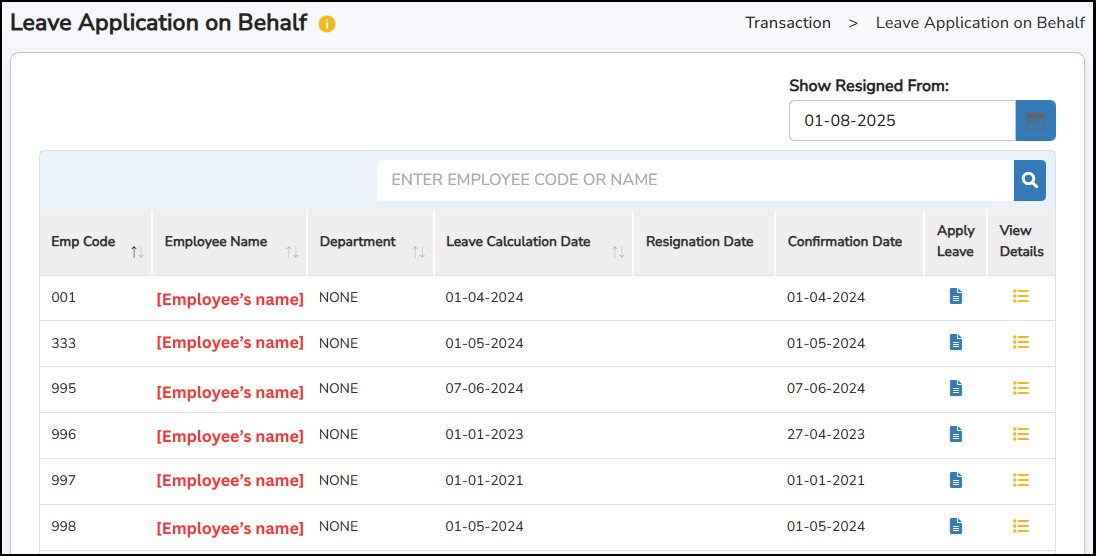
How to apply leave on behalf of the employee?
Step 1: Go to Leave Management > Leave Apply on Behalf
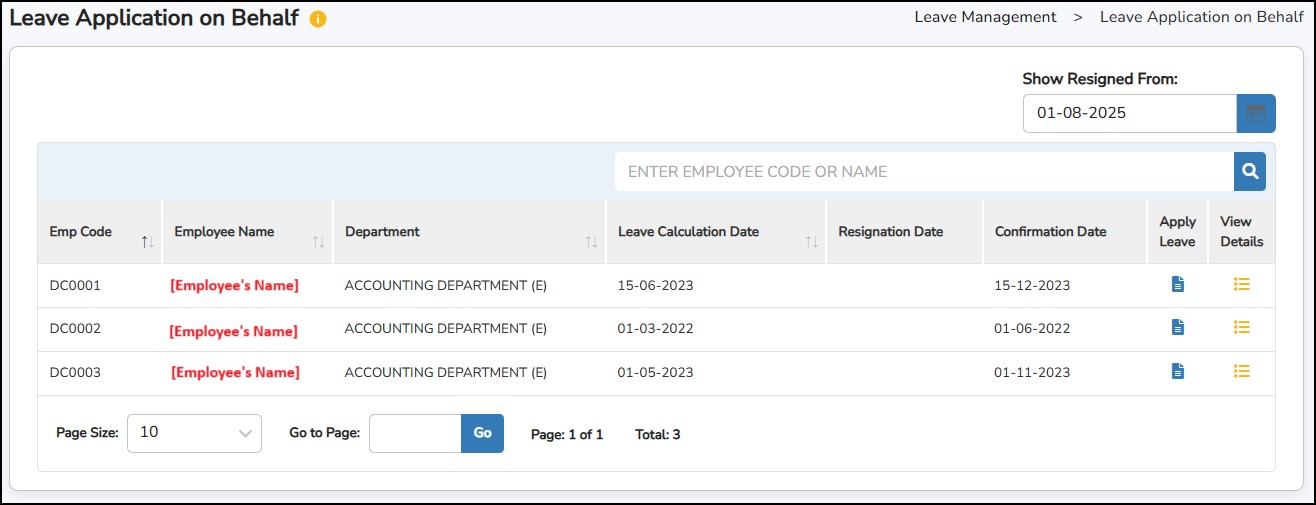
Step
2:
Click
on the
Apply
Leave
button ![]() to
enter the employees leave application.
to
enter the employees leave application.
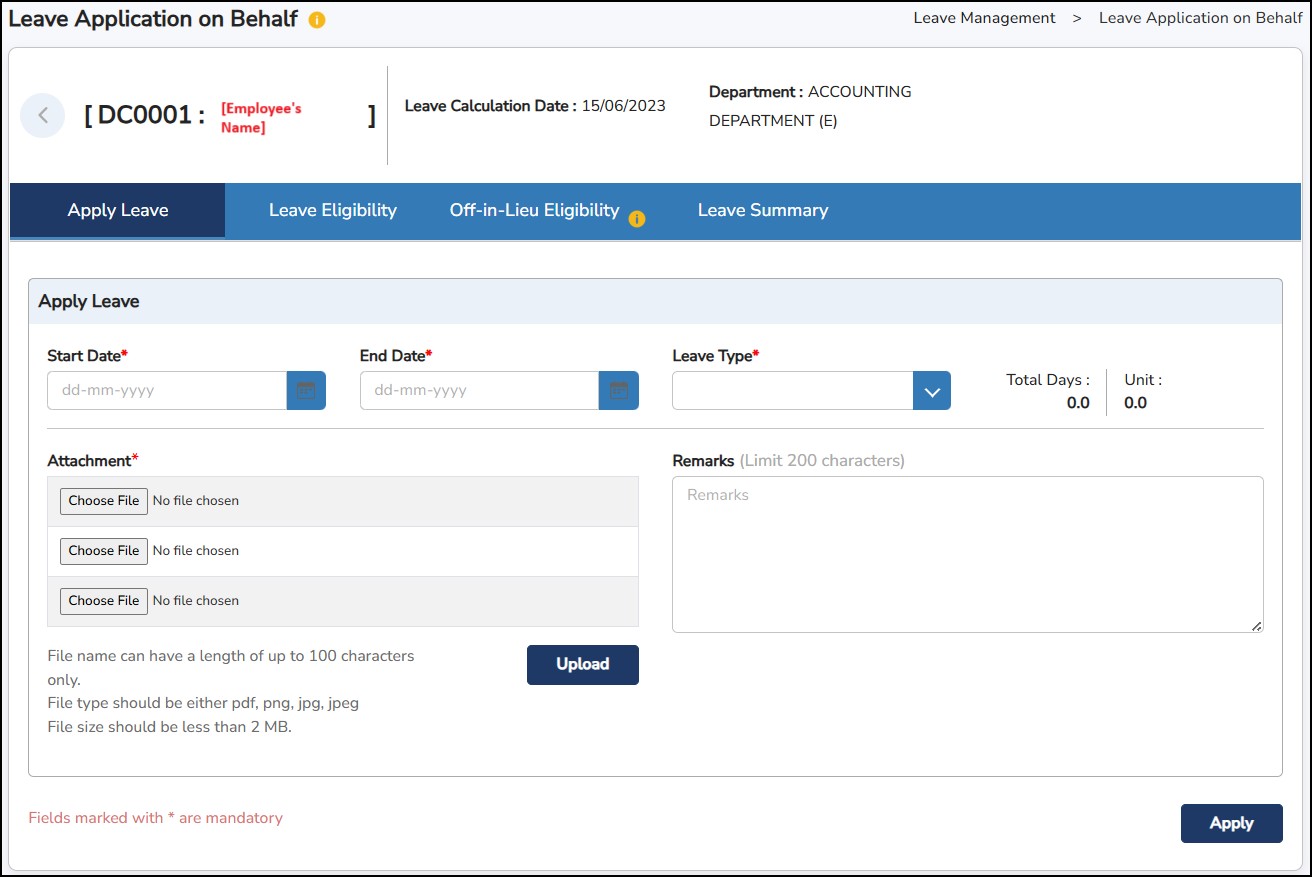
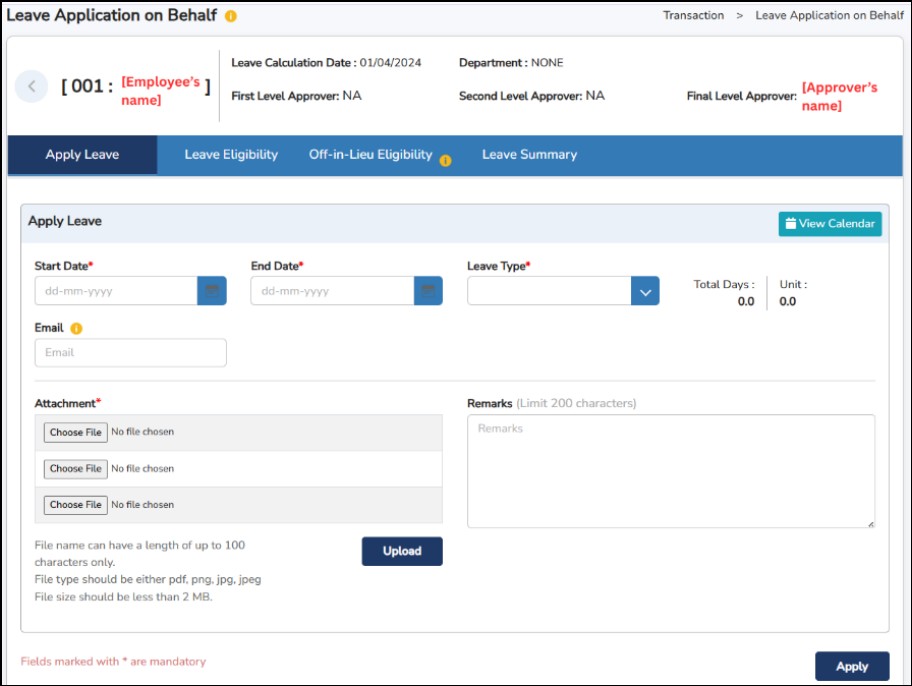
Step 3: Enter the Start and End Date of the leave > select the Leave Type > enter the Remarks
Step 4: Click on the Choose File icon to select the document that you need to attach to support the leave application. This is usually used for Medical Leave or Medical / Dental Claim application.
Step
5:
Click
![]() to
proceed with the application.
to
proceed with the application.
Step
6:
Click
on
View
Details
button
![]() to see immediately the employee’s leave
eligibility
,
earned
,
taken
and
balance:
to see immediately the employee’s leave
eligibility
,
earned
,
taken
and
balance:

To cancel leave on behalf of employees:
Step 1: Go to Transaction > Leave Apply on Behalf
Step 2: Search for an employee
Step
3:
Click
on the
Apply
Leave
button
![]() to
enter the employees leave application.
to
enter the employees leave application.
Step 4: Click Leave Summary.
Step 5: Tick the leave to cancel.
Step 6: Fill in the Cancellation Remarks.
Step 7: click
![]()
Note:
After clicking
![]() , go to Transaction > Leave Approve/Reject to approve the leave cancellation request.
, go to Transaction > Leave Approve/Reject to approve the leave cancellation request.
Leave Type – This is where you can create the different leave reasons that your employee can apply for.

Step 1: Go to Leave Management > Leave Type > Leave Type tab
Step
2: Click
![]() to create a new leave type
to create a new leave type
Step 3: Enter the Leave Type Code and Leave Type Name
Is Leave? – Select Yes/No if the employees can apply for this leave type or not.
Pay Type – Select whether the leave type is paid or unpaid (first half / second half / hourly).
Leave Group – Select where you want to deduct this leave type whenever the employee applies for it. (refer Leave Group setting)
Hide Leave Type Across All Pages – It hides the leave type from being shown.
Step
4: Click
![]() once done
once done
Leave Group – This is where the leave type is deducted from whenever the employee apply for it.

Step 1: Go to Leave Management > Leave Type > Leave Group tab
Step
2: Click
![]() to create a new leave type
to create a new leave type
Step 3: Enter the Leave Group Code and Leave Group Name
Step 4: Select application method for this Leave Group: -
Step
5: Click
![]() once done
once done
This system feature is to help you import the leave records of the employees into the Info Pay
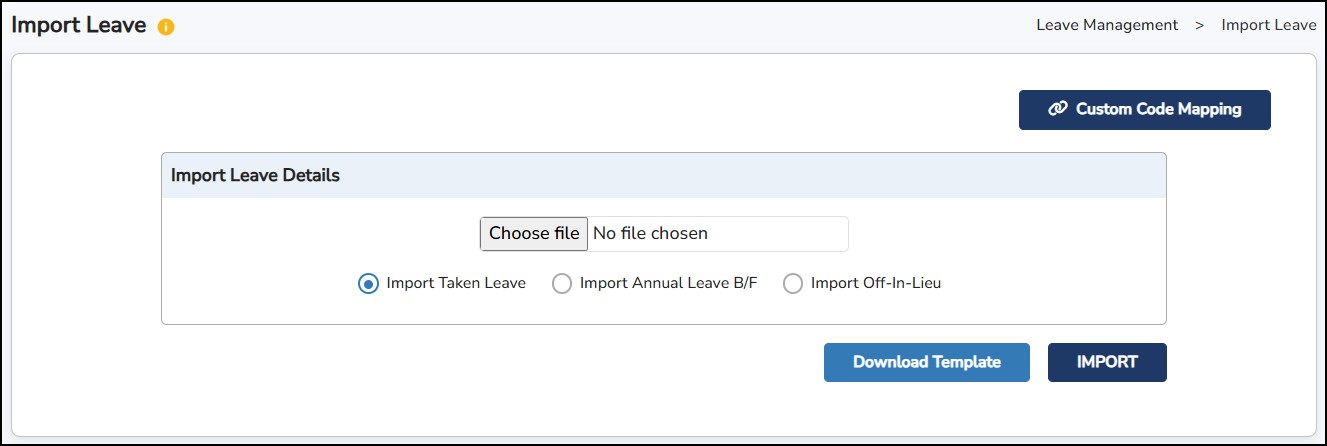
Step 1: Go to Leave Management > Import Leave
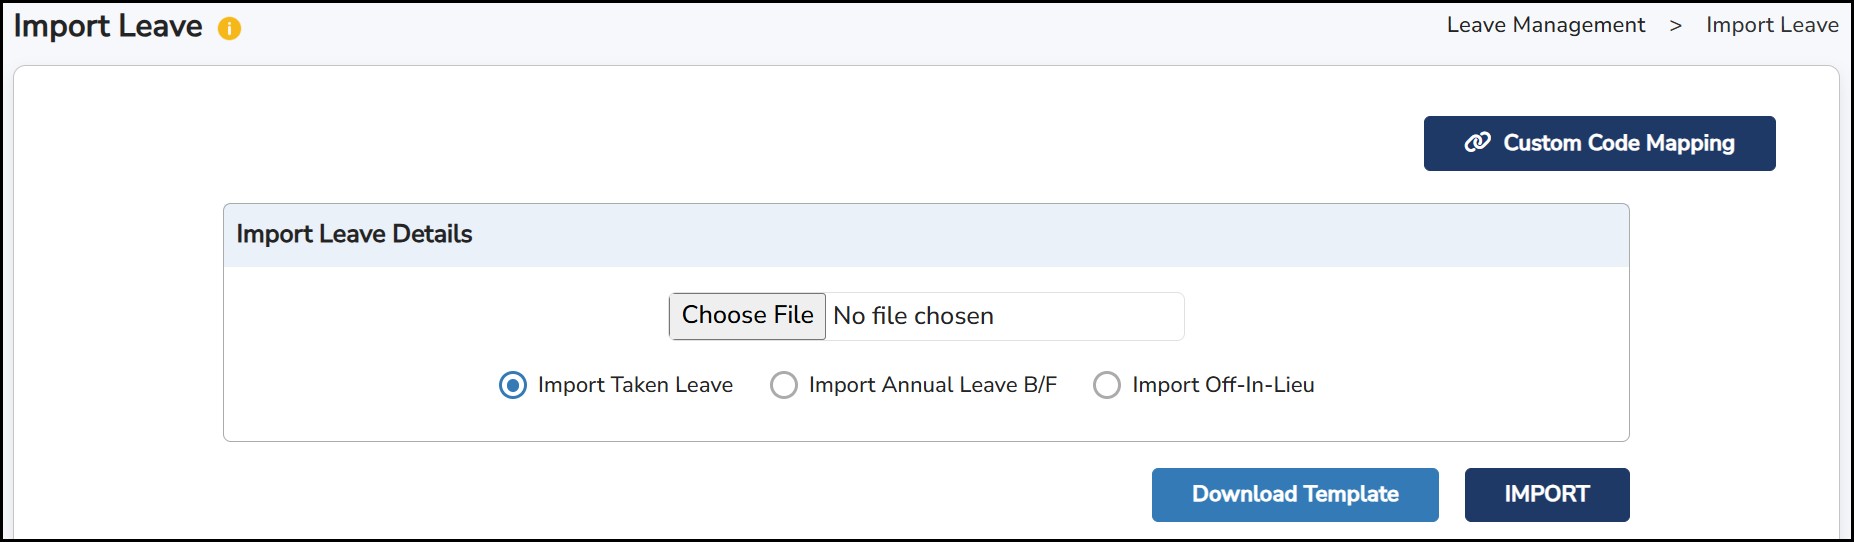
Step
2: Click
![]() > enter the leave code from your own records under
Customer
Code
> enter the leave code from your own records under
Customer
Code
Custom Code Mapping - This is to help you match the leave codes from your own records versus the leave codes from Info Pay.
Step
3: Choose which template to download, Taken Leave / Import Annual Leave BF / Import Off-In-Lieu and then click on
![]() > enter the necessary details > save the excel template
> enter the necessary details > save the excel template
Import taken Leave :
To ensure accurate display of all leave entitlements, leave taken, and remaining leave balances, you must import the leave history records.
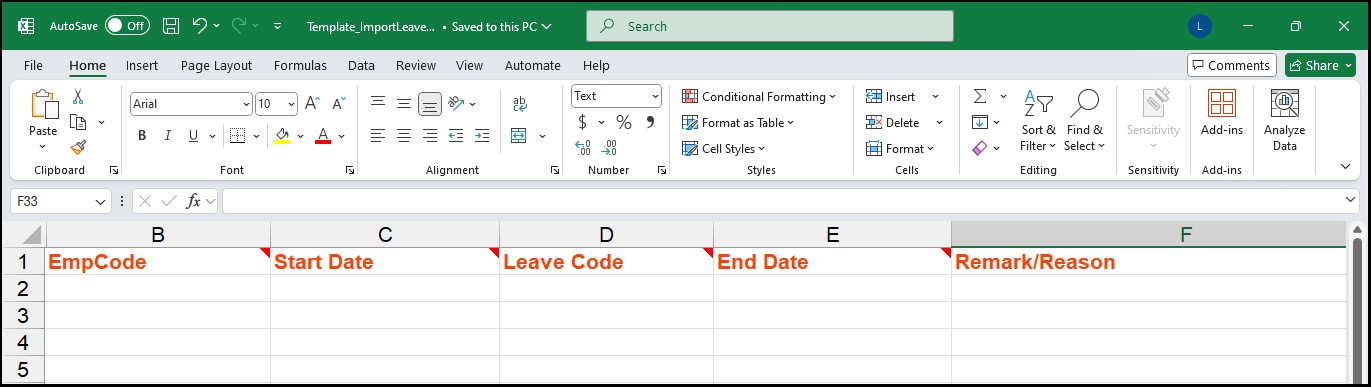
Note: When importing Paternity Leave (GPATN), the "Child Confinement Date" field is mandatory and must be filled in.
Import Annual Leave BF :
If you are a new Info-Leave user, you must import the previous year's Annual Leave balances. This ensures that the correct leave balance is carried forward and available for the current year.
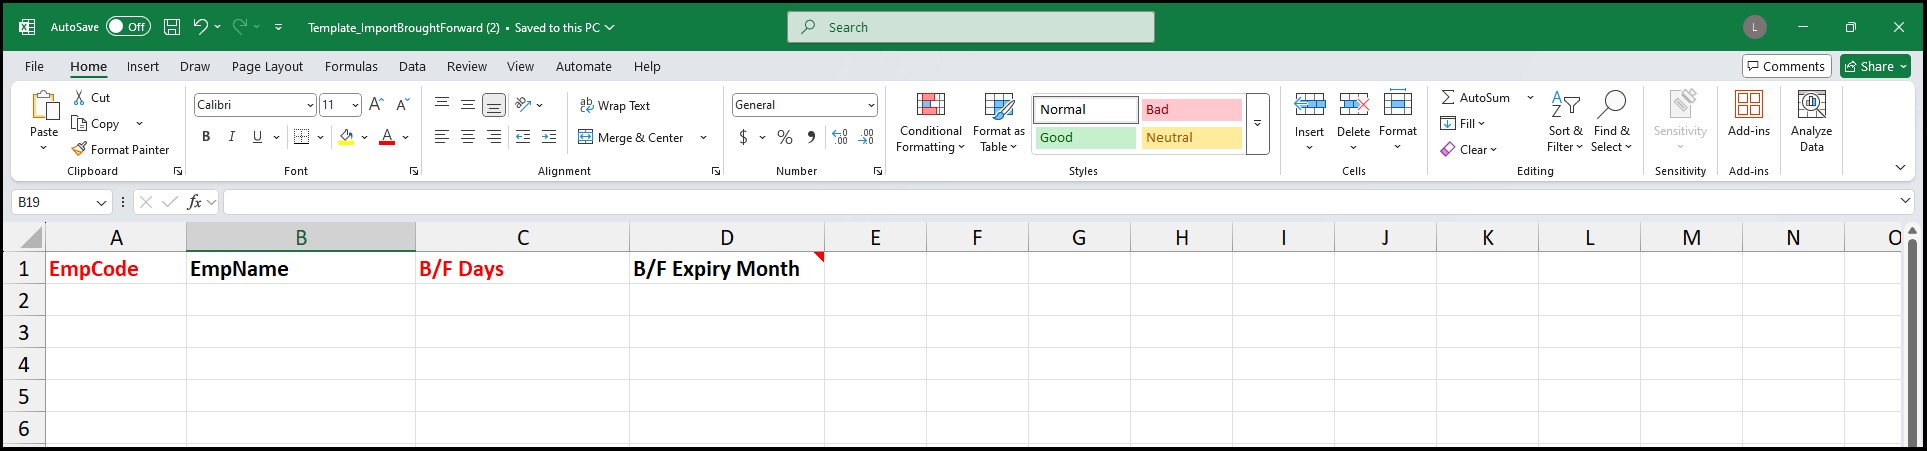
Emp Code – Employee code.
EmpName – Employee's name.
B/F Days – Number of days to be brought forward.
B/F Expiry Month – The last month for the carried forward leave to be forfeited.
Import Off-In Lieu :
This function is to import Off-In-Lieu (OIL) records for multiple employees simultaneously.
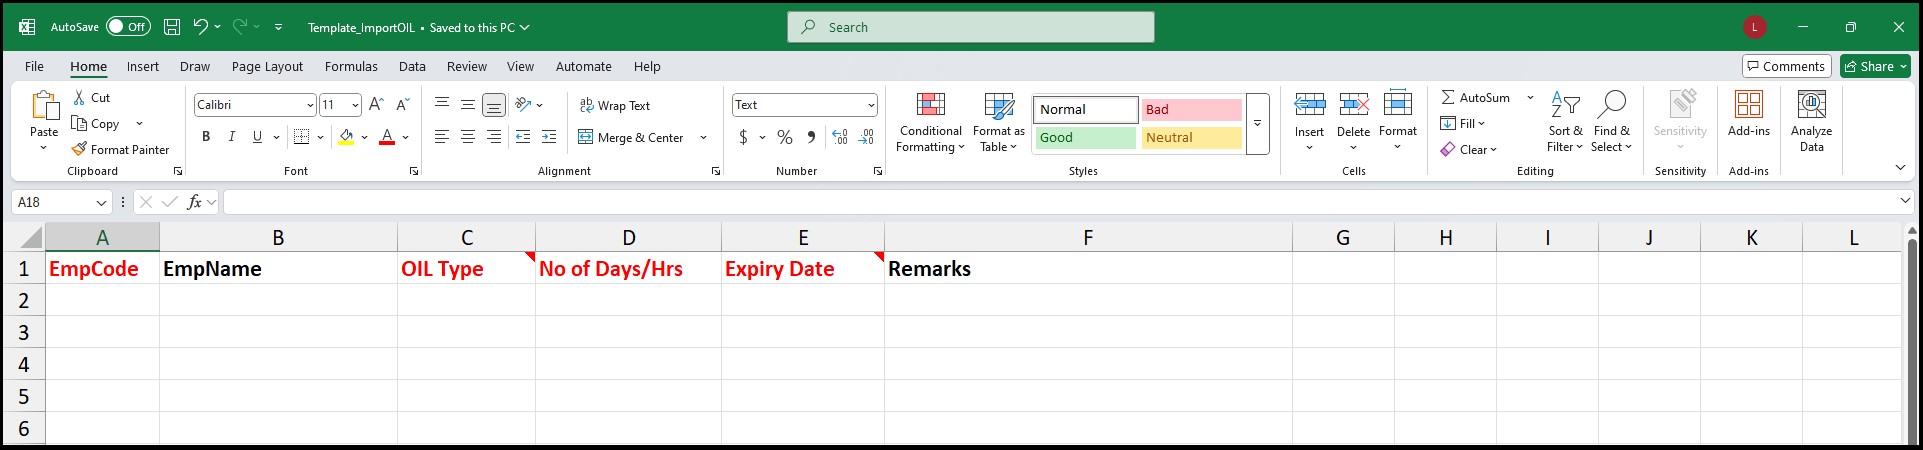
EmpCode – Employee's Code.
EmpName – Employee's Name.
OIL – Choose type of OIL to be given, Hourly or Daily.
No of Days/Hrs – Number of days or hours to be given.
Expiry Date – Last date for the employees to apply for leave.
Remarks – To enter any remarks when applying for leave.
Step 4: Click on the Choose File to select the excel template from Step 3
Step
5:
Ensure to select the correct file to upload. Example: to import Taken Leave, once the file is chosen,
click on the "Import Taken Leave" before clicking on the
![]() button for the details to be imported into the system.
button for the details to be imported into the system.
Step 6: Click
![]() button to import the excel template.
button to import the excel template.
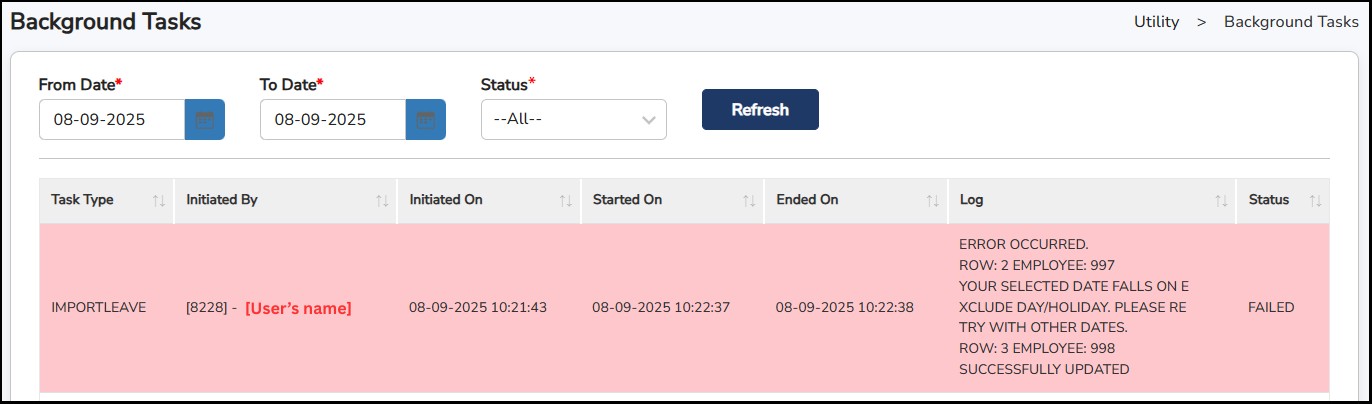
Note : The Status section will display whether the file has been uploaded successfully or not.
Step 7: To verify that the uploaded details have been successfully imported, go to Administration > Background Tasks. Here you can monitor the progress and status of the imported file.
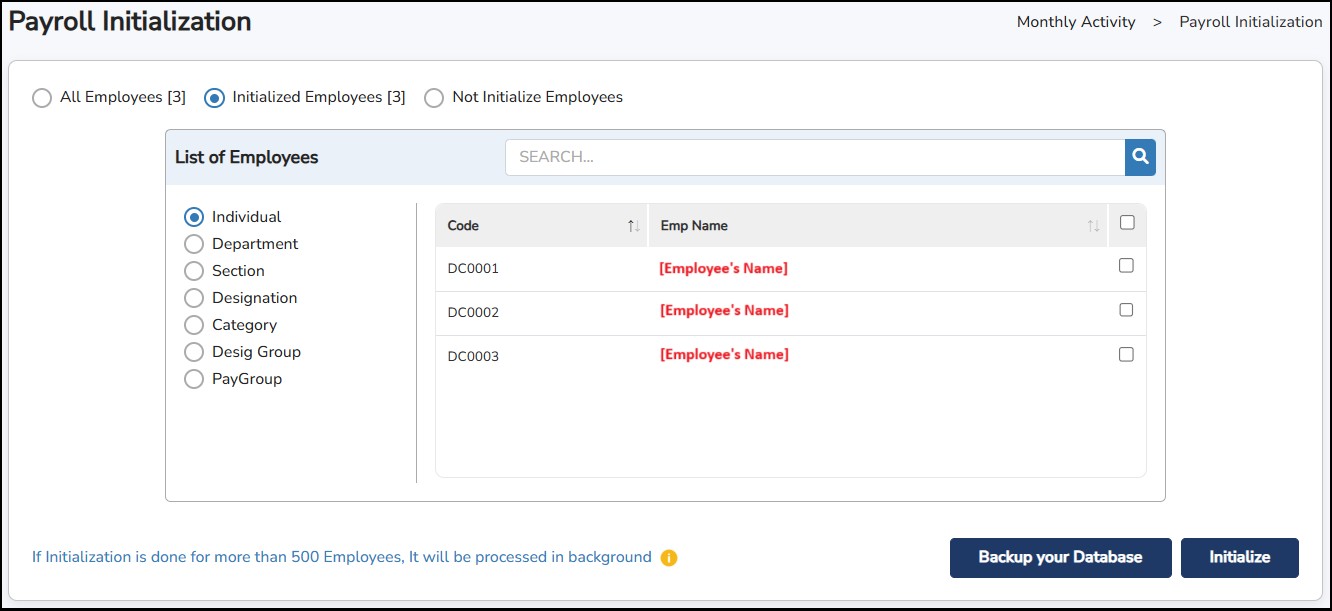
Payroll Initialization is a required step to begin the payroll process. It collects all necessary employee salary-related details before salary disbursement.
Step 1: Go to Monthly Activity > Payroll Initialize .
Step 2: Select the employee(s) or group that you need to initialize.
Step 3: Click
![]() to initialize.
to initialize.
This function is to capture the attendance of the employee for the selected month, which includes absence, lateness, under time, overtime and other attendance-based allowances.
Step 1 : Go to Monthly Activity > Link Attendance Data
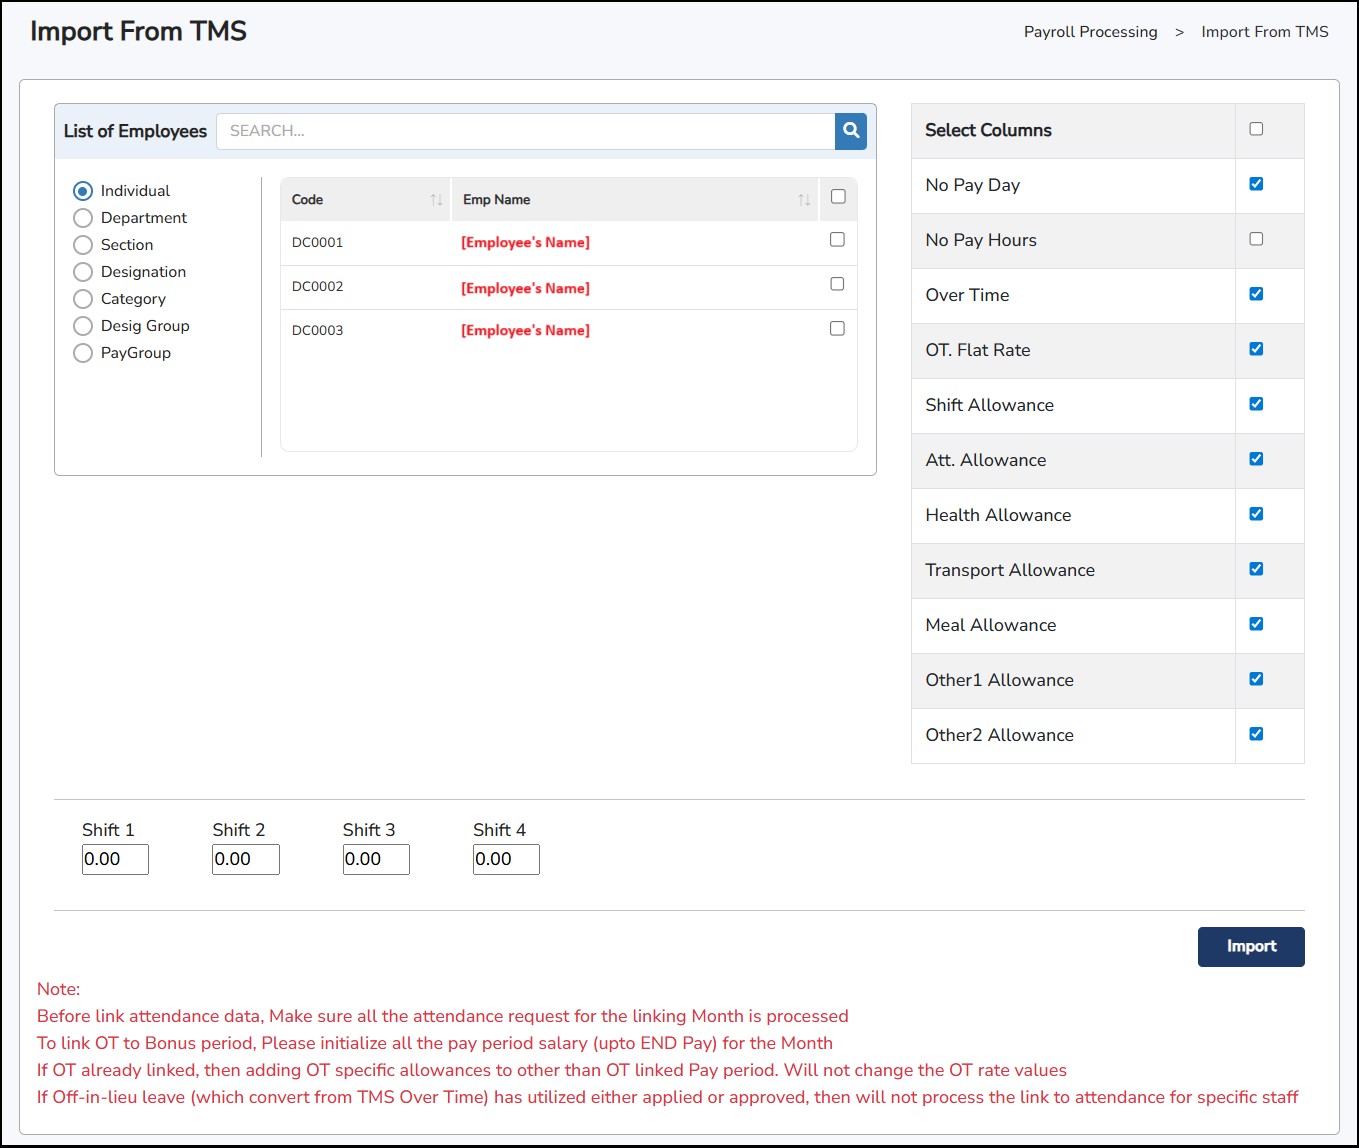
Step 2: Under List of Employees , select the employee(s) or group of employees.
Step 3: Choose Payment/Deduction Columns: This section allows you to select the relevant data points that will be used for calculating salaries or deductions:
No Pay Day (Unpaid Leaves and Absences) – Choose this column to inform the system about days when employees were not entitled to pay.
No Pay Hour (Lateness and Undertime) – Select this to deduct non-paid hours due to lateness or undertime from the total hours worked.
Over Time (OT) – Select this column if you want the system to consider overtime hours for the selected employees.
OT Flat Rate – Choose this if you want to apply a fixed rate for overtime pay calculations.
Step 4: If there is any daily attendance-based allowance being created in the Time Attendance Software (Info-TMS > Allowance Settings), you may put in the allowance amount in the Shift 1, Shift 2, Shift 3 and Shift 4 column.
**Note : No mandatory to put the amount in sequence as the system will detect it based on the amount insert.
Step
5: Click on
![]() once confirmed.
once confirmed.
This function is to capture the claims of the employee that have been completely approved based on the Claim Date Range that has been set in the Claim Software (Info-Claim). This claim will be paid together with the salary and appear on the payslip.
**Note : This feature is only applicable if you have the Claim Software (Info-Claim).

Step 1: Go to Monthly Activity > Link E-Claim Data.
Step 2: Select the claims to be linked by tick on the check box at the last column.
1. Not Linked Claims
Displays claims that have been submitted by the employee and approved by the approvers.
Once linked, the claim will automatically move to the Linked Claims section.
2. Linked Claims
Displays all claims that have already been linked to Info-Pay.
These claims are now ready to be processed together with payroll.
3. Unmapped Claims
Displays claims that have been approved but were not linked to Info-Pay.
Step
3: Click on
![]() once confirmed.
once confirmed.
**Note : The Import Status column will show if the claim has been successfully imported or failed.
**Note : Please select End Pay Period to link the approved claims.
This feature is where the user can make necessary adjustments (one-by-one) in the processed/initialized payroll for each employee.
Step 1: Go to Monthly Activity , then select Salary Adjustment .
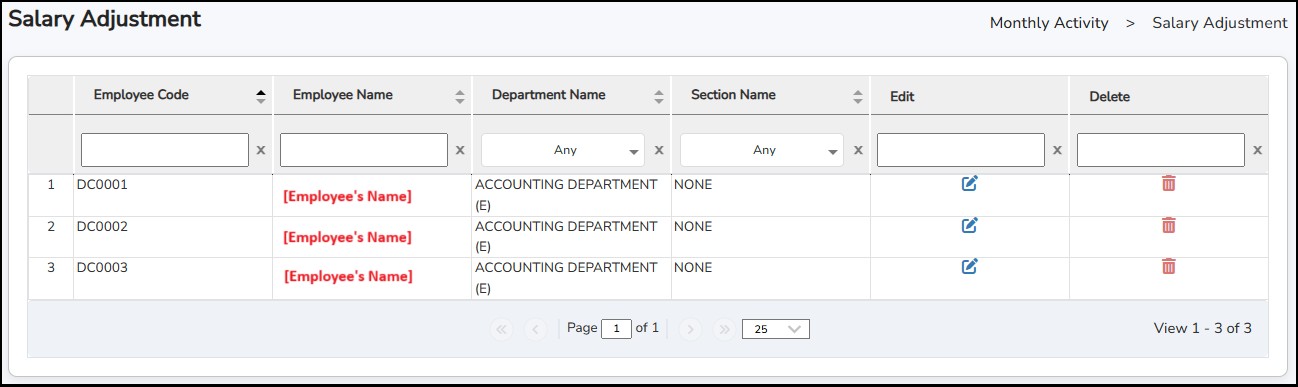
Step
2: Click
![]() to modify employee’s salary for the month, click
to modify employee’s salary for the month, click
![]() to delete the initialized payroll for the month.
to delete the initialized payroll for the month.
Click
![]() to lock or secure the salary information of the employee after adjustments have been made. Click
to lock or secure the salary information of the employee after adjustments have been made. Click
![]() to unlock salary information of the employee and be able to make the necessary adjustments.
to unlock salary information of the employee and be able to make the necessary adjustments.
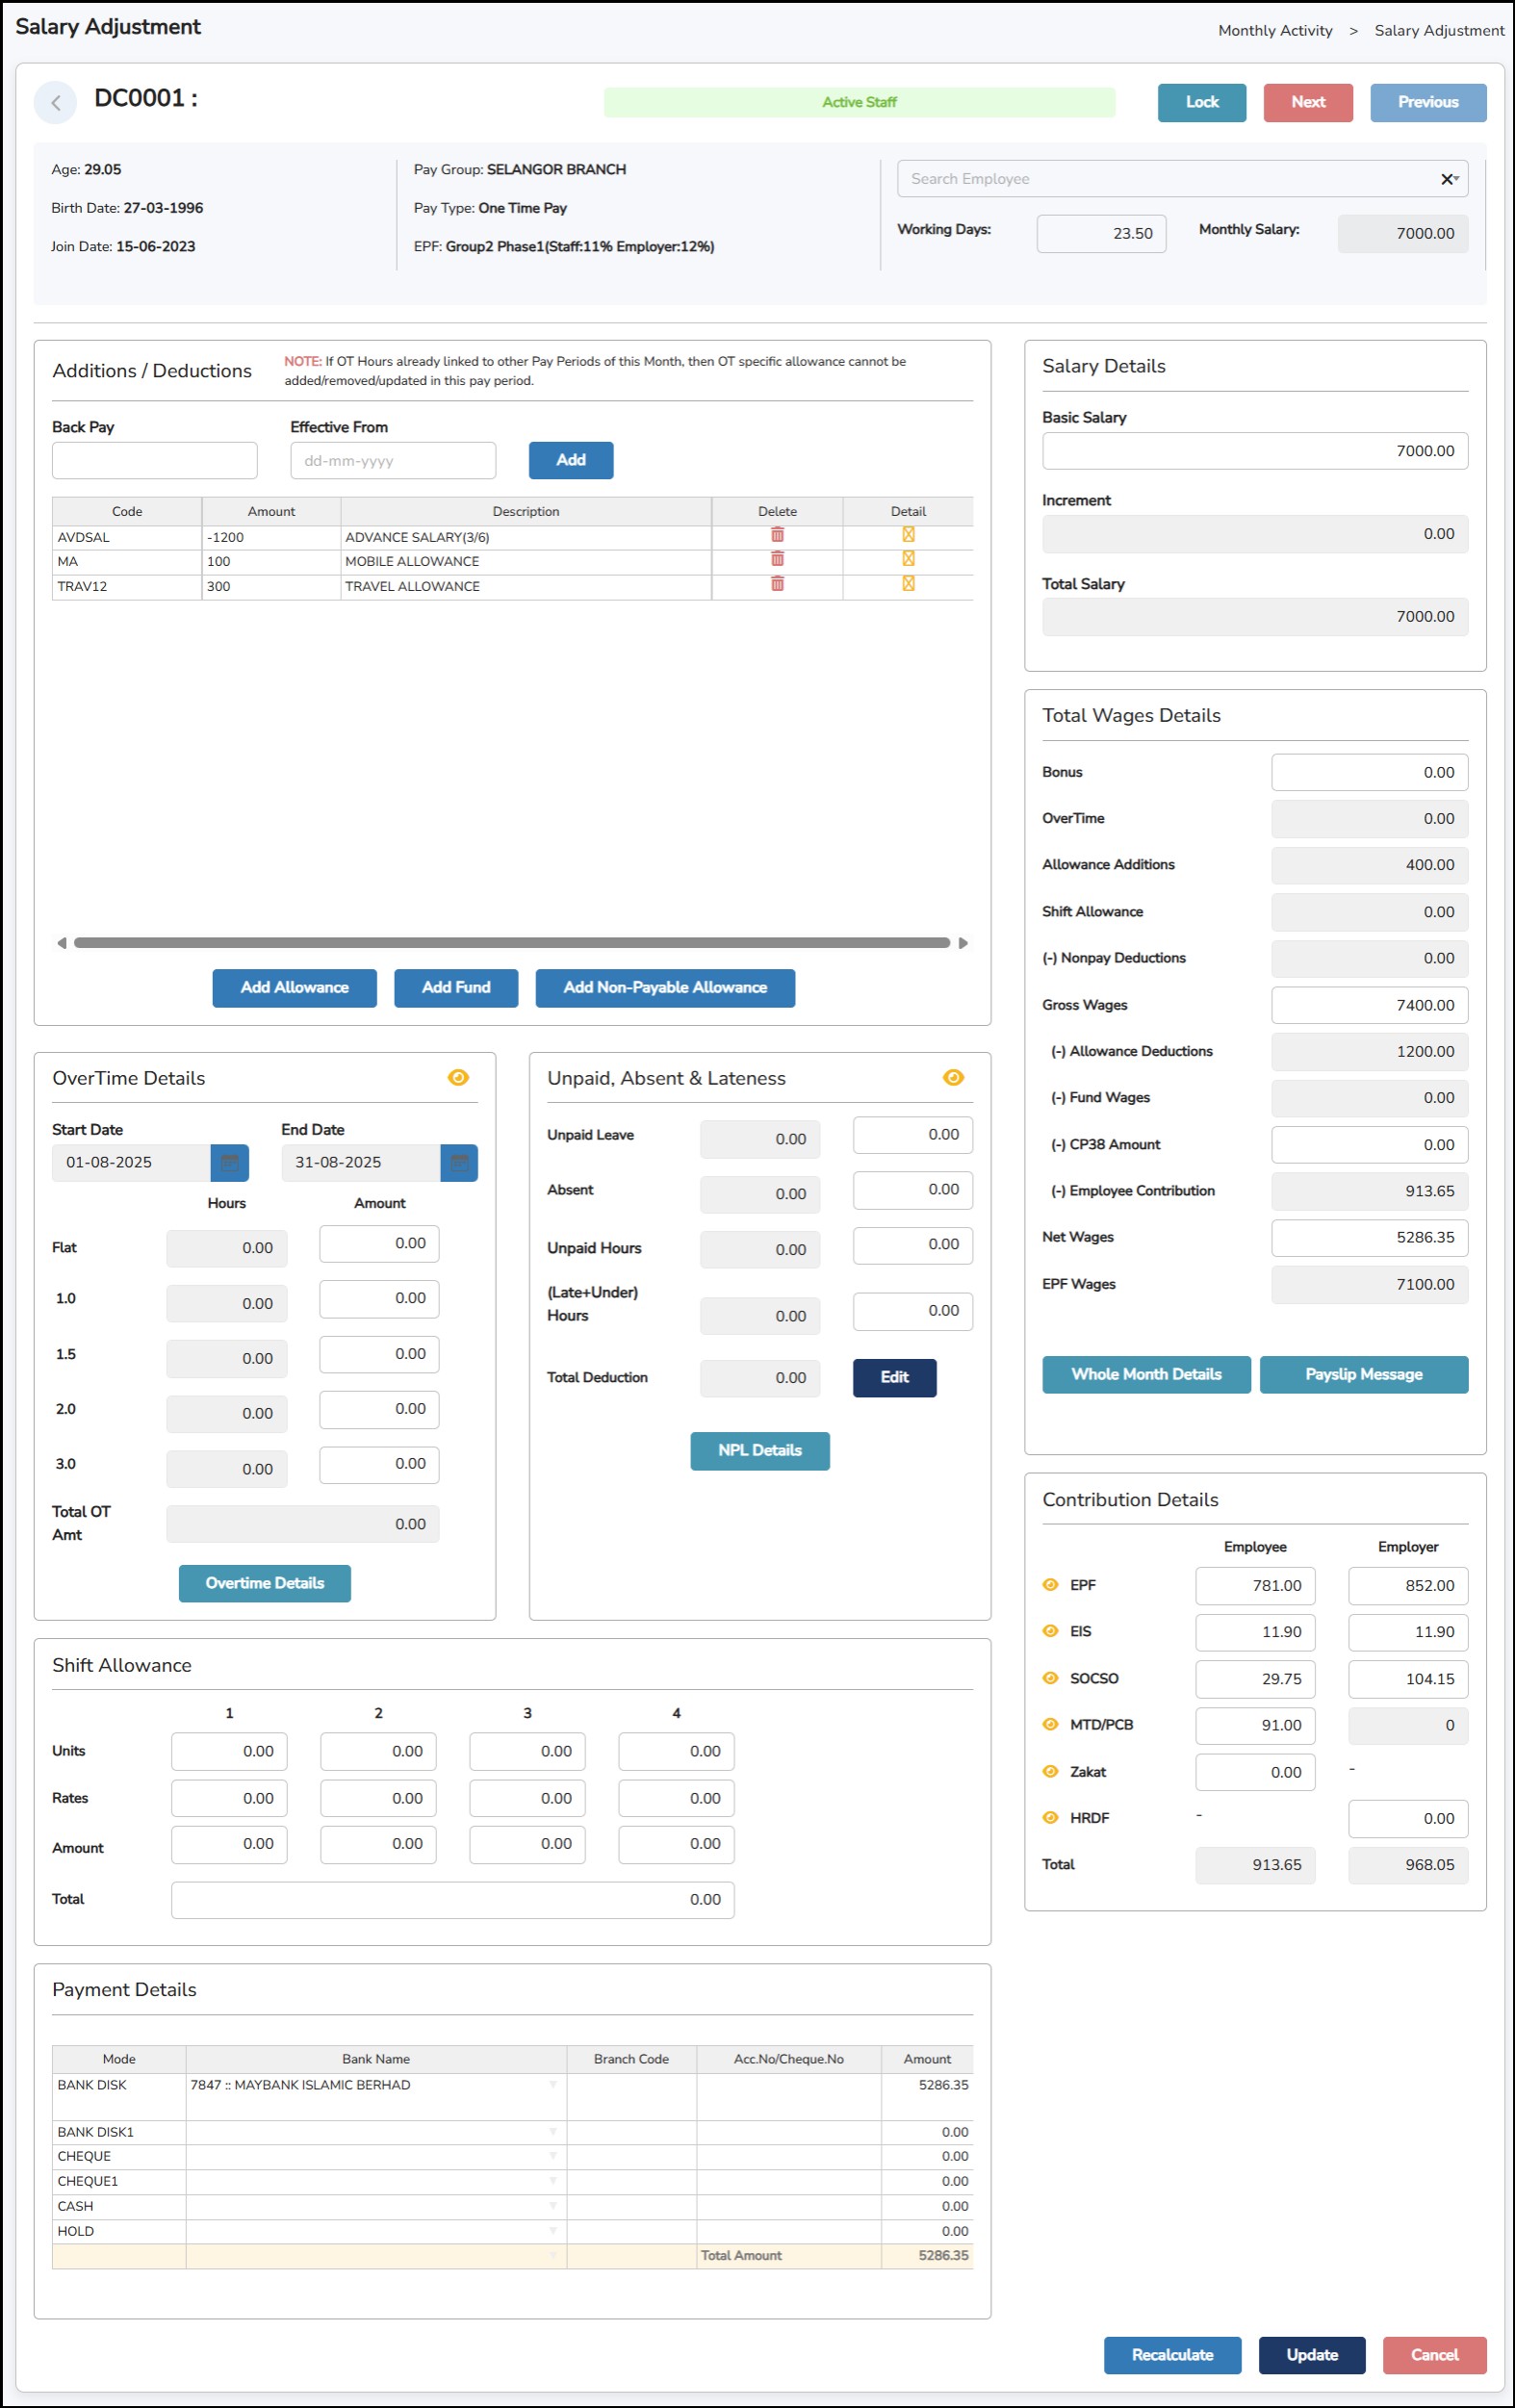
This is where user can add allowances, deductions, fund and/or non-payable allowances for the specific period only. The load applied under Human Resource (Loan & Withhold) section will also be displayed on this section as a deduction.
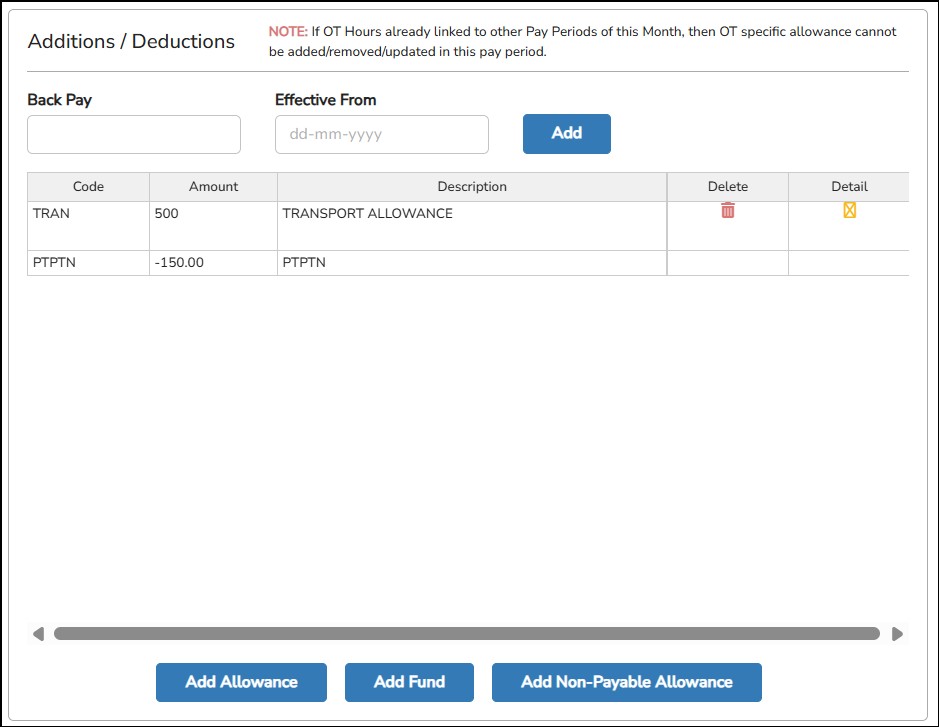
Back Pay – To enter the backdated payment.
The system will automatically calculate the back pay amount based on the effective date entered and prorate it according to working days.
Formula of Back Pay is:
(Back Pay = Monthly Adjustment Amount / Total Working Days in Month × No. of Working Days from Effective Date)
Effective From – The date when the backdated payment should start.
Click
![]() to add an allowance or deduction for the month.
to add an allowance or deduction for the month.
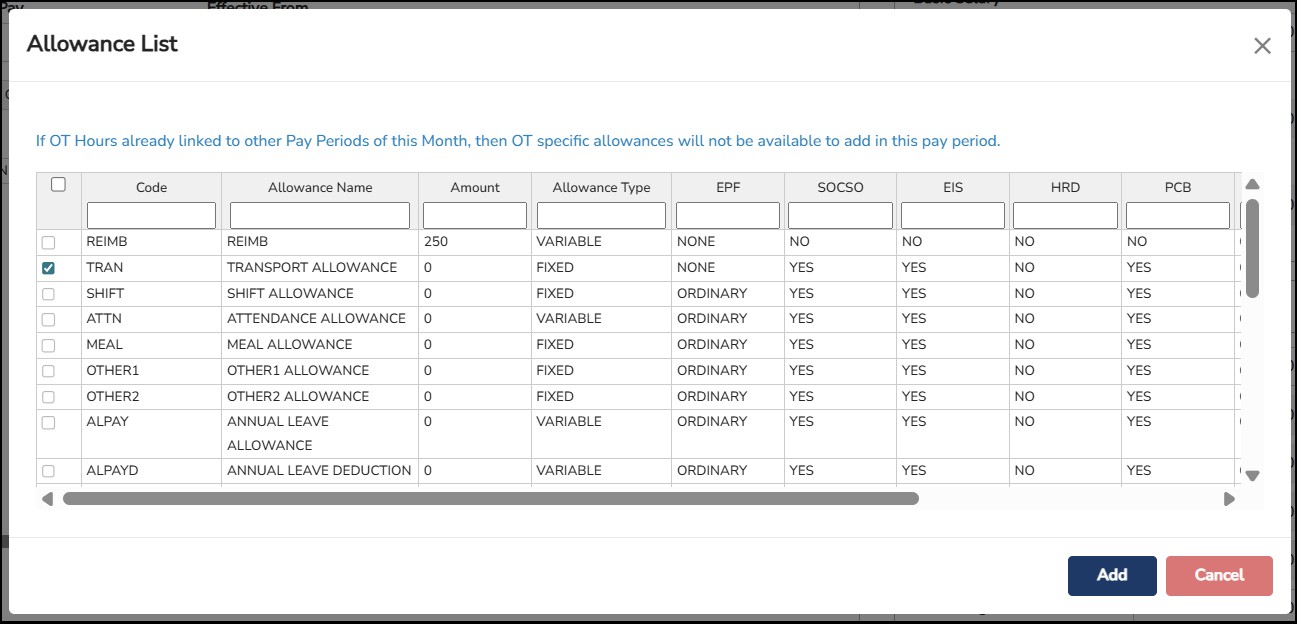
Tick on the allowance > Click.
![]()
Enter the allowance amount under the Amount column. To delete the added allowance, click
![]() under the Delete column. The hover on the
under the Delete column. The hover on the
![]() icon under Details column will show how the allowance details have been set under Master > Allowances Setup.
icon under Details column will show how the allowance details have been set under Master > Allowances Setup.
**Note
:
The same procedure is to be done to
![]() and
and
![]()
The Start Date and End Date are based on the Overtime / Allowances and Lateness Period configured in the 1.2.3 Pay Day Group assigned to the employee.
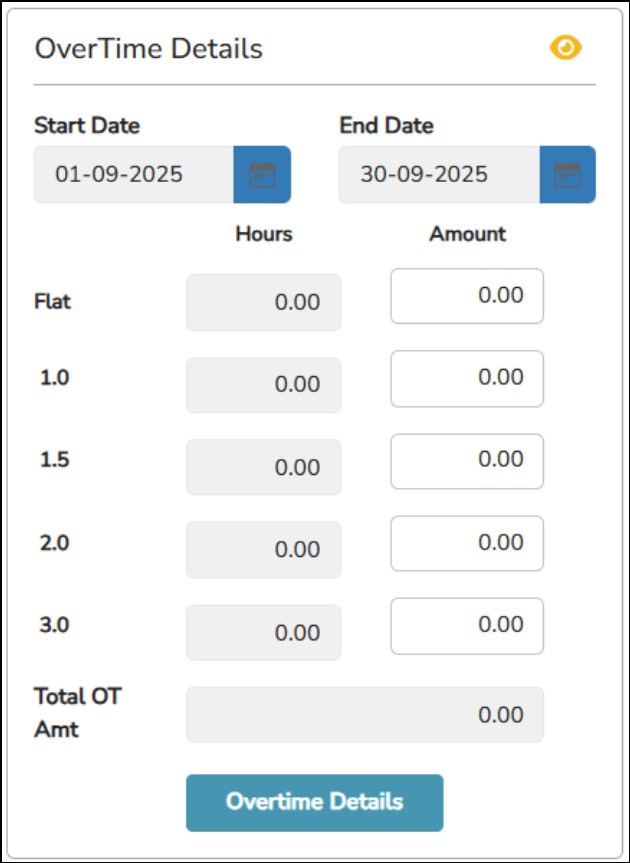
The
number of Overtime hours will be auto populated if
Link
Attendance Data
has been performed. You may also add it manually by click on the
![]() button.
button.
**Note : To Link Attendance Data, you must have Time Attendance Software (Info-TMS) and the Overtime hours will be filled up based on the shift settings and attendance of the employee.
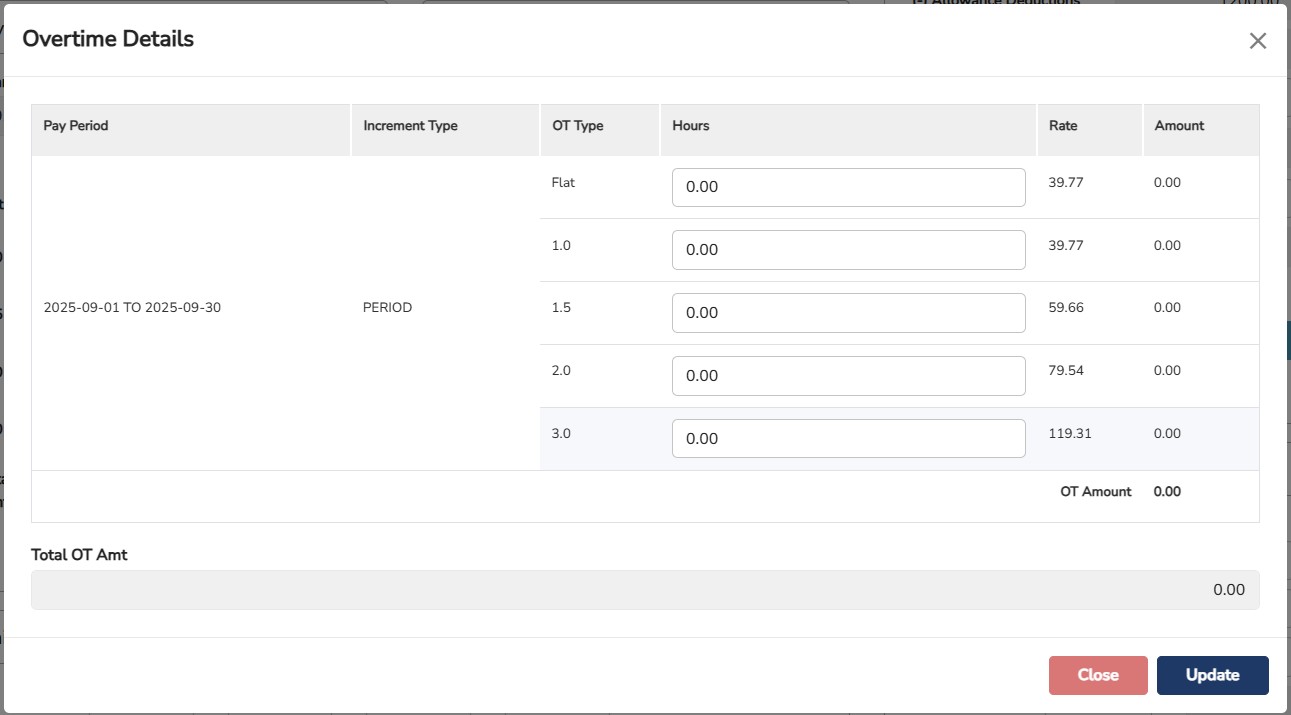
Enter the Overtime hours in the Hours column based on the Pay Period stated (if there is any Increment). The Amount will be calculated automatically based on the Rate that has been set.
**Note : The calculation of the Rate can be defined in the Salary Calculation under Admin Setting > System Setting.
This section is where the user can view the Basic Salary information, Increment (if any. Can update in the Master > Employee Basic Details before initializing the payroll) and the Total Salary for the specific period of the employee

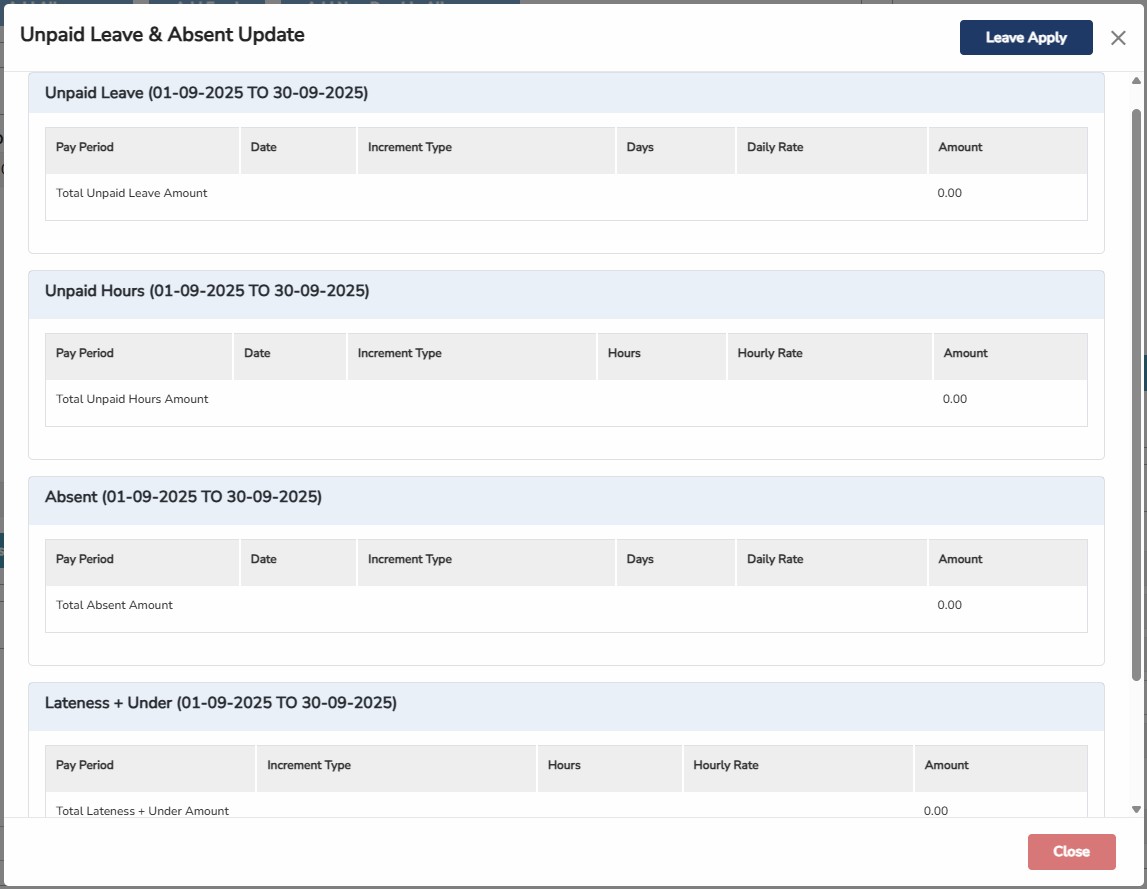
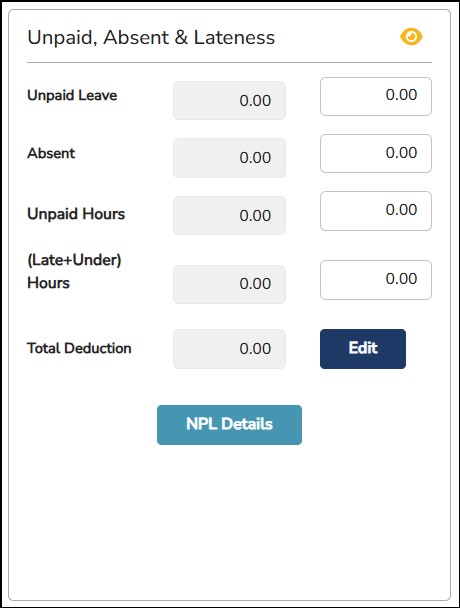
This section displays the total unpaid leave / absences and lateness for the specific period.
The system will auto-sync the Unpaid Leave taken from Leave Software (Info-Leave) and the Absent from the Time Attendance Software (if Link Attendance Data has been done).

You
can add the Unpaid Leave manually by click on the
![]() .
.
Click
on the
![]()
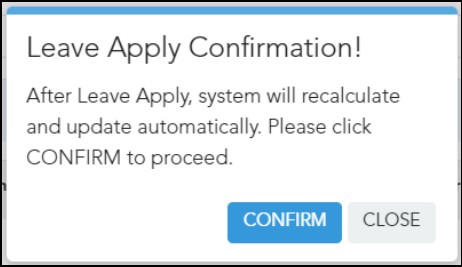
Click
![]() to proceed.
to proceed.

Select
the Start Date, End Date and the Leave Type accordingly > Click
![]()
Click
![]() to exit the pop-up.
to exit the pop-up.
Alternately,
you can click on the
![]() button to manually update the Unpaid Leave, Unpaid Hours & Absent
by entering the number of days.
button to manually update the Unpaid Leave, Unpaid Hours & Absent
by entering the number of days.

Above
screen will be prompted, then you can enter number of days
accordingly on the first column, then click
![]() .
.
This section will display the shift allowances linked and calculated from the Time Attendance Software (Info-TMS) via Link Attendance Data step.

You may also manually put in the no. of days for this employee entitled for the allowance in the Units column.
This section will display the Statutory Contributions of the employee’s salary for both amounts to be deducted from employee’s salary and employer have to contribute.

You
may click on the
![]() next to each contribution to see the breakdown of how it’s
being calculated.
next to each contribution to see the breakdown of how it’s
being calculated.
This section will show the total wages that the employee is entitled to.

This section will show you the final amount of salary to be paid to the employee and the mode of the payment.
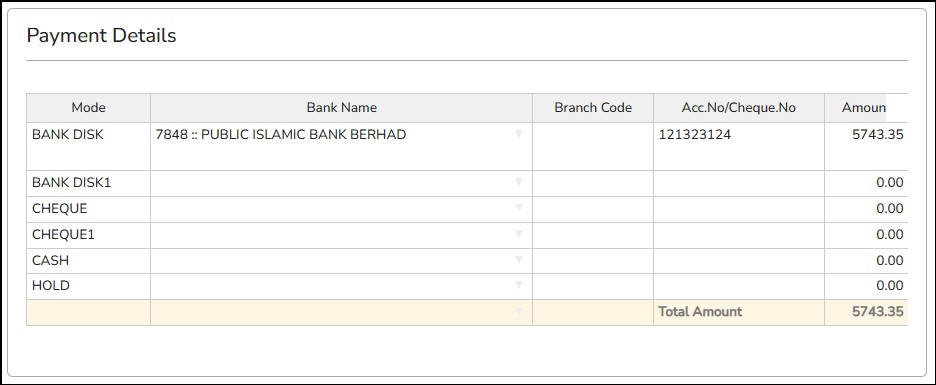
This section also allows you to modify the current payment mode or split the Nett Wages into another different payment mode / Bank.
**Note : If the payment will be splitting, the Total Amount must be equal to the Nett Wages under Total Wages Details.
Step 3: Verify the amounts.
Step 4: Once done, if any changes are made, click
![]() and then click
and then click
![]()
Click
![]() to calculate the newly added allowance that has been entered into the Total Wages Details.
to calculate the newly added allowance that has been entered into the Total Wages Details.
Click
![]() to save the salary information.
to save the salary information.
This feature will help you to import the salary information (basic salary, increment, allowances, deductions) for the month or period.
Step 1: Go to Monthly Activity > Payroll Excel Import
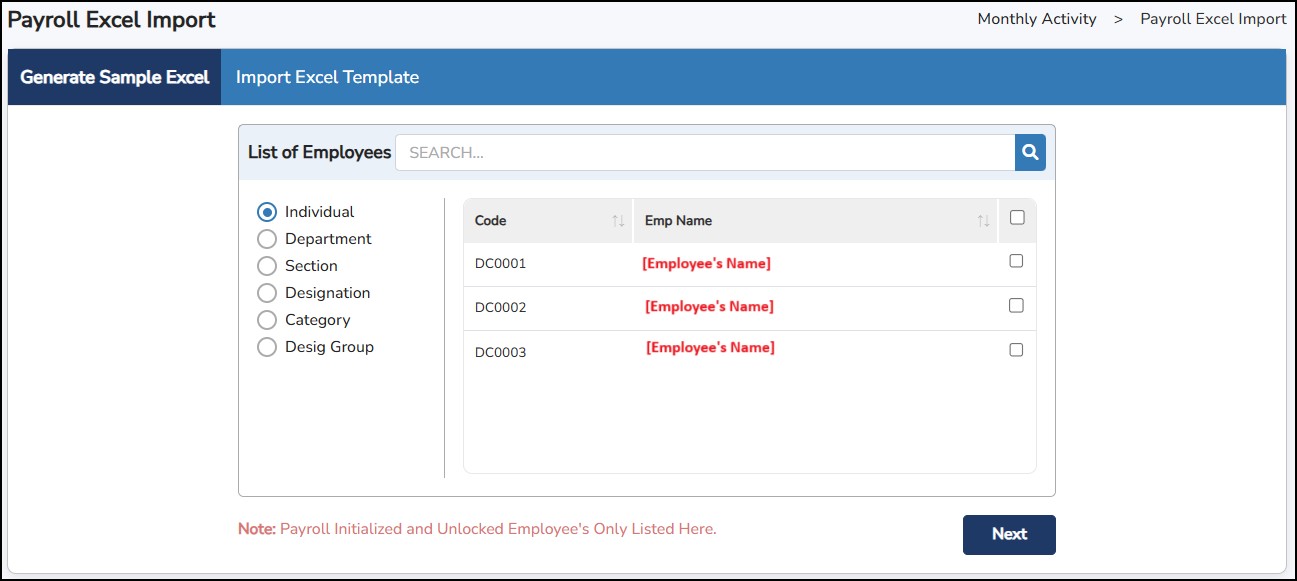
Step
2: Under
Generate
Sample Excel file tab
– Select the employees > Click
![]()

Step
3: Select the payroll items that you would need to export into the
excel file > Click
![]()
Step 5: Open the excel file and enter the necessary amount needed for each employee and payroll item.

Step 6: Save the excel file.
**Note : If the allowance is not applicable to an employee, leave the column blank.
Step 7: Go back to Monthly Activity > Payroll Excel Import > Import Excel Template tab.

Step
8: Click on
![]() and locate the excel file you have generated > updated > saved.
and locate the excel file you have generated > updated > saved.
Step 9: Select whether to Append Allowance (add to existing allowance in Salary Adjustment) or Override Allowance (overwrite the existing allowance amount).
Step
10: Click on
![]() to upload the payroll items into the employee’s salary for the
month and period.
to upload the payroll items into the employee’s salary for the
month and period.
Step 11: Check the Status box where it will indicate whether the file has been successfully uploaded or has encountered an error on which employee.
This feature will help secure payroll transactions processed for the month and period.
Step 1: Go to Monthly Activity > Lock / Unlock Payroll Record .
Step 2: Tick on which employee to lock or unlock.
Step
3: Click on
![]() or
or
![]() button.
button.
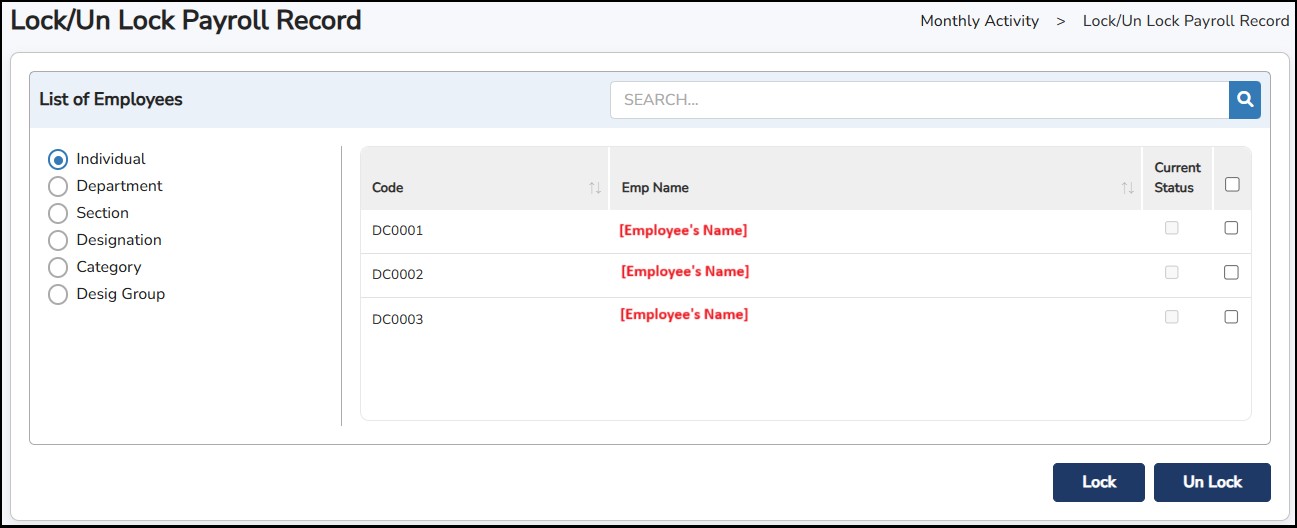
Step 4: You may refer to the Current Status column where it will indicate if the check box is ticked, the employee’s payroll record for the month is Locked . Unticked if it is Unlocked.
The system provides three methods to generate and share payslips with employees:
Use this option to view payslips in printable format.
Payslips can be printed directly or saved into the system for record purposes.
Send the payslip directly to the employee's registered email address.
Ensure the email address is correctly entered under Employee Basic Details.
Uploads the payslip to the employee's Cloud Portal and Mobile App.
Employees can log in to view or download their payslip securely.
Step 1: Go to Monthly Activity > Payslip Generation
Step 2: Choose the ways to generate the payslip.
Payslip Printable Format
E-mail Payslip
Publish Payslip
Step 3: Select the items you want display or hide in the payslip.

Step 4: Select the paper size: -
![]()
Step
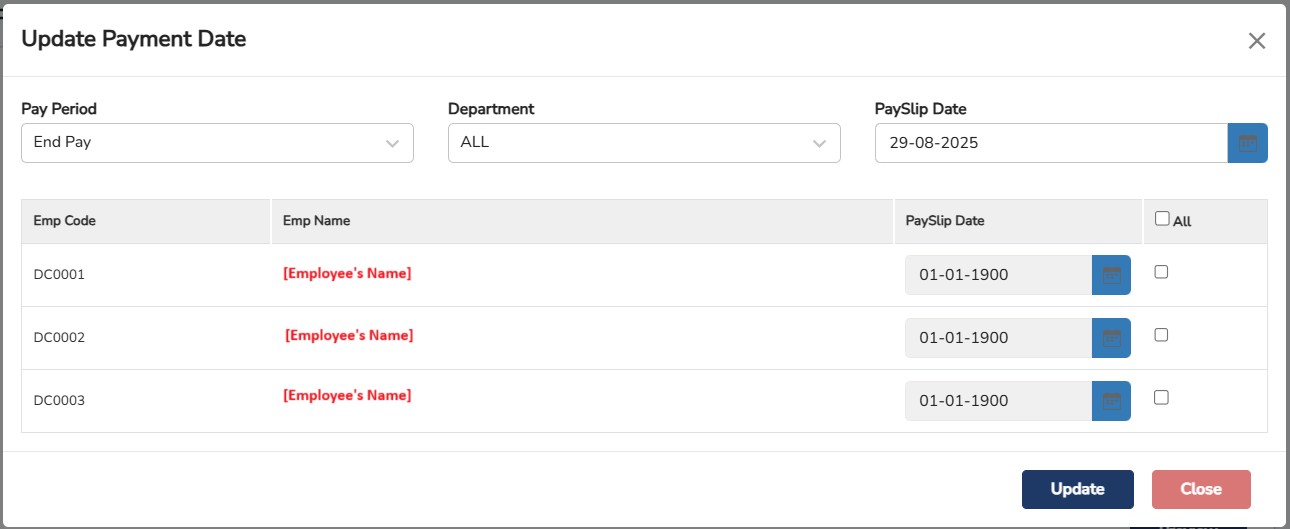
5: Click on
![]() to update the payment date that will be printed in the pay slip. This
is the date that the salary is given to the employee.
to update the payment date that will be printed in the pay slip. This
is the date that the salary is given to the employee.
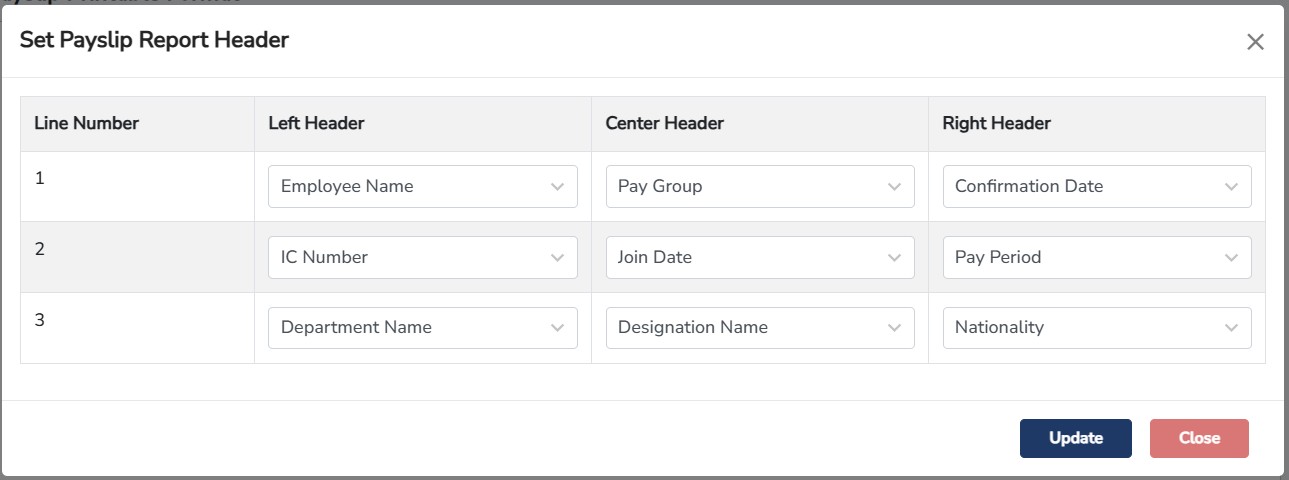
Step 6: Click
![]() to customize the header by selecting the dropdown selections for each Header: Left, Center and Right. Once done, click
to customize the header by selecting the dropdown selections for each Header: Left, Center and Right. Once done, click
![]()
If Payslip Printable Format is selected:
Step 7: Once confirmed, click
![]()
**Note: Payslip Printable Format allows you to view the payslip before printing, emailing or publishing to the employees. It allows users to review before proceeding to the next step.
If Email Payslip is selected:
Click
![]() for employees to receive the payslips in their email. The system will send to the email that you have entered in Employee Basic Details.
for employees to receive the payslips in their email. The system will send to the email that you have entered in Employee Basic Details.
If Publish Payslip is selected:
Click
![]() to publish the payslip to an employee's mobile app and portal.
to publish the payslip to an employee's mobile app and portal.
Click
![]() to remove or to undo the publish payslip process.
to remove or to undo the publish payslip process.
This is where you can verify the status for Unpaid Leave / Unpaid Hours are linked to payroll or not linked to payroll.
Step 1: Go to Monthly Activity > Unpaid Leave/Hour Linked to Payroll.

Once Unpaid Leave / Unpaid Hour Leave applied before Payroll Initialize for the employee it will be shown as “Not Linked Unpaid Leave / Hour” screen. After Payroll Initialize for the Employee, it will move into the “Linked Unpaid Leave / Hour” screen.
This is where you can generate the file that will be uploaded to the company’s bank website for GIRO processing.
Step 1: Go to Monthly Activity > Bank Submission .
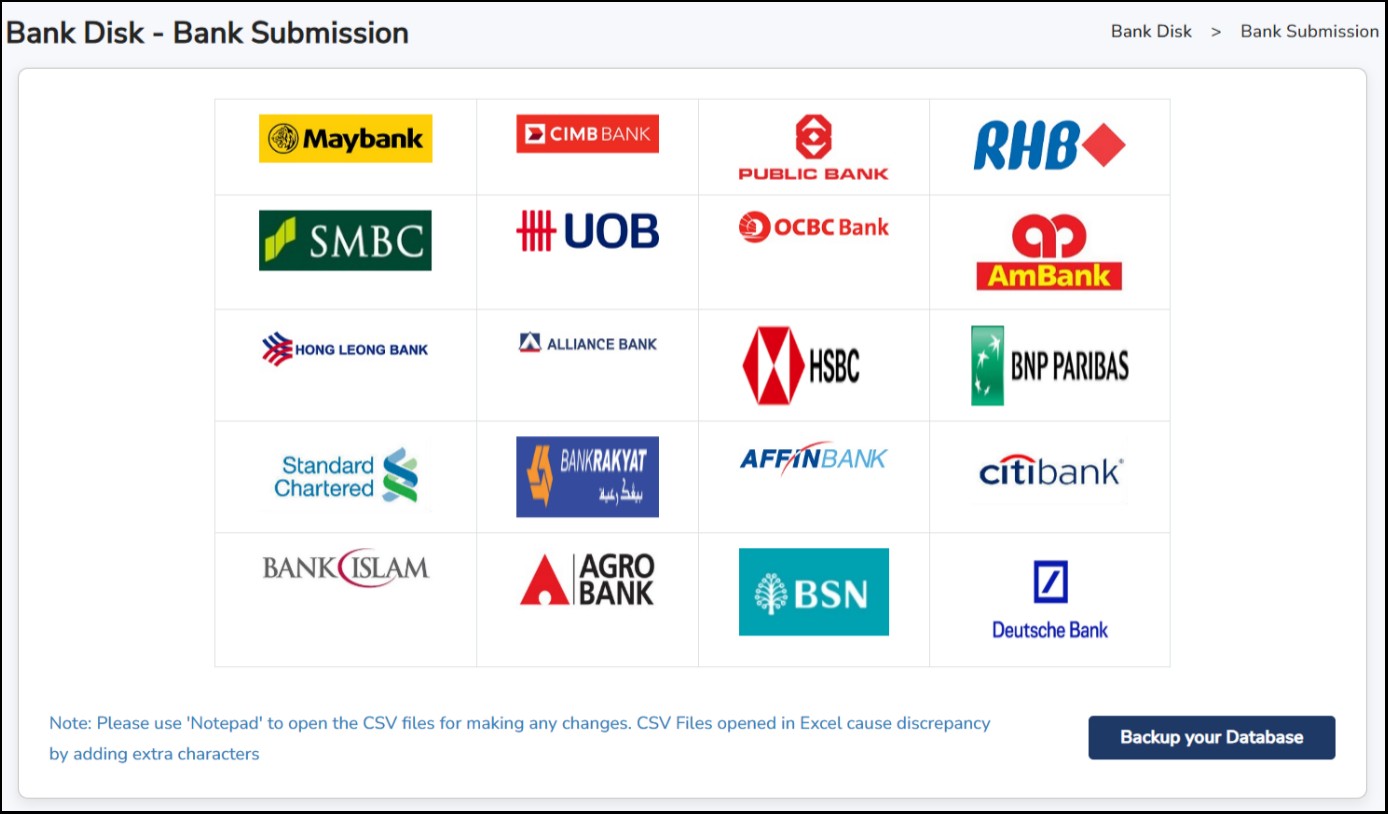
Step 2: Select your company’s bank by clicking on the bank logo to which bank the file will be generated by.
Step 3: Enter the necessary company details that is needed by the bank.
Step 4: Select the employee(s)
Step 5: Select the format of the file to be generated (i.e., Salary)
**Note : For some banks, you may generate out the statutory submission files as well to be uploaded to the bank website. Otherwise, you may generate it separately from the Government Submission steps.
Step
6: Click
![]() to view the report format and verify or review the bank submission
information.
to view the report format and verify or review the bank submission
information.
Step
7: Click
![]() to generate out the file.
to generate out the file.
Step 8: Login to the bank website and upload the exported file.
**Note : Kindly contact your bank to know how to do Bank GIRO in the internet banking website after generating the necessary file from Payroll Software (Info-Pay).
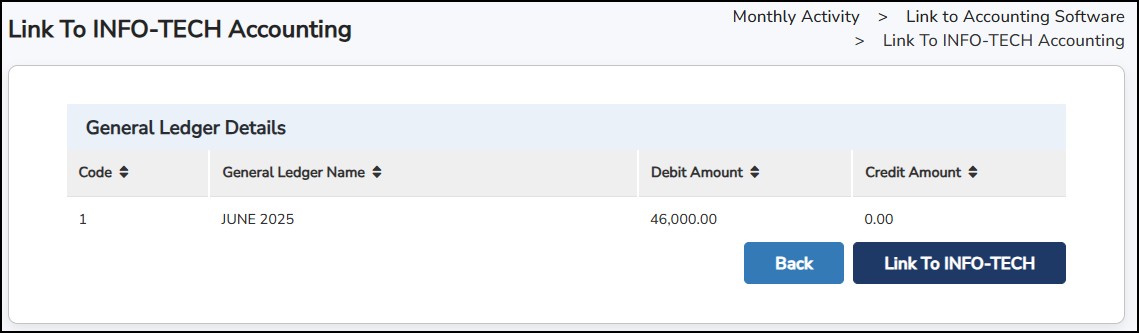
You may need to create all General Ledger in Info-Tech System to link it to the other Accounting System.
Step 1: Go to Monthly Activity > Link to Accounting Software > Create General Ledger > New.
Step 2: Enter the General Ledger Code , General Ledger Name and select Debit/Credit.

Step 3: Select employees to include in this General Ledger.
**Note: Can select Apply By to filter by Individual, Department, Section, Designation, Desig group or Category.
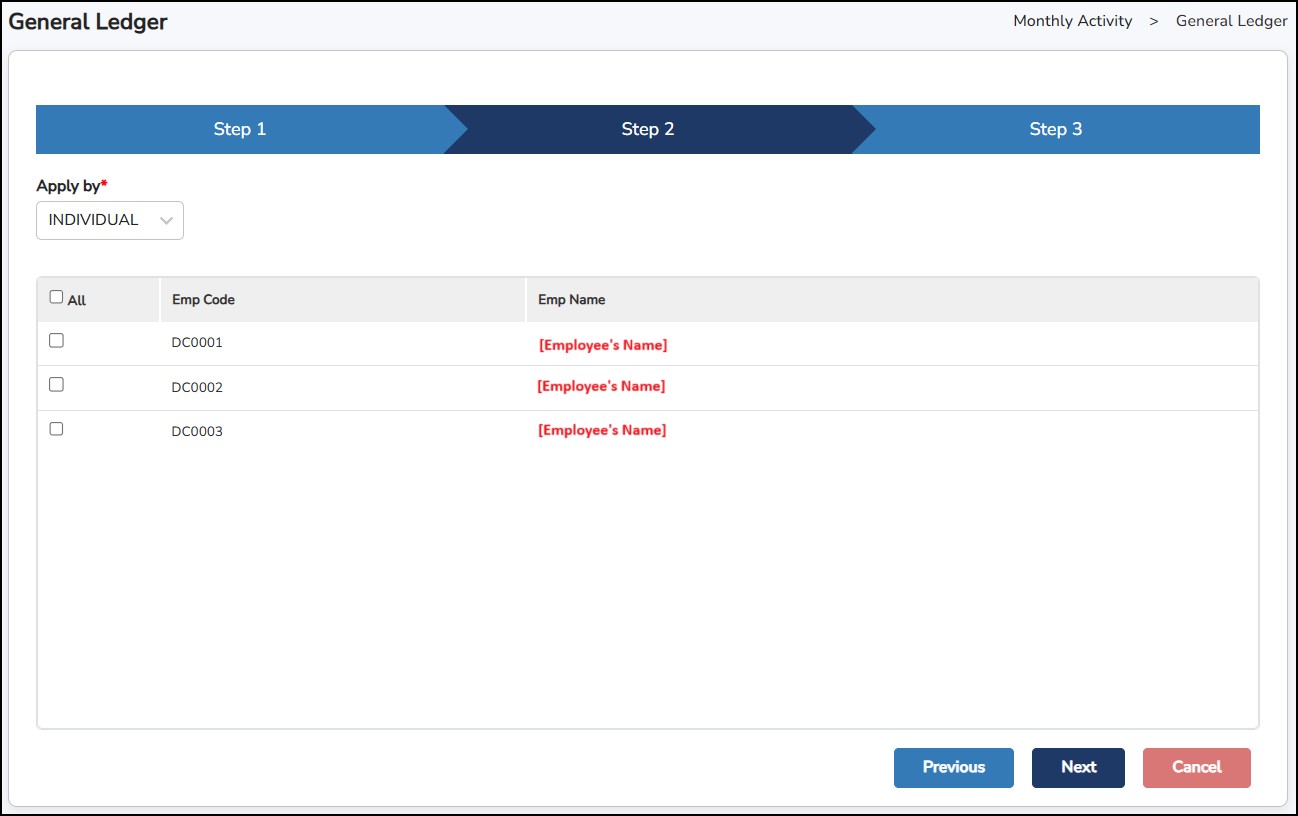
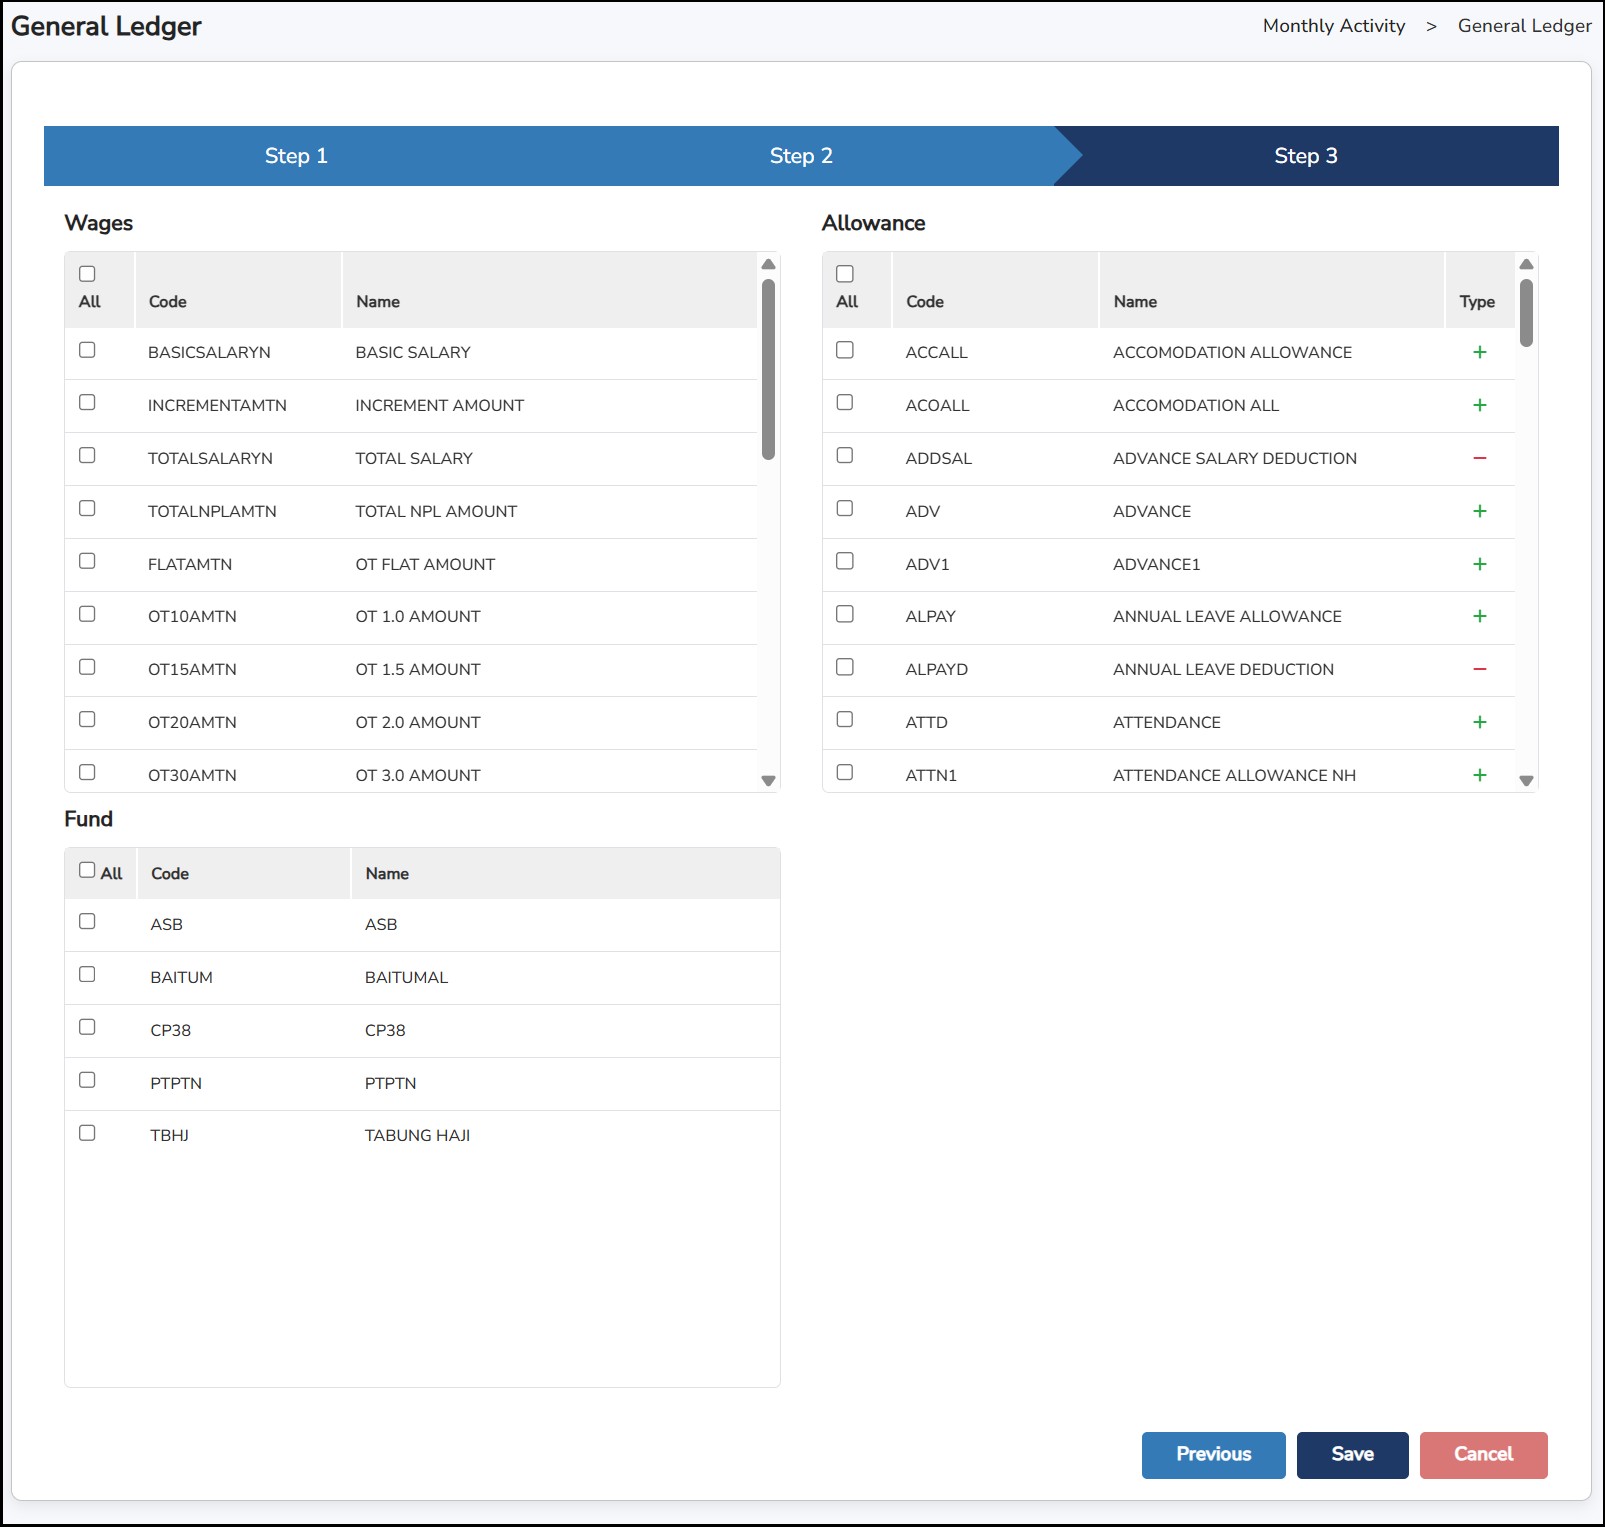
Step 4: Select Wages , Allowance or Fund to include in this General Ledger and click on SAVE to save the ledger.
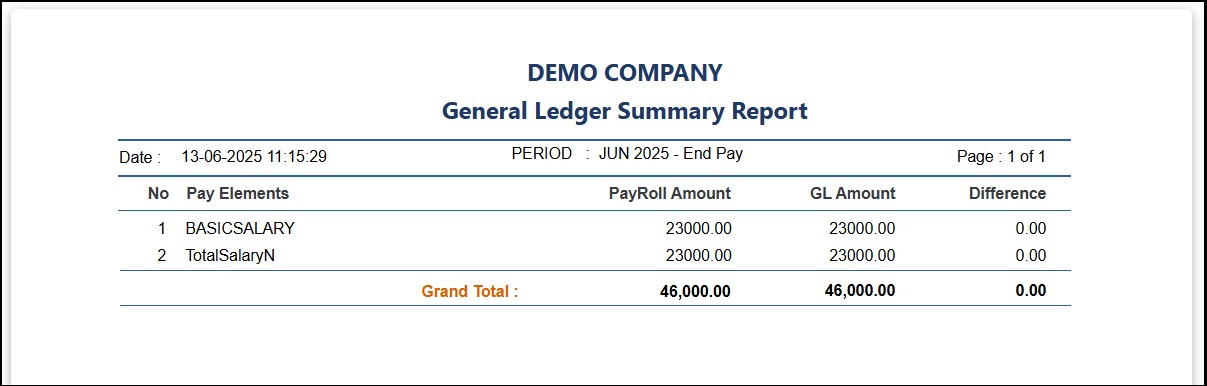
Before linking to the other accounting software, you may generate out the report of the ledger created.
Step 1: Go to
Monthly Activity >
Link to Accounting Software >
a. General Ledger Summary Report
b. General Ledger Detail Report
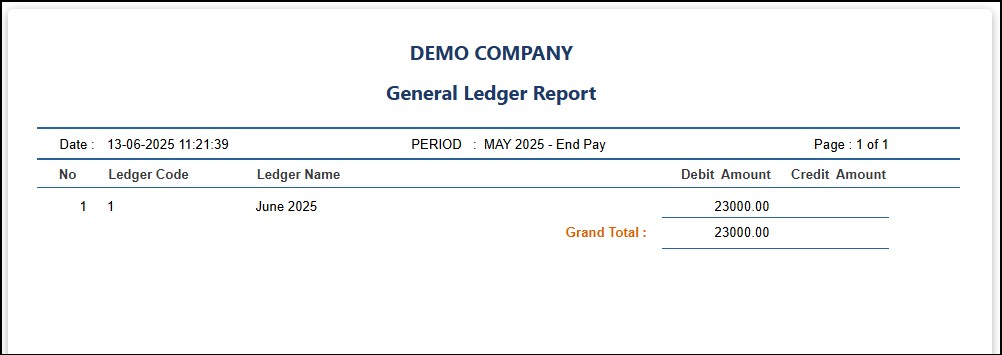
c. General Ledger Report
**Note : If double entry cannot tally, please check Create General Ledger.
General Ledger Summary Report
General Ledger Detail Report
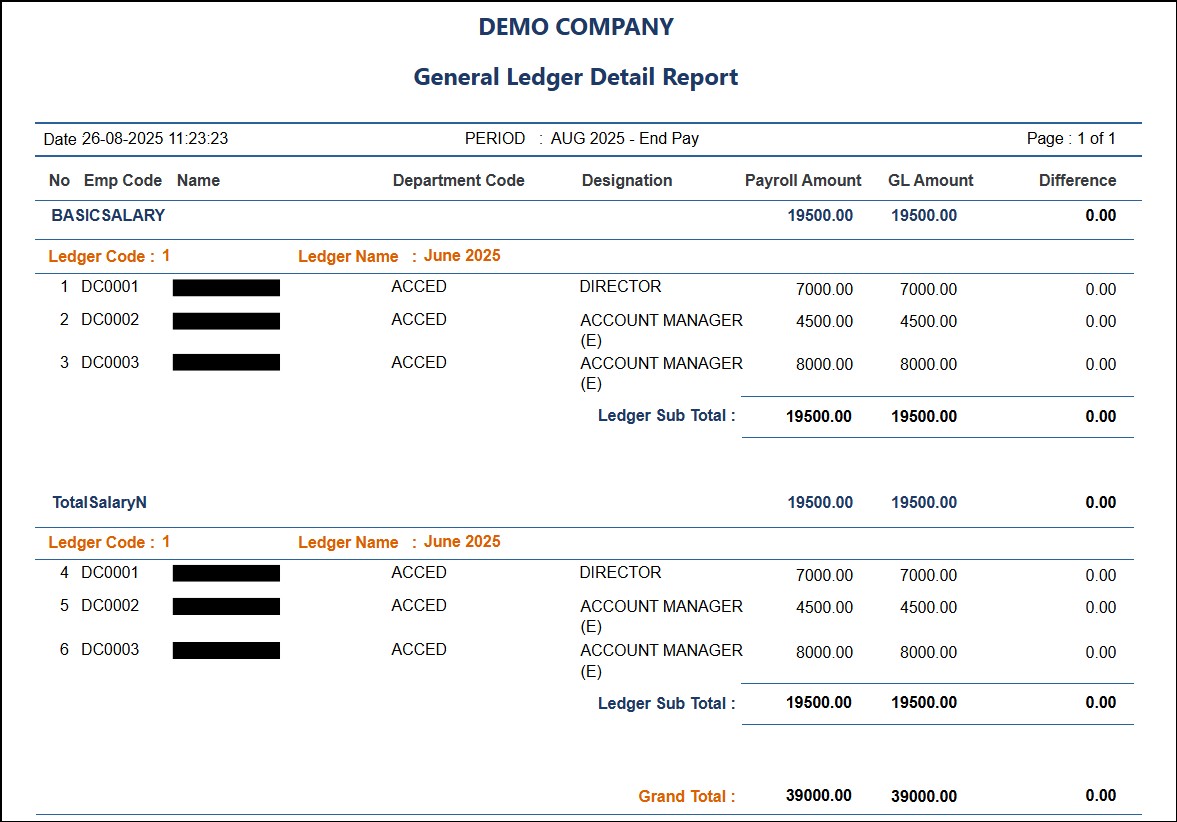
General Ledger Report
When the reports are ready to link all transactions to the Accounting Software, follow the steps below: -
Fav365 Accounting
Step 1: Go to Monthly Activity > Link to Accounting Software > Fav365 Accounting
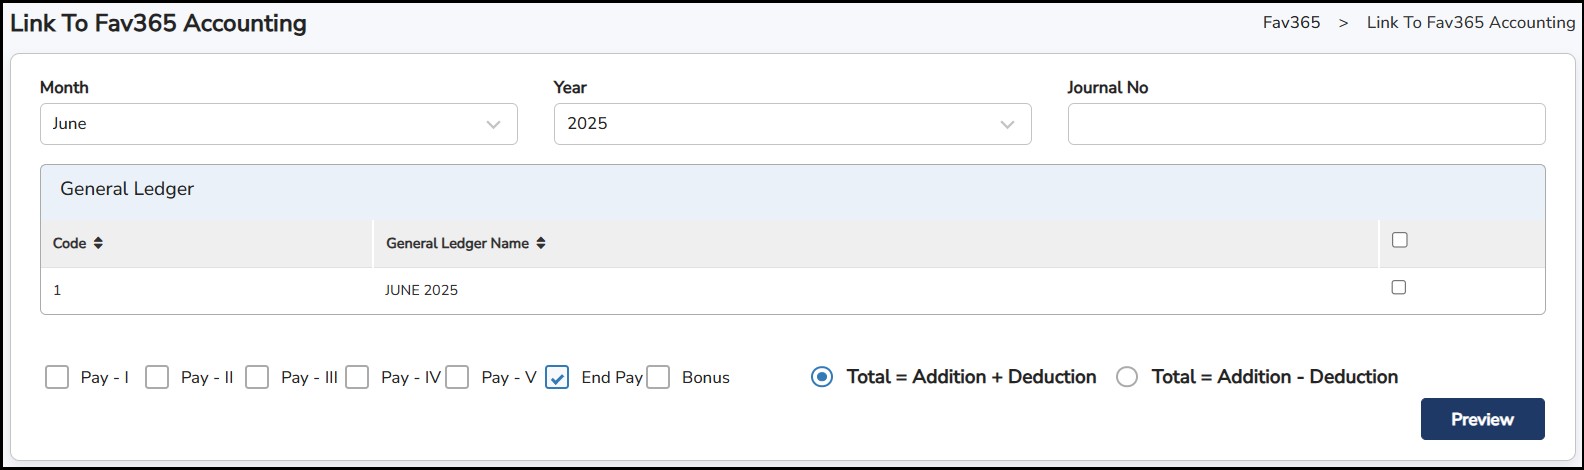
Step 2: Select Month, Year and Journal No.
Step 3: Choose the General Ledger created
Step 4: Select
Addition + Deduction
or
Addition - Deduction
>
![]()
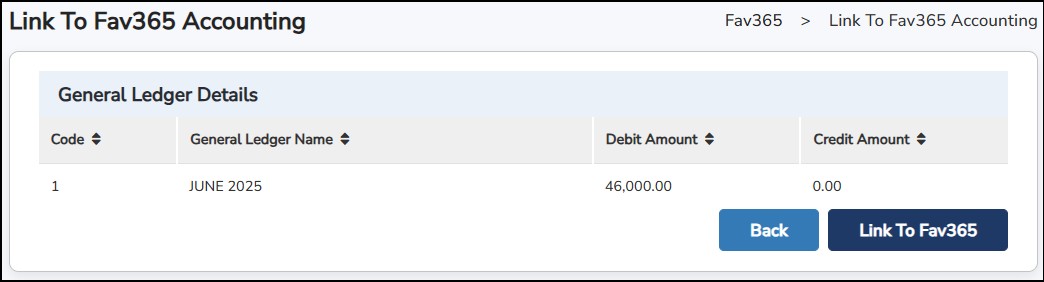
Step 5: Click
![]()
Xero Accounting V2.0
Step 1: Go to Monthly Activity > Link to Accounting Software > Xero Accounting 2.0
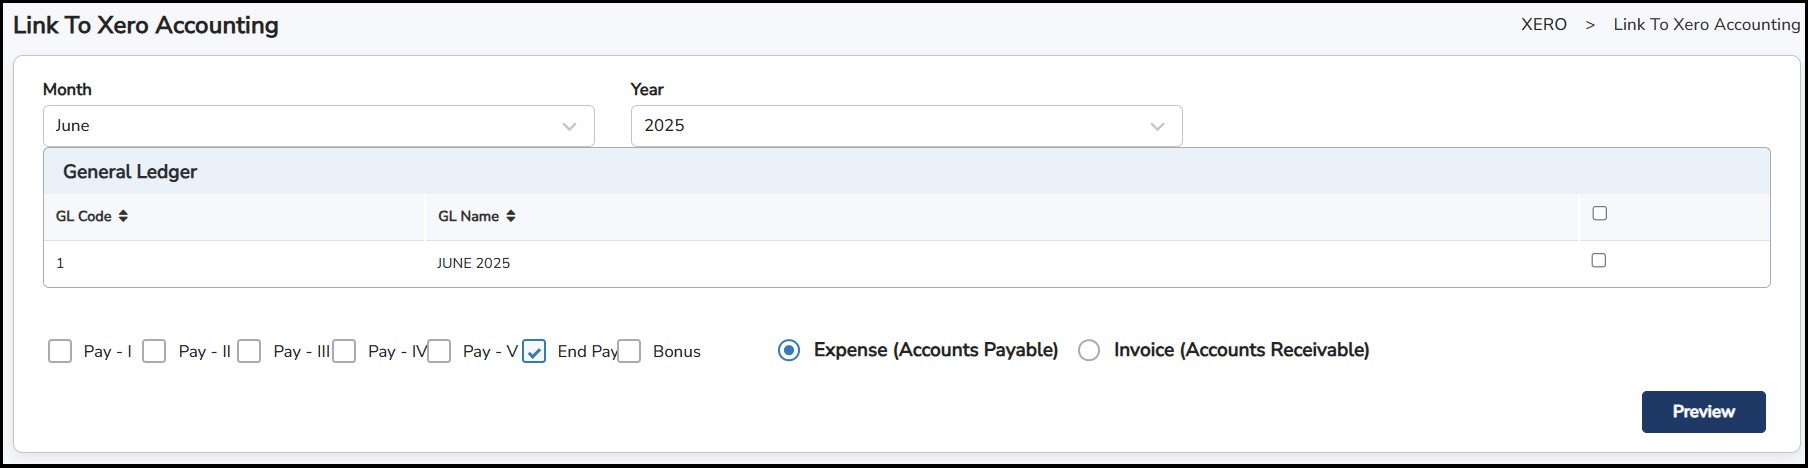
Step 2: Select Month & Year
Step 3: Choose the General Ledger created
Step 4: Select
Expenses
or
Invoice
>
![]()
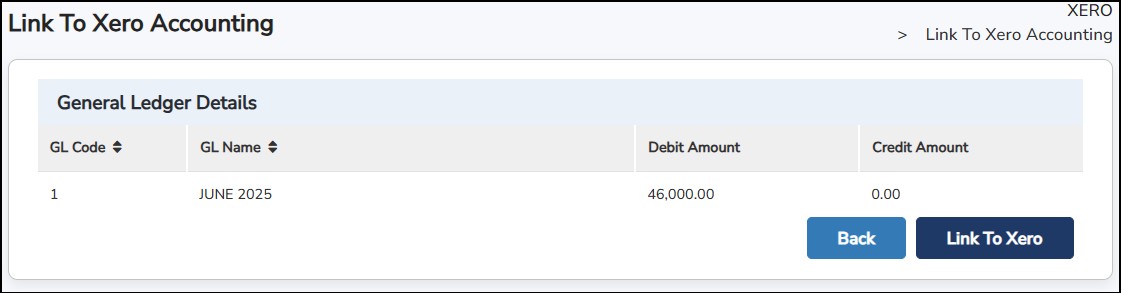
Step 5: Click
![]()
SQL Accounting
Step 1: Go to Monthly Activity > Link to Accounting Software > SQL Accounting
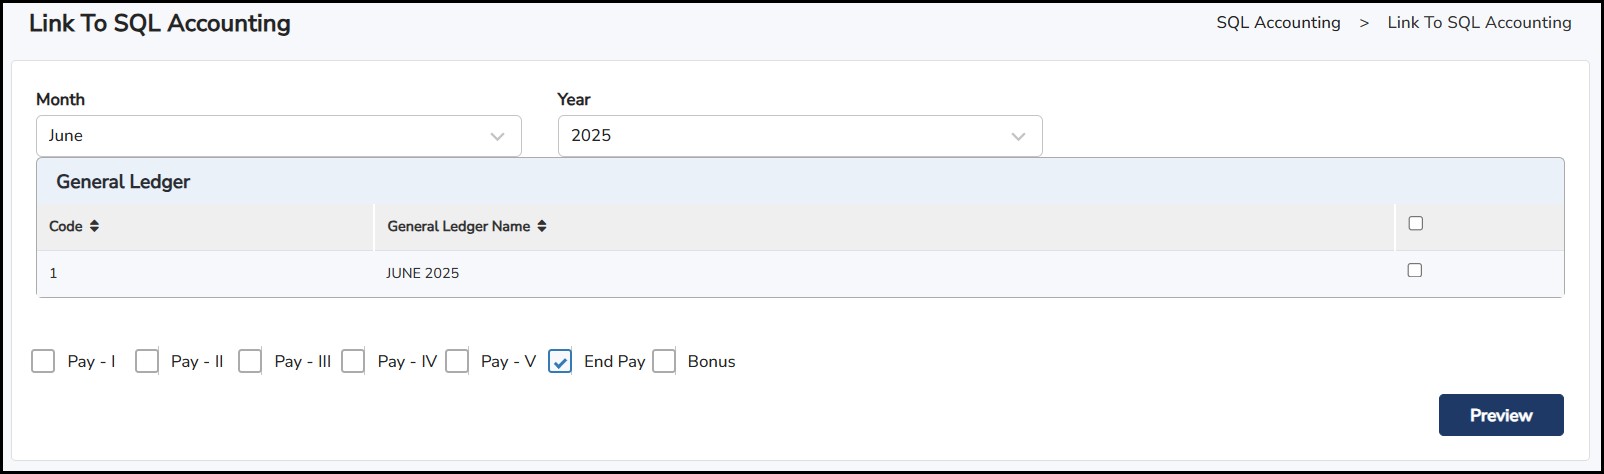
Step 2: Select Month & Year
Step 3: Choose the General Ledger created
Step 4: Select
Pay Period
>
![]()
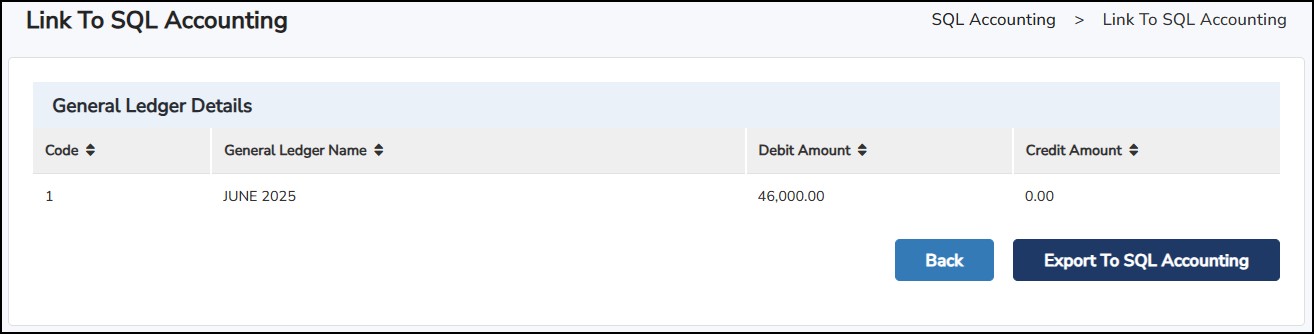
Step 5: Click
![]()
Info-Tech Accounting
Step 1: Go to Monthly Activity > Link to Accounting Software > SQL Accounting
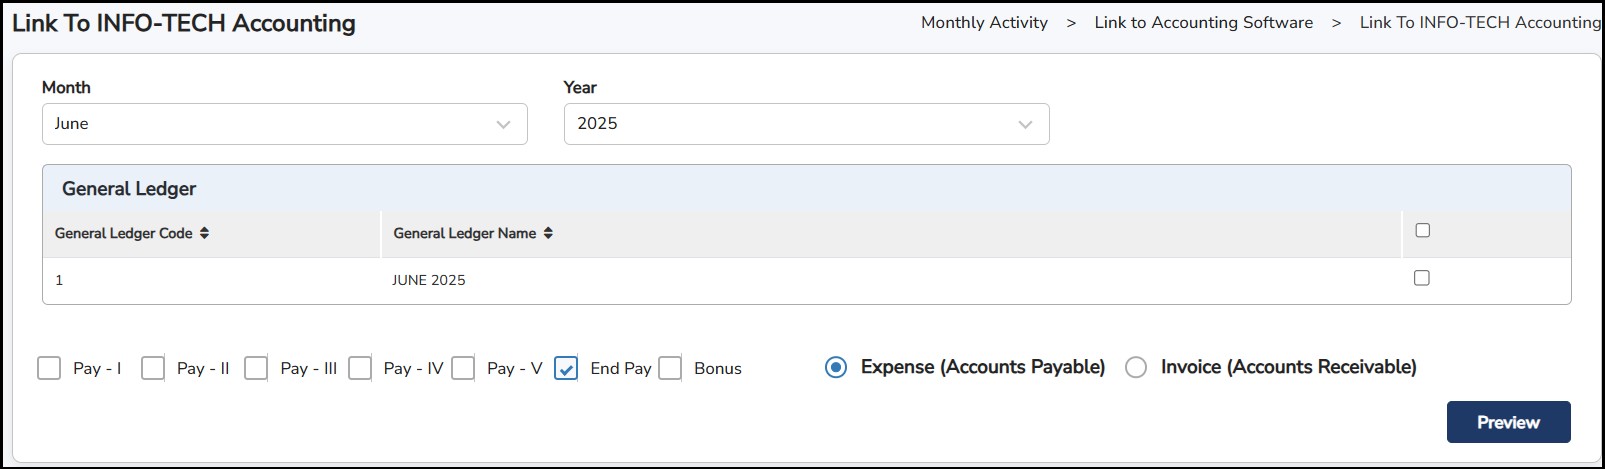
Step 2: Select Month & Year
Step 3: Choose the General Ledger created
Step 4: Select
Expense or Invoice
>
![]()
Step 5: Click
![]()
This section allows you to set the currency conversion rate for salary payments in foreign currencies.
Note: You may need to enable this feature first by going to Admin Setting > System Setting > General Setting.
Step 1: Go to Monthly Activity > Conversion Rate.
Step 2: Select the Year, the Month, and the Period (e.g., End Pay).
Step 3: Enter the Malaysian Currency Rate in each of the other currencies.
Step 4: Click
![]() once done.
once done.

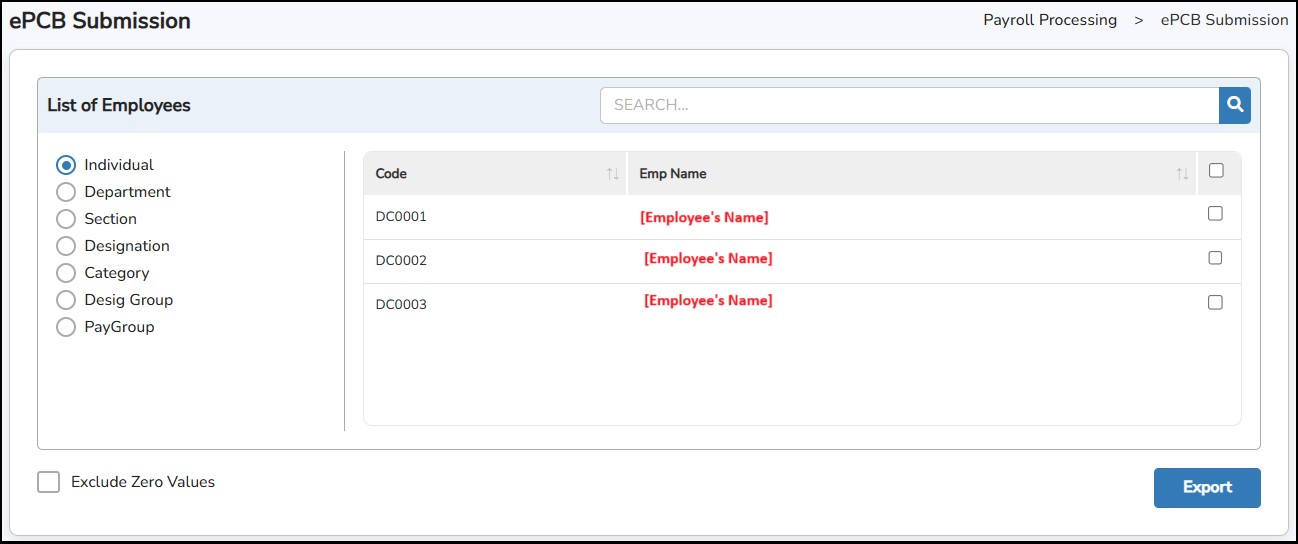
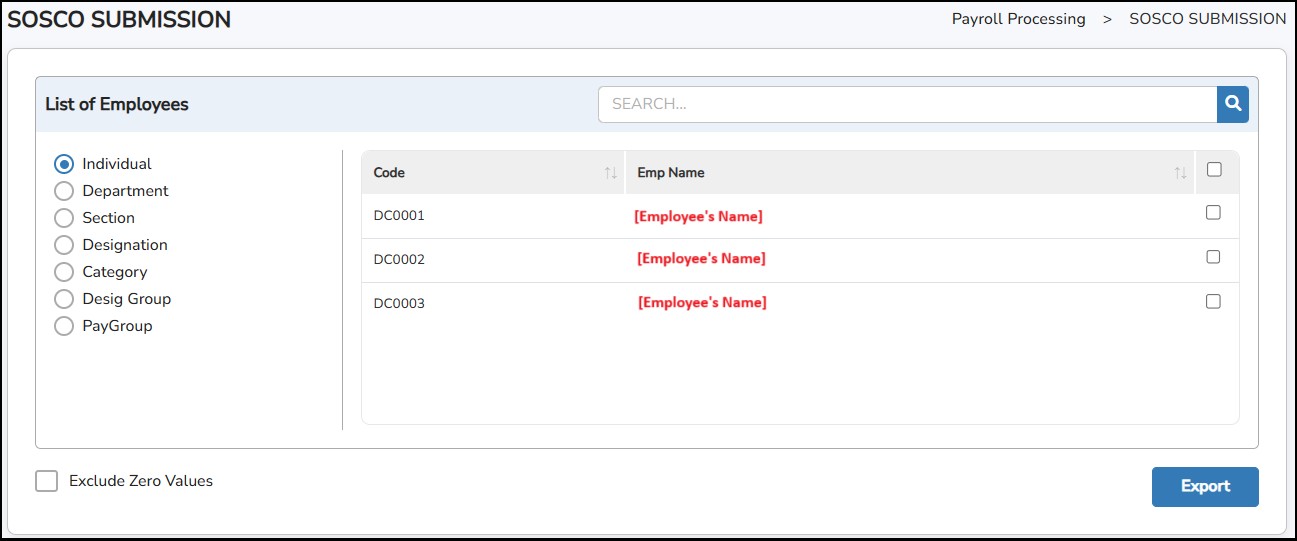
This is the page to generate text files to submit to government portals for monthly submission.
Step 1: Go to Submission > Monthly Submission > Choose: -
Step 2: Select employee (s)
Step
3: Click on the
![]() button. A file will be downloaded to your computer and you may
proceed with the submission.
button. A file will be downloaded to your computer and you may
proceed with the submission.

This is where the HR/Administrator/Payroll Approver can approve the TP1 request submitted by the employee for inclusion in their PCB calculation.
Step 1: Go to Submissions > TP1 Request Approve/Reject
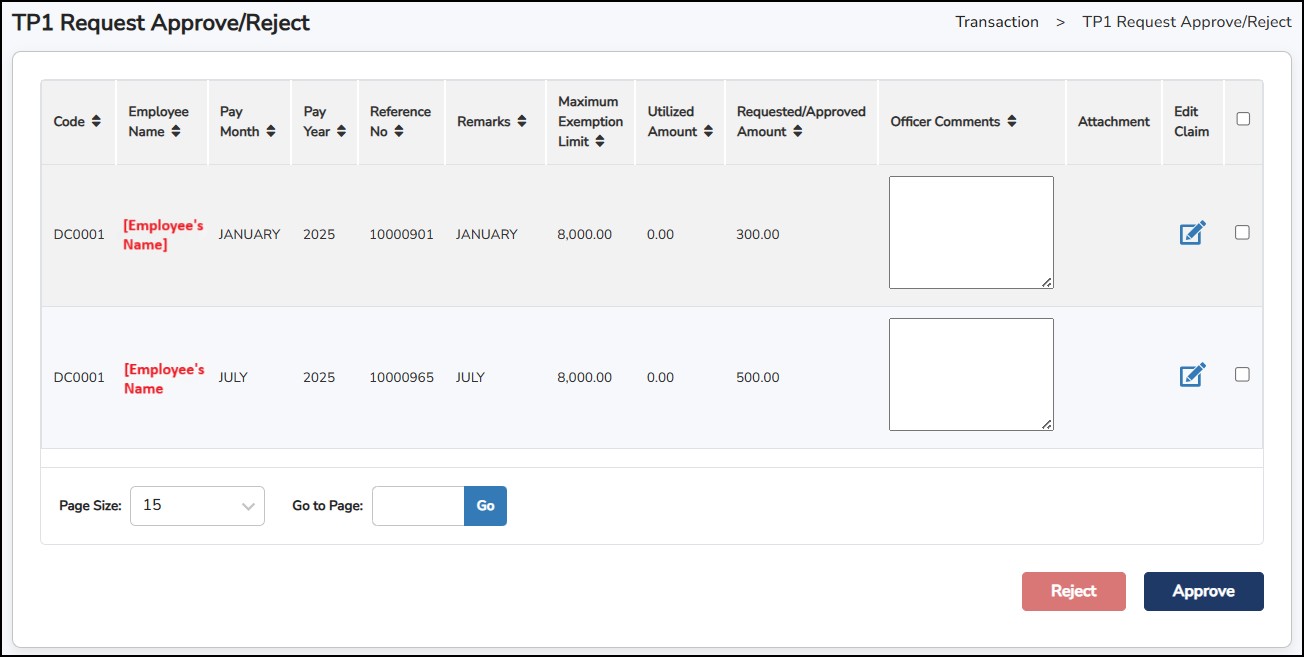
Step 2: Click Edit Claim if needed to change the requested amount.
Step 3: Select the request by tick on the check box.
Step
4: Click on the
![]() or
or
![]() to proceed. Once approved, the details will be updated in the
Submissions
> TP1 Form
.
to proceed. Once approved, the details will be updated in the
Submissions
> TP1 Form
.
This is where you can initialize, update and generate EA from under the Submissions screens.
Step 1: Go to Submissions > EA > EA Initialize
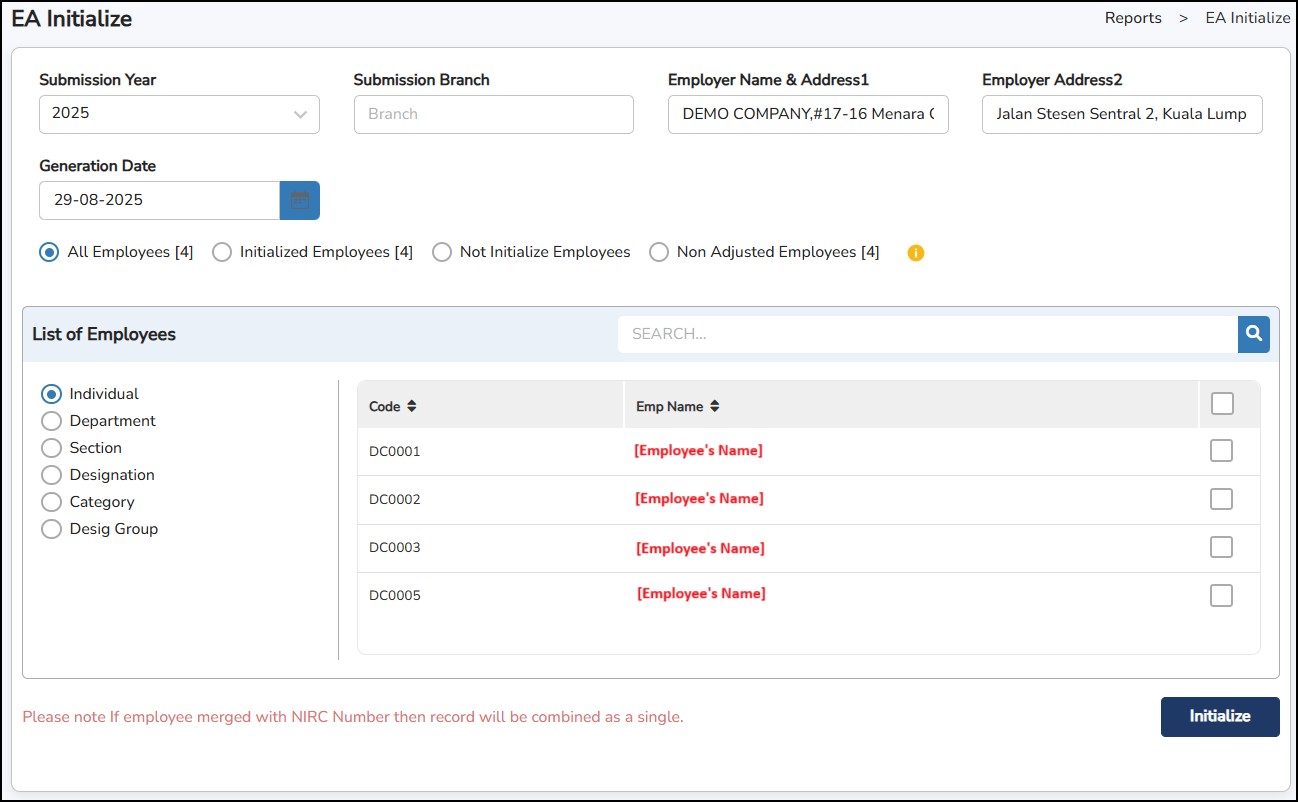
Step 2: Fill up all the necessary information to be appeared in the EA form.
Step
3: Click on the
![]() button.
button.
In case of any changes required to implement in the generated EA from: -
Step 1: Go to Submissions > EA > EA Adjustment .
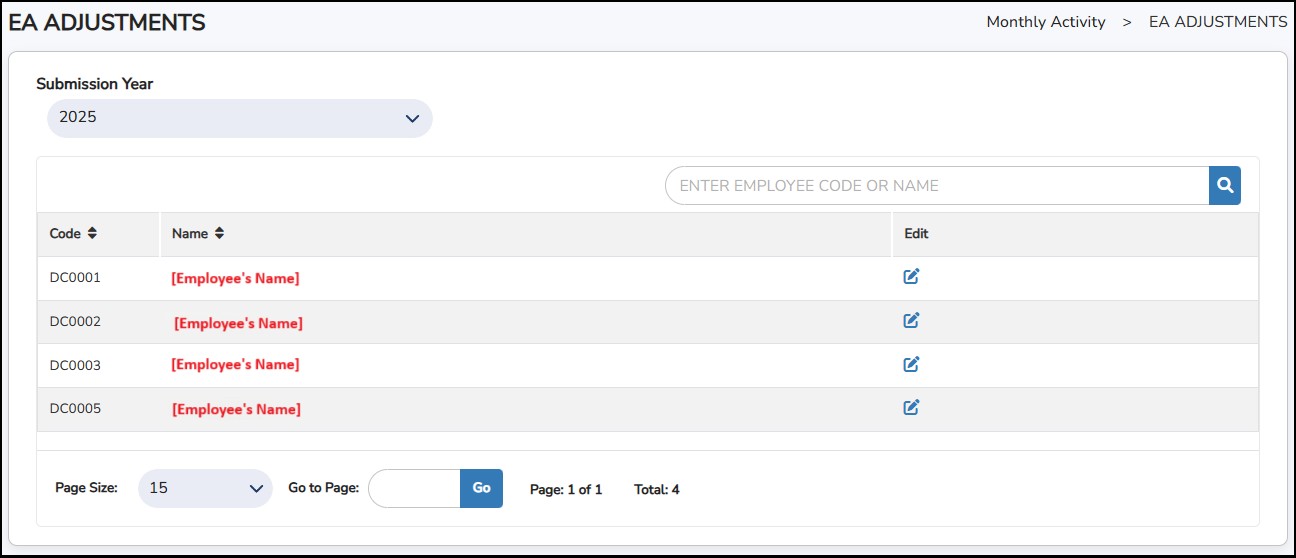
Step
2: Click
![]() to
which employee’s EA details to be adjusted.
to
which employee’s EA details to be adjusted.
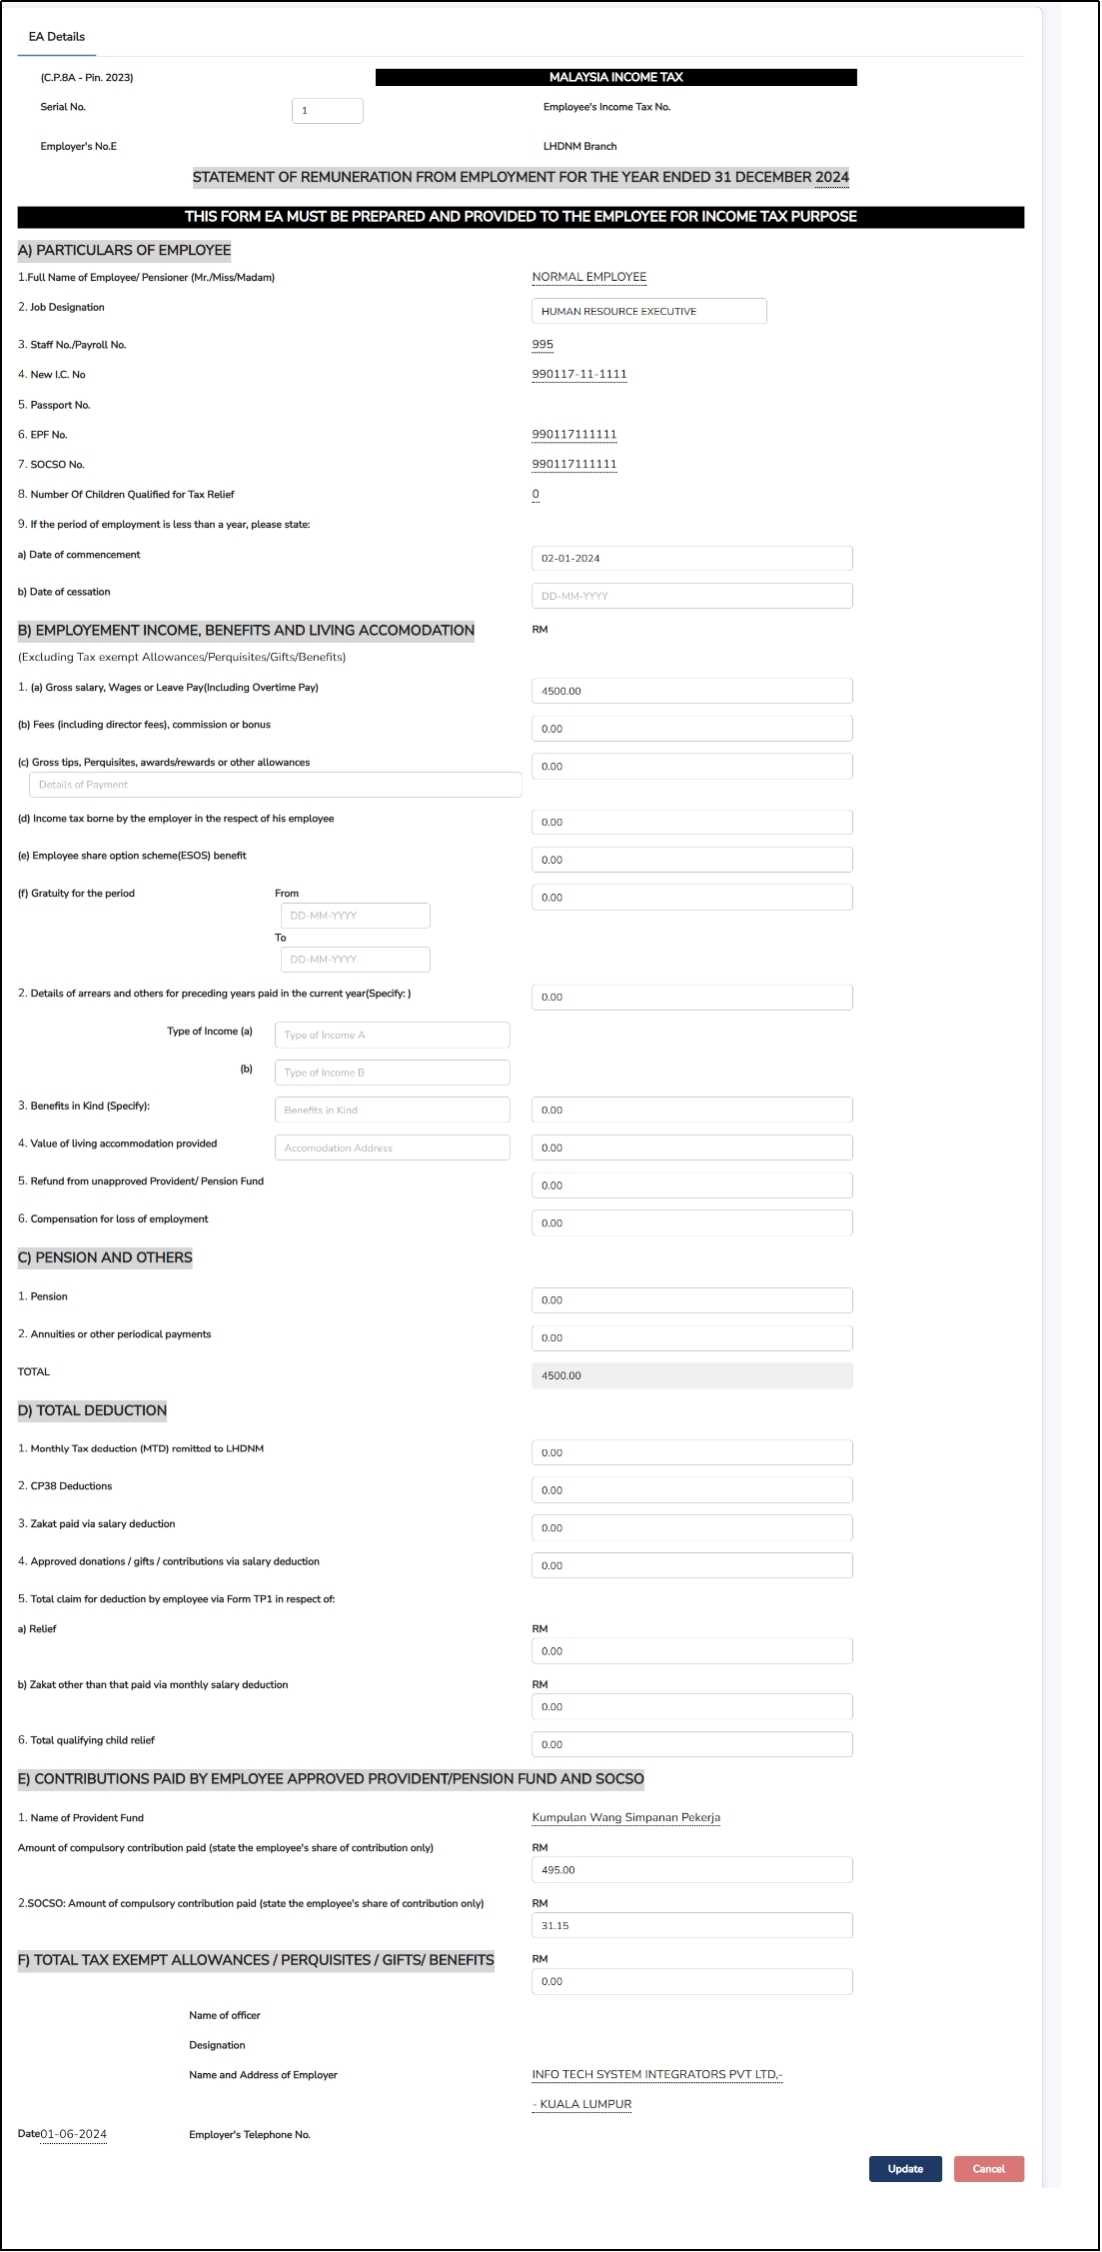
Step
3: Adjust the details accordingly > Click on the
![]() to save the changes.
to save the changes.
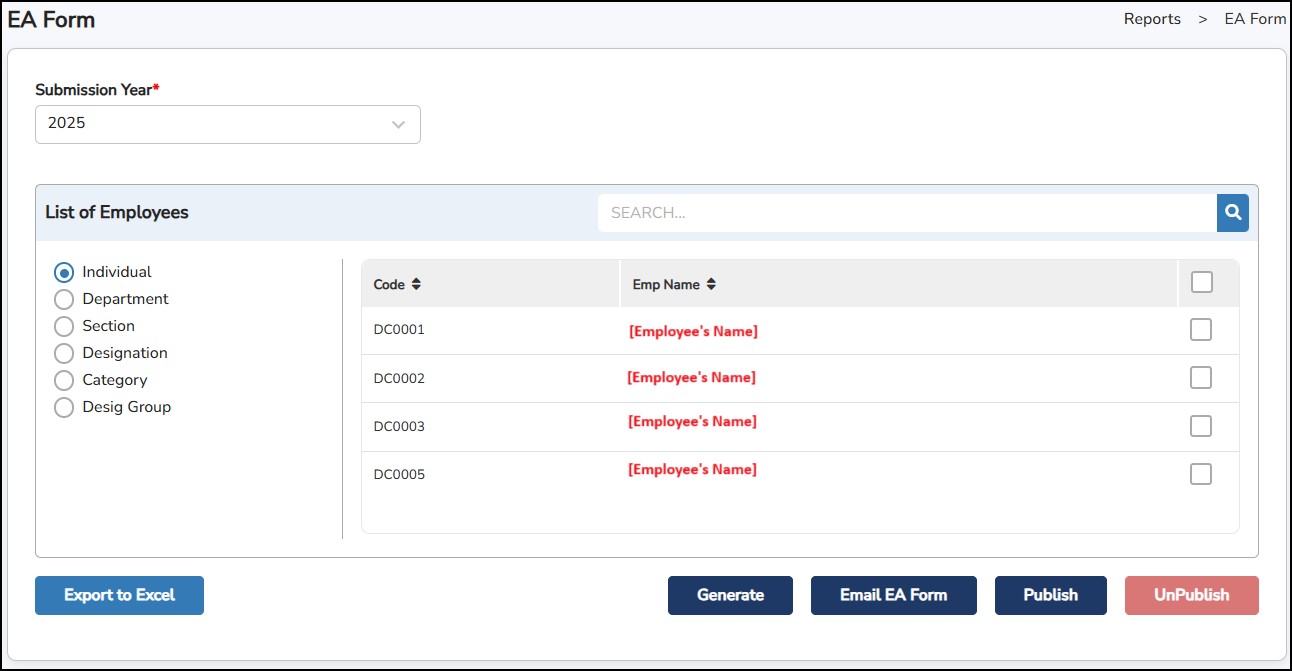
Step
4: Click on
![]() to generate the form.
to generate the form.
Generate – To generate and view initialized and adjusted form.
Email EA Form – To email the EA Form to employee's email.
Publish – To publish and display EA Form to the portal and the mobile app.
UnPublish – To remove the published EA Form from the portal and the mobile app.
Export to Excel – To export the adjusted EA Form into an Excel file showing the details (allowances, tax exempt, etc.).
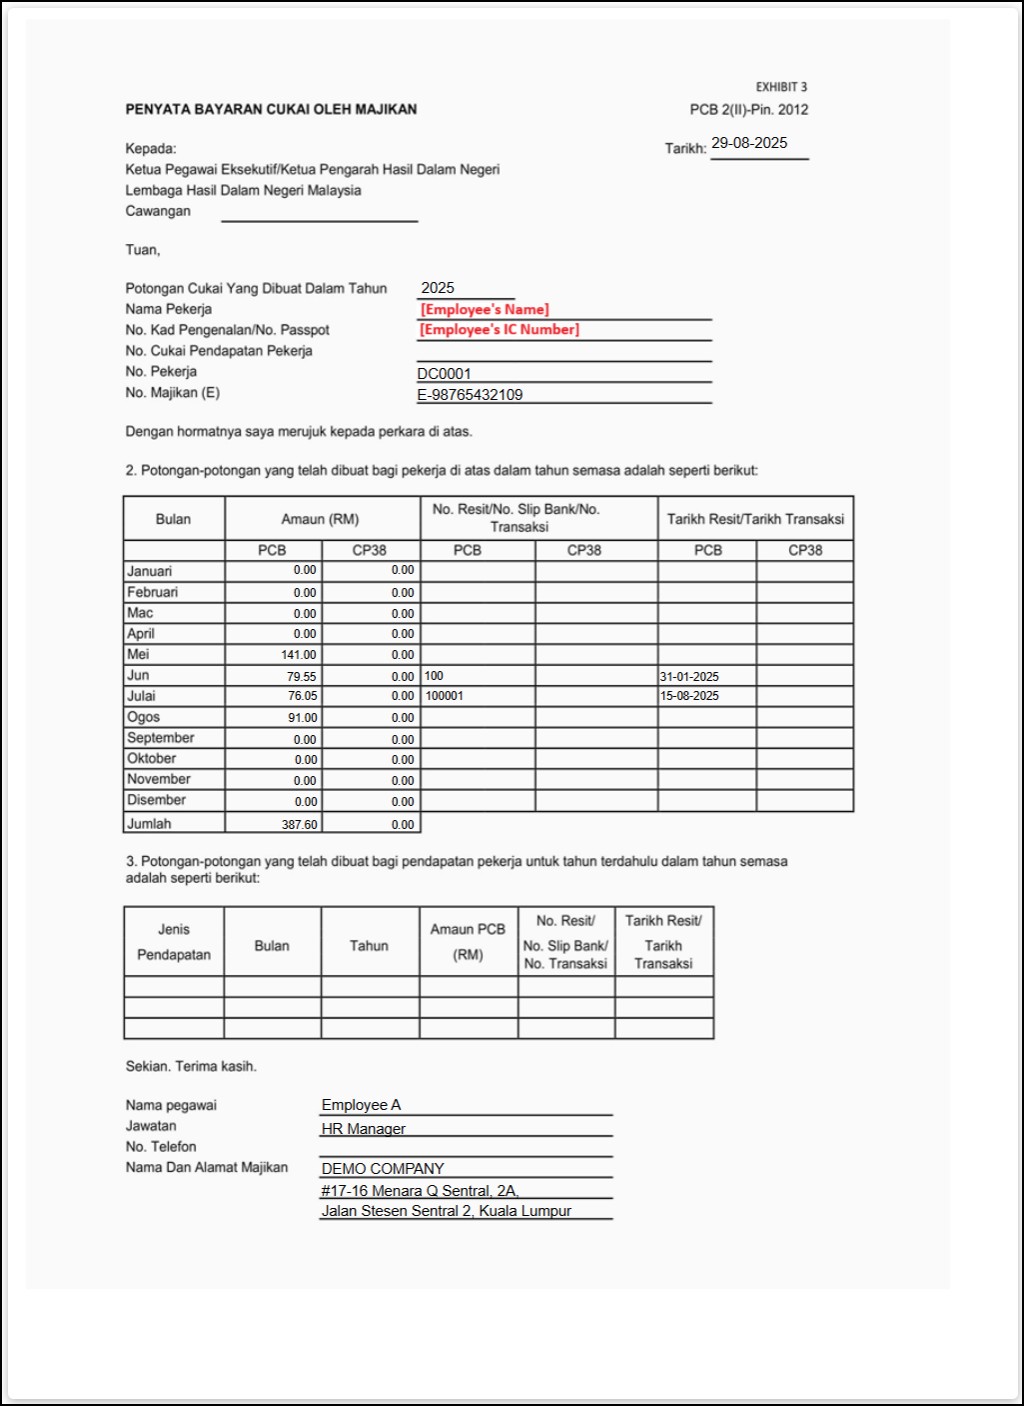
This form is used when there are changes to an employee's monthly tax deduction (PCB) arising from salary revisions, new allowances, or additional benefits.
The purpose is to ensure that monthly PCB deductions and CP38 (if applicable) remain accurate, helping to prevent both underpayment and overpayment of taxes.
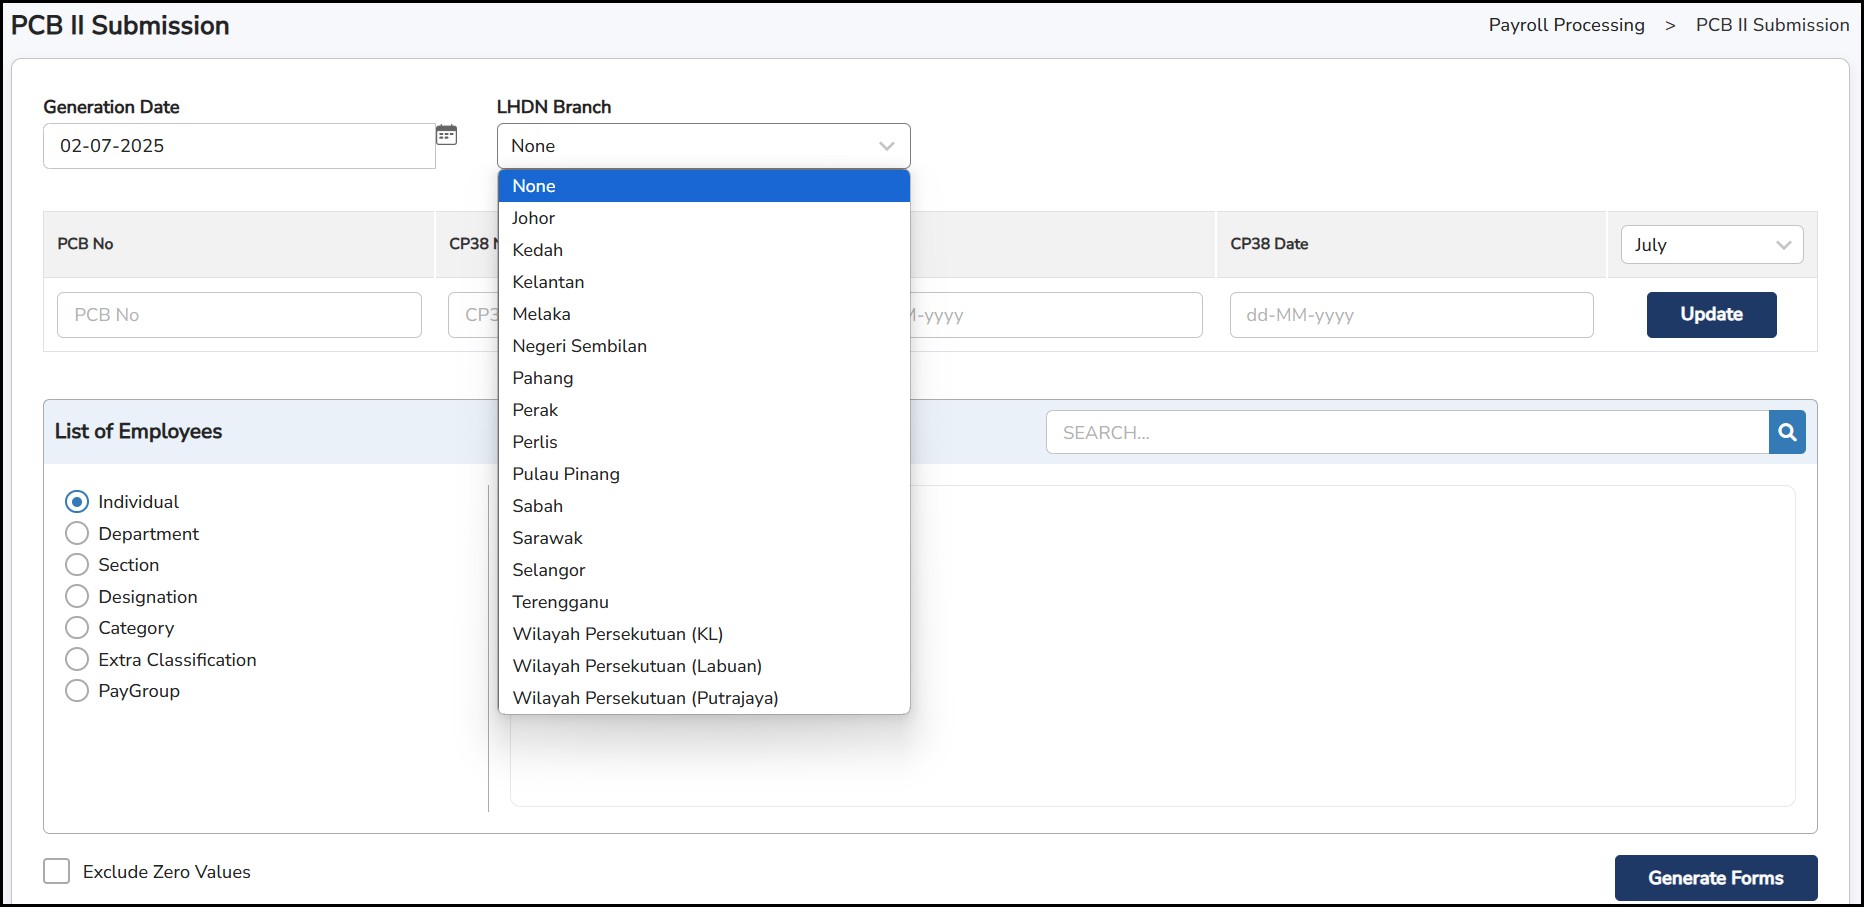
Step 1: Go to Submissions > PCB II Form
Step 2: Select the LHDN Branch from the dropdown selection.
Step 3: Enter the PCB No and CP38 No. This is to enter the Receipt No of the payment made for PCB or CP38 (if applicable).
Step 4: Select the PCB Date and the CP38 Date. This is to enter the Date of the payment made for PCB or CP38 (if applicable).
Step 5: Select the month from the dropdown selection for the PCB or CP38 to be reflected.
Step 6: Select the employees from the list.
Step 7: Click
![]() for the information to be reflected.
for the information to be reflected.
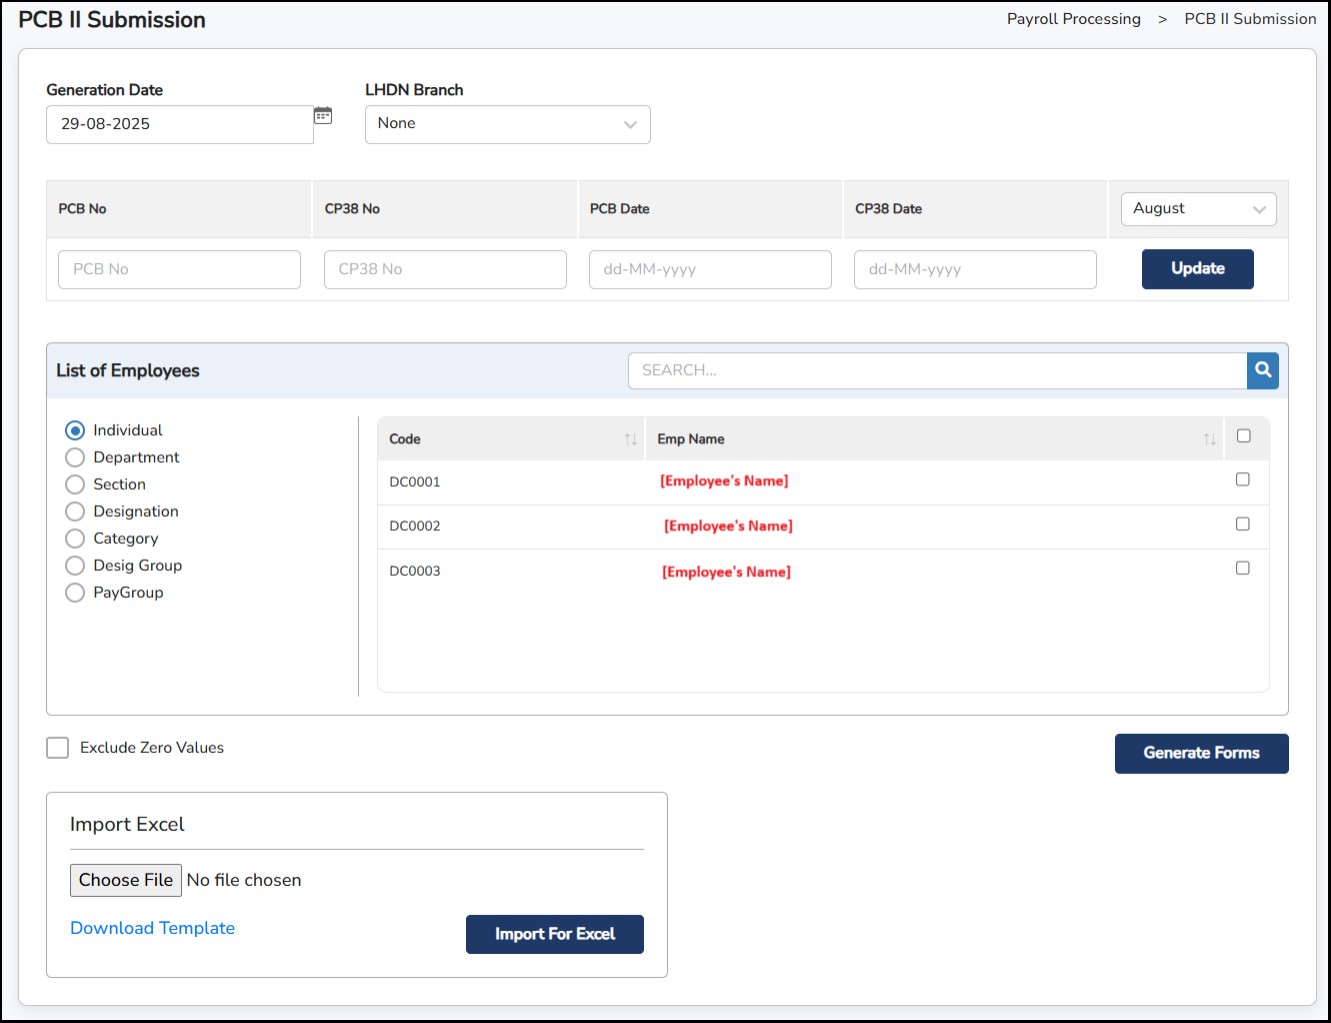
Step 8: Once done, click
![]() to generate the forms.
to generate the forms.
This is a tax clearance form that must be submitted when an employee is leaving Malaysia for a period of more than three months. It notifies LHDN and ensures the employee's tax matters are settled before departure.
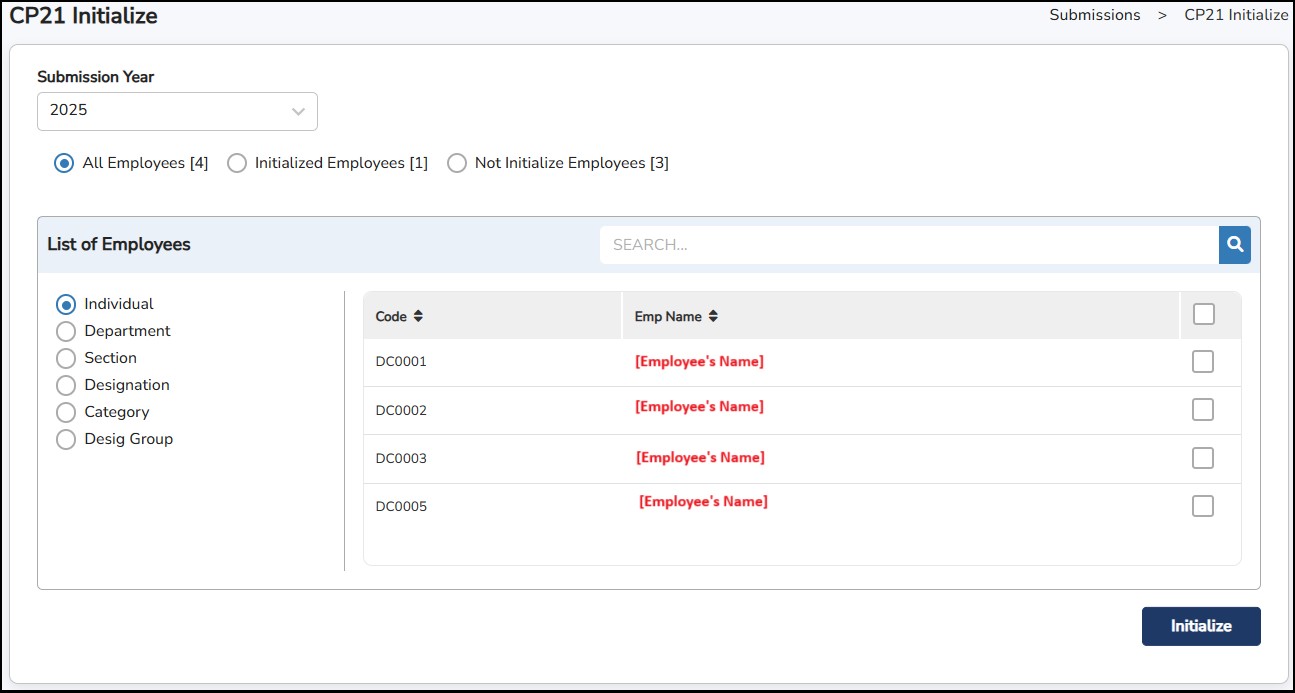
Step 1: Go to Submissions > CP21 > CP21 Initialize.
Step 2: Select Submission Year to be appeared in the CP21 Form.
Step 3: Click on
![]() the button.
the button.
In case of any changes required to implement in the generated CP21 Form:
Step 1: Go to Submissions > CP21 > CP21 Adjustment.
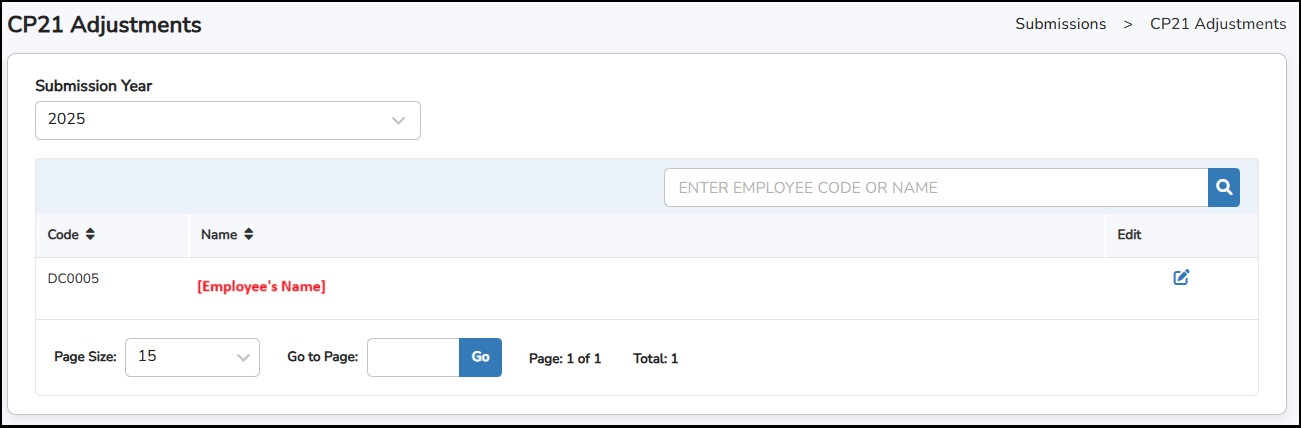
Step 2: Click
![]() to which employee's CP21 details to be adjusted.
to which employee's CP21 details to be adjusted.
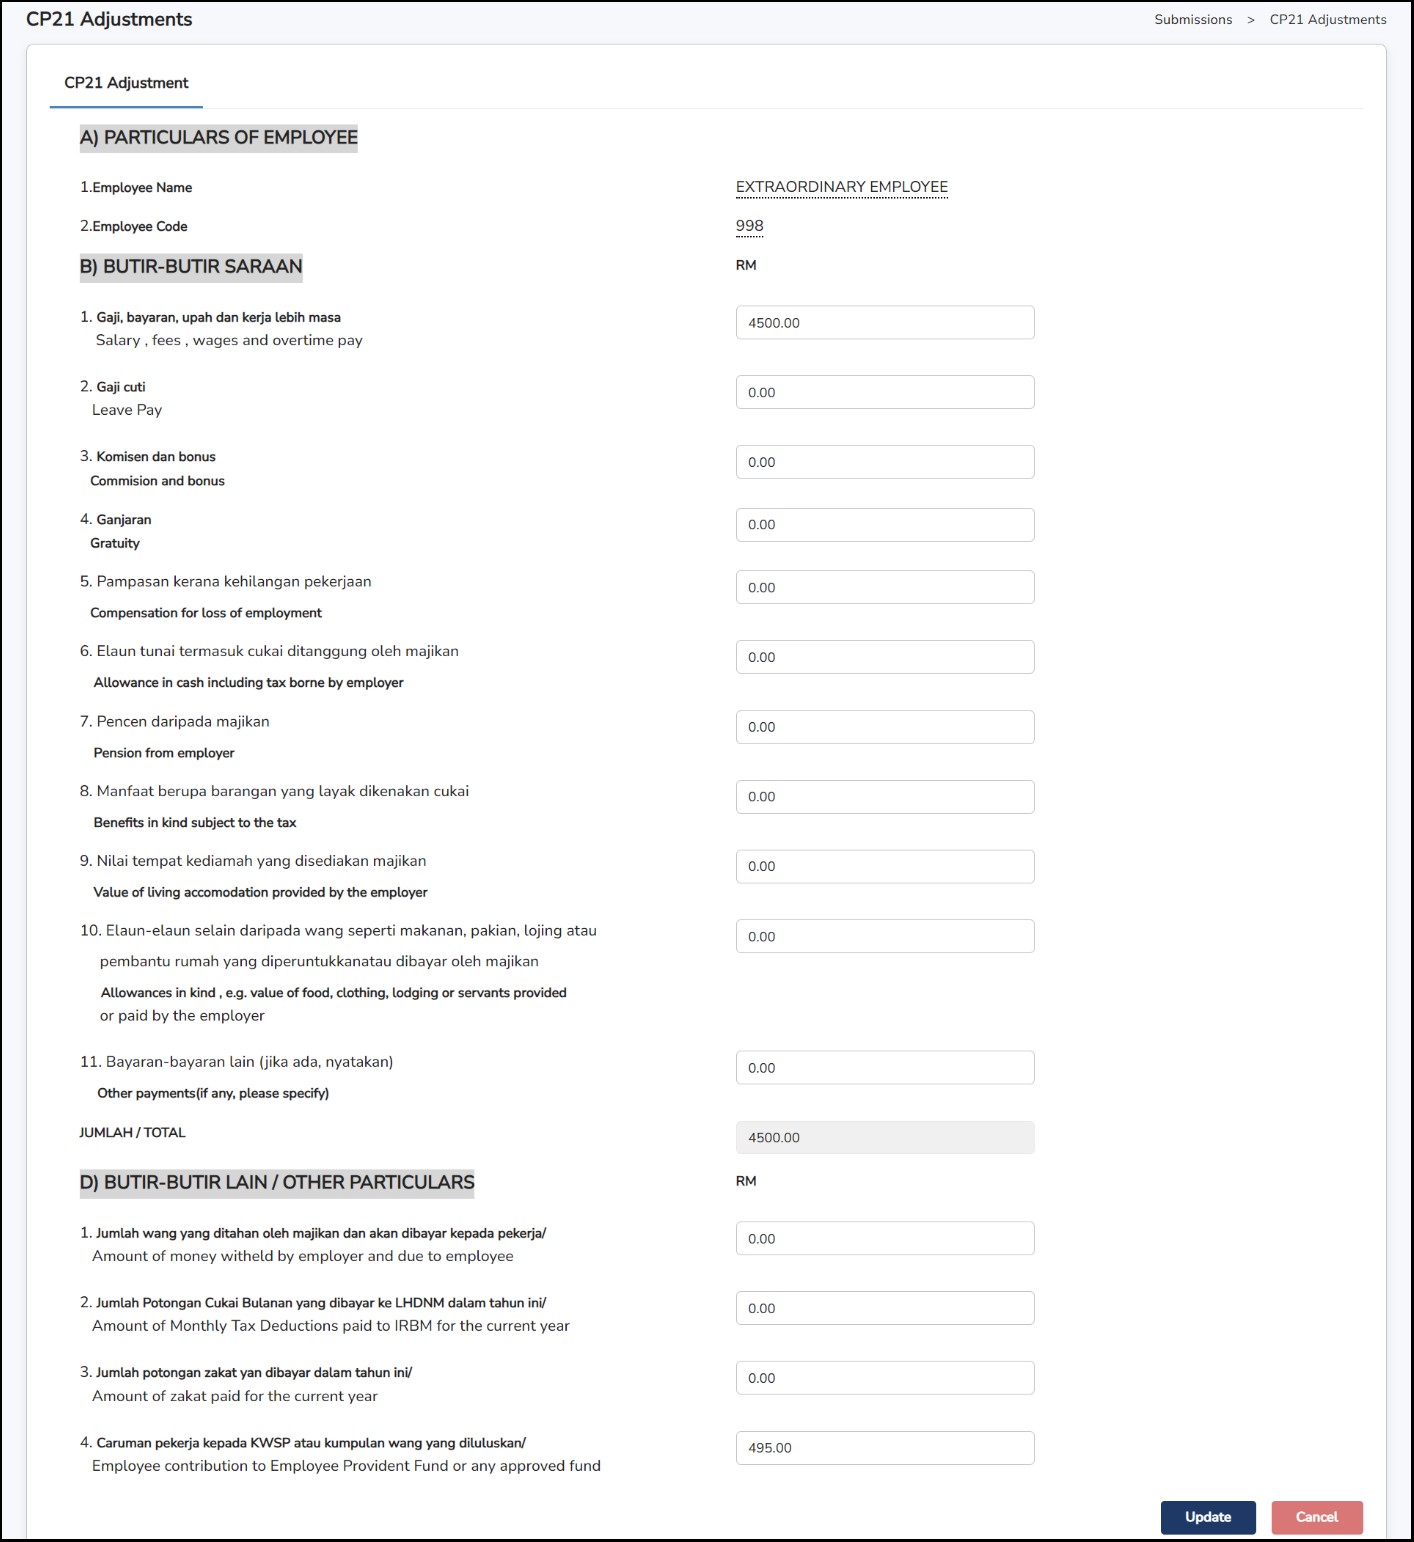
Step 3: Adjust the details accordingly > Click on the
![]() button to save the changes.
button to save the changes.
Step 4: Go to Submissions > CP21 > CP21 Form
Step 5: Enter the CP21 Bulk Update column for the information to be reflected in the form.
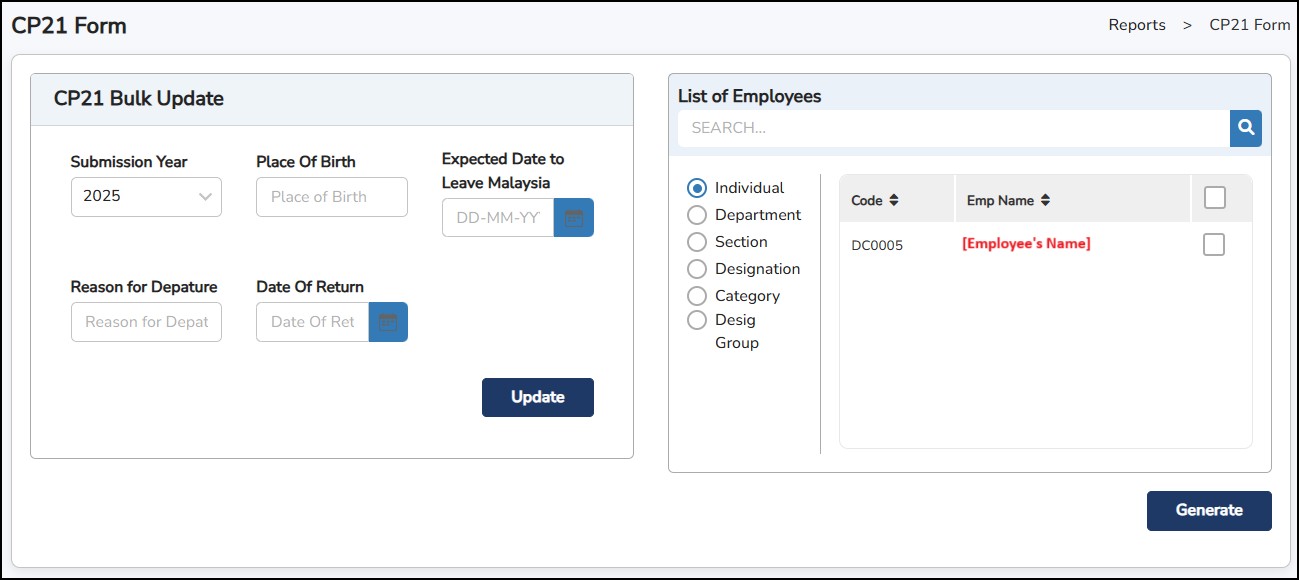
Step 6: Click on
![]() the button to generate the form.
the button to generate the form.
This form is submitted by employers to LHDN every month. It provides details of the monthly tax deductions (PCB) made from employee's salaries and serves as the official record for remitting the deducted tax to LHDN.
Step 1: Go to Submissions > CP39.
Step 2: Select the employees.
Step 3: Enter the Cheque/DD Number / Branch / Cheque/DD Date if applicable.
Step 4: Click
![]() once done.
once done.
Employers must submit this form to LHDN when a new employee joins the company. It informs LHDN of the employee's details and employment start date for tax record purposes.
Step 1: Go to Submissions > CP22 > CP22 Initialize
Step 2: Select Year and Month to be appeared in the CP22 Form.
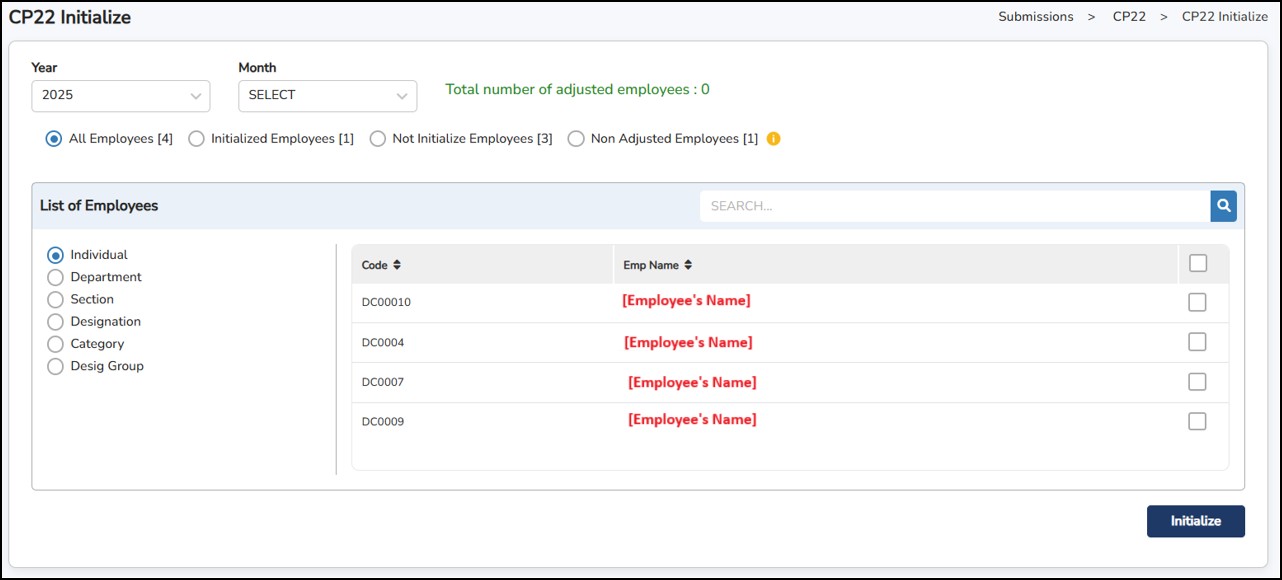
Step 3: Click on the
![]() button.
button.
In case of any changes required to implement in the generated CP22 Form:-
Step 1: Go to Submissions > CP22 > CP22 Adjustment.
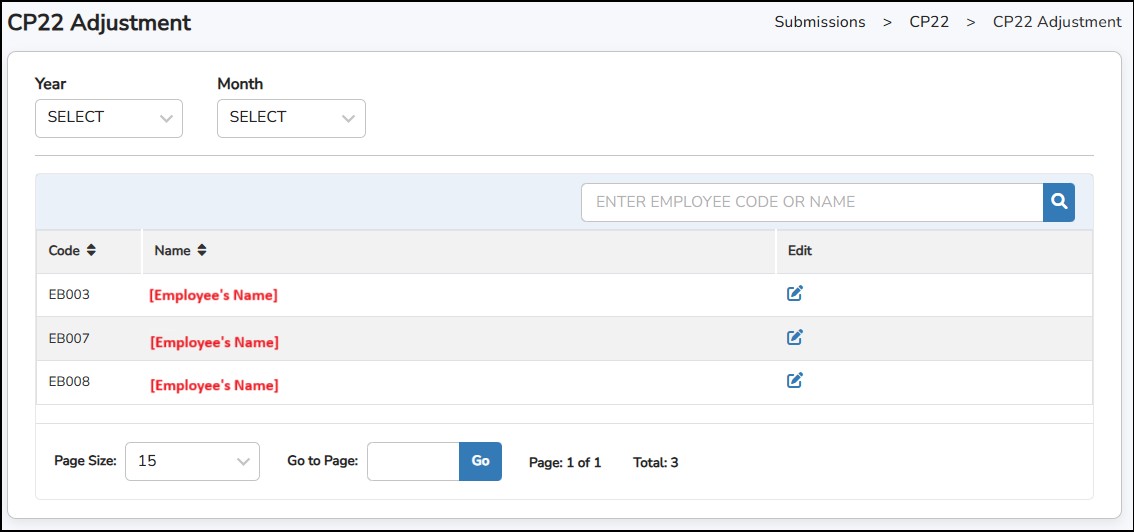
Step 2: Click
![]() to which employee's CP22 details to be adjusted.
to which employee's CP22 details to be adjusted.
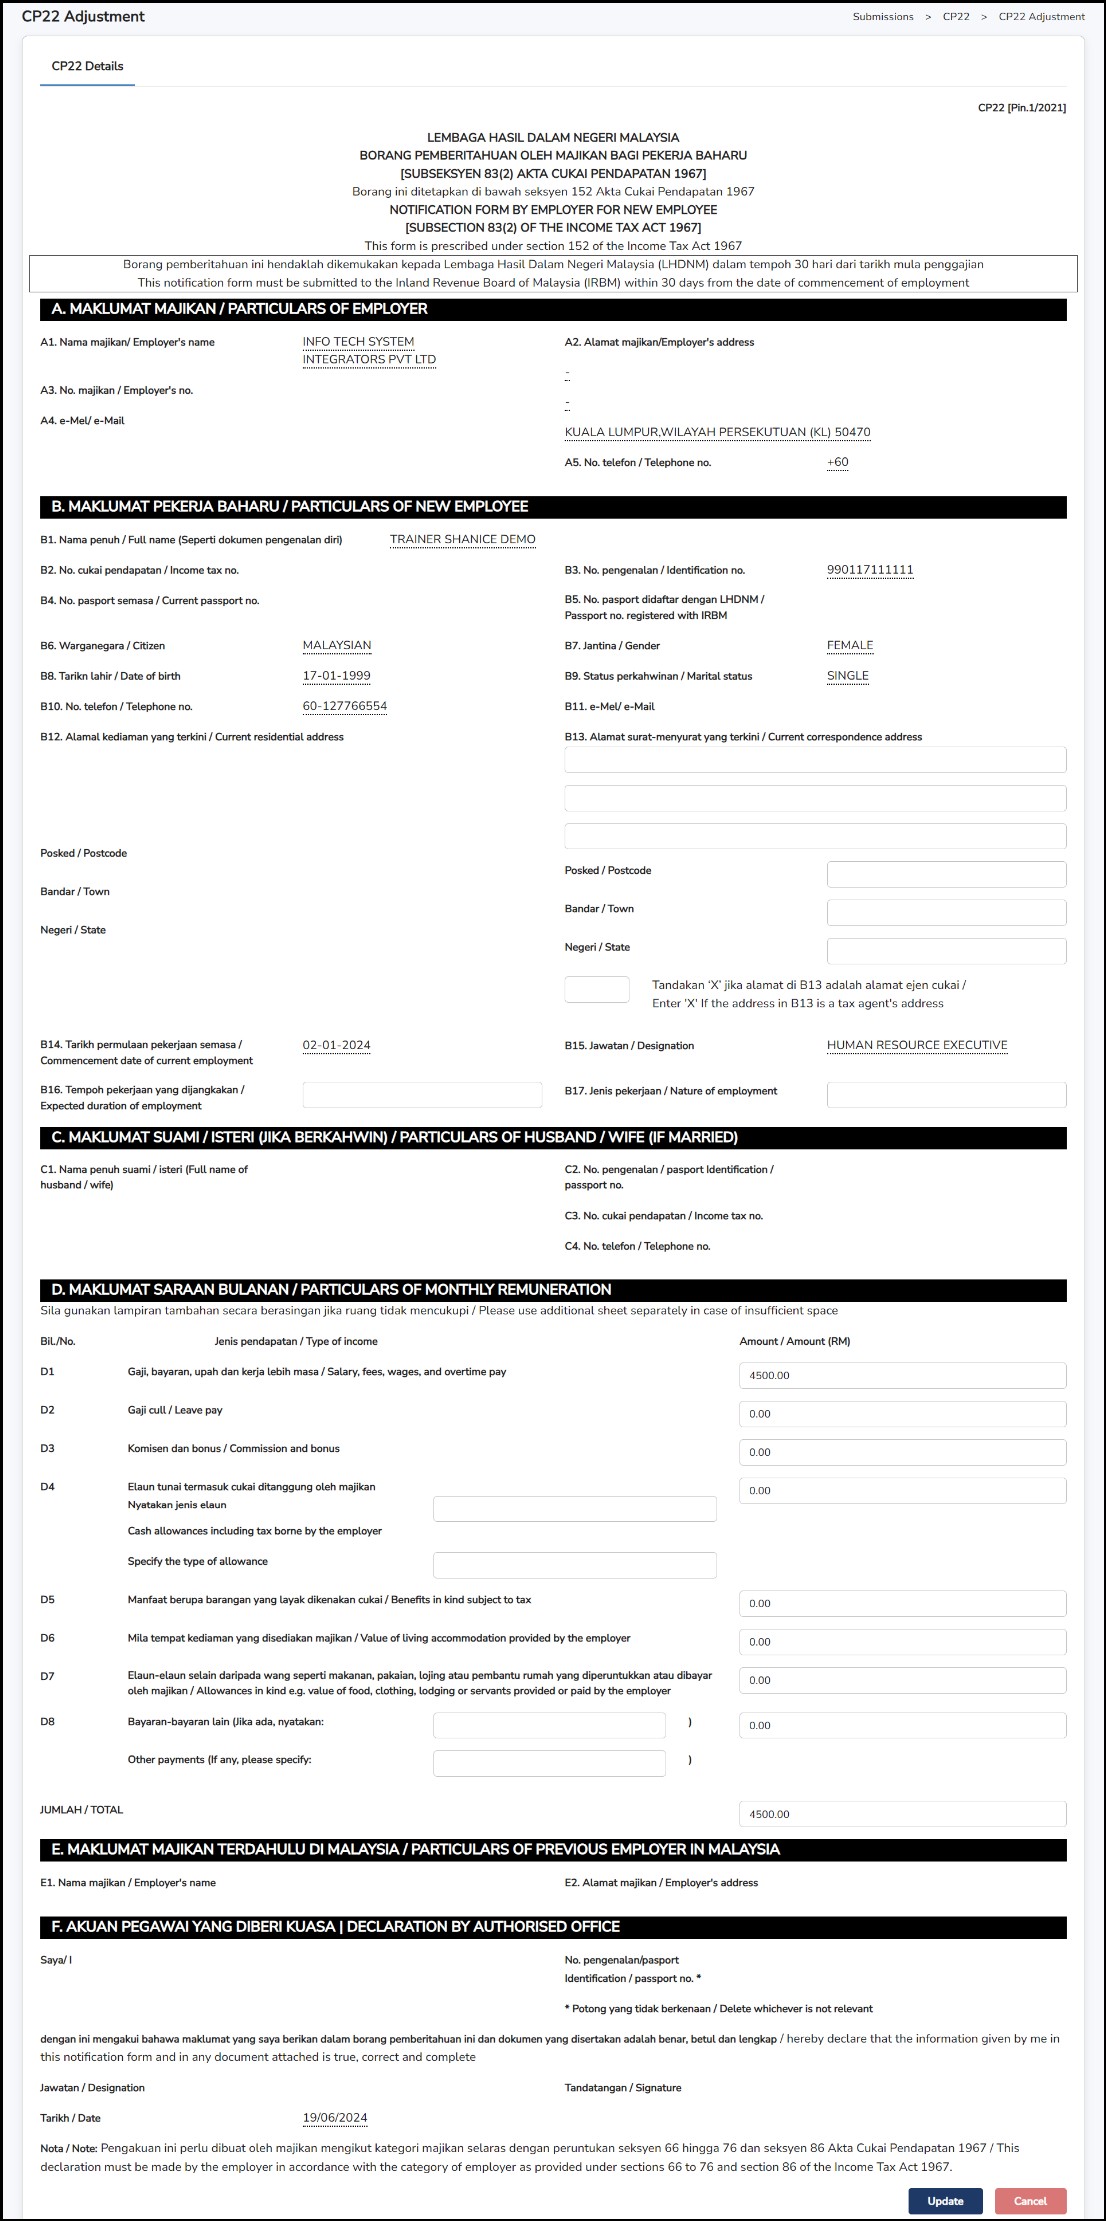
Step 3: Adjust the details accordingly > Click on the
![]() to save the changes.
to save the changes.
Step 4: Go to Submissions > CP22 > CP22 Form.
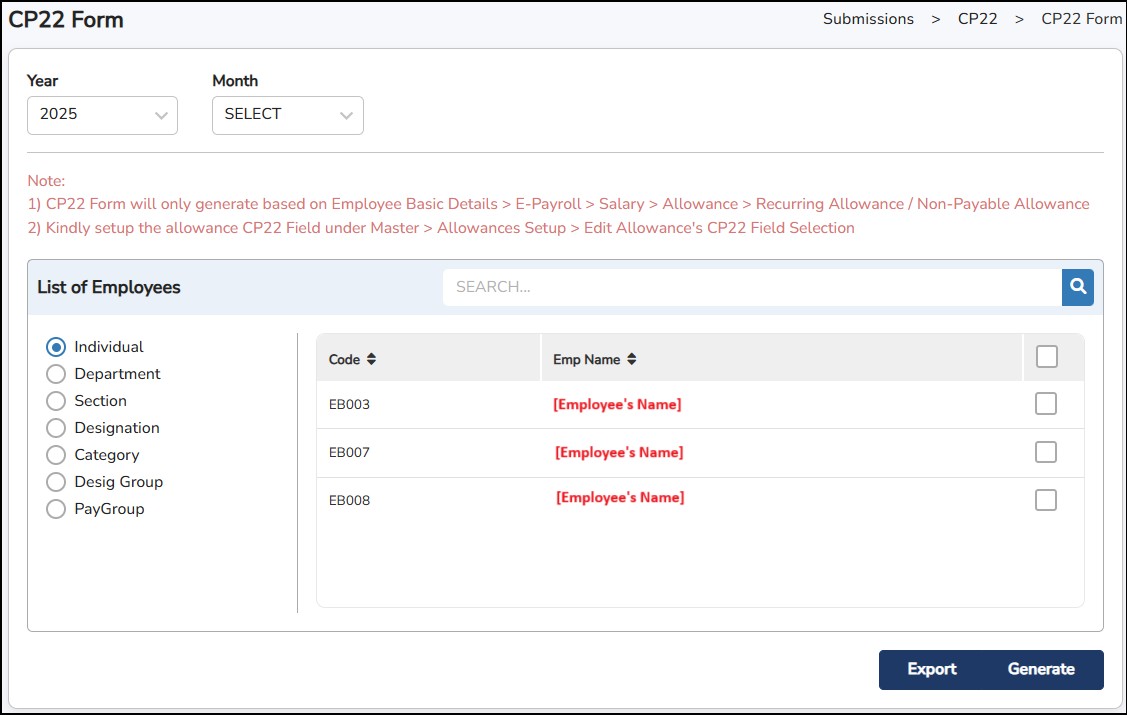
Step 5: Click on
![]() to display the form. Alternatively, the generated form can be exported to txtfile by clicking on the
to display the form. Alternatively, the generated form can be exported to txtfile by clicking on the
![]() button.
button.
CP8D is a report that employers must submit to LHDN. It lists the number of employees and details their income. This form contains details of all employee's annual income, allowances, benefits, and deductions.
Step 1: Go to Submissions > CP8D > CP8D Initialize.
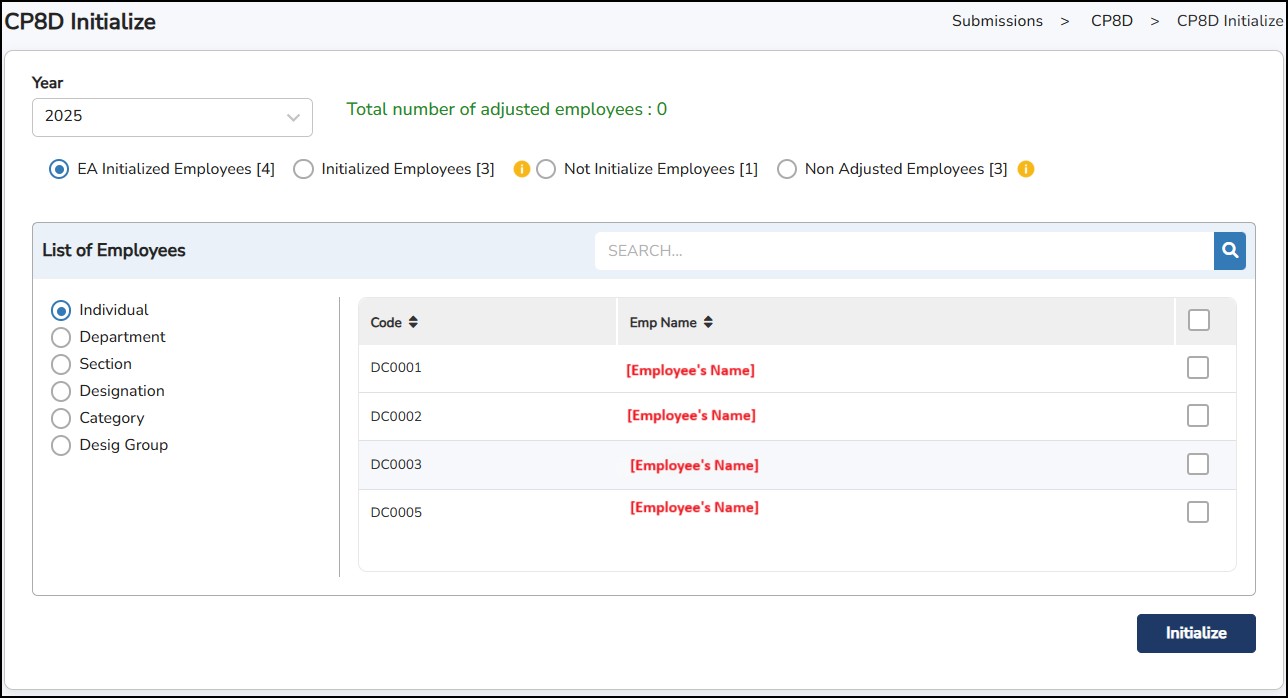
Step 2: Select Year of submission to be appeared in the CP8D Form.
Step 3: Click on the
![]() button.
button.
In case of any changes required to implement in the generated CP8D Form:
Step 1: Go to Submissions > CP8D > CP8D Adjustment.
Step 2: Click
![]() to which employee's CP8D details to be adjusted.
to which employee's CP8D details to be adjusted.
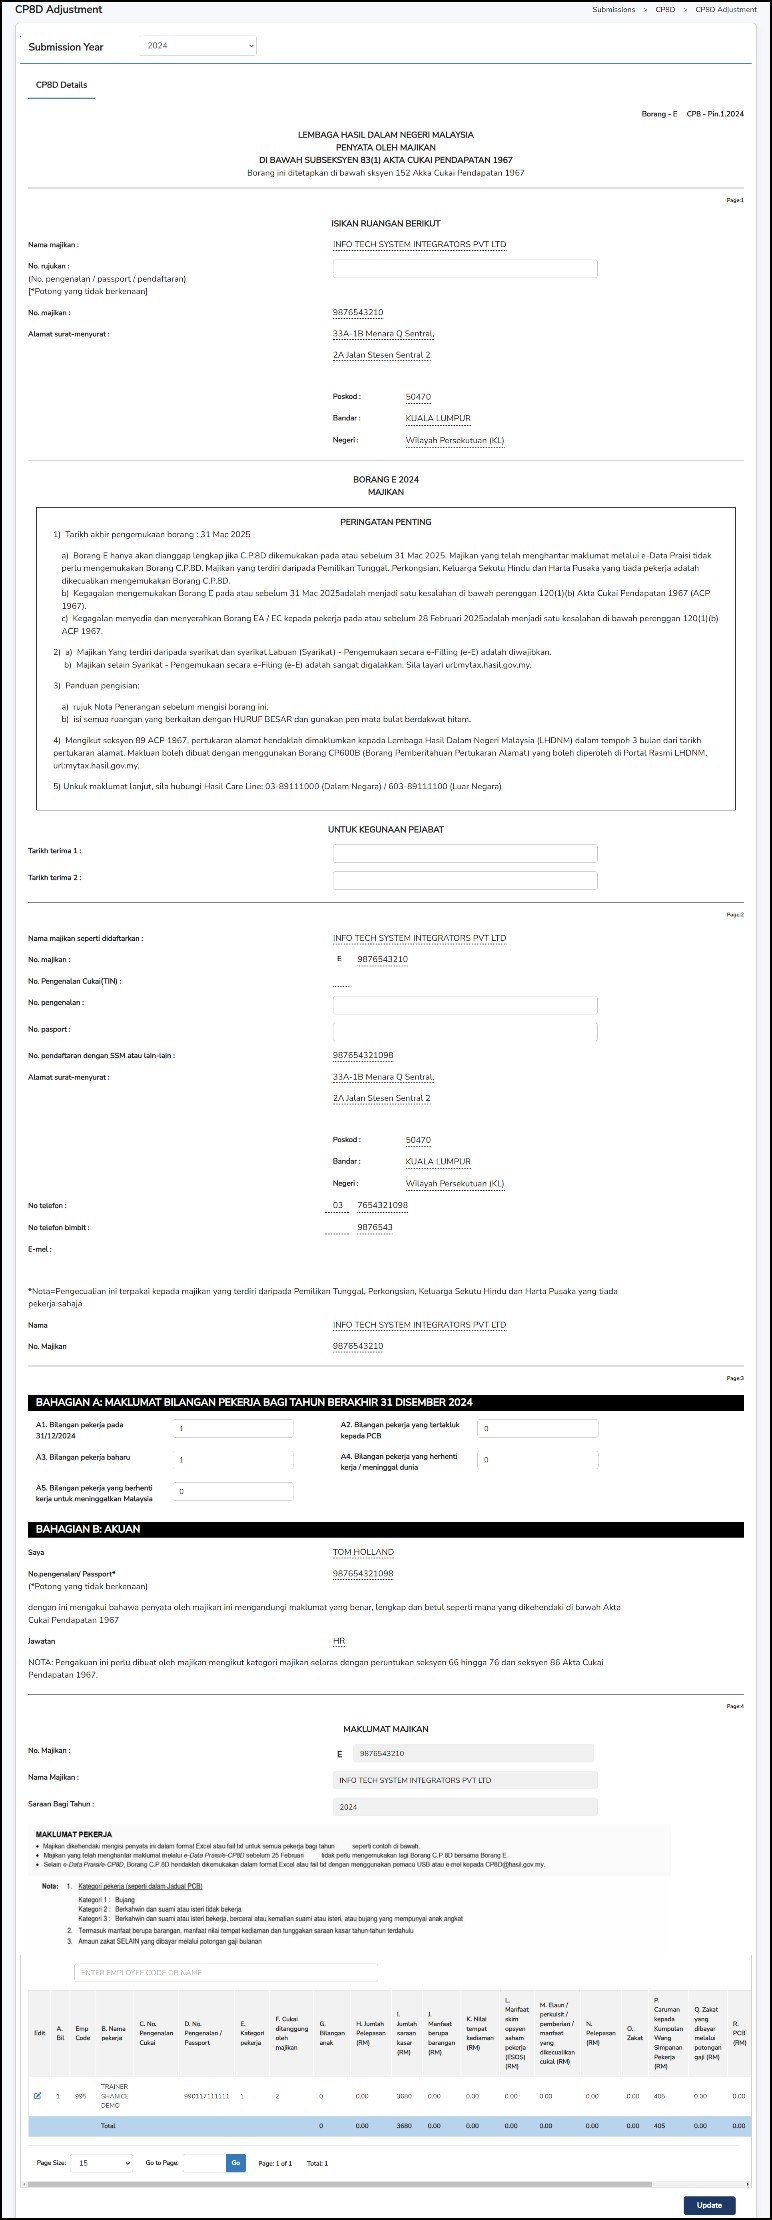
Step 3: Adjust the details accordingly > Click on the
![]() to save the changes.
to save the changes.
Step 4: Click on
![]() to generate the form. Alternatively, you can export the generated file to excel by clicking
to generate the form. Alternatively, you can export the generated file to excel by clicking
![]()

CP8D Online – To download and generate CP8D form into .txt file.
E-Data Praisi – To download and generate CP8D form into .txt file in E-Data Praisi format.
An income tax form provided by the employee to the employer ensures that monthly tax deductions (MTD) accurately reflect applicable rebates and deductions. These include expenses such as books, insurance, medical costs, and others.
Step 1: Go to Submissions > TP1 Form
Step 2: Select the employees from the list.
Step 3: Select the Month and the Year.
Step 4: Select the Relief Type, enter the amount and the Reference No if applicable.
Step 5: Click
![]() the button once confirmed; the details will be reflected in the section below.
the button once confirmed; the details will be reflected in the section below.
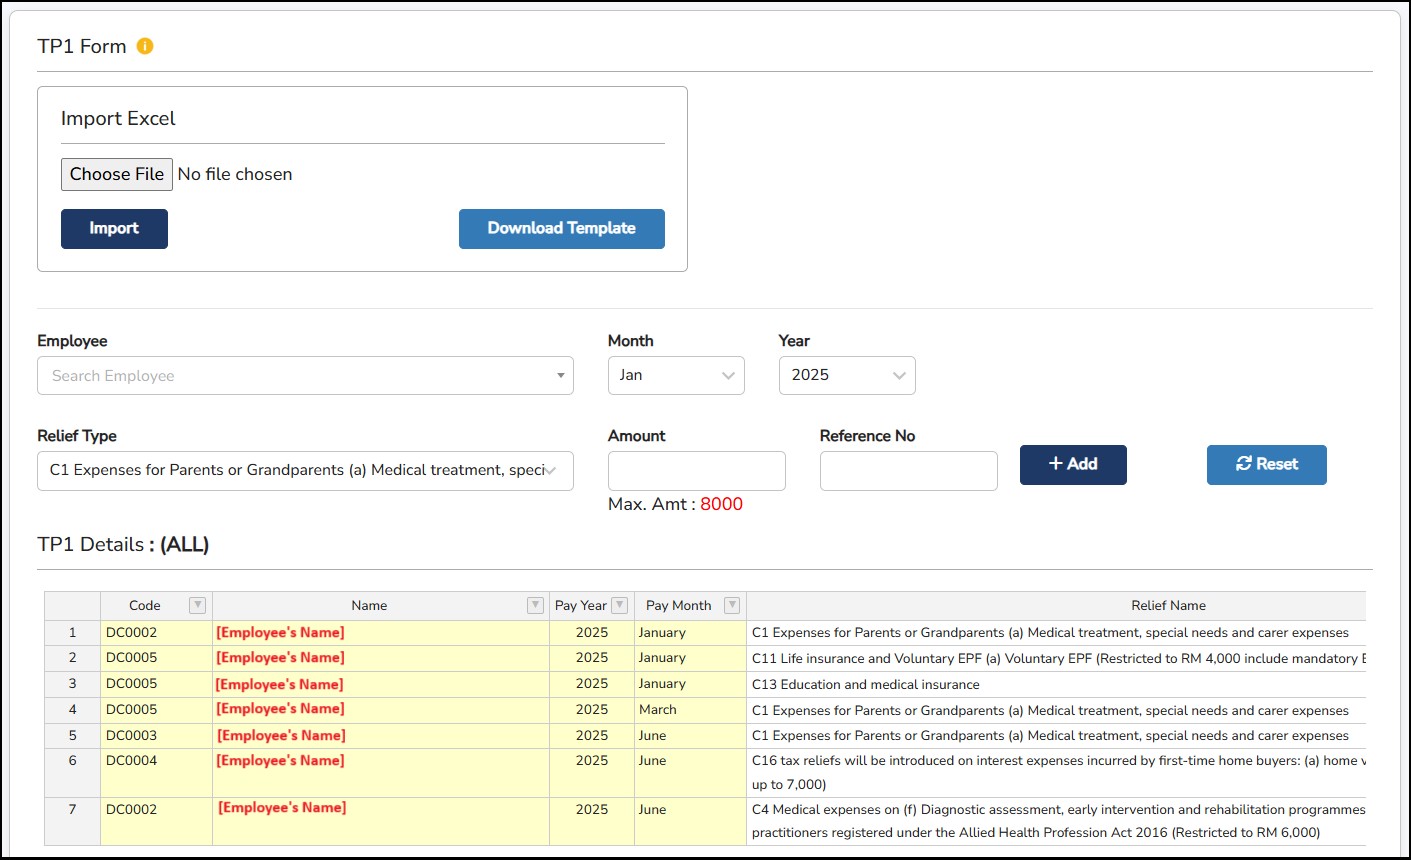
Alternatively, users are also able to update the TP1 details for multiple employees at once by clicking on the
![]() to download the TP1 excel file template.
to download the TP1 excel file template.
TP2 Form is a form for employees who receive Benefits in Kind (BIK) such as cars, accommodation, drivers, or other non-cash benefits from their employer. This form must be submitted annually by employees who want these benefits to be included in their PCB calculation.
Once an employee has opted to include BIK in their PCB through the TP2 form, the decision cannot be withdrawn within the same year and with the same employer.
Step 1: Go to Submissions > TP2 Form
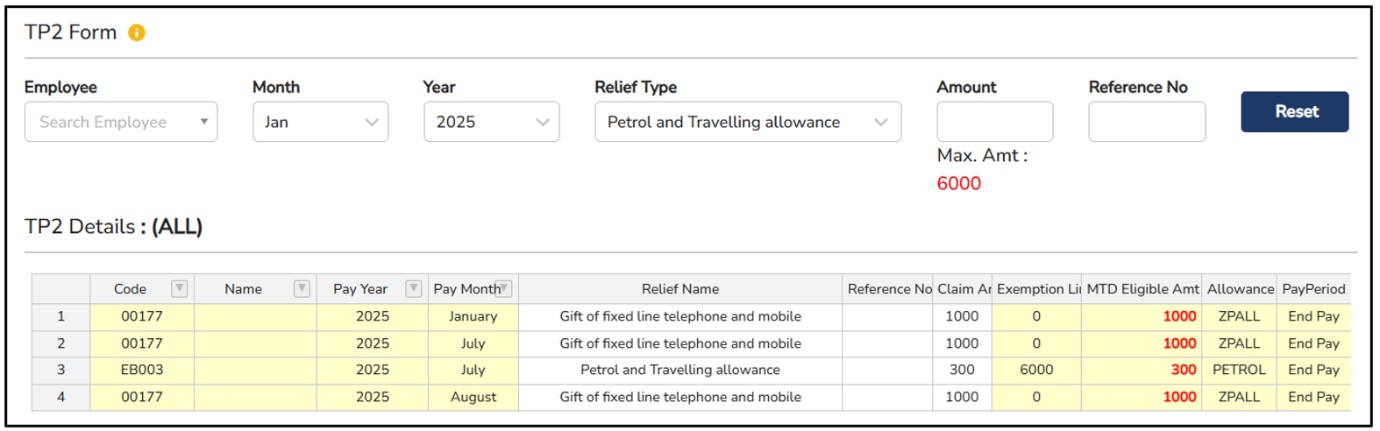
These fields will be automatically added based on the Allowances that have been assigned to the employee and the Tax Exemption Category selected during Allowances Setup.
This form is completed by new employees and submitted to the employer. It provides the necessary personal and tax information (e.g., tax reference number, marital status, number of children) to ensure accurate PCB calculation from the start of employment.
Step 1: Go to Submission > TP3 Form
Step 2: Select the employees from the list.
Step 3: Click
![]() to generate the TP3 Form.
to generate the TP3 Form.
This form is submitted when an employee resigns, retires, or otherwise ceases employment (but is not leaving Malaysia). It ensures LHDN is notified of the employee's last drawn salary and other relevant details for accurate tax computation.
Step 1: Go to Submissions > CP22A > CP22A Initialize.
Step 2: Select Submission Year and LHDN Branch to be appeared in the CP22A Form.
Step 3: Click on the
![]() button.
button.
In case of any changes required to implement in the generated CP22A Form:
Step 1: Go to Submissions > CP22A > CP22A Adjustment.
Step 2: Click
![]() to which employee's CP22A details to be adjusted.
to which employee's CP22A details to be adjusted.
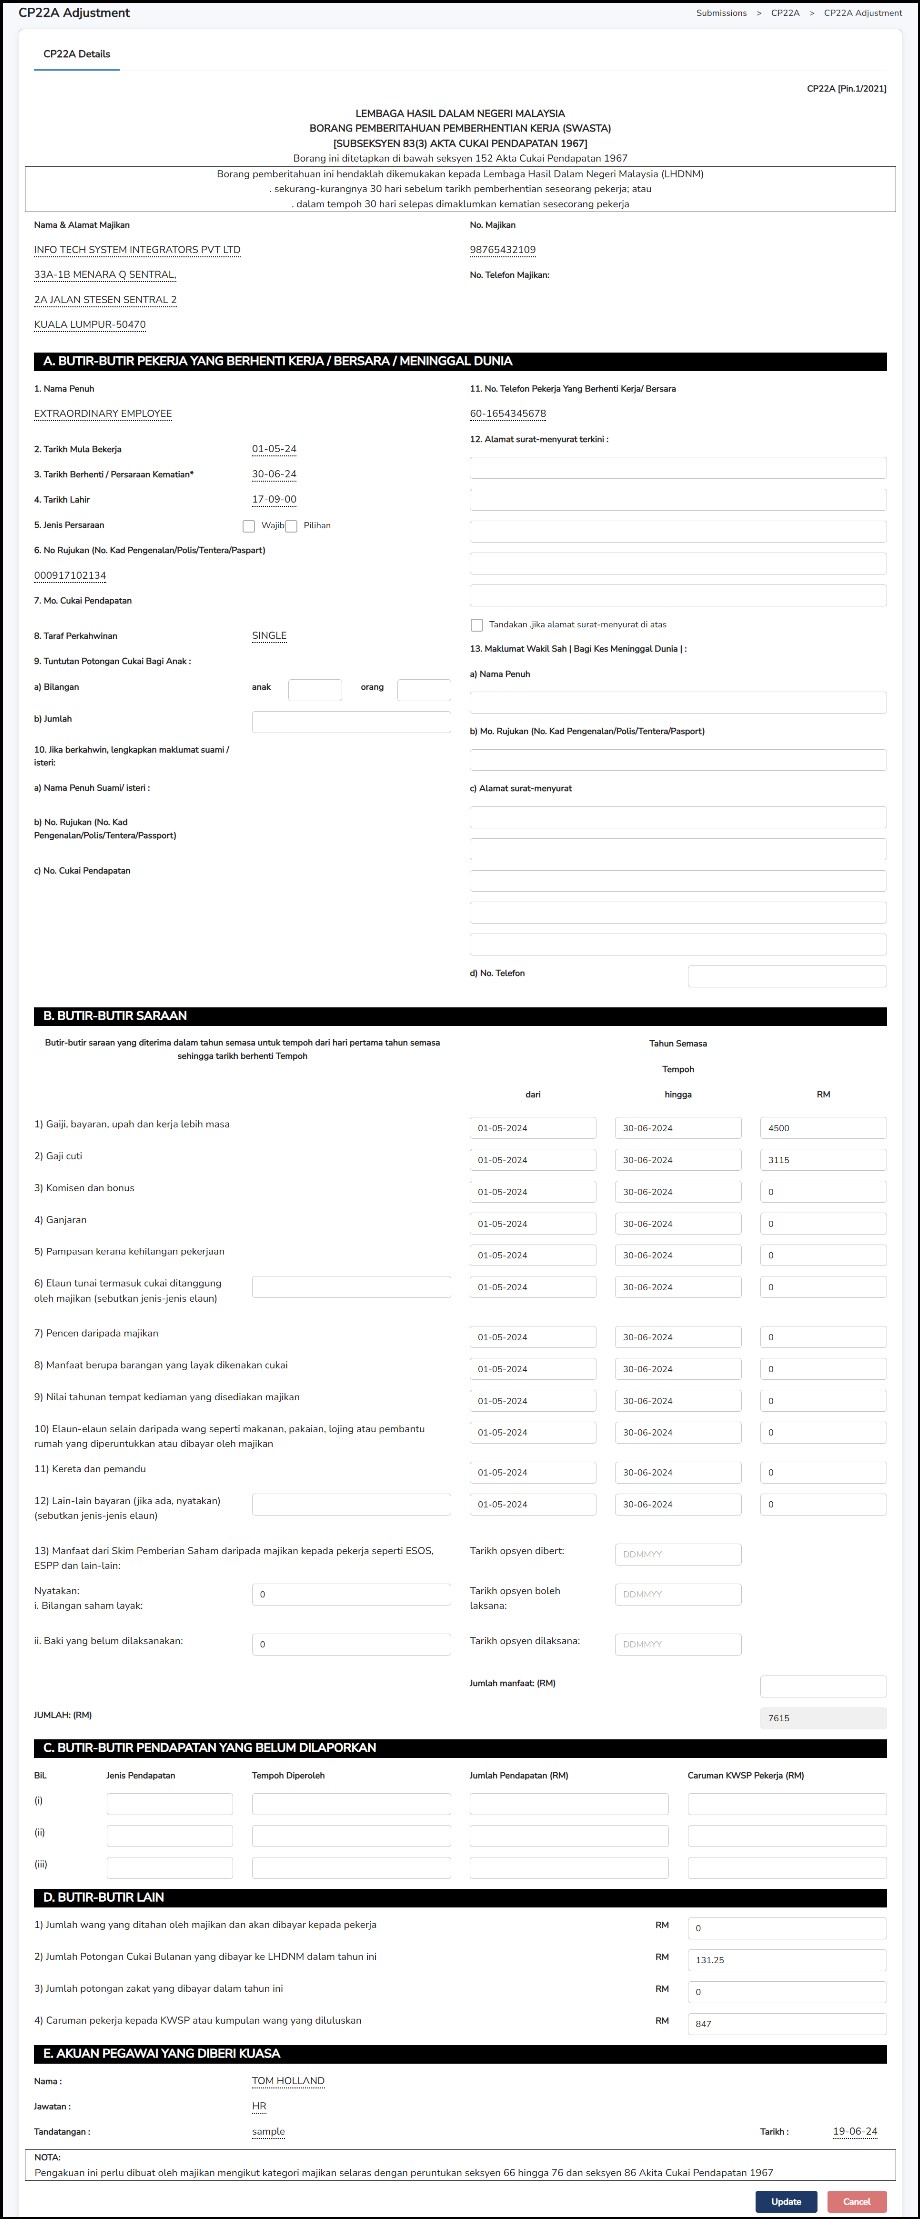
Step 3: Adjust the details accordingly > Click on the
![]() to save the changes.
to save the changes.
Step 4: Go to Submission > CP22A Form to generate and view the form.
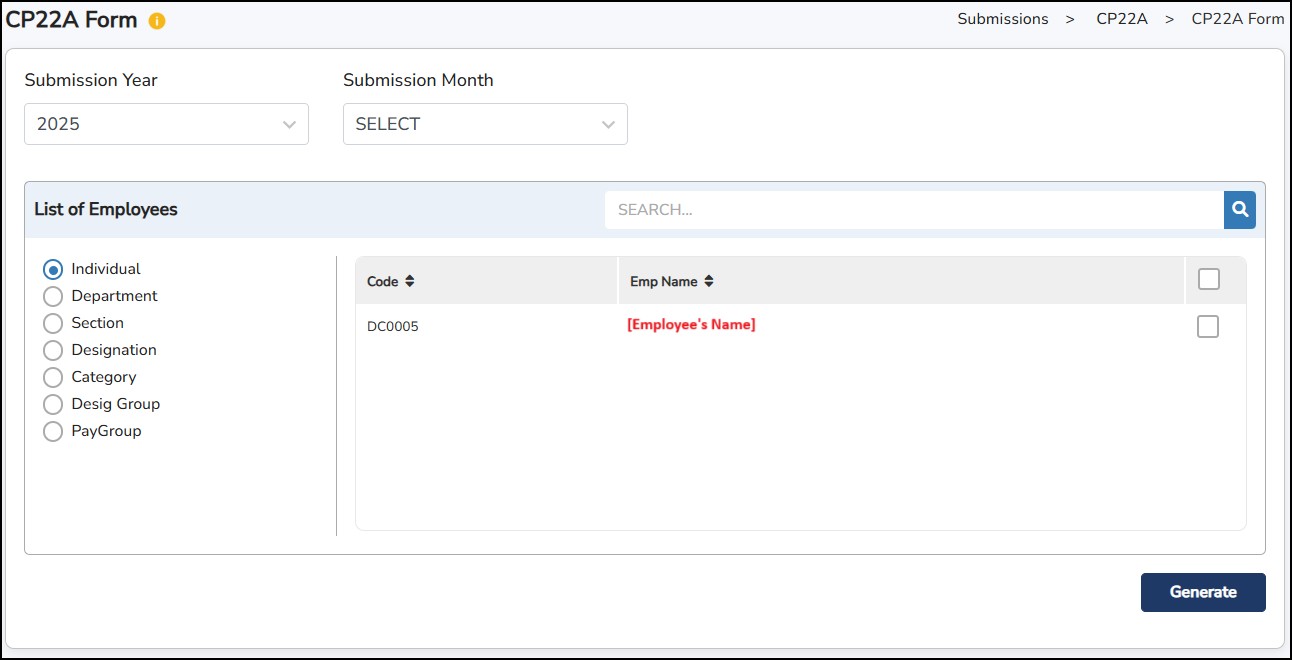
Step 5: Click on
![]() to generate the form.
to generate the form.
Statement of Monetary and Non-Monetary Incentive Payments to an Agent, Dealer, or Distributor. It serves as a record for both the payer and the recipient for tax reporting purposes.
Step 1: Go to Submissions > CP58 > CP58 Initialize.
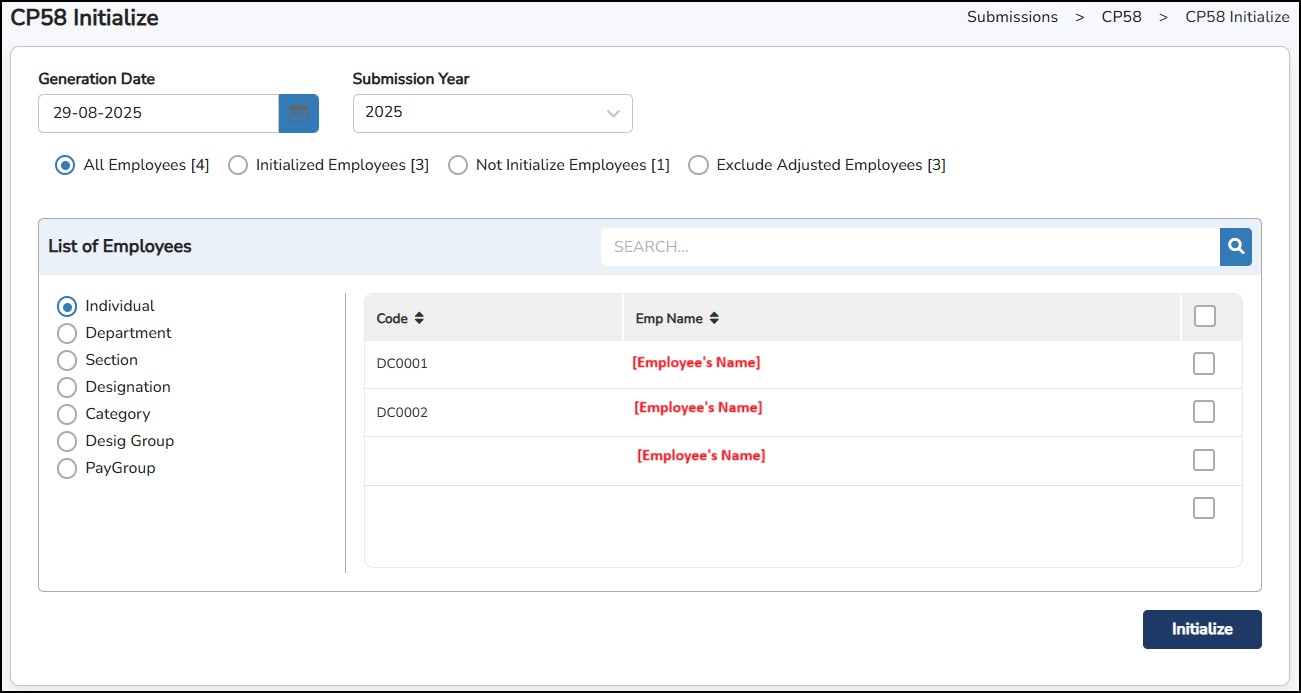
Step 2: Select Generation Date and Submission Year to be appeared in the CP58 Form.
Step 3: Click on the
![]() button.
button.
In case of any changes required to implement in the generated CP58 Form: -
Step 1: Go to Submissions > CP58 > CP58 Adjustment.
Step 2: Click
![]() to which employee's CP58 details to be adjusted.
to which employee's CP58 details to be adjusted.
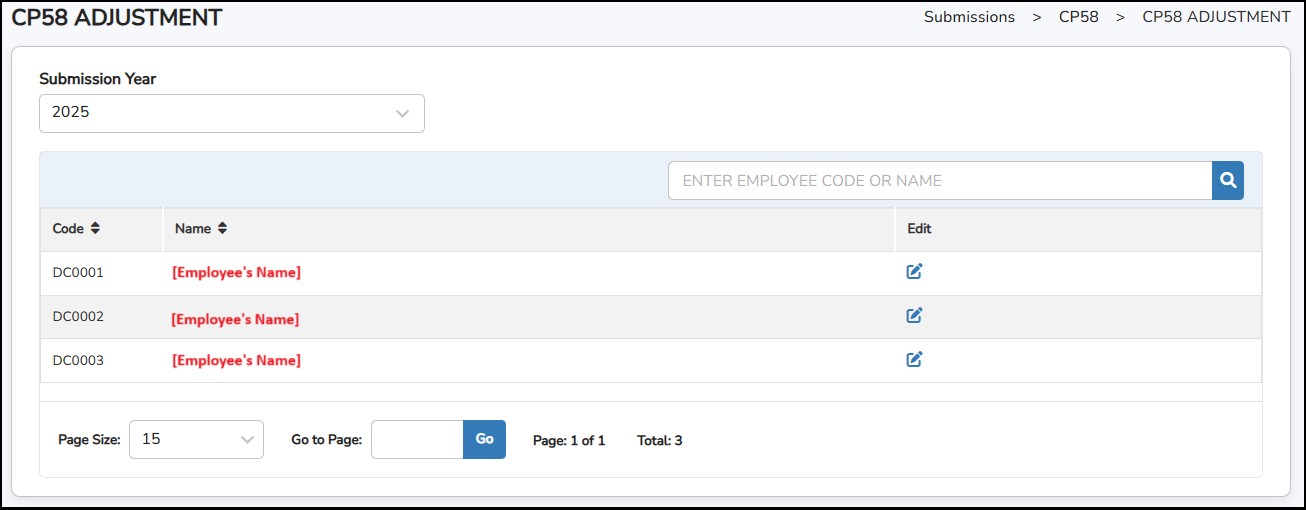
Step 3: Adjust the details accordingly > Click on the
![]() to save the changes.
to save the changes.

Step 4: Go to Submissions > CP58 Form to generate the form.
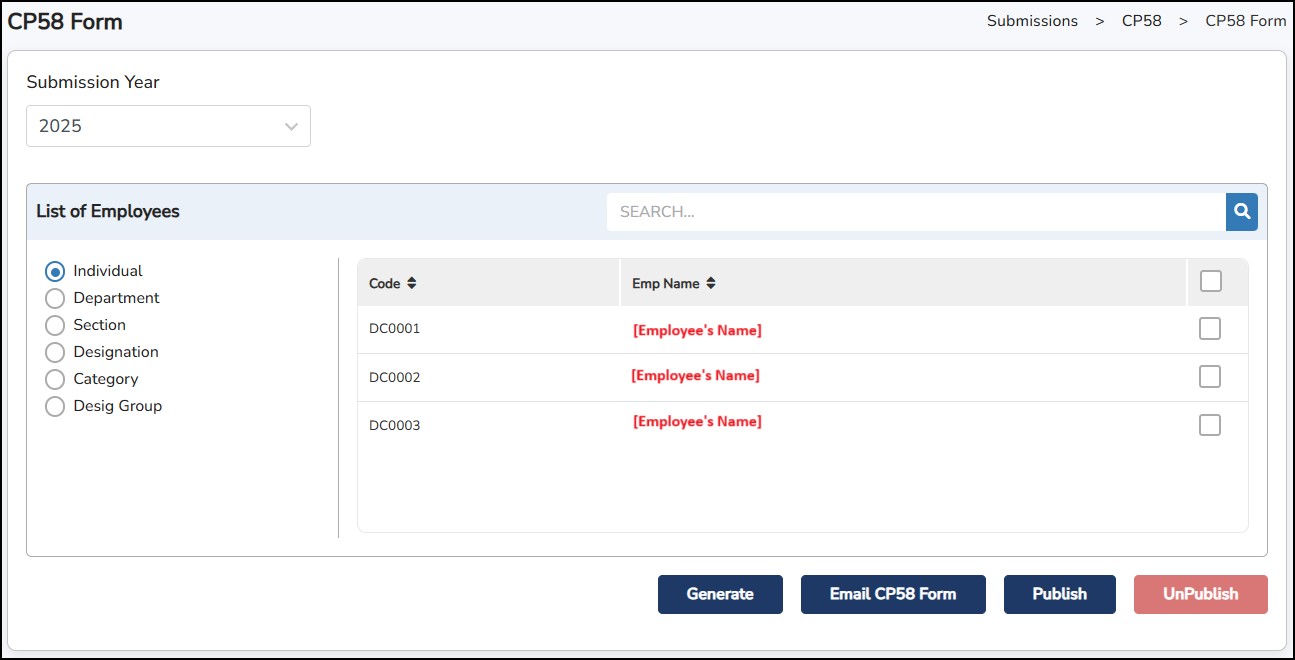
Step 5: Click on
![]() to display the form.
to display the form.
Email CP58 Form – To send email the CP58 form to employee's emails.
Publish – To display CP58 form in the portal and the mobile app.
Unpublish – To remove the published CP58 form from the portal and the mobile app.
Consists of either the Lampiran B Excel file (Statement of Allowances & Tax Deductions (PCB & CP38)) or the PCB Audit text file (Employee Master, Payroll Register, Chart of Account for Payroll).
Step 1: Go to Submission > LHDN Audit File.
Step 2: Select the Submission Year and the Type of file to generate.
Lampiran B: an Excel file generated for each individual employee.
It provides a detailed breakdown of the employee's monthly remuneration.
The report includes statutory deductions such as EPF, SOCSO, EIS, and PCB.
PCB Audit File: a text file (.txt format) generated at a group level.
It contains a summary of all remuneration and information for the selected employees.
Unlike Lampiran B, it does not show detailed monthly deductions per employee, but rather a compiled view for compliance checking.
Step 3: Select the employees from the list.

Step 4: Click
![]()
This is where you can process the employee’s Loan, Withhold and Savings applications and keep important employment records for reference purposes.
Step 1: Go to Human Resource > Employee Personal Details .
**Note: If you would like to bulk update insurance for multiple employees, you may click
![]() and fill in the details of the information.
and fill in the details of the information.
Once done, you may select the employees to assign and click
![]() once done.
once done.
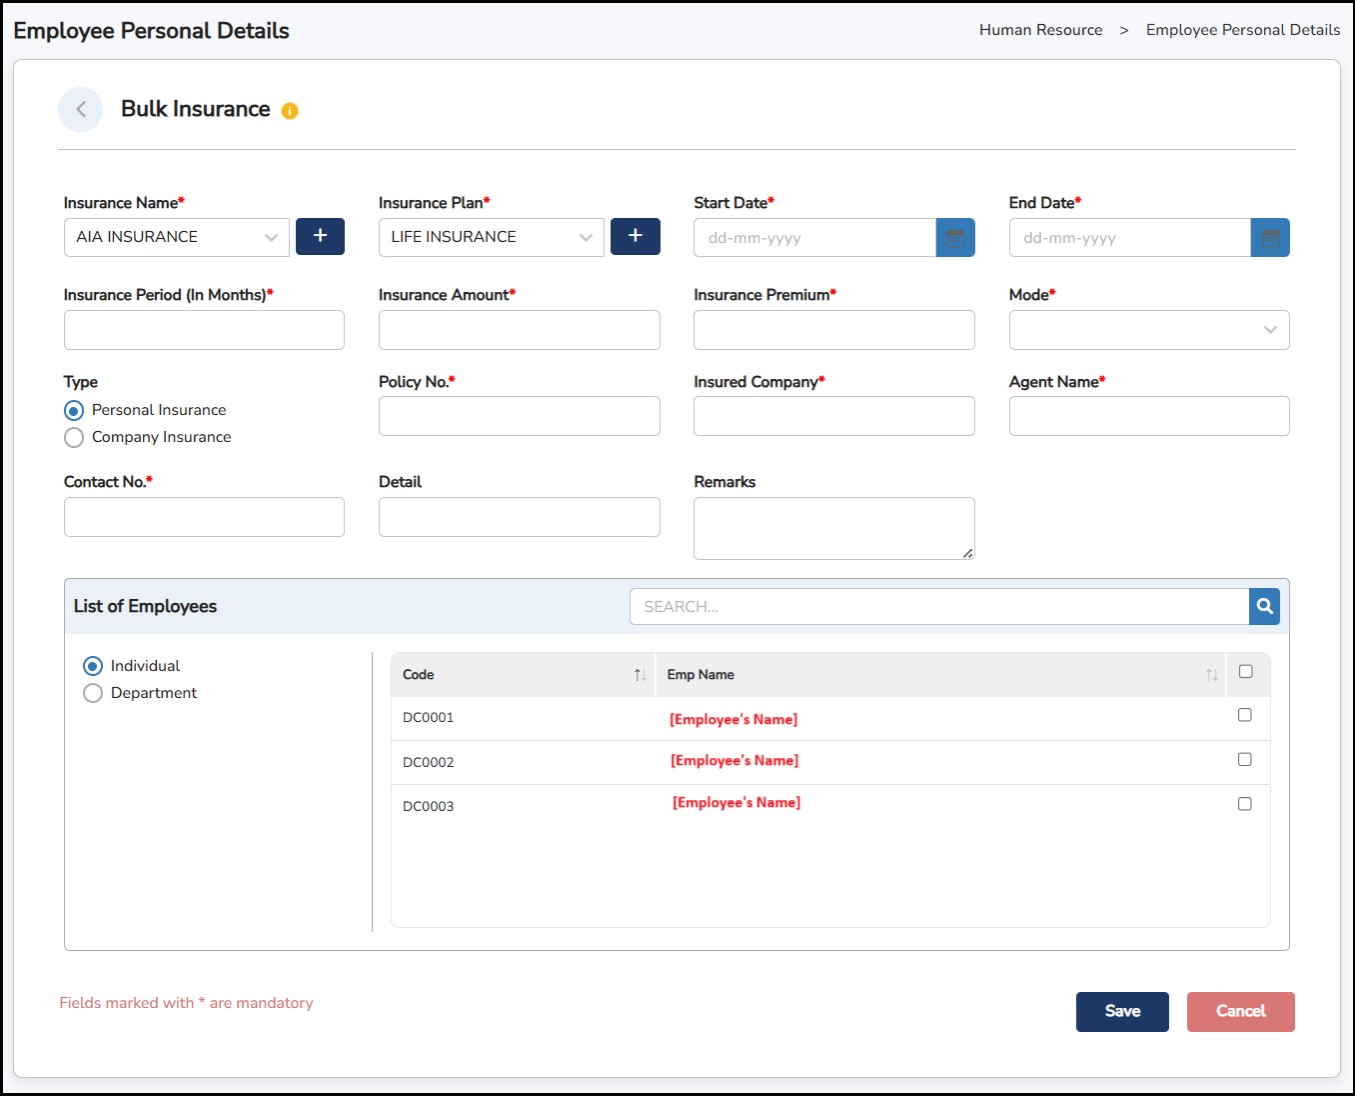
Step 2: Click on the Edit button to edit the employee's details.

Step 1: Go to Human Resources > Personal Details
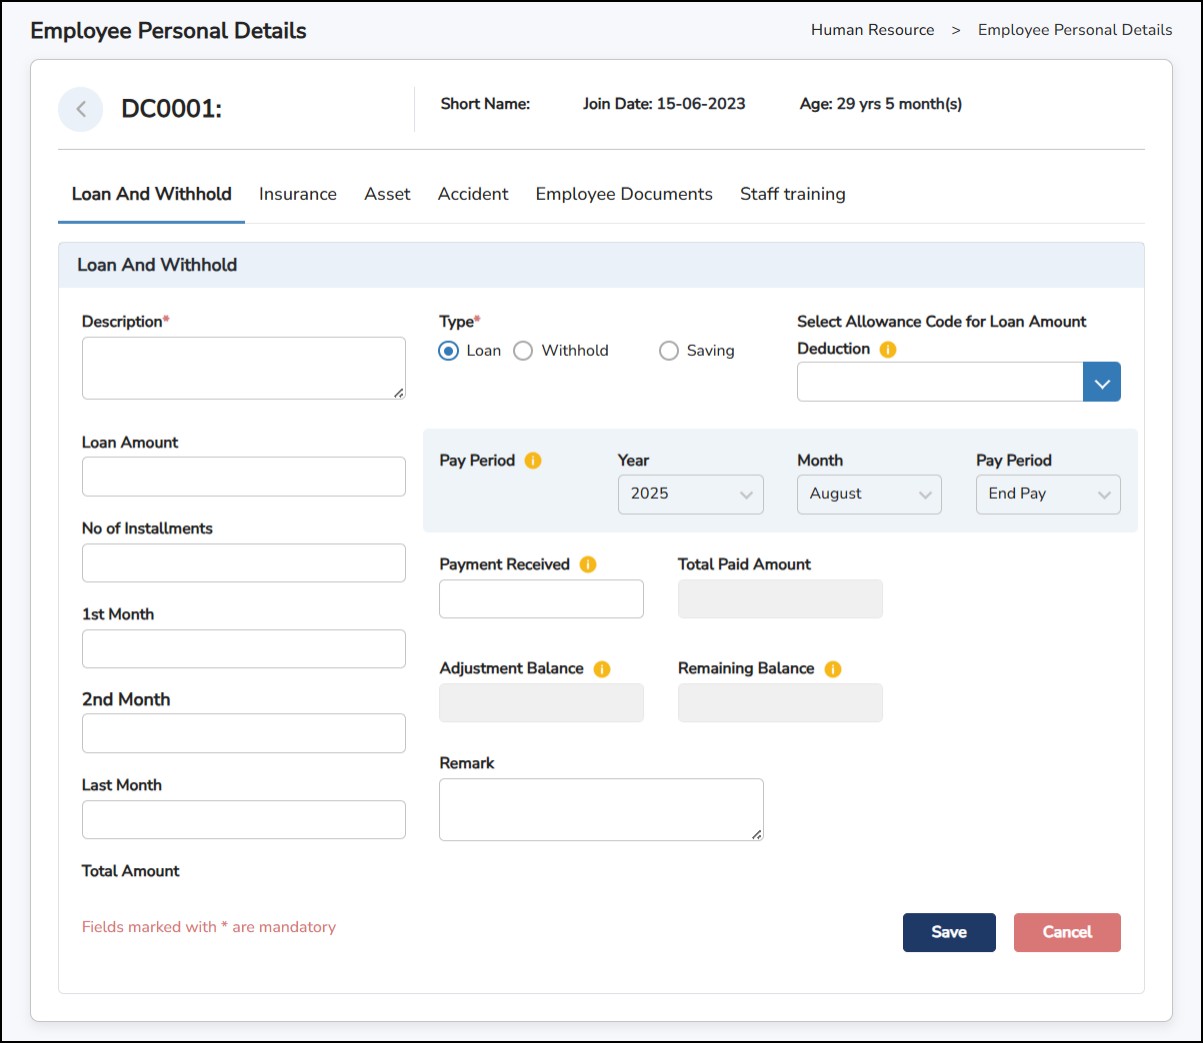
Description – Enter a short title or note explaining the purpose of the entry (e.g., "Staff Loan for Laptop").
Type – Choose one of the following:
Loan – when the company lends money to an employee.
Withhold – for temporary withheld payments.
Saving – if it's a staff savings scheme.
Select Allowance Code – Choose the payroll allowance code that will be used to deduct the loan/withhold amount from the salary. (Mandatory for loan type.)
Loan Amount
No. of Installments – Number of months the amount will be repaid over.
1st Month, 2nd Month, Last Month – Input specific monthly deduction values if the installment amounts vary (optional – used for custom repayment schedules).
Total Amount – This will auto-calculate based on loan amount or entered instalment values.
Pay Period – Enter which Pay Period will this instalment starts.
Payment Received – Enter the amount paid by the employee.
Remark – To put any remarks regarding the loan and withhold of the employee.
This is where you can keep a record of employee’s Insurance details:
Step
1: Go to
Insurance
Tab > Click
![]()
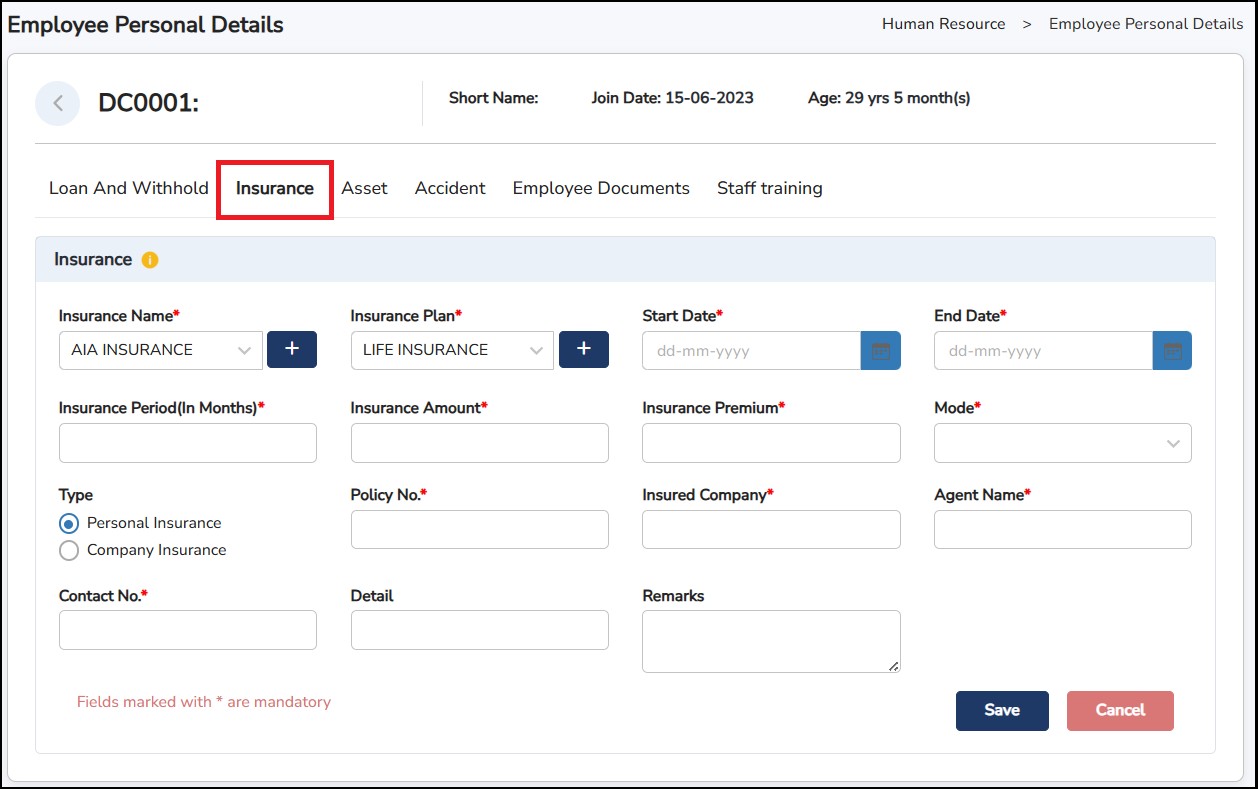
Step
2: To create
Insurance
Name
and
Insurance
Plan
,
click on the
![]() icon > Enter the
Code
and the
Name
> Click
icon > Enter the
Code
and the
Name
> Click
![]()
|
|
|
|
Insurance Name |
Insurance Plan |
Step 3: Enter all the mandatory details.
Step
4: Click
![]() once done.
once done.
This is where you can record any office items that you have provided to your employee(s) (i.e., handphone, laptop, car, & etc…)
Step
1: Go to
Human Resource > Employee Personal Details > Asset tab >
Click
![]()

Step
2: To create a new
Asset
,
click on the
![]() icon > Enter the
Asset
Code
and
Asset
Name
> Click
icon > Enter the
Asset
Code
and
Asset
Name
> Click
![]()
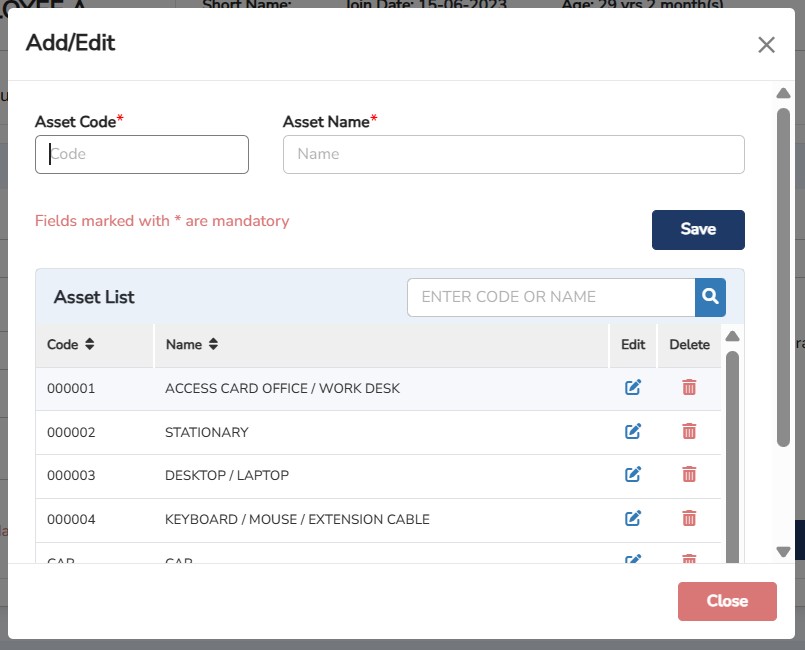
Step 3: Enter all the mandatory details.
Step
4: Click
![]() once done.
once done.
This is where you can record any accidents that the employee may have encountered during working hours.
Step
1: Go to
Accident
tab > Click
![]()
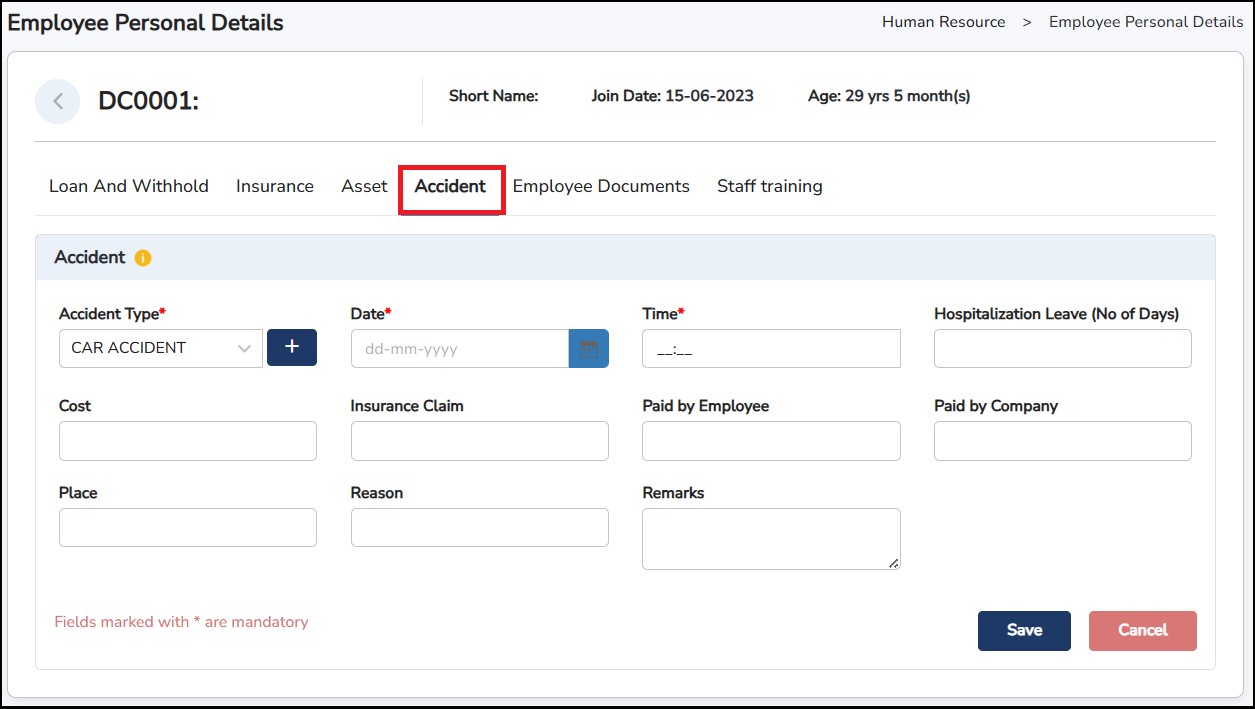
Step
2: To create a new
Accident
Type
,
click on the
![]() icon > Enter the
Accident
Code
and
Accident
Name
> Click
icon > Enter the
Accident
Code
and
Accident
Name
> Click
![]()
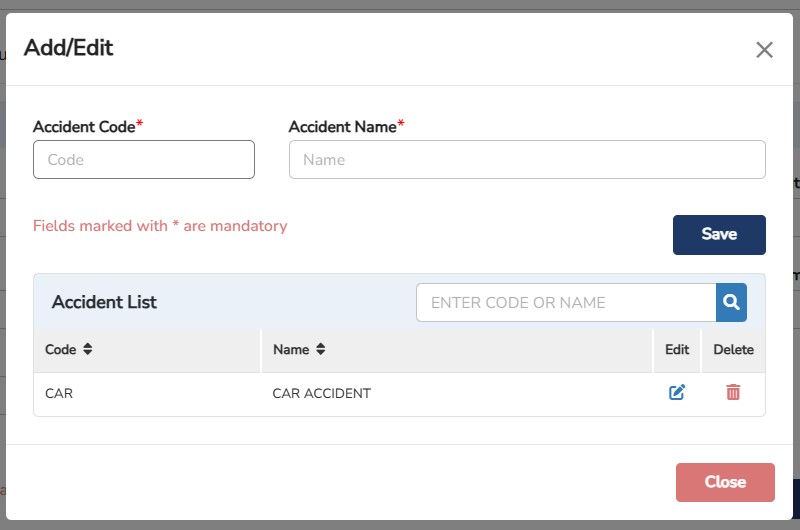
Step 3: Enter all the mandatory details.
Step
4: Click
![]() once done.
once done.
This is where you can upload all kinds of employee’s documents such as work permit, driving license, passport, training, documents, education and other documents as well.
Step
1: Go to
Employee
Documents
tab > Click
![]()
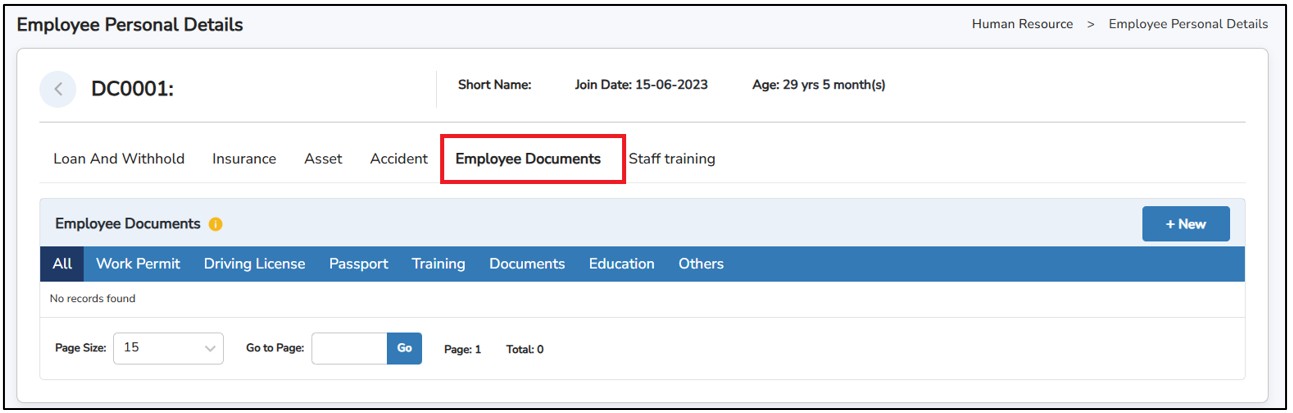
Step 2: Select which Document Type from the drop-down menu > Enter the Title and Description.
Step
3: Click on
![]() to select the document from your computer.
to select the document from your computer.
Step
4: Click
![]() once done.
once done.
This is where you can record the training(s) that the employees have attended to.
Step
1: Go to
Staff
Training
tab > Click
![]()
Training Detail
To create training courses to assign to the employees.
Step 1: Go to Human Resources > Employee Personal Details > Staff Training > Training Detail.
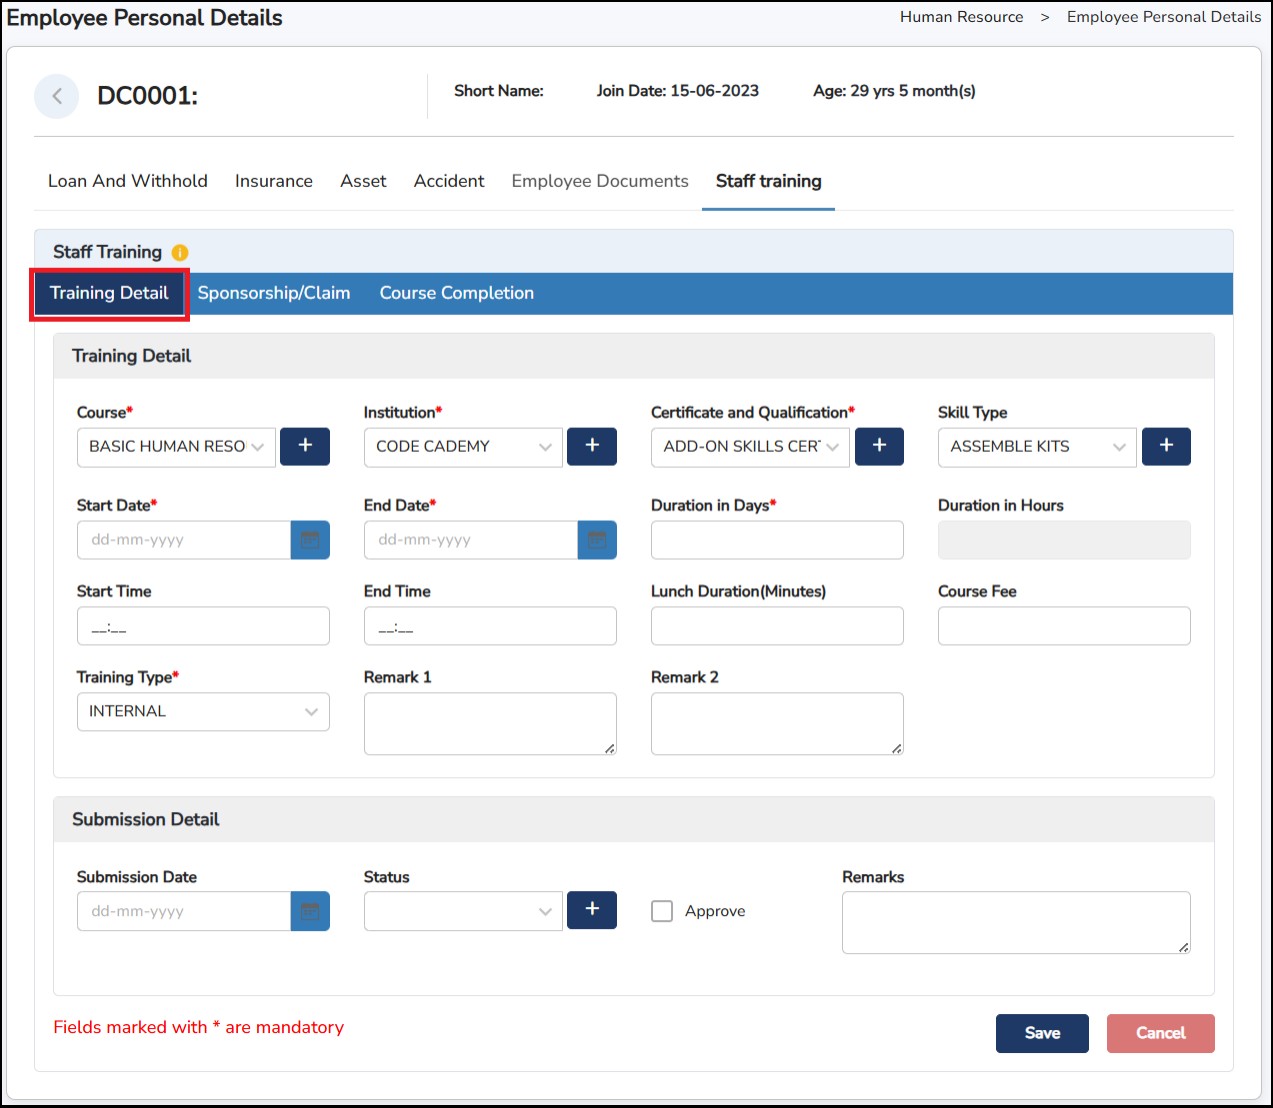
Step 2: Click on the
![]() icon > Enter the Code and Name accordingly > Click
icon > Enter the Code and Name accordingly > Click
![]() .
.
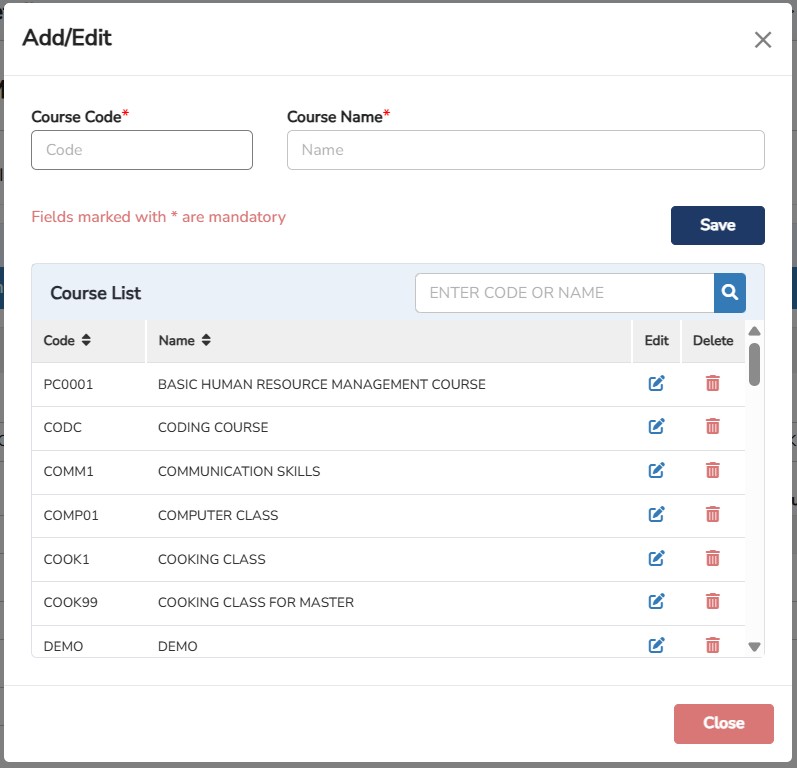
Step 3: Enter all the mandatory details.
Step 4: Click
![]() once done.
once done.
Sponsorship/Claim tab
Enter the necessary Sponsorship / Claim regarding the course.
Step 1: Human Resources > Employee Personal Details > Staff Training > Course Completion
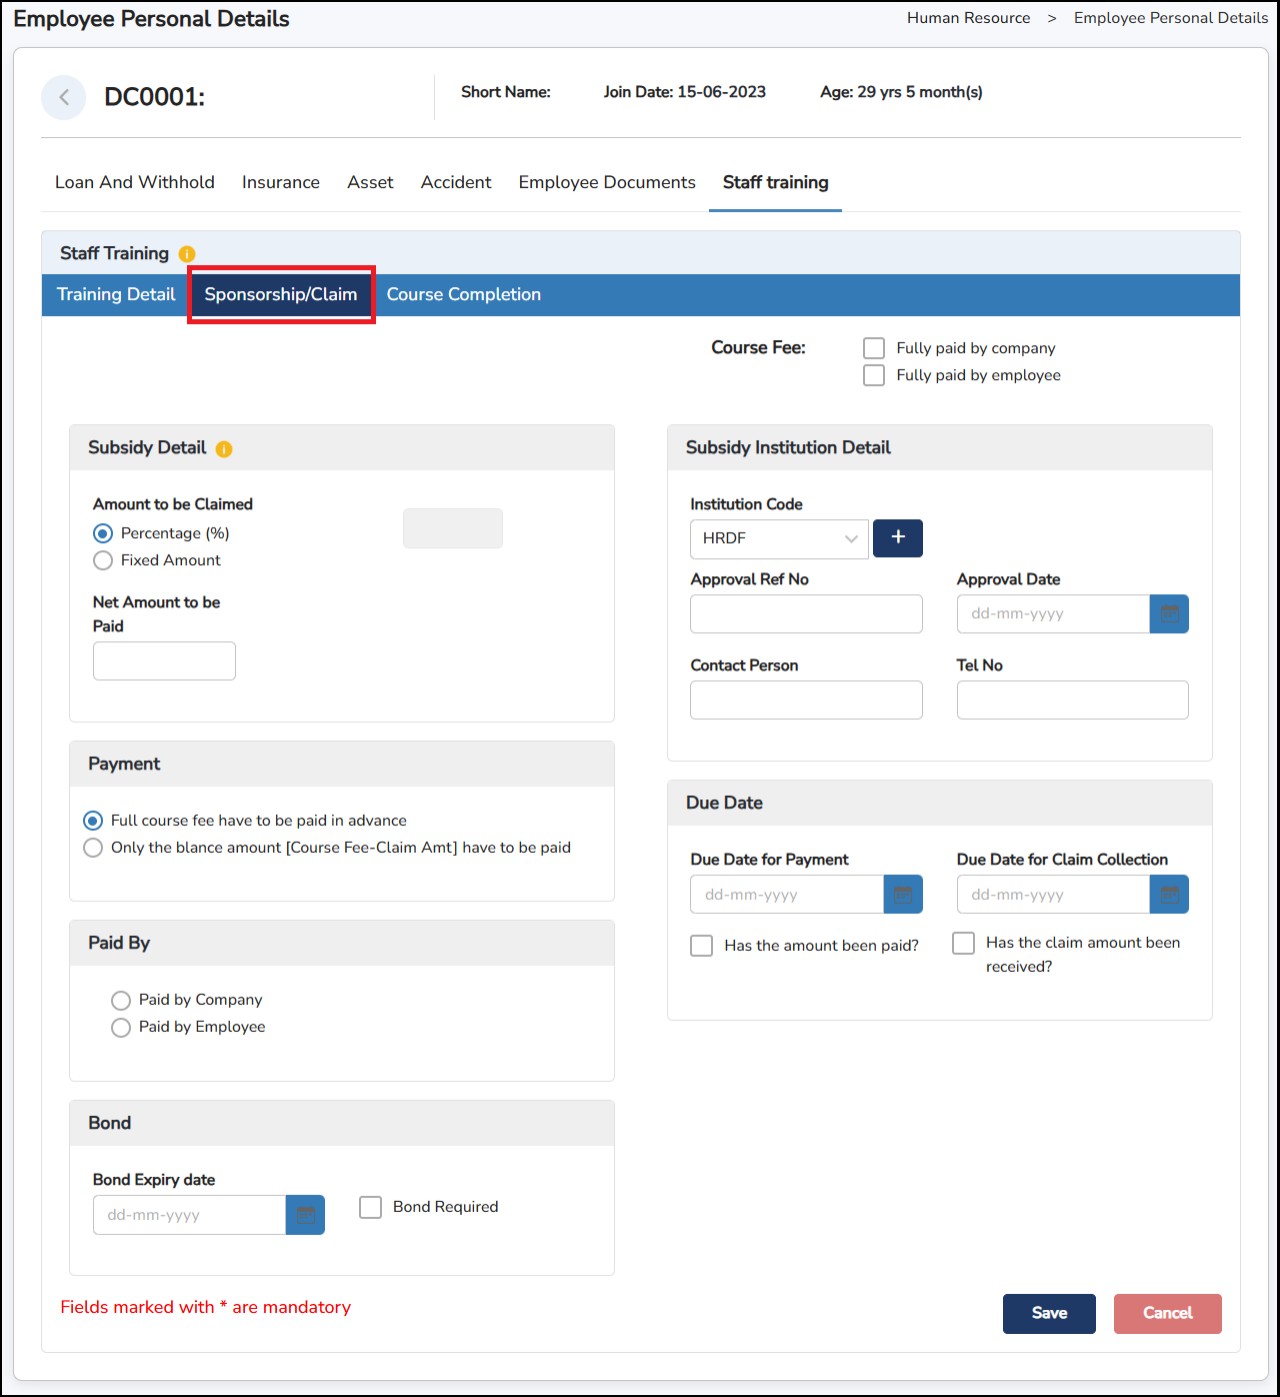
Step 2: Enter all the mandatory details.
Course Fee – Tick Fully paid by company or Fully paid by employee.
Subsidy Detail – Percentage (%) or Fixed Amount, then enter the Net Amount to be Paid
Subsidy can be applied only if a Course Fee is provided.
The Net Amount to be Paid reflects the remaining payable amount.
Payment Terms – Select one:
Full course fee has to be paid in advance; or
Only the balance amount (Course Fee – Claim Amount) has to be paid.
Paid By – Choose Paid by Company or Paid by Employee to record who makes the upfront payment.
Subsidy Institution Detail – Complete where applicable: Institution Code (e.g., HRDF), Approval Ref No, Approval Date, Contact Person, Tel No.
Due Dates & Status
Due Date for Payment: enter date and tick Has the amount been paid? once settled.
Due Date for Claim Collection: enter date and tick Has the claim amount been received? after reimbursement is received.
Bond – Tick Bond Required and set Bond Expiry date.
Step 3: Click
![]() once done.
once done.
Course Completion tab
To submit once the employee has completed the assigned courses.
Step 1: Human Resources > Employee Personal Details > Staff Training > Course Completion.
Step 2: Tick on the Course Successfully Completed
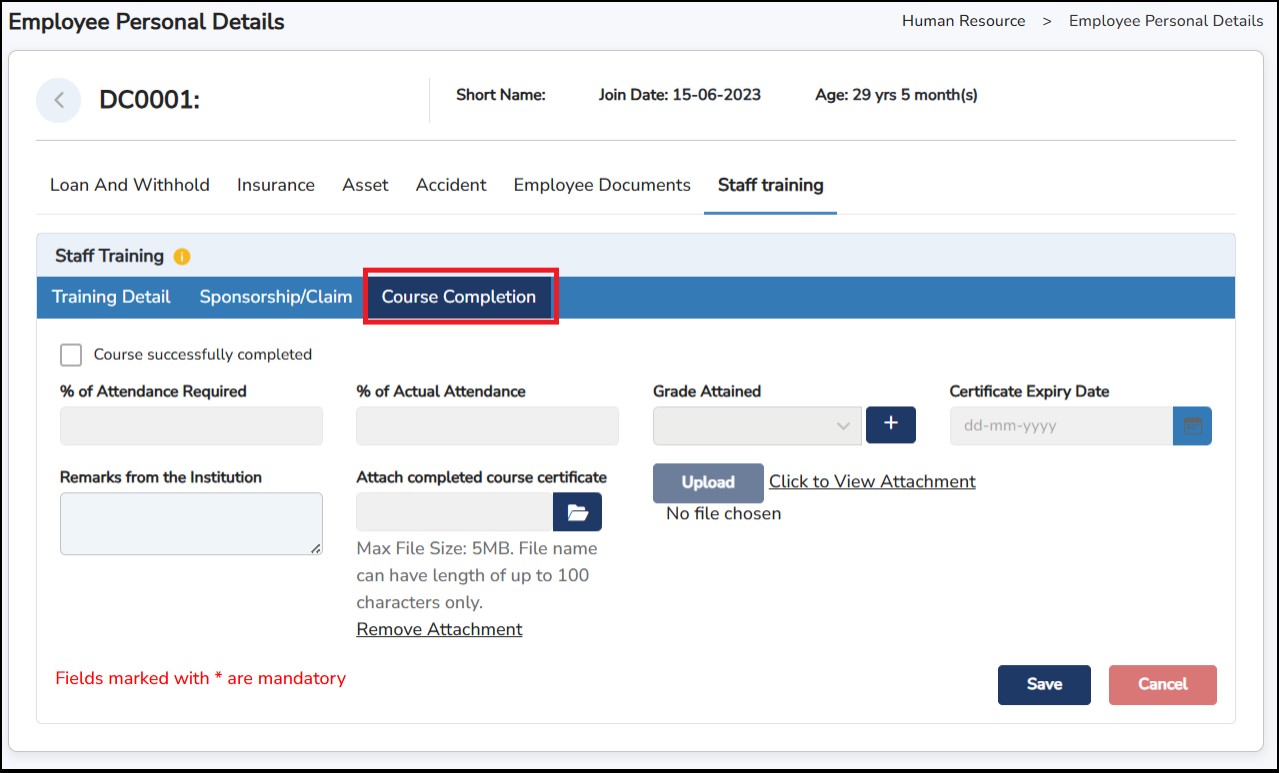
Step 3: Once ticked, all the columns will be available to be filled in.
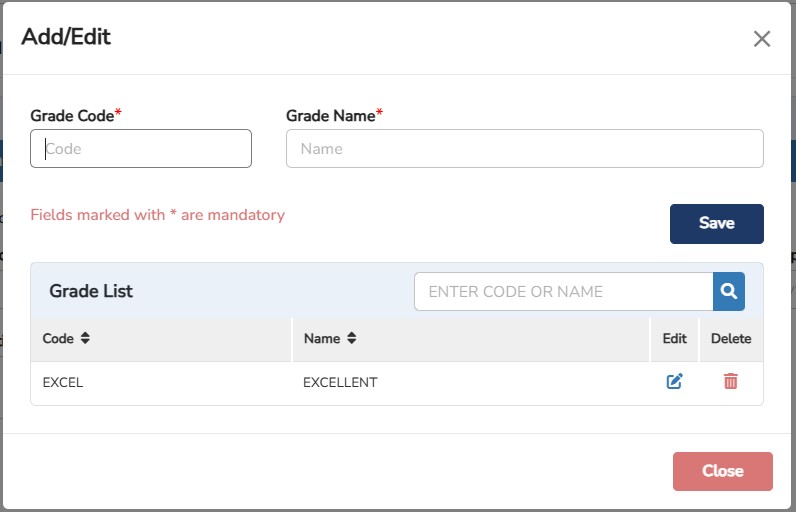
Step 4: Click on the
![]() icon > Enter the Code and Name accordingly > Click
icon > Enter the Code and Name accordingly > Click
![]()
Step 5: Click
![]() once done.
once done.
IMPORT STAFF TRAINING
You may IMPORT the staff training by group: -
Step
1: Go to
Human
Resource
>
Employee
Personal
Details
> Edit one of the employees > Click
![]()
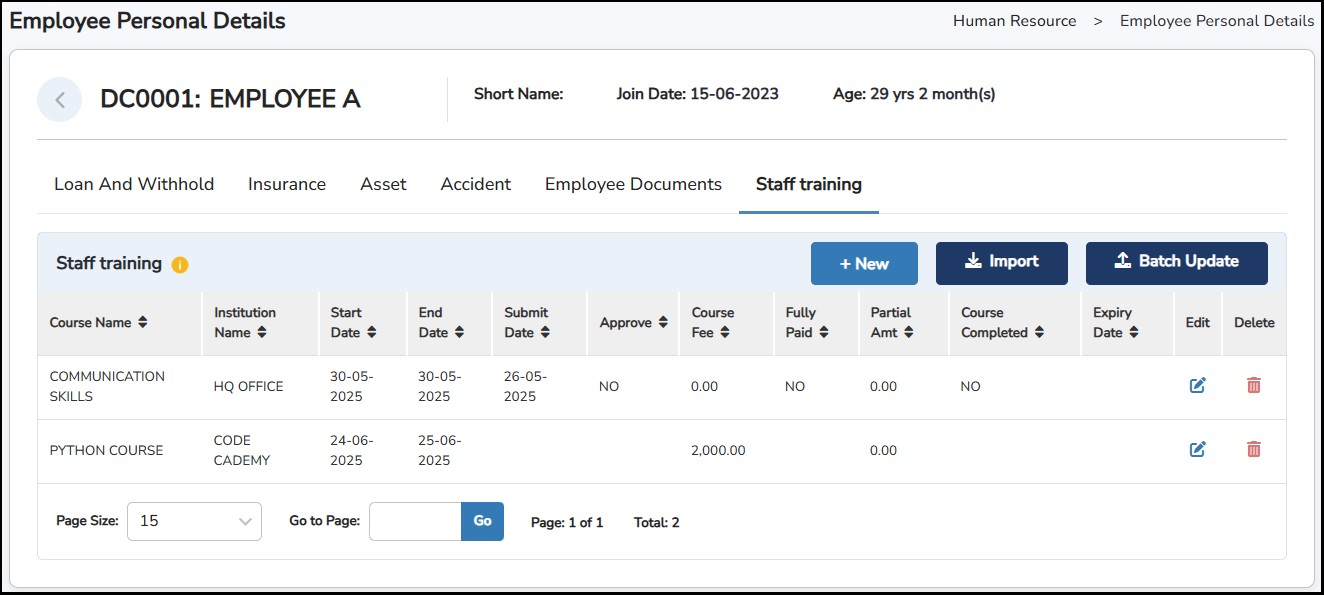
Step 2: Click on Download Template link to export an excel file wherein you can enter the training course details.
Step
3: Save the file > Click on
![]() to select the saved file.
to select the saved file.
Step
4: Click
![]() once done.
once done.
BATCH UPDATE (STAFF TRAINING)
You may do BATCH UPDATE to copy the training course to all employees: -
Step
1: Go to
Human
Resource
>
Employee
Personal Details
> Edit one of the employees > Click
![]()
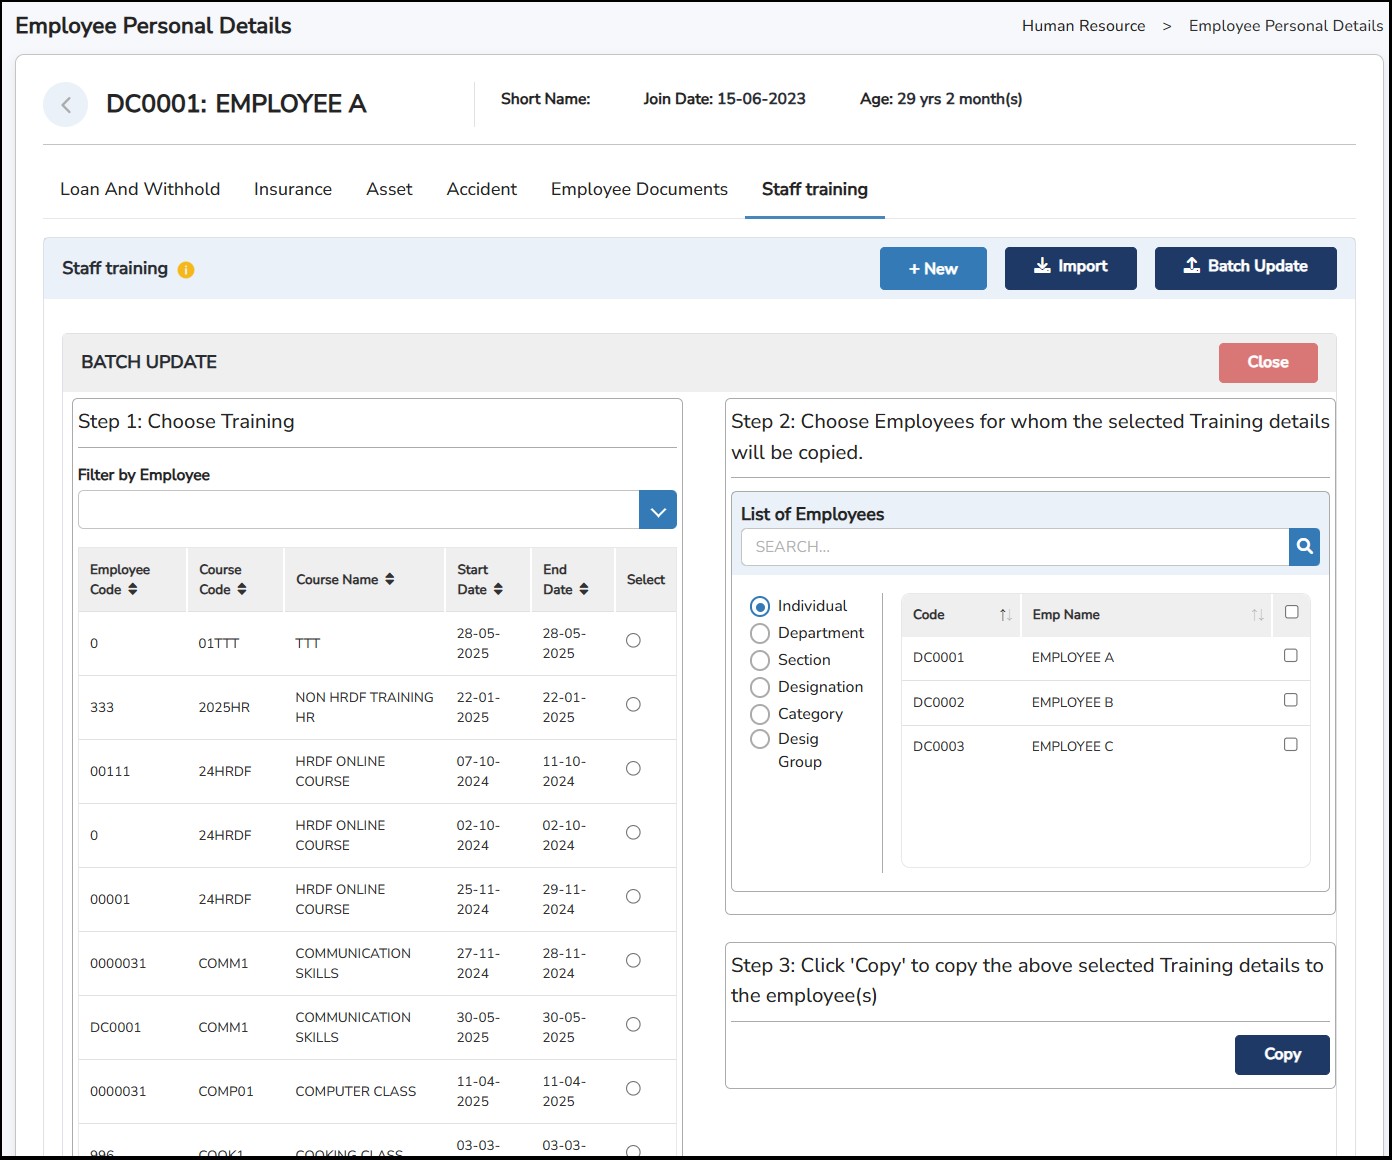
Step
2: Choose the
Training
Course
> Select the employee(s) > Click
![]()
** All the details of the training course will be copied to the selected employees.
As the employee able to submit a request to make any changes or update for their Personal Particular, the request will be sent to the Approver to approve or reject it. Once approved, then only the changes will be reflected in the system.
The Approver will be receiving below email notification with the information that there is a pending request for approval.
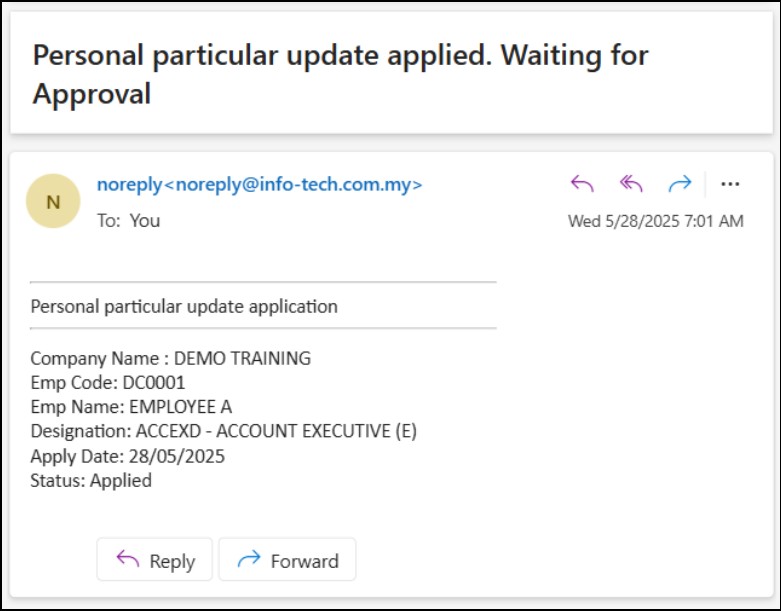
How to approve request for changes on Personal Particular?
Step 1: Go to Human Resource > Staff Personal – Approve/Reject.
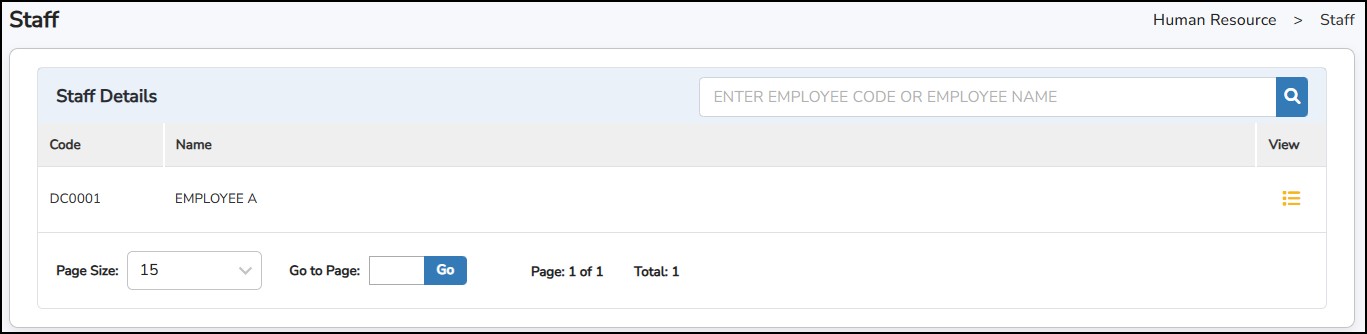
You may see the requester under Staff Details.
Step
2: Click
![]() to view the request.
to view the request.

Step 3: Verify the requested changes under New Details and you may see the current details under Old Details .
Step
4: Click
![]() or
or
![]()
Step 1: Go to Human Resource > Bonus/Increment > Bonus Proposal
Step 2: Click
![]() to create a proposal.
to create a proposal.
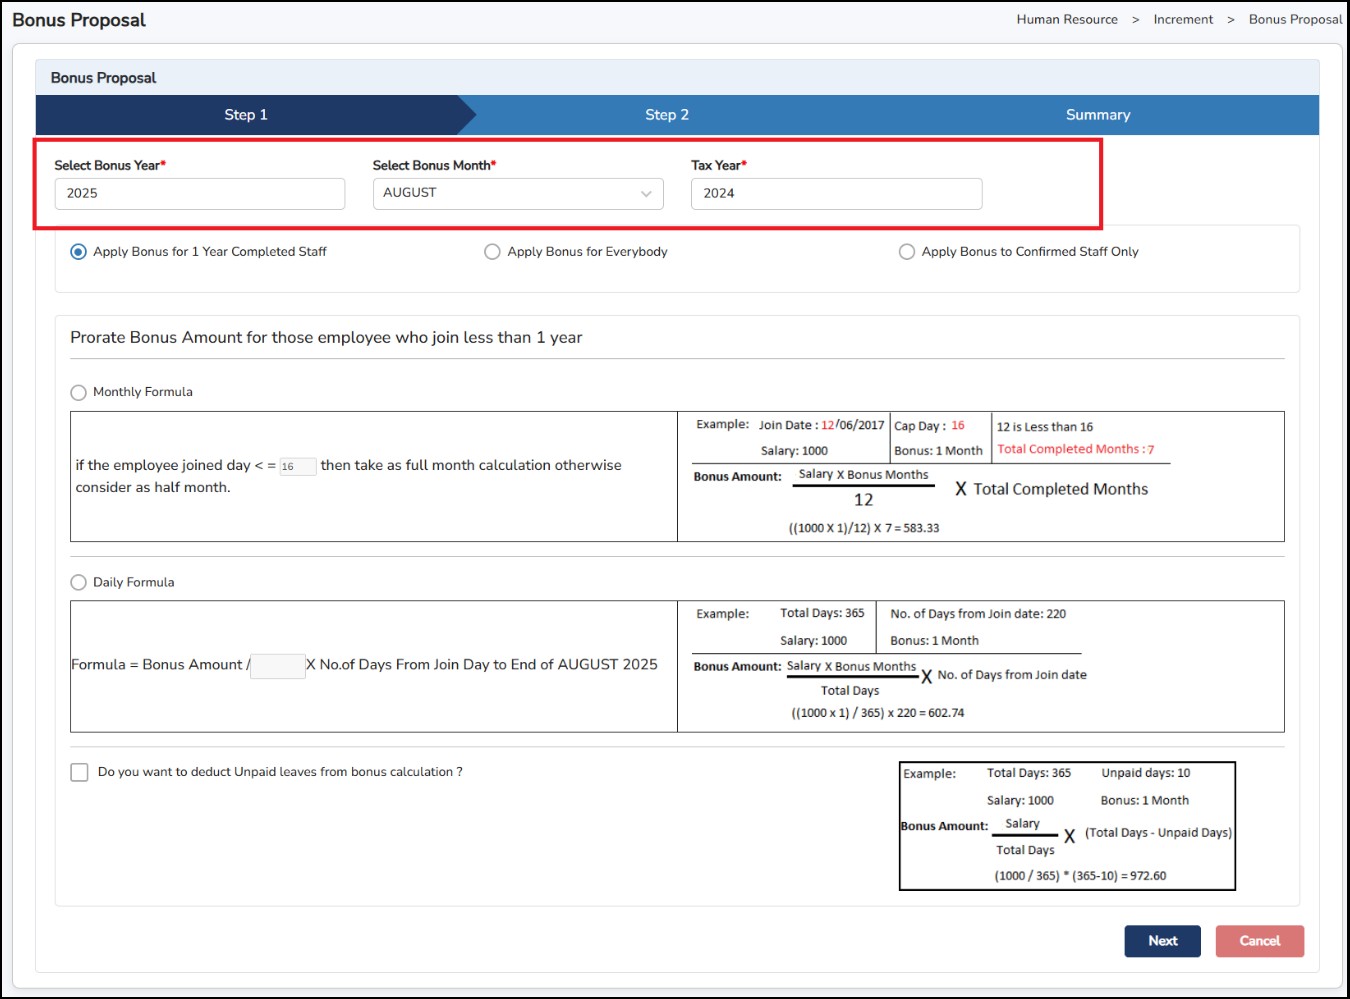
Step 3: Enter the Bonus Year , select the Bonus Month and Tax Year in which year it will be taxable.
Step 4: Choose the target group of this Bonus Proposal : -
If the target group selected is Apply Bonus for Everybody / Apply Bonus to Confirmed Staff only, you will need to choose the formula to prorate the bonus amount for those employees who joined less than 1 year.
If Monthly Formula is chosen : -

Formula: -
Bonus Amount = [(Basic Salary X Bonus Type) / 12 Months] X Completed Months
Example: -
Maximum Date : 16th
Joined Date : 13-05-2025 (13 th is < 16 th . Total Completed Months = 8)
Basic Salary : RM4000
Bonus Type : 1 Month (refers to the selection by Month/Percentage
Bonus Amount = [(RM4000 X 1 Month) / 12 Months] X 8 Completed Months
= RM2666.67
If Daily Formula is chosen : -

Formula: -
Bonus Amount = [(Basic Salary X Bonus Type) / 365 days per year] X No. of days from
Joined Date to End of Bonus Month
Example: -
Joined Date : 13-05-2025
Total No. of days : From 13-05-2025 to 31-12-2025 = 233 days
Basic Salary : RM4000
Bonus Type : 1 Month (refers to the selection by Month/Percentage
Bonus Amount = [(RM4000 X 1 Month) / 365 days per year] X 233 days
= RM2553.42
You may also choose to deduct Unpaid Days from the Bonus calculation by tick on below formula: -

Select
the unpaid days reason to be included in the deduction by click on
the
![]()
Formula: -
Bonus Amount = (Basic Salary X 365 days) / (365 days – No. of Unpaid days)
Example: -
No. of Unpaid Days : 10 days (within the year)
Basic Salary : RM4000
Bonus Amount = (RM4000 X 365 days) / (365 days – 10 days)
= RM3890.80
Step
5: Click
![]()
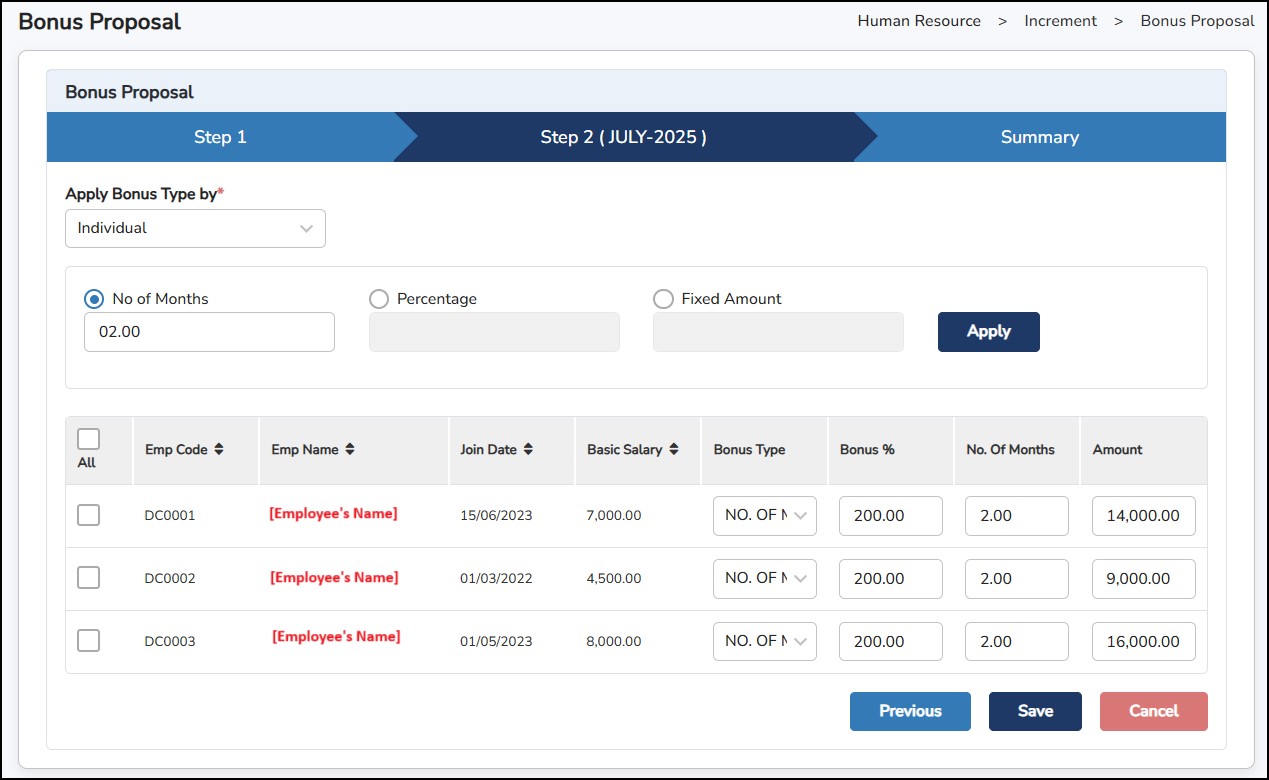
Step 6: Select Apply Bonus Type by Individual / Department / DesigGroup / Category
Step 7: Choose if the bonus amount will be based on No. of Months / Percentage / Fixed Amount
Step 8: Select Employee / Departments / Designations / etc to apply for a bonus.
Step
9: Click
![]()
Step
10: Click
![]() button
to save the page and continue to
Summary
Page
.
button
to save the page and continue to
Summary
Page
.
Alternatively, you can also choose to key in or overwrite the amount directly in the Amount column.
This is the Summary Page . You may review the Bonus Amount.
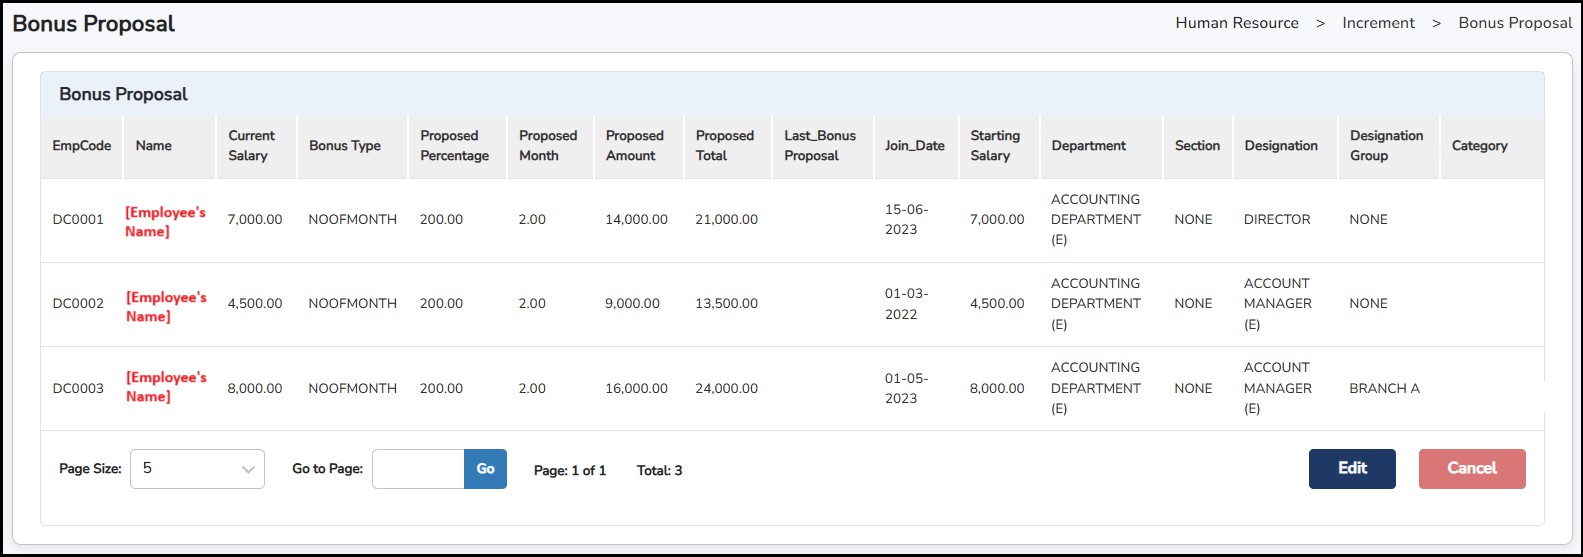
Click
![]() to go back to the Main Page.
to go back to the Main Page.
Click
![]() if you wish to do further editing.
if you wish to do further editing.
Import/Export Bonus Proposal
Bonus Proposal that has been created can be exported into an Excel file for further review or modification which you may import the file back to synchronize the data.
Step
1: Click
![]() > Select the employees to export > Click
> Select the employees to export > Click
![]() .
.
Step
2: Click
![]() to import the amended Excel file back into the system > Choose the
file > Click IMPORT
to import the amended Excel file back into the system > Choose the
file > Click IMPORT
Link Bonus to the Payroll
Once the Bonus Proposal is done, you can decide to link the amount to the payroll which will reflect in their salary.
Step
1: Go to
Human
Resource
>
Increment
>
Bonus
Proposal
> Click on
![]() under
the
Link
to Payroll
column.
under
the
Link
to Payroll
column.
Step 2: Choose to which Pay Period for the Bonus to be linked.
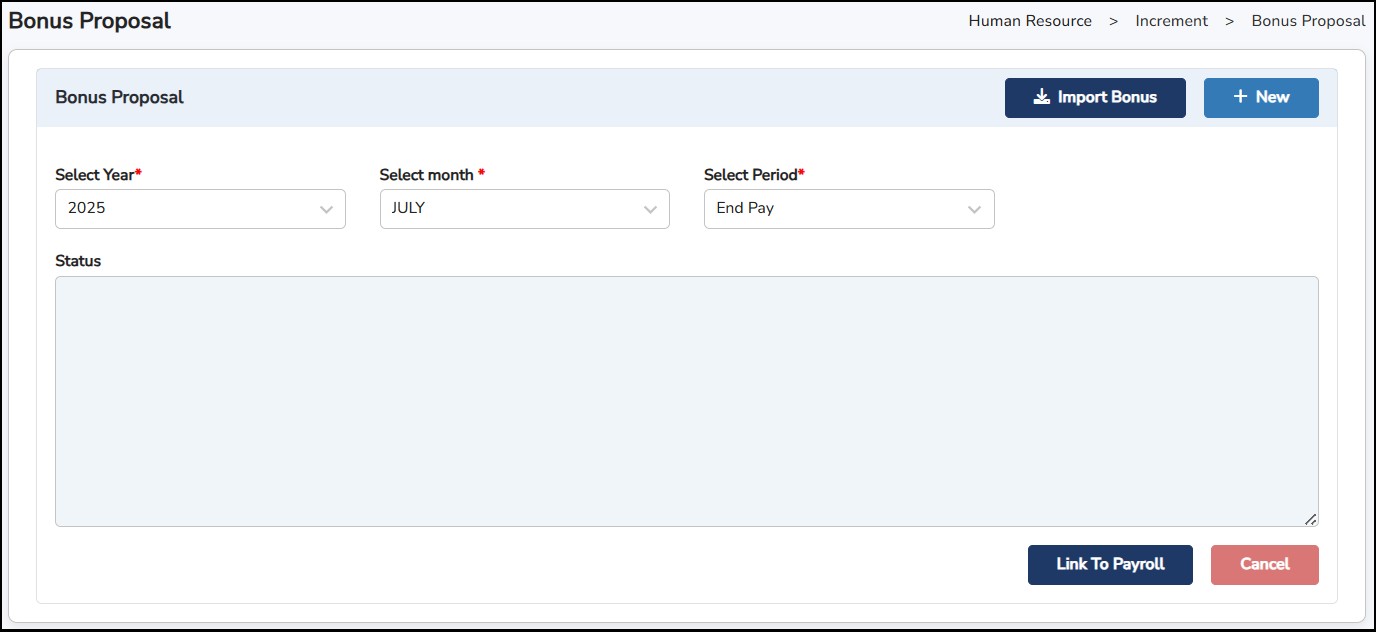
There are 2 ways to pay out the Bonus where can be selected in the Select Period : -
Step
3:
Click
![]()
**Note : Please make sure Payroll Initialization is done FIRST before linking the Bonus.
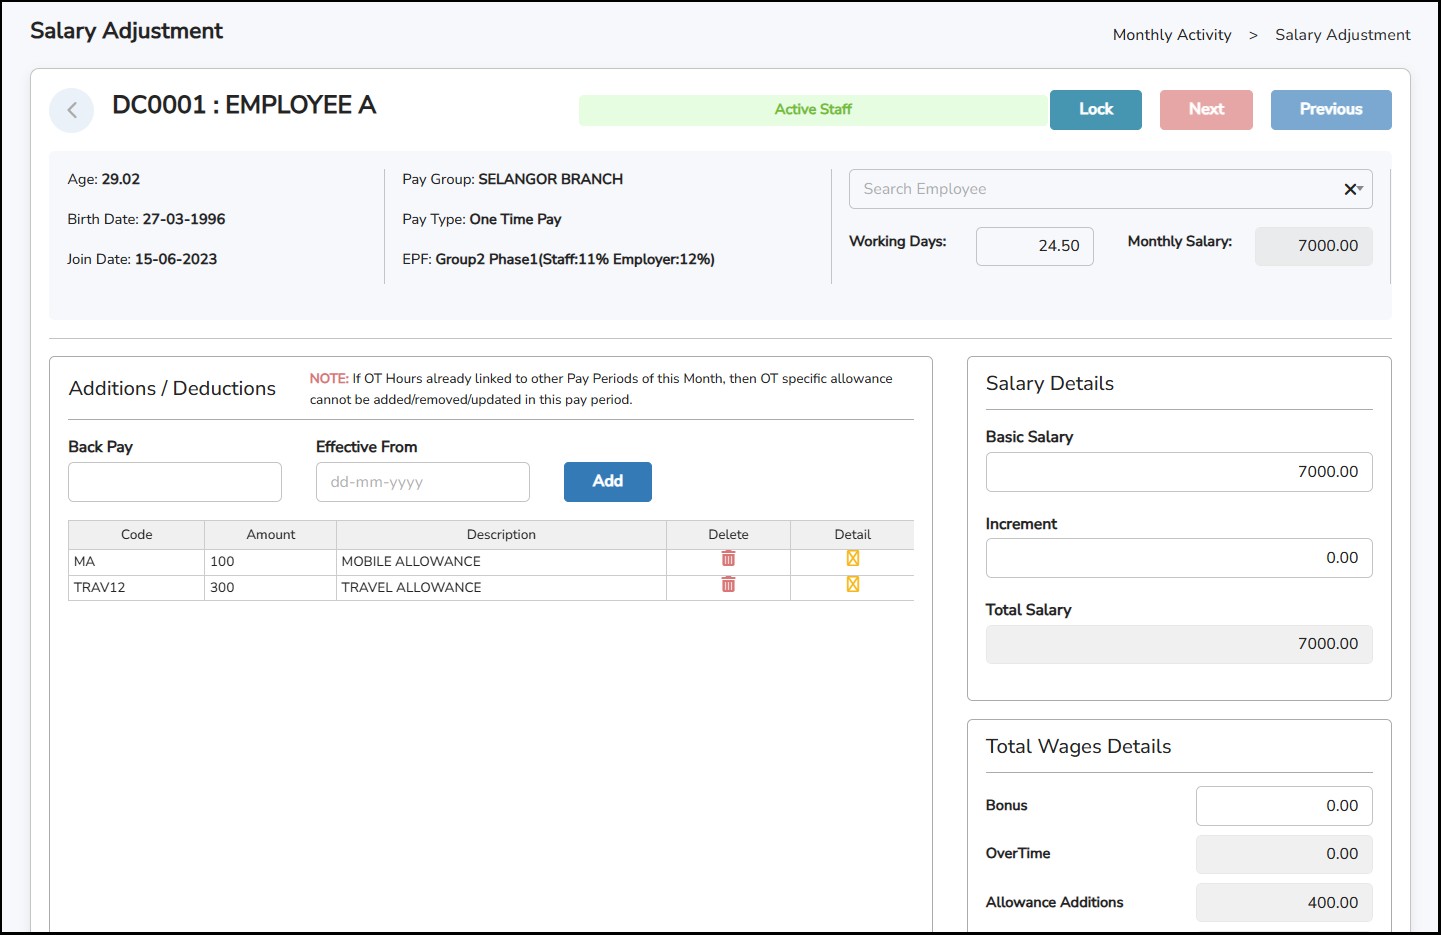
The Bonus amount that has been linked will appear in the Monthly Activity > Salary Adjustment under the Total Wages Details in the Bonus column.
Step 1: Go to Human Resource > Bonus/Increment > Increment Proposal
Step
2: Click
![]() to create a new proposal.
to create a new proposal.
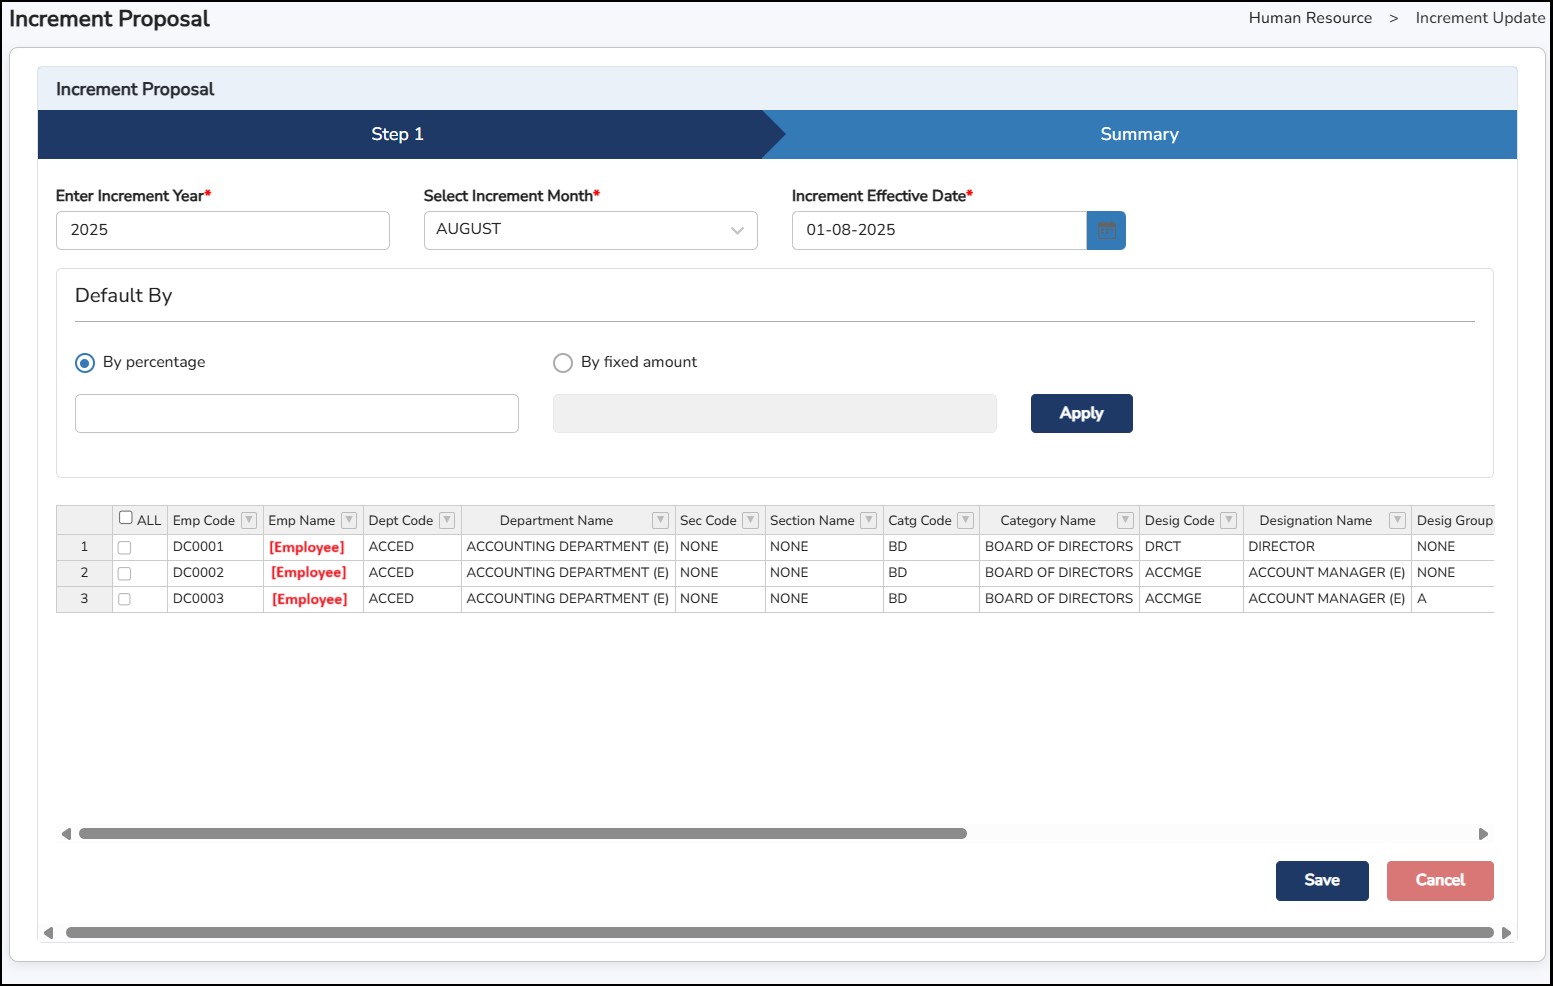
Step 3: Enter the planned Year, Month and Effective Date.
Step 4: Choose a method either to go by Percentage (of Basic Salary) or Fixed Amount.
Step 5: Select the employee(s) to apply.
**Note : You may also manually put in the increment % / Amount / Increment Date directly in the table for each employee.
Step
8: Click
![]() >
>
![]()
**Note : Saving the proposal will not have any effect on the employee’s profile and payroll.
Export/Import Increment Proposal
An increment proposal that has been created can be exported into an Excel file for further review or modification which you may import the file back to synchronize the data.
Step 1: Go to Human Resource > Bonus / Increment > Increment Proposal

Step
2: Click on the
![]() button to export the employee data into an Excel file.
button to export the employee data into an Excel file.
Step 3: Enter Increment Year > Increment Month
Step
4: Tick employee(s) to export > Click
![]()
Step
5: Import the amended Excel file back to the system, click on the
![]() button.
button.
Step
6: Choose the file > Click
![]()
Link Increment to the employee’s profile
Once the increment proposal is done, you can decide to link the amount to the employee’s profile in Employee Basic Details which will reflect in their payroll as well.
Step 1: Go to Human Resource > Increment > Increment Proposal
Step
2: Click on the View icon
![]() .
.
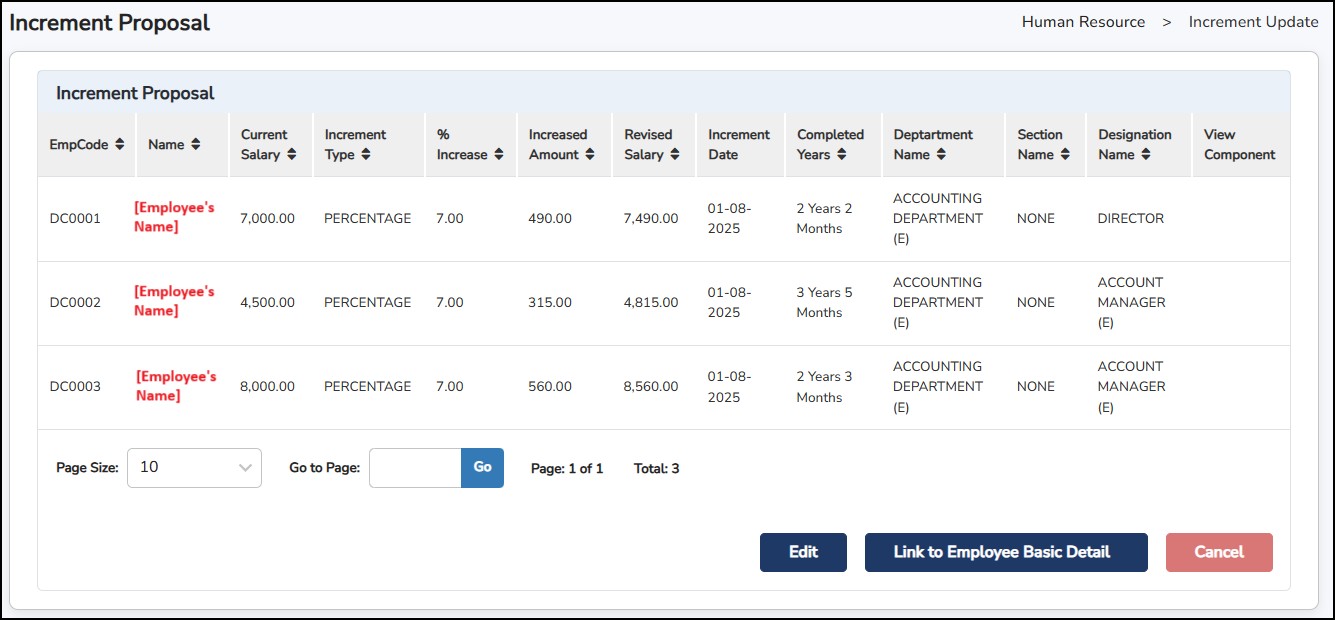
Step
3: Click on the
![]() button.
button.
**Note : This will only link to the Employee Basic Details, not to the payroll. Increment amount will only appear in the employee’s payroll when payroll initialization is done for the month of the increment effective date.

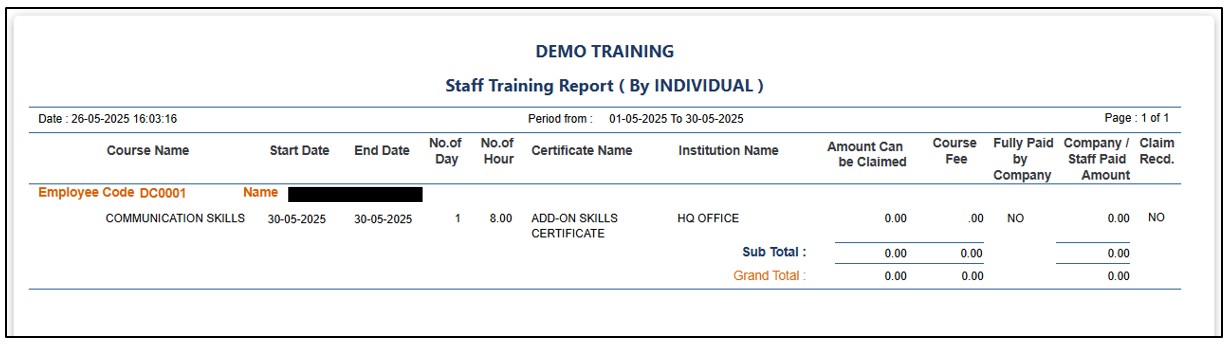
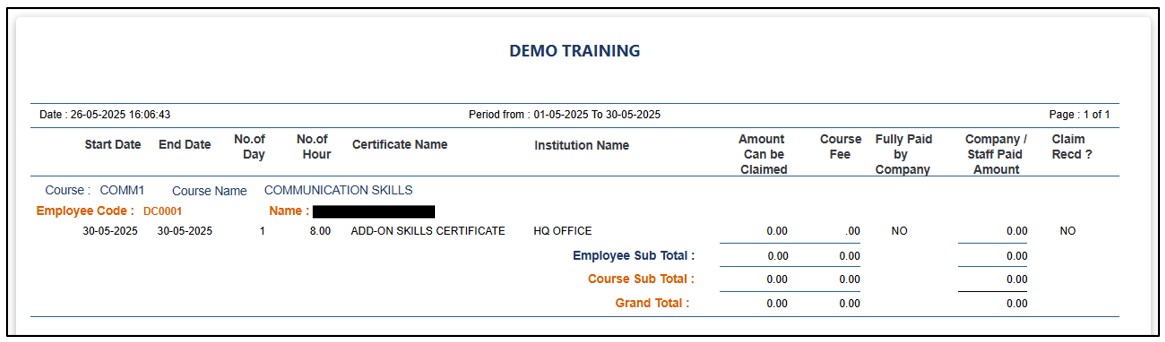
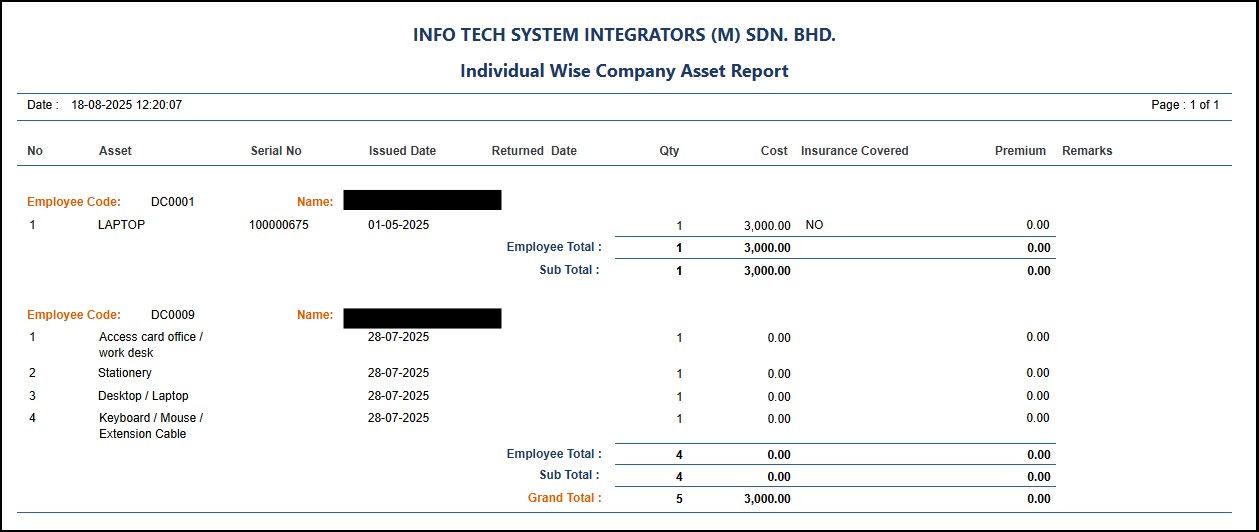
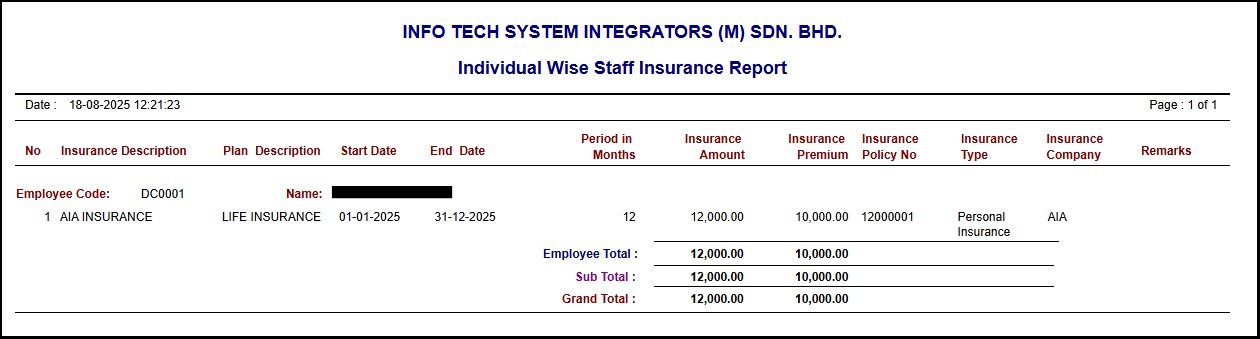
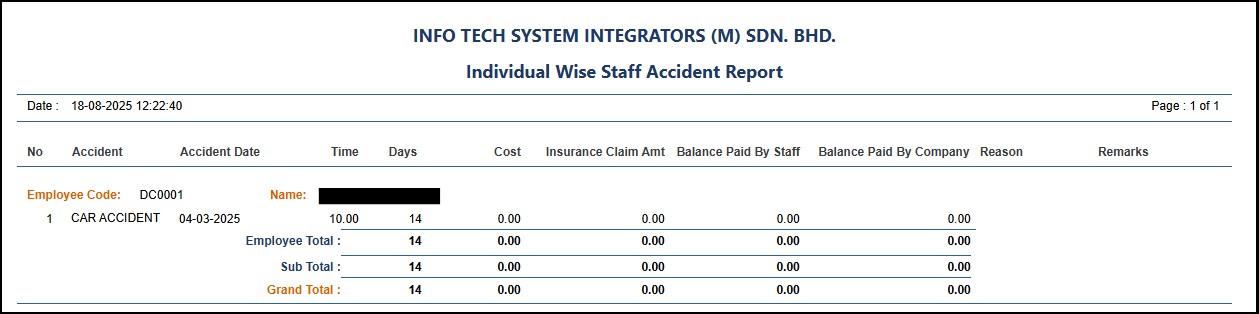
This is where you can configure the system settings which are needed to make the whole system function. The function can be found under Admin Setting > System Setting. Below is the list of each function under this setting.
Company Information
This is where you can enter the company details that will be used in monthly processing of the employee’s salary.
Step 1: Go to Admin Setting > System Setting > Company Information
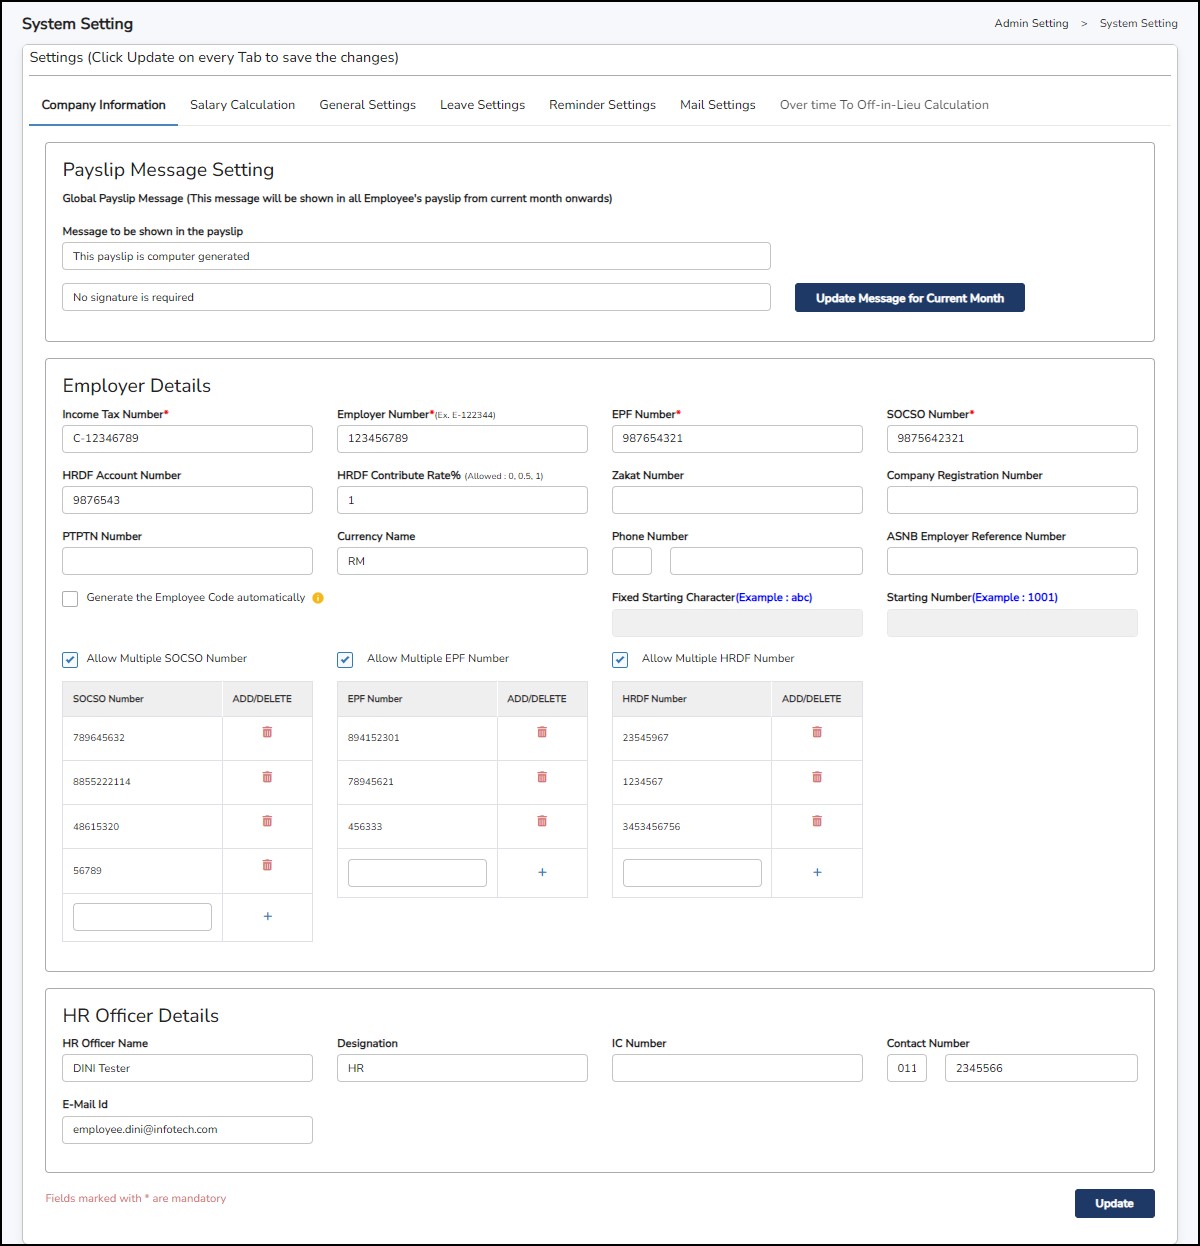
*Click
on the
![]() button to save the message.
button to save the message.
Click
on
![]() button once you are done on this tab.
button once you are done on this tab.
Salary Calculation Tab
This is where you will need to select on which formula that suits your company policy related to the salary calculation.
Step 1: Go to Admin Setting > System Setting > Salary Calculation.

Click
on
![]() button once you are done on this tab.
button once you are done on this tab.
General Settings Tab
There are 2 settings you may need to go through and tick/untick accordingly based on your company policy.
Step 1: Go to General Setting > System Setting > General Setting.

Leave Settings Tab
This is where you can set up the leave cycle for Annual, Medical and Other Leave settings.
Step 1: Go to Admin Setting > System Setting > Leave Setting.

Example 1: Employee's Annual Leave eligibility is 20 days per year, and he has served the company for 5 complete months, he will earn 8 days of Annual Leaves. 20 (eligible per year) / 12 (months per year) X 5 (completed months) = 8.3 (round to the nearest value = 8 days
Example 2 :Employee's Annual Leave eligibility is 24 days per year, and he has served the company for 5 complete months, he will earn 10 days of Annual Leaves. 24 (eligible per year) / 12 (months per year) X 5 (completed months) = 10 days.
Example: Leave Category ‘A’ has the setting: -
0 year – 1 st year = 10 days
2nd year – 4 th year = 11 days
An employee has joined on 01-10-2024 under Leave Category ‘A’.
His 1 st year cycle will be created as 01-01-2024 to 31-12-2024.
His leave eligibility will be prorated as 3 days.
Prorate Formula: -
[(Eligible days / Total days in a year) X No. of days starting date of joined until end of the year]
[(10/365) X 92 days] = 2.5 = round to the nearest value = 3 days
After doing Leave Year End process, new cycle for 2025 will be created as 01-01-2025 to 31-12-2025.
His leave eligibility will be prorated as 10 days.
[(Eligible days of the 1 st year / Total days in a year) X No. of days from 01-01-2025 to 31-09-2025] + [(Eligible days of the 2 nd year / Total days in a year) X No. of days from 01-10-2025 to 31-10-2025]
[(10/365) X 273] + [(11/365) X 92] = 10.24 = round to the nearest value = 10 days
Reminder Settings Tab
This setting is to help set the different reminders regarding the employee’s information.
Step 1: Go to Admin Setting > System Setting > Reminder Setting
Click
on
![]() button once you are done on this tab.
button once you are done on this tab.
The
reminders will be shown on the Home Page >
![]() of the cloud portal.
of the cloud portal.
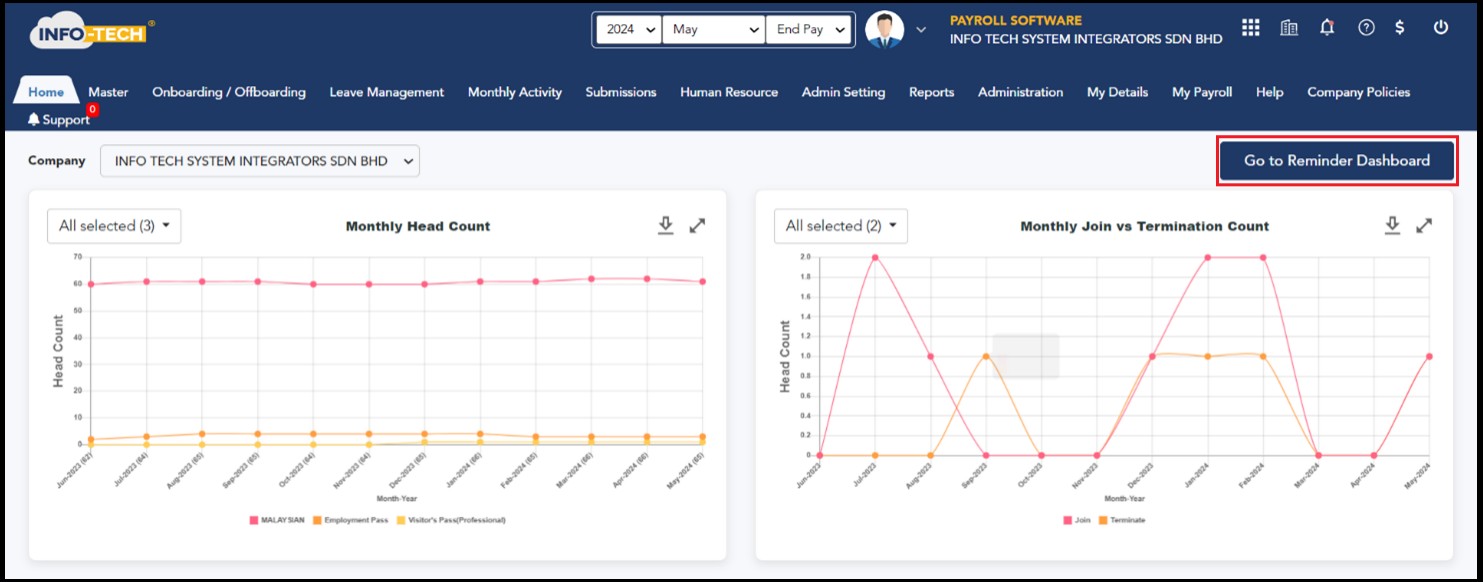
Mail Settings Tab
This is where you can set up the mail format of the payslip that the employees will receive when the payslip being sent via email.
Step 1: Go to Admin Setting > System Setting > Mail Setting.
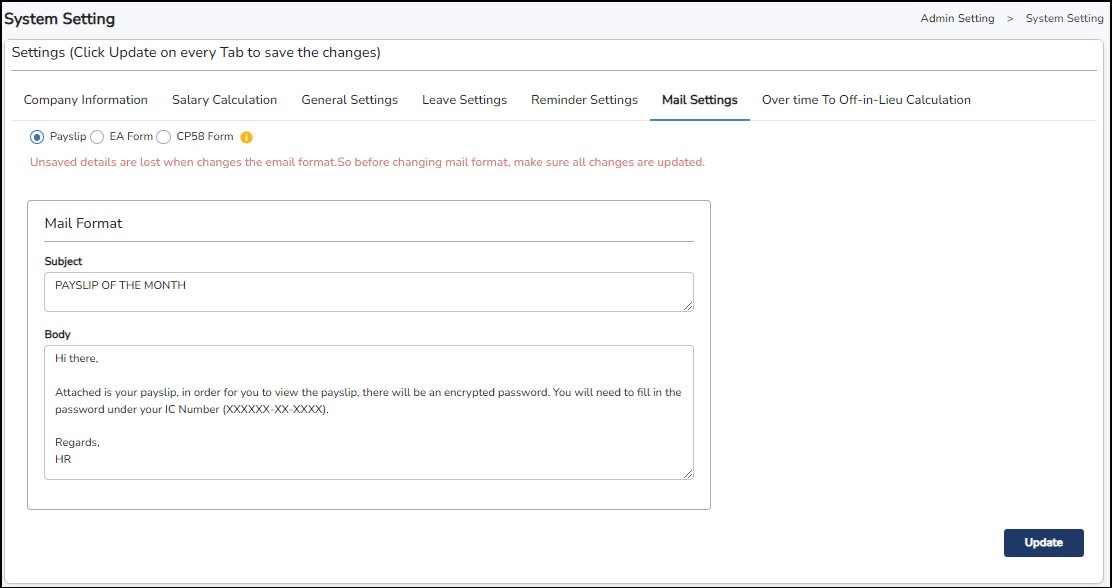
Click
on
![]() button once you are done on this tab.
button once you are done on this tab.
Over Time to off-in-Lieu Calculation Tab
This is where you can set up the OT to be converted into Off-In-Lieu. If un-ticked, OT will be added into the Payslip under OverTime Amount.
Step 1: Go to Admin Setting > System Setting > Over Time to Off-In-Lieu Caclulation.
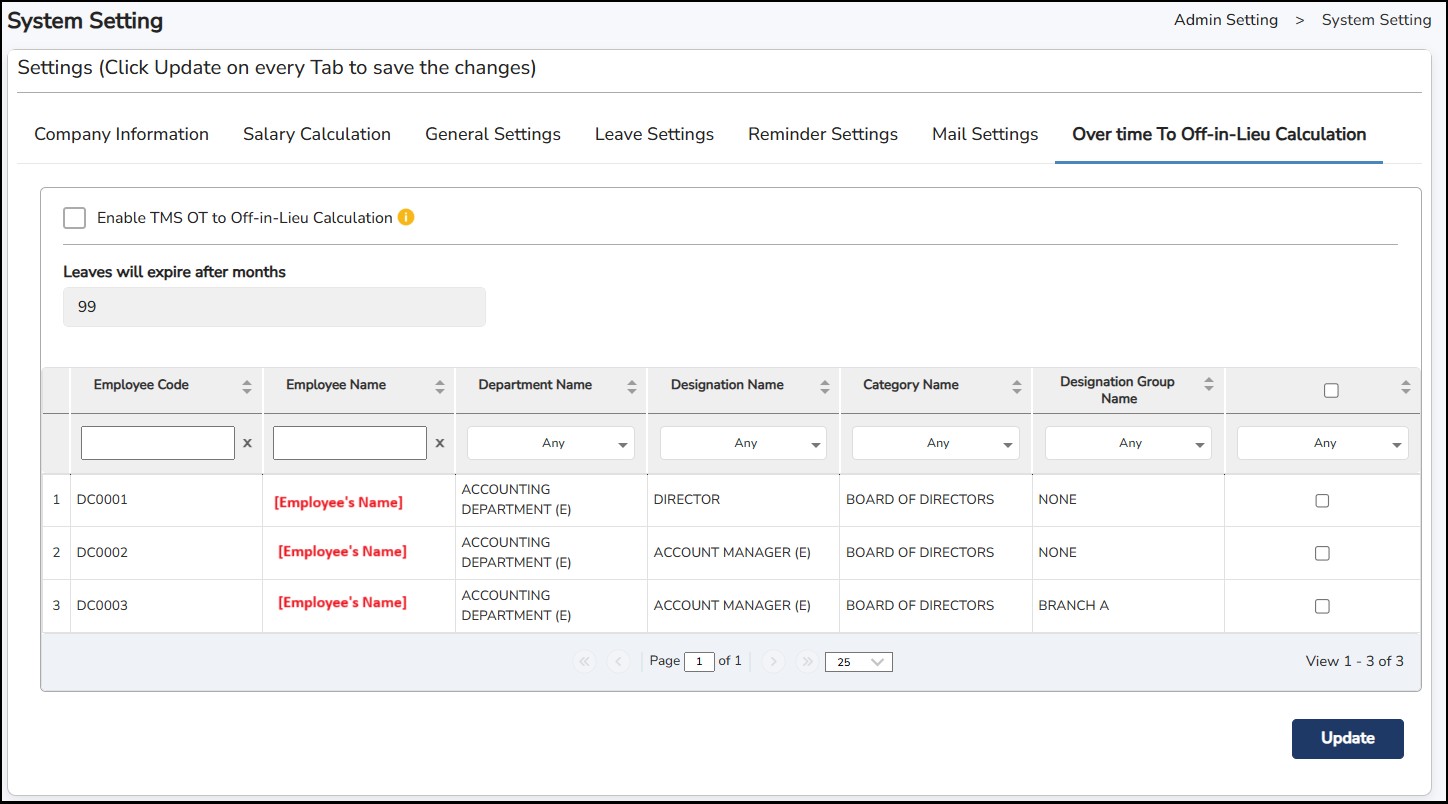
Step 2: Tick
![]() to enable the Overtime to be converted to Off-In-Lieu.
to enable the Overtime to be converted to Off-In-Lieu.
Step 3: Select the employee that will have this setting
Step 4 : Click
on
![]() button once you are done on this tab.
button once you are done on this tab.
This section allows you to view the leave eligibility entitled to all employees based on the employee's joined date and the Leave Category that has been assigned to each employee. It also allows you to enter all the carry forward Annual Leave manually (for the first-time setup) which is from the previous leave cycle.
Step 1: Go to Admin Setting > Leave Eligibility
Step 2: Enter the employee's name
Step 3: Select the Department (if applicable)
Step 4: Enter the Resigned Date From (if users would like to display Resigned Employees Data)
Step 5: Enter the Eligible AL days and BF days (if applicable)
Step 6: Enter the Eligible ML days
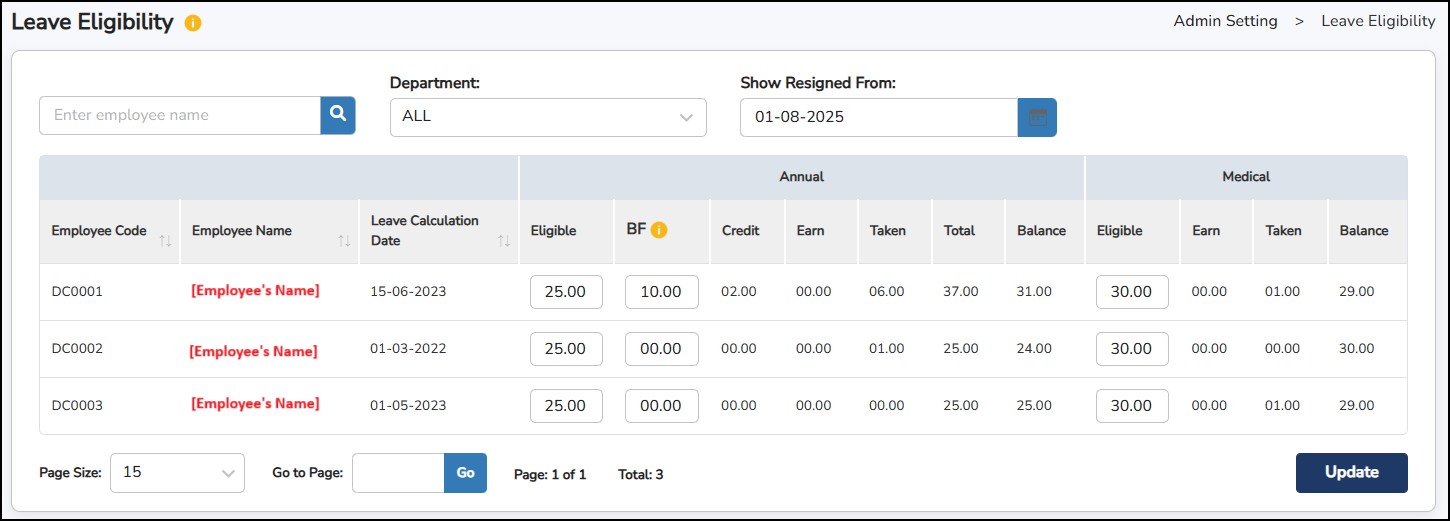
Step 7 : Click
![]() once done for the leave entitlement of the employees to be updated in the system
once done for the leave entitlement of the employees to be updated in the system
You can view the details for Annual and Medical Leave on how many leaves have been credited, earn, taken, total and balance of the leave still eligible to be applied.
This defines the number of working days per month for the employees. The number of working days per month will vary, depending on the number of working days in a week of the employees. This is where the user can setup the cut off period for the salary, unpaid leave and Overtime (OT).
How to create a Pay Day Group?
Step
1
:
Go to
Admin
Settings
>
Pay
Day Group
> click on
![]()
Step 2 : Select NO under “ Do you wish to choose existing Pay Day Group?” to create a new pay day group.

Step 3: Enter the necessary details:
Click
![]() once done.
once done.
Step
4: Enter the
No
of Working days in a week
> click
![]()
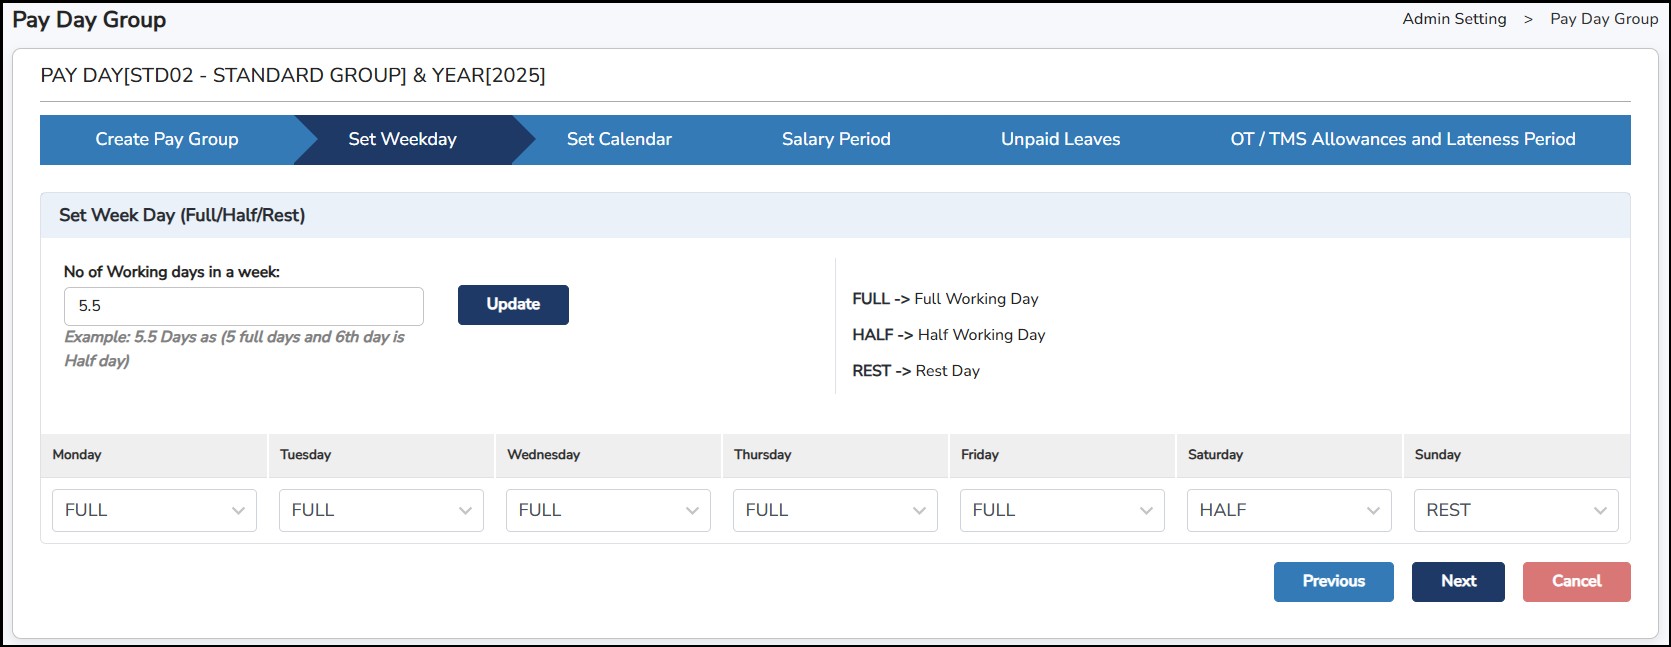
Click
![]() once done.
once done.
Step 5: Calendar view of the pay day group
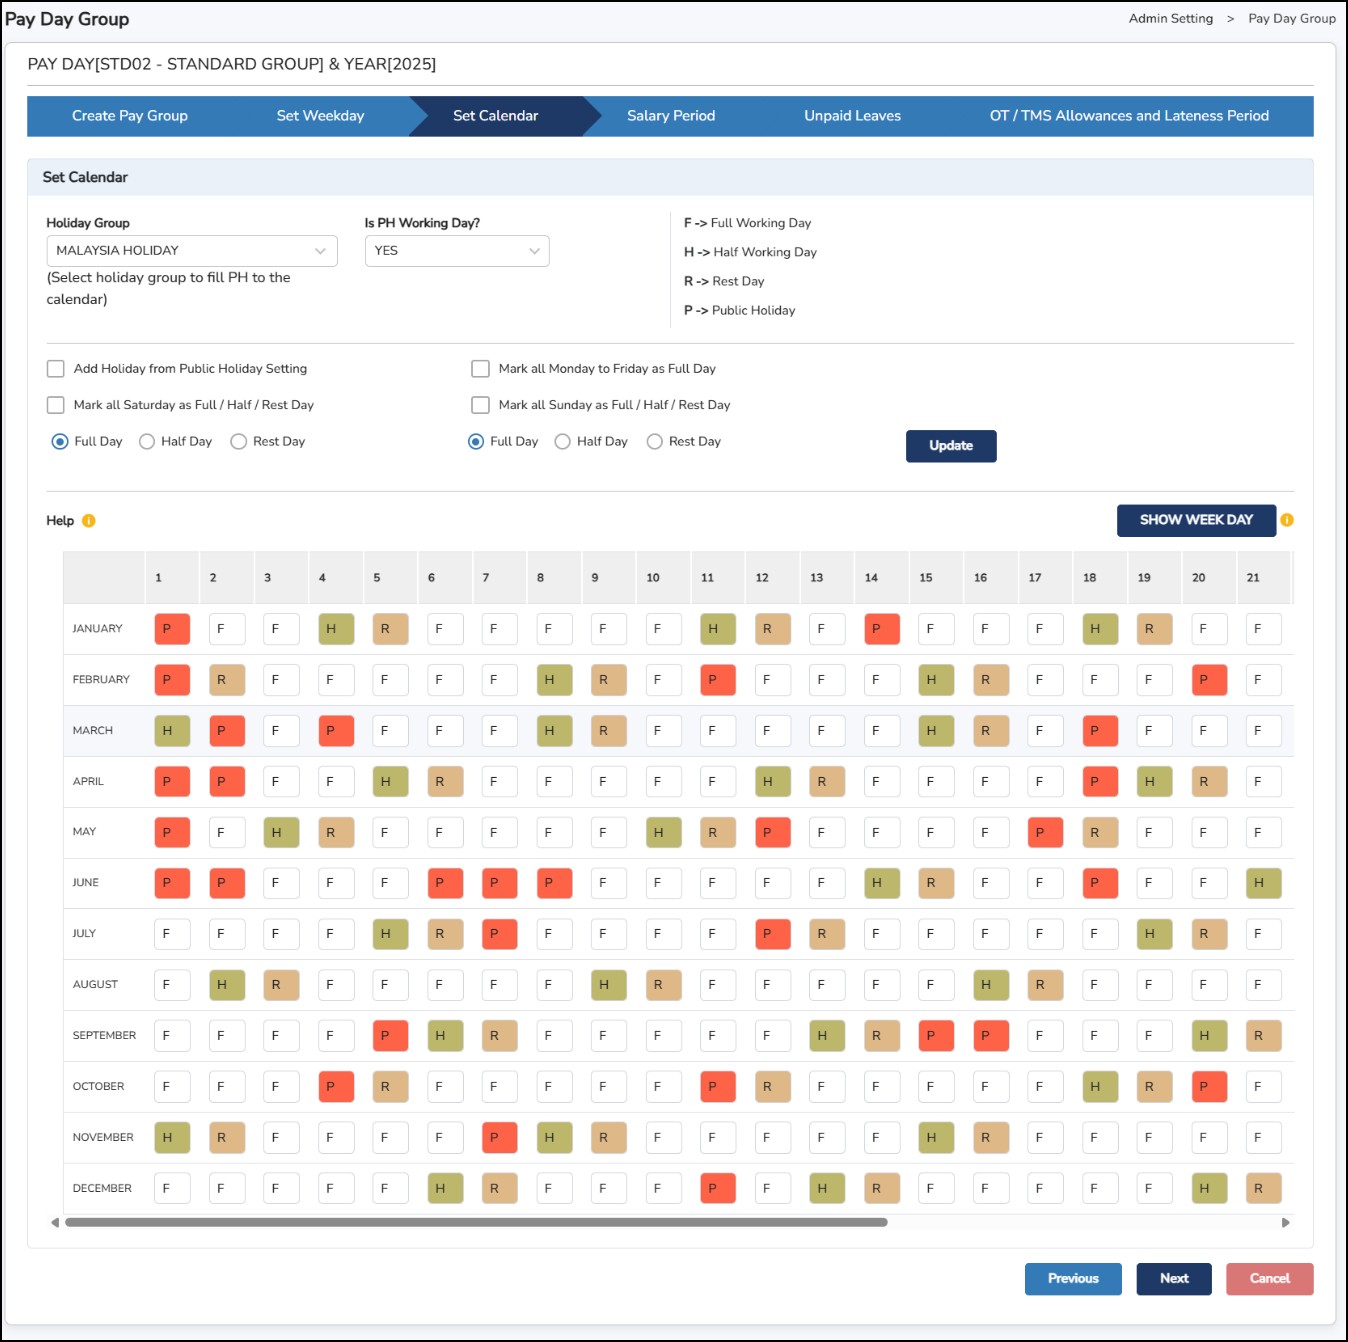
Click
![]() once done.
once done.
Step 6: Configure the cut off period for the Salary Period by entering the From and To dates of the cut off accordingly.
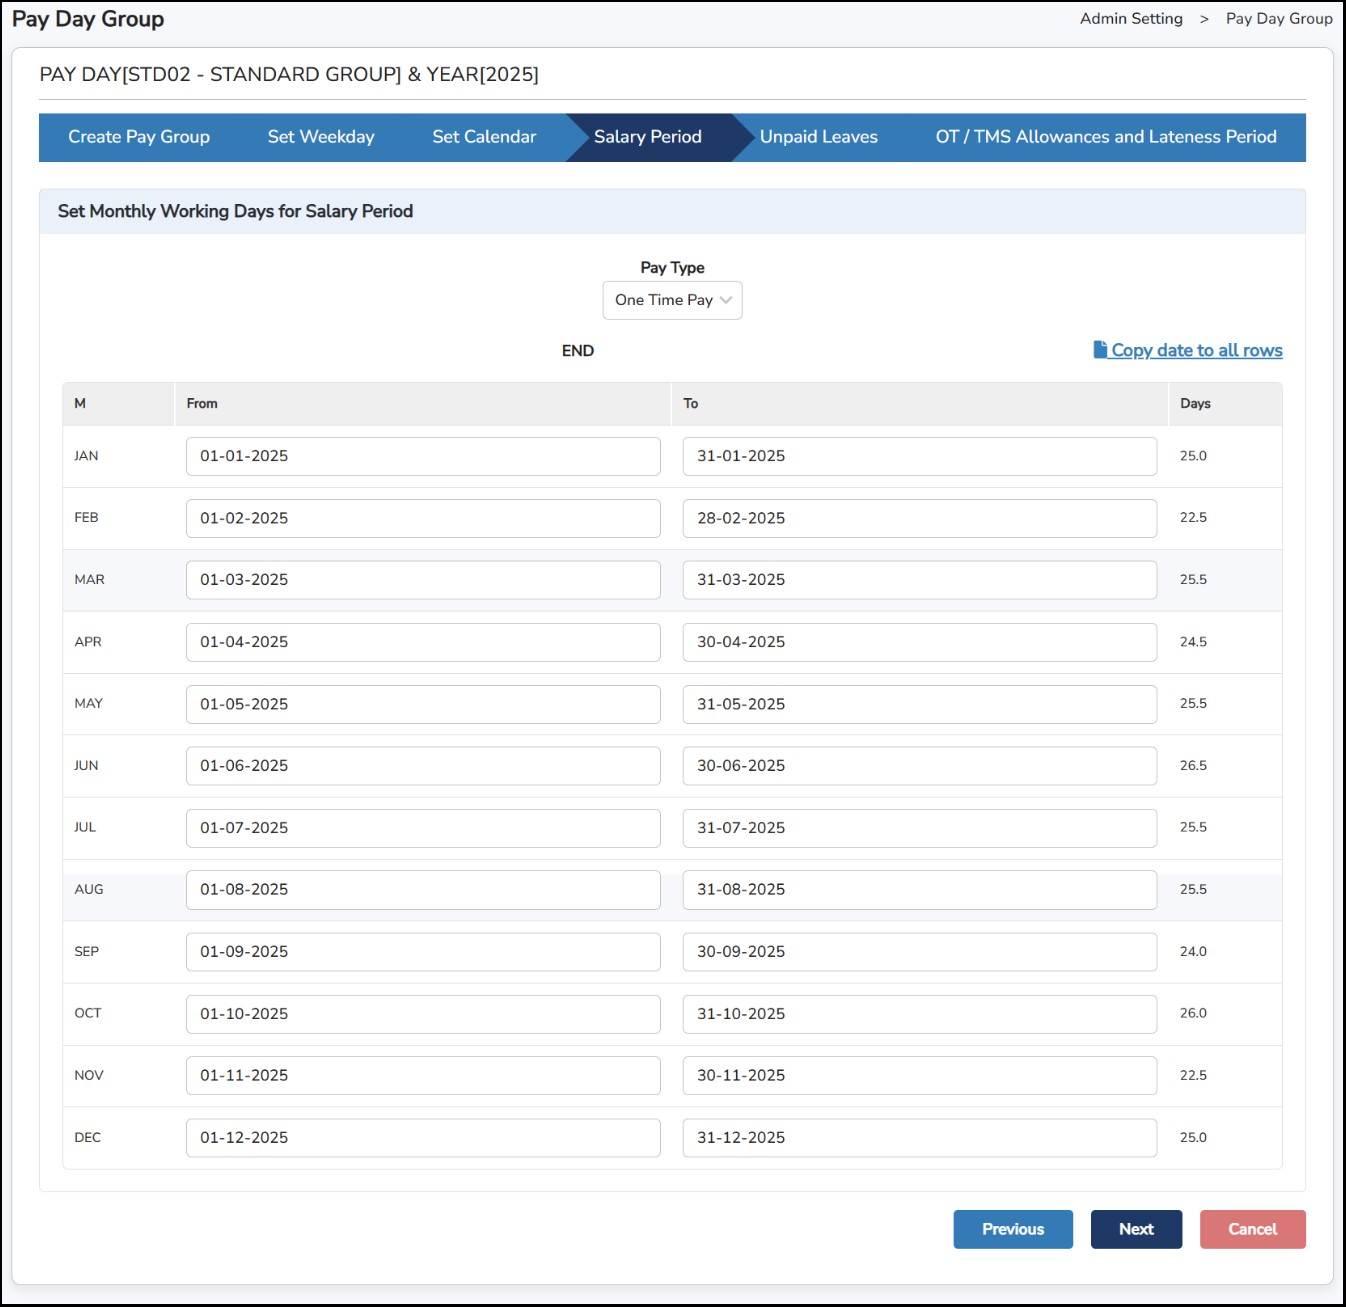
Step
7: Click on
![]() button to update all rows with the same cut off period > Click
button to update all rows with the same cut off period > Click
![]() once done.
once done.
**Note : The same procedure is to be done with the same or different cut off period for Unpaid Leaves and Overtime Period.
This is where you can do a mass recalculation of the employee’s salary should there have been any changes done.
Step 1: Go to Admin Settings > Salary Management > Recalculate Salary .
Step
2: Tick on the employees > Click
![]()
This function allows you to remove the unwanted salary records processed for the resigned employee(s). This usually happens when the employee’s termination date was entered into the system much later than the actual date.
Step 1: Go to Admin Settings > Salary Management > Clear Extra Records
Step 2: Select the employee(s)
Step
3: Click on
![]()

This is to delete the salary that has been processed for the month and period selected.
Step 1: Go to Admin Settings > Salary Management > Purge Salary .
Step 2: Select the employee(s)
Step 3: Choose the Pay Periods from the drop-down menu.
Step
4: Click on
![]()
This function allows you to add allowances and/or increment in the processed salary of the employees (Salary Adjustment), by batch.
Step 1: Go to Admin Settings > Salary Management > Global Change
Step 2: Select the employee(s)
Step 3: Set the values by selecting the Field (Allowance or Increment) that you want to add in the employee’s salary.
|
|
|
Selected Field: Allowance |
|
|
|
Selected Field: Increment |
Step
4: Click
![]() to proceed in capturing the
Allowance
or
Increment
in the Salary Adjustment.
to proceed in capturing the
Allowance
or
Increment
in the Salary Adjustment.
**Note : The payroll for the period should have been initialized before the Global Change can be processed.
This report is designed to display the payroll data that has been processed for the particular month and period you are logged in to.
Step 1: Go to Report > Monthly Payroll Summary > Monthly Payroll Summary

Step 2: Choose the type of the report format ( Monthly Detailed Report / Monthly Summary Report / Monthly Summary Report (Format 2) )
Step 3: Select the employee(s).
Step 4: You may sort the report by Employee Code or Employee Name .
Step 5: Select the Pay Periods for which salary details you want to generate in the report.
Step 6: You may tick on Hide Zero Values to not display the amount of 0.00 on the report.
Step
7: Click
![]()
Sample Monthly Detailed Report
This report displays payroll data for each employee: -
Sample Monthly Summary Report
This report displays payroll data per group (by Department, Section, Designation, Category).
Sample Monthly Summary Report (Format 2)
This report displays the breakdown of total cost of the company for each employee.
**Note : Additional information will be available in the Excel to Excel (Report > Monthly Payroll Summary > Export to Excel).
This report is designed to display employee salary information for the month and group it by payment mode.
Step 1: Go to Reports > Salary Payment Mode.
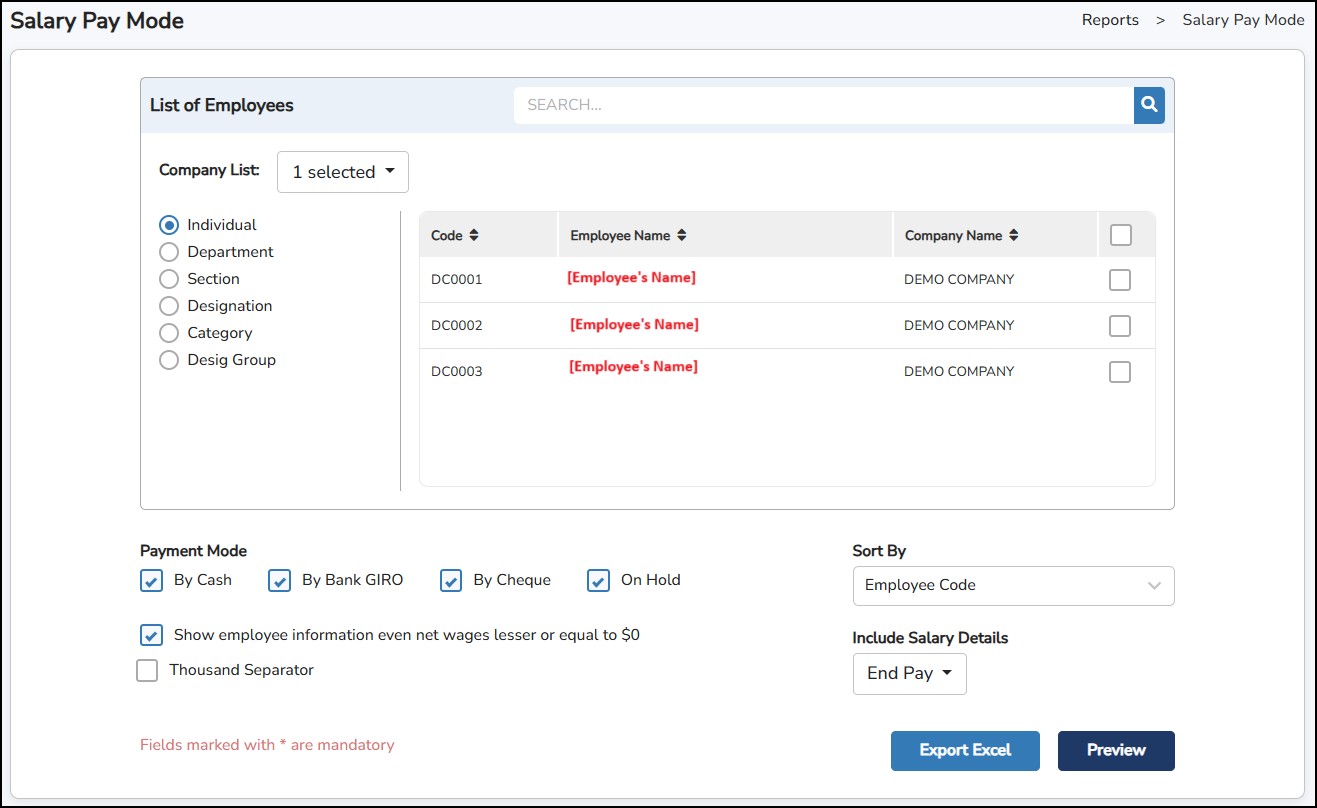
Step 1: Select the employee(s).
Step 2: Select which Payment Mode type you want to view.
Step 3: Select the pay period under the Include Salary Details drop-down menu.
Step 4: You may sort the report by Employee Code or Employee Name .
Step
5: Click
![]()
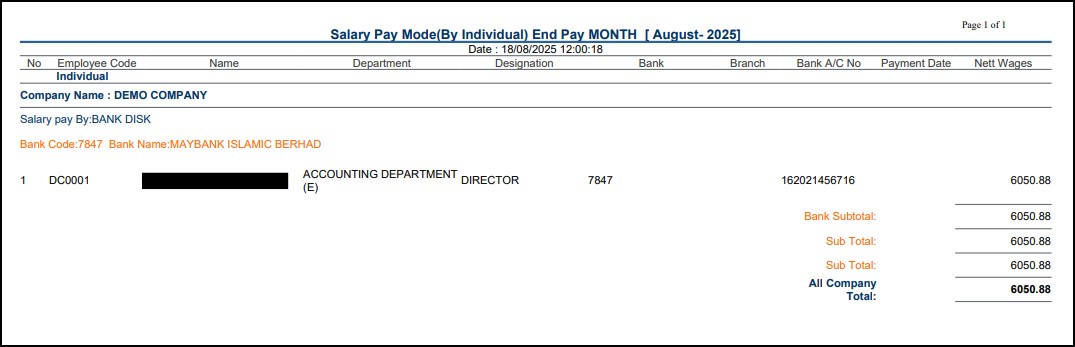
This report is designed to generate whole financial or calendar year salary details.
Step 1: Select the From and To dates – the dates entered cannot exceed one (1) year.
Step 2: Select to show the details by Individual/Department/Section > Select employee(s).
Step 3: Choose the Pay Period from the drop-down menu to which period the salary details to be generated.
Step 4: Tick on Show Allowance Details to show the breakdown of all the allowances
Step
5: Click
![]()
Sample Yearly Summary Report
This will display the overall of the entire year salary processed in the system.
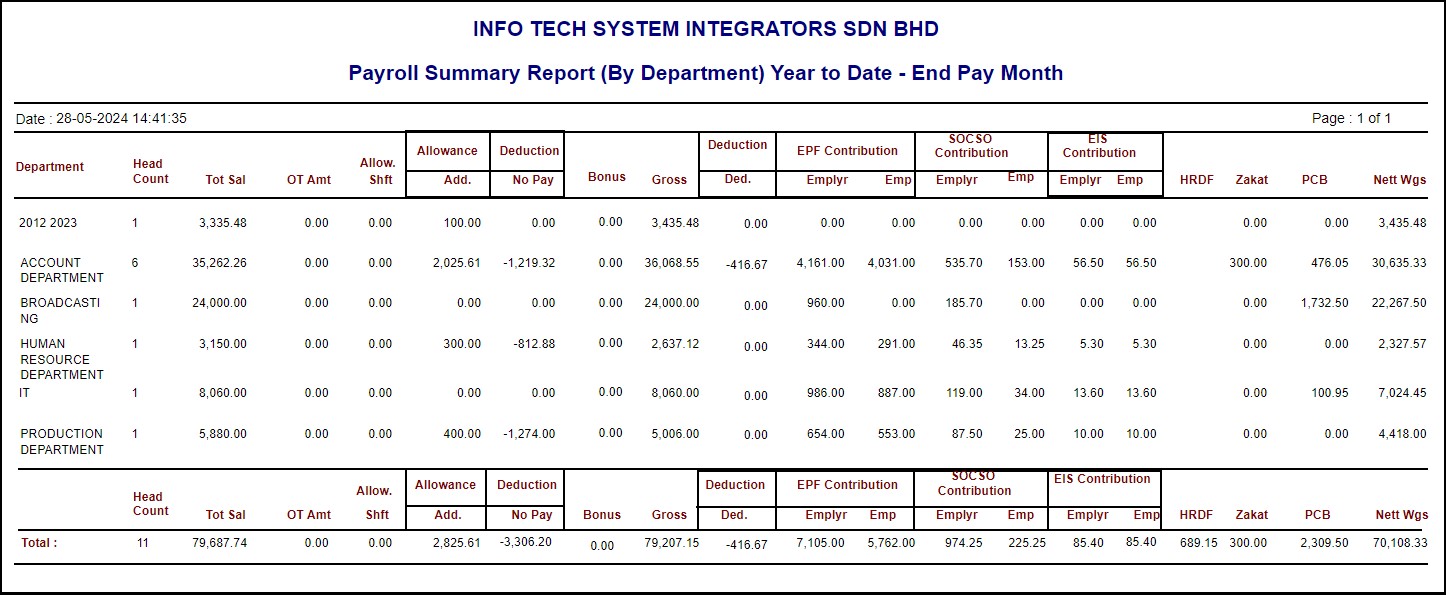
Sample Company Wise
This will display the summary of the entire year salary processed in the system.
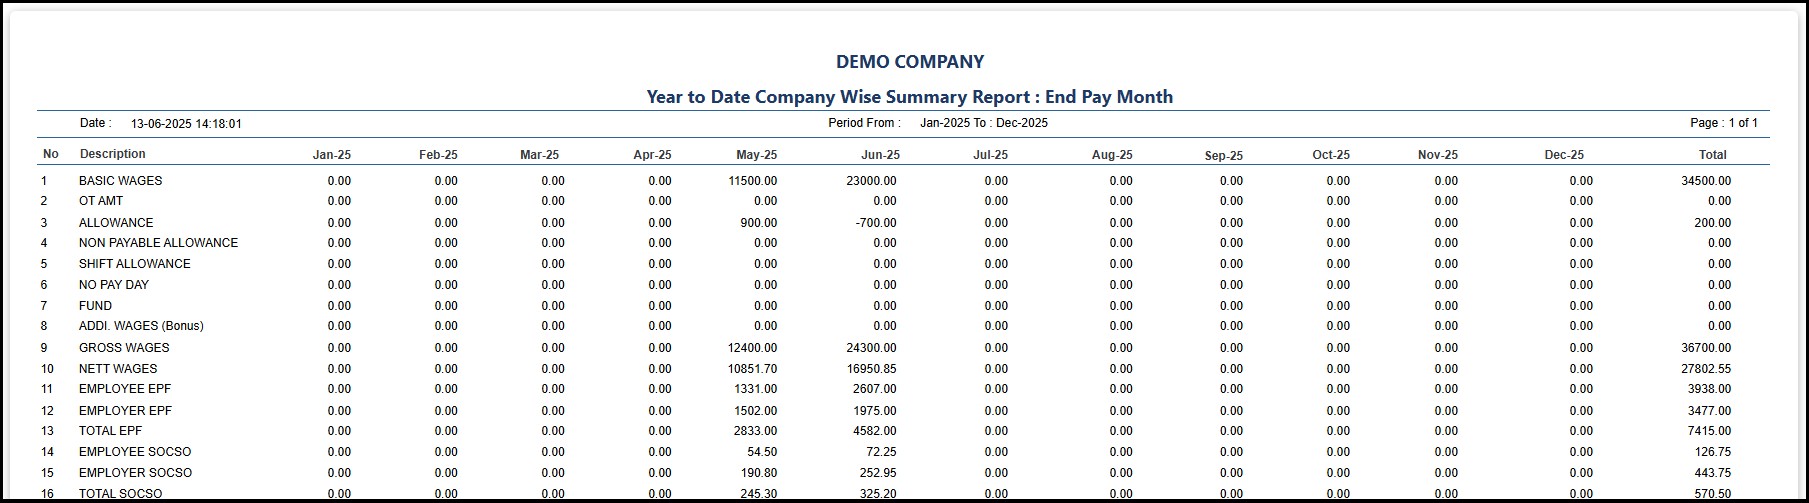
Sample Individual Wise
This will display entire year salary processed per employee.
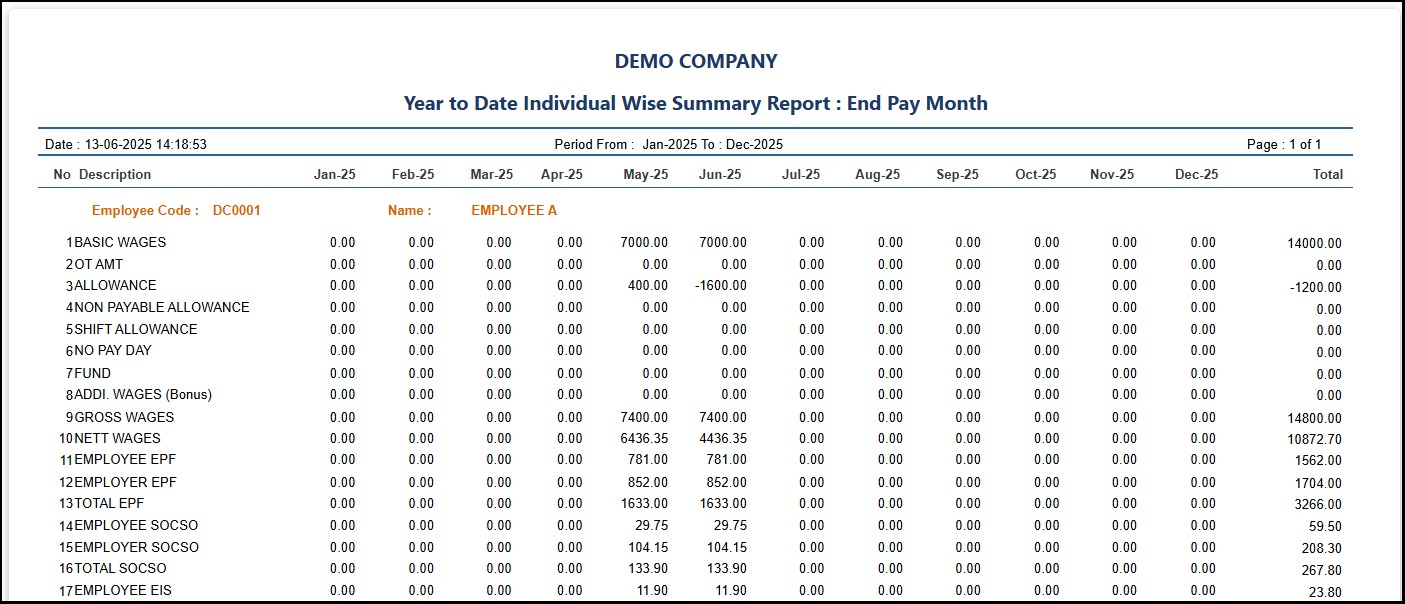
Sample Yearly Summary Report Format 1
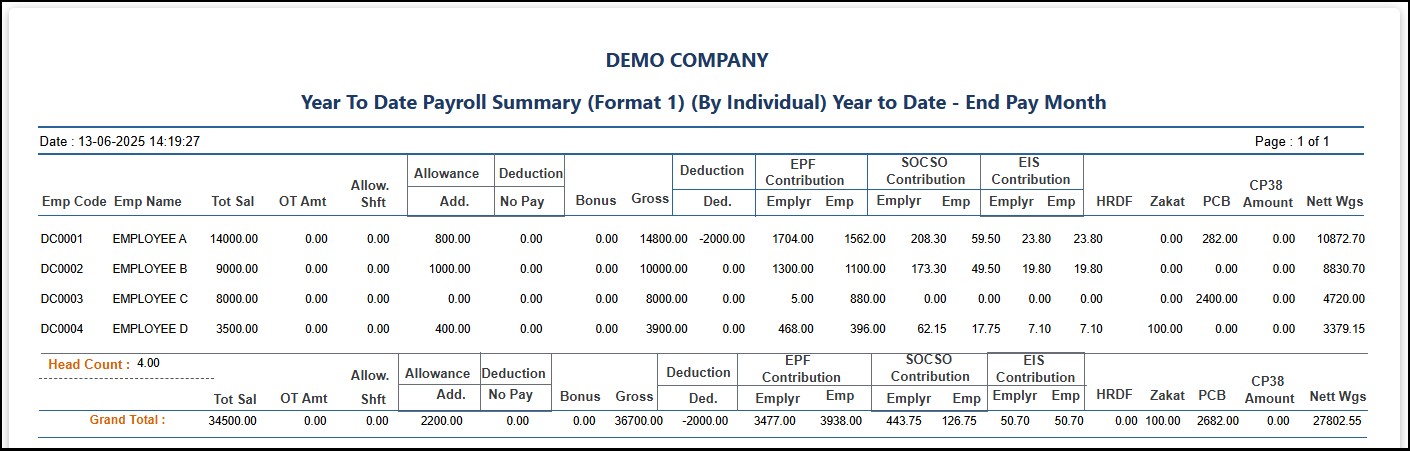
Sample Yearly Summary Report Format 2
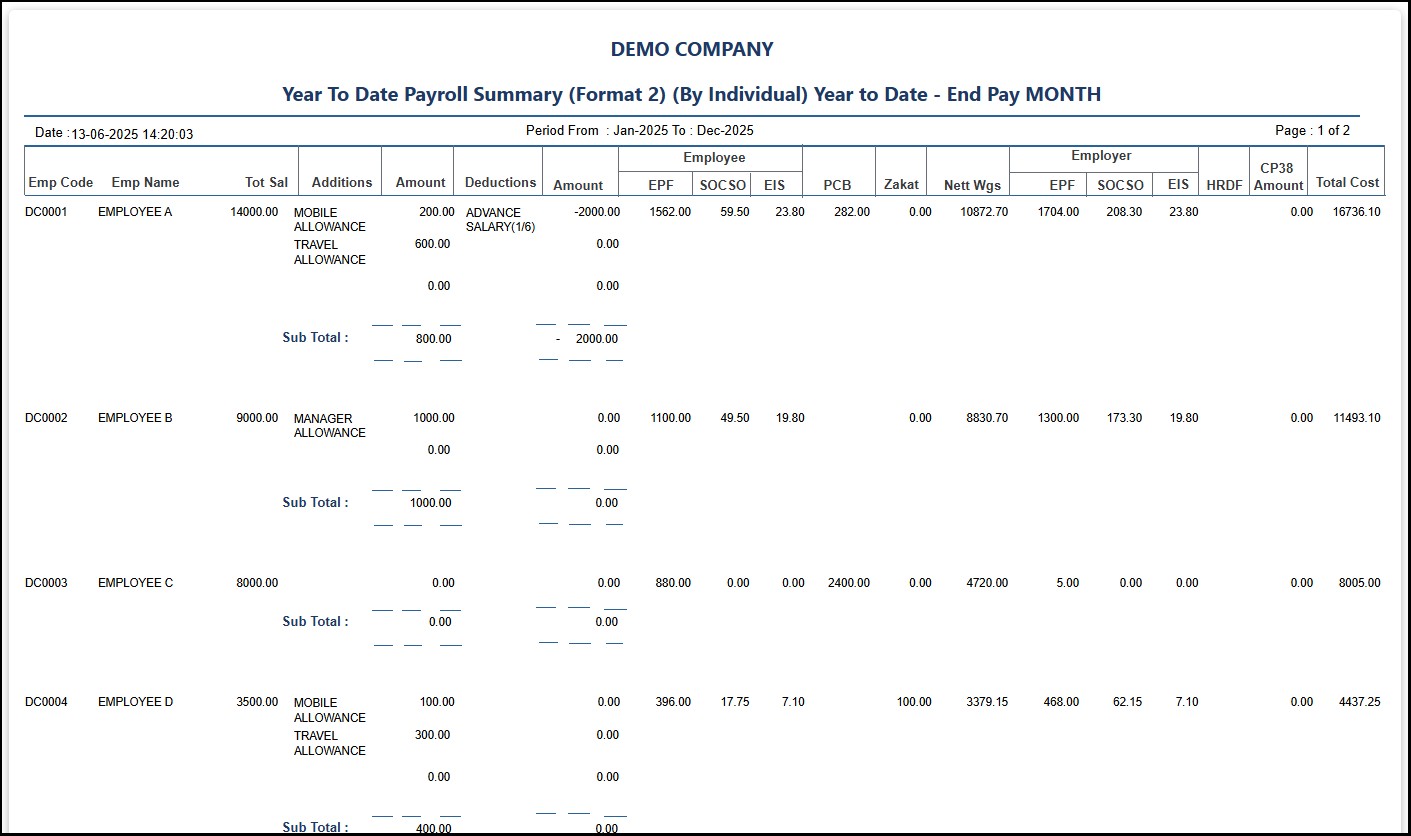
This report is designed to be able to compare the salary of the employees between specific months. This is to help double check if there are any difference in the salary of the employee between these months.
Step 1: Go to Reports > Salary Comparison.
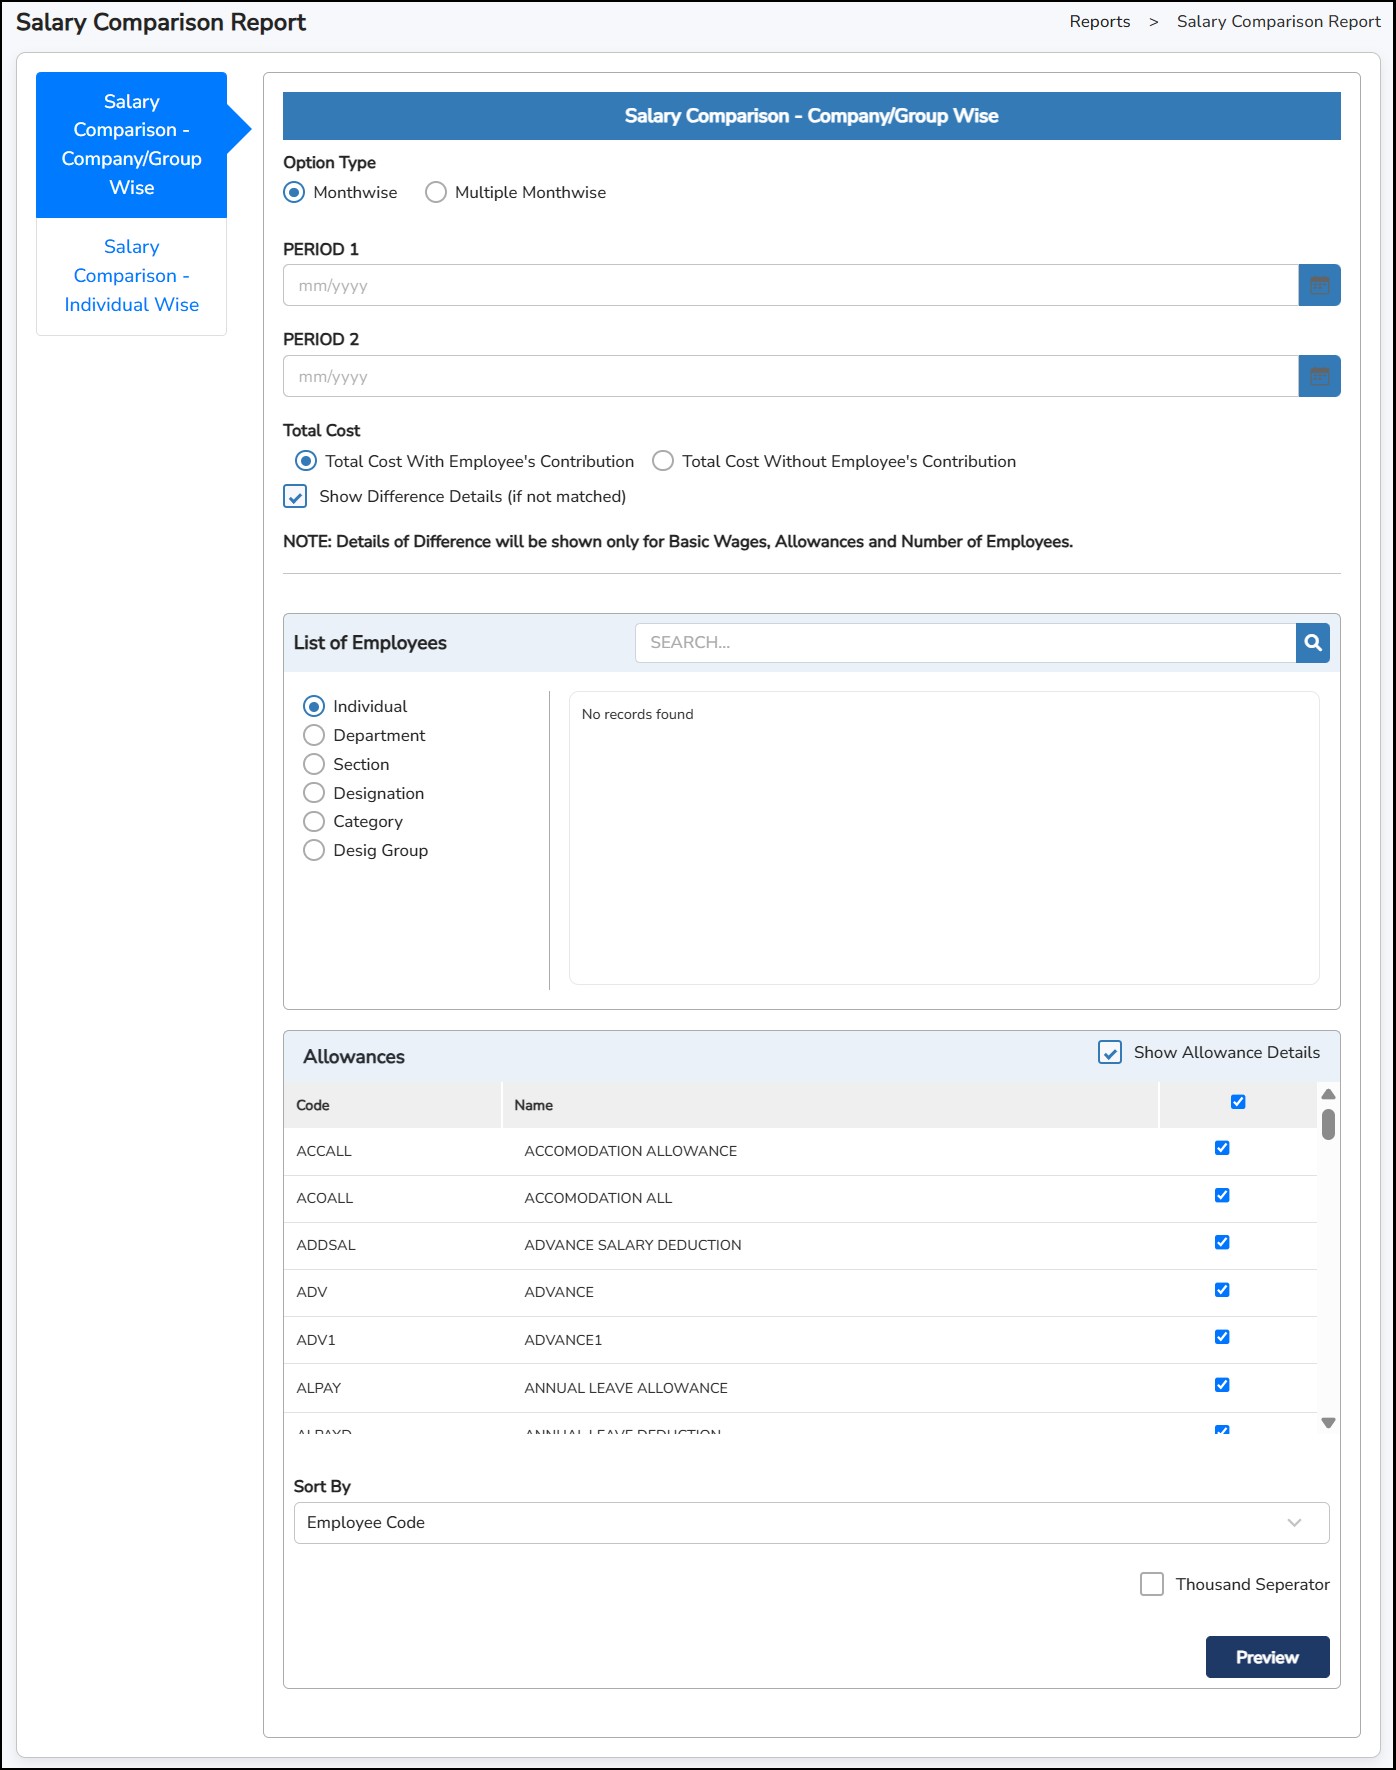
Step 2: Select either Salary Comparison – Company/Group Wise or Salary Comparison – Individual Wise.
Step 3: Choose whether you want to view Monthwise (Comparison between 2 months) or Multiple Monthwise (Comparison between multiple months).
Step 4: Enter the month in the Period 1 and Period 2 to be compared.
Step 5: Select employee(s) > Tick if you want to show the allowance in the reports and which particular allowance you want to include.
Step 6: You may sort the report by Employee Code or Employee Name .
Step
7: Click
![]()
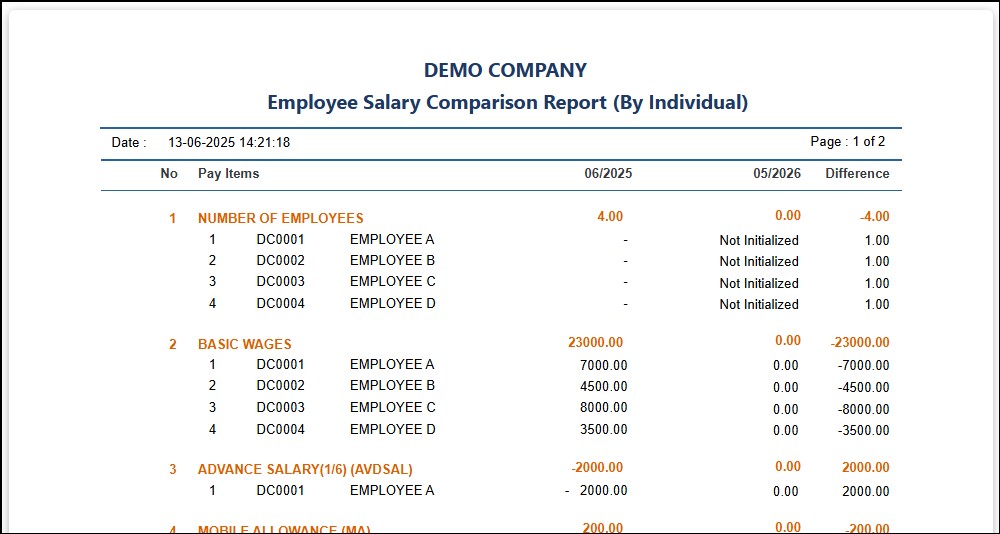
This report is designed to display the allowances that the employees have received for the specific month & period. You have the option to view the Payable Allowance/Deduction or Non-Payable Allowance .
Step 1: Go to Reports > Allowance.
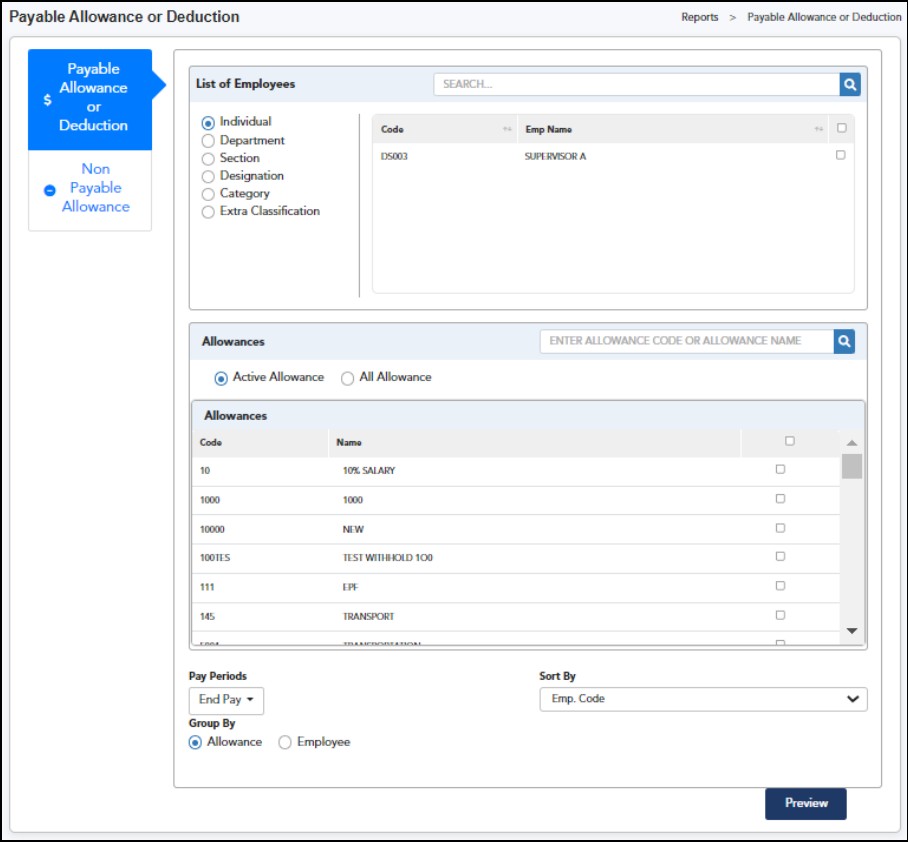
Step 1: Select the employee(s) > select the Allowance (s) that you want to view.
Step 2: Select whether you want to include allowances given under which Pay Period .
Step 3: You may sort the report by Employee Code or Employee Name
Step 4: Select whether you want to view the report by Allowance or Employee under Group By option .
Step
5: Step 6: Click
![]()
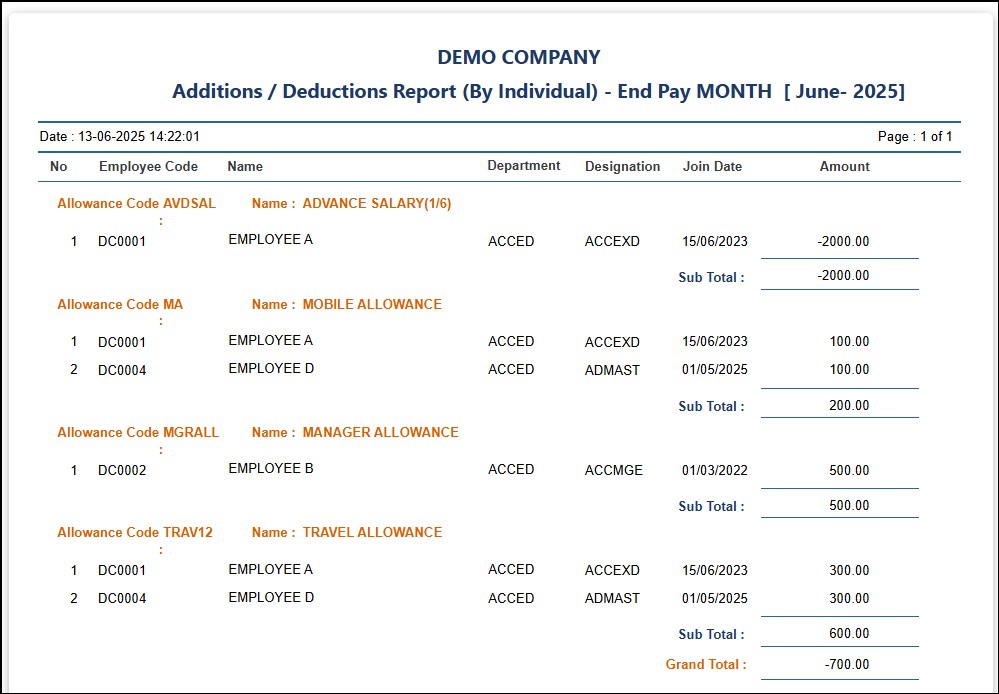
This report is designed to show out the total amount of each contribution (SOCSO, EIS, EPF, HRDF, ZAKAT & PCB) of the month.
Step 1: Go to Reports > Contribution Report
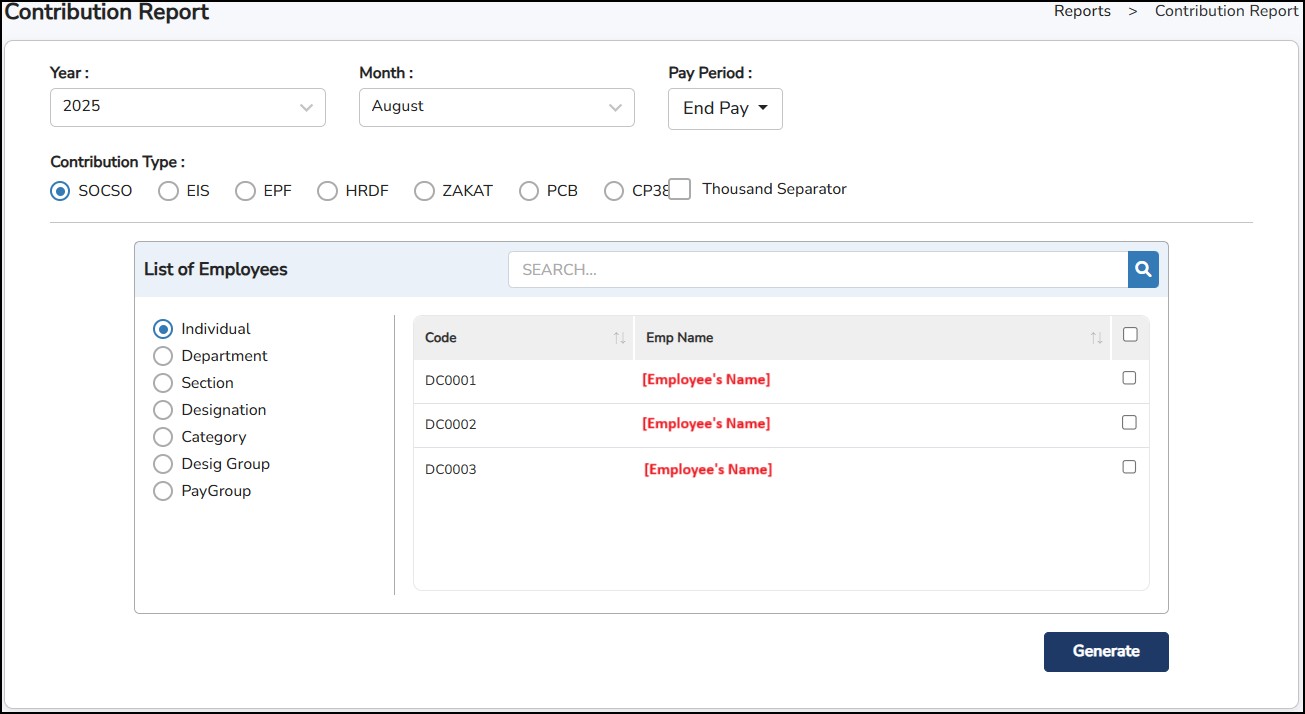
Step 2: Select the Year , Month and Pay Period accordingly.
Step 3: Tick on which Contribution Type you want to view.
Step 4: Select the list of employees
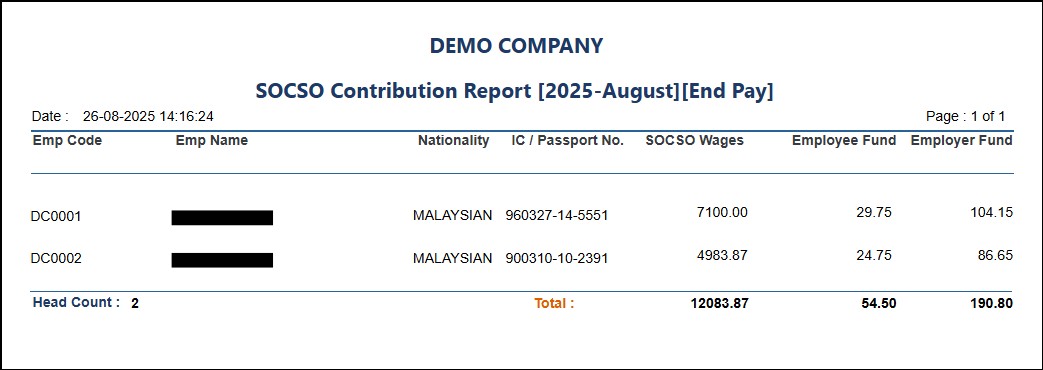
This report is designed to show the employee basic information entered in the Employee Basic Details. It will be displayed in a Bio data format.
Step 1: Go to Reports > Employee Biodata
Step 2: Select the employees to generate.
Step 3: Select the order to display by Employee Code or Employee Name
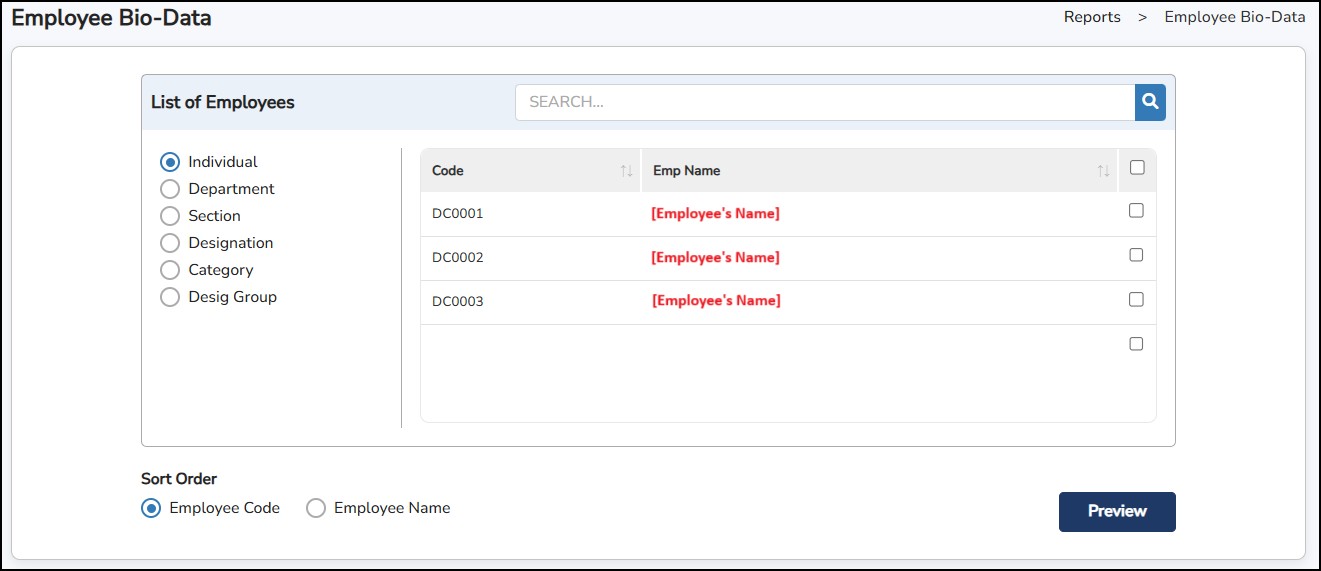
Step 4: Click
![]() to generate.
to generate.
Employee Bio-Data Report Sample
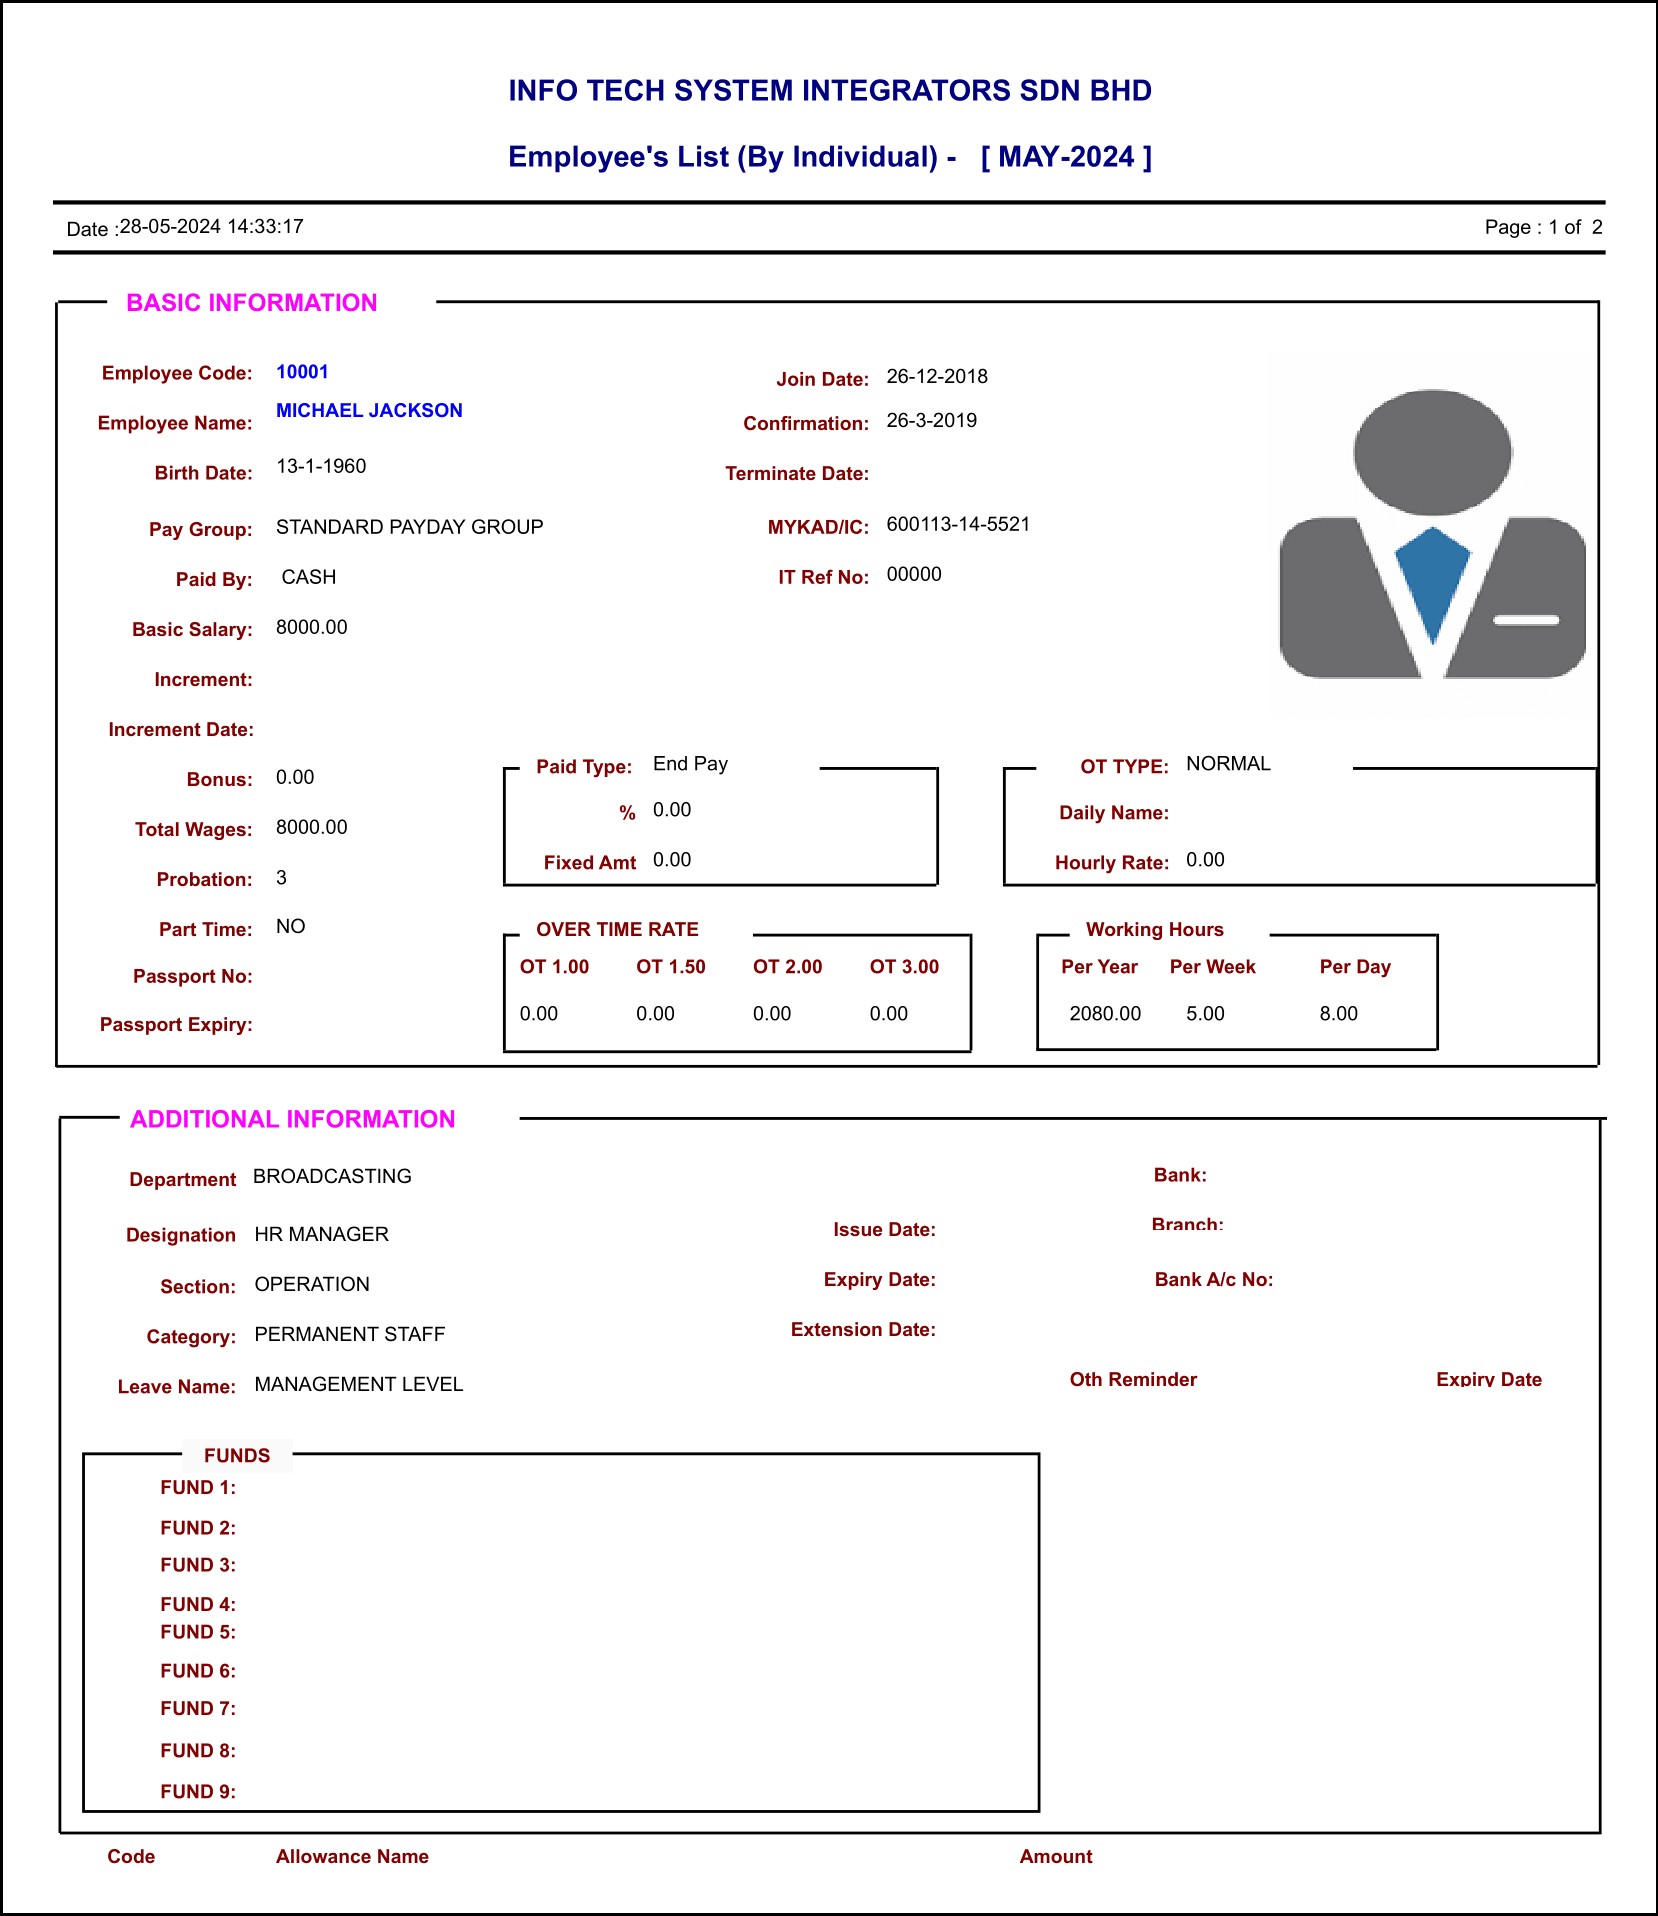
This report is designed to list down ALL the employees as of the selected month and year. You may select to show the Newly Joined and/or Resigned Employees for the month only.
Step 1: Go to Reports > Employee List.
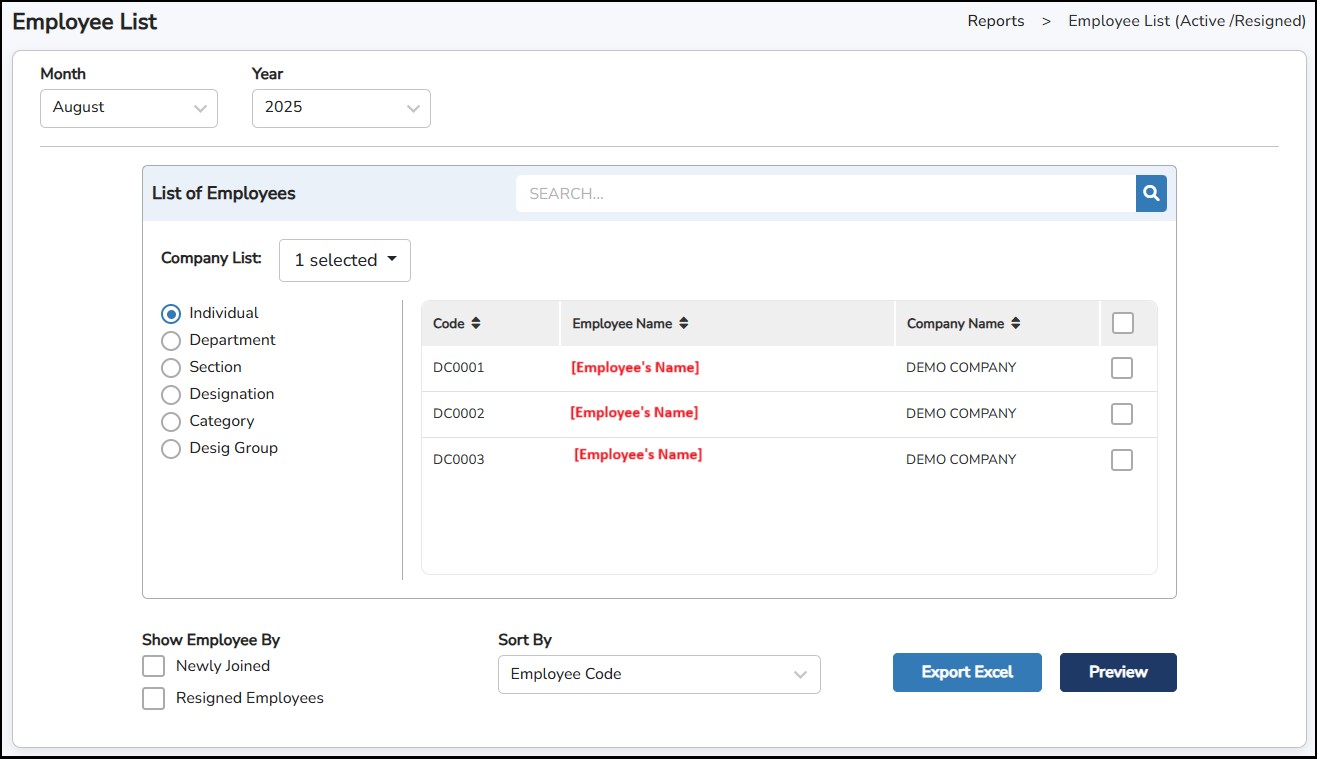
Step 1: Select the Month and Year > select the employee(s).
Step 2: Tick on Newly Joined or Resigned Employees , if you want to view only these employees.
Step 3: You may sort the report by Employee Code or Employee Name .
Step
4: Click
![]()
**Note : The report will display the list of employees by group (ACTIVE | RESIGNED | NEWLY JOINED)
Employee List Report Sample

This report is designed to display the total number of years and months that the employee has been working in the company as of the specified date.
Step 1: Go to Reports > Employee Length of Service.
Step 2: Enter the Service End Date
Step 3: Select the Employee from the list.
Step 4: Select the Report to sort by Employee Code, Employee Name or Job Name
Step 5: Tick Show Year Only if applicable
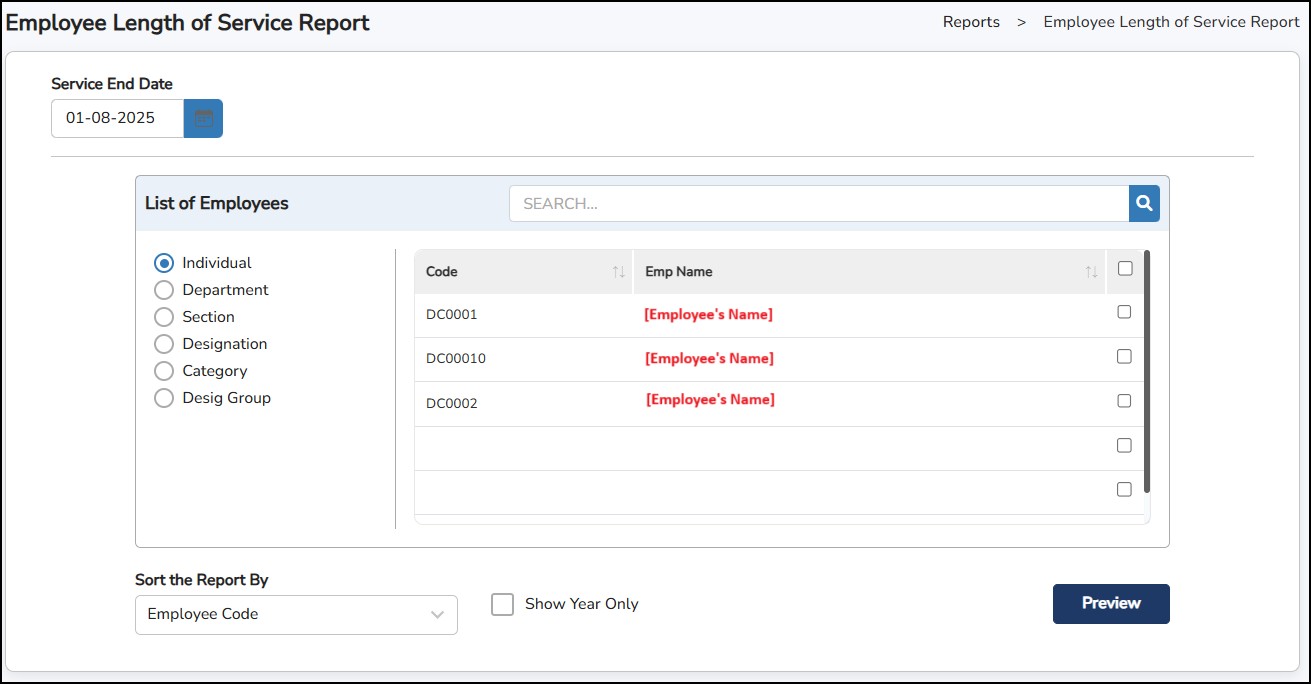
Step
6: Click
![]() to generate.
to generate.
Employee Length of Service Report Sample
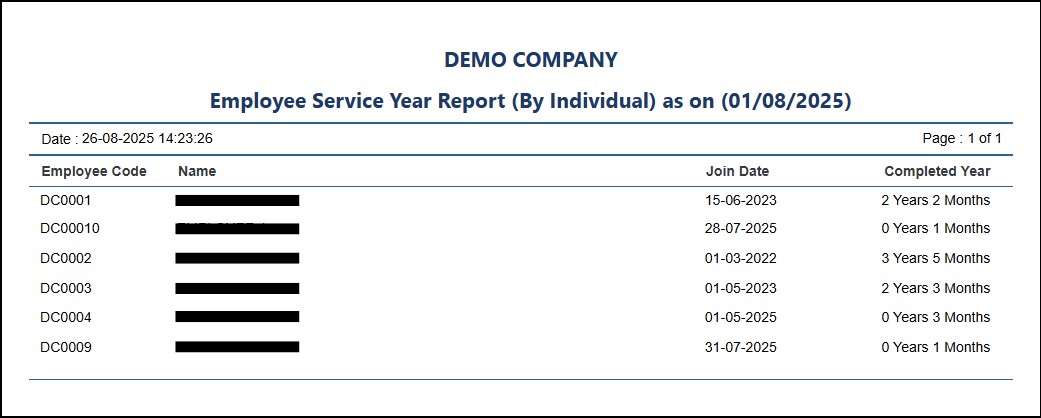
This report is designed to list down the compan's turnover rate (newly joined, resigned, transferred, promoted) for the month.
Step 1: Go to Reports > Turn Over
Step 2: Select the department.
Step 3: Choose Detail or Summary if applicable.
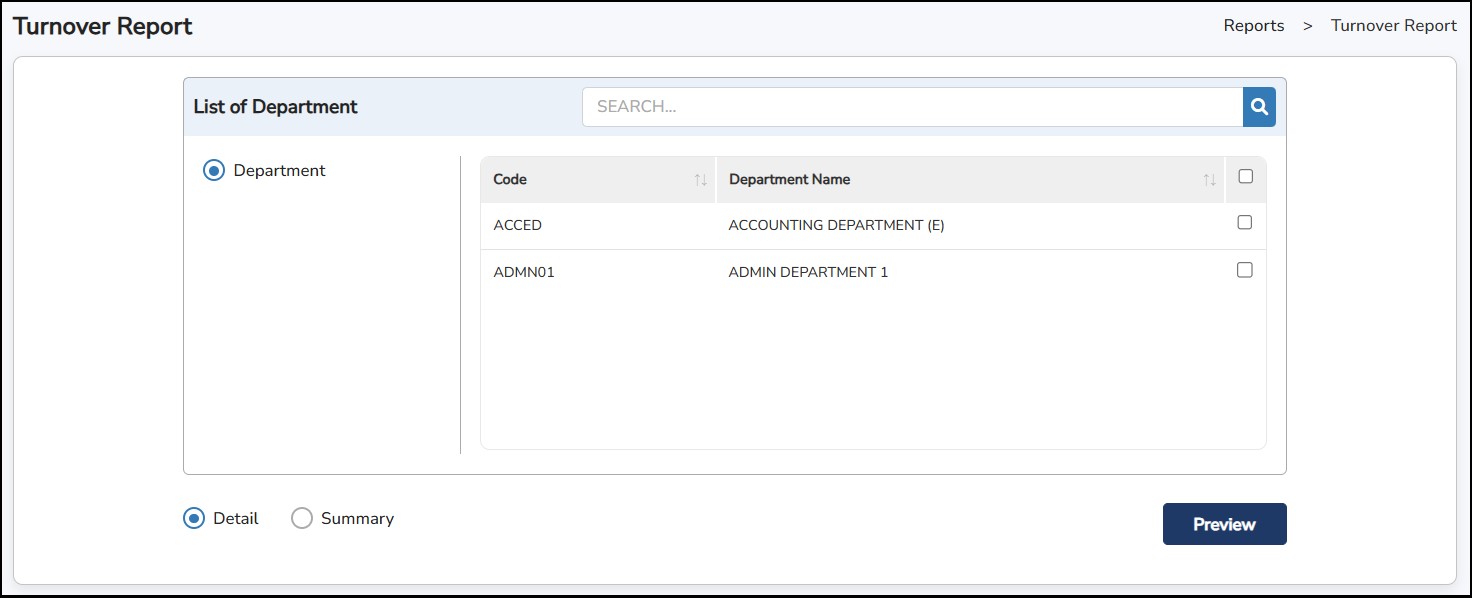
Step
6: Click
![]() to generate.
to generate.
Detail Report
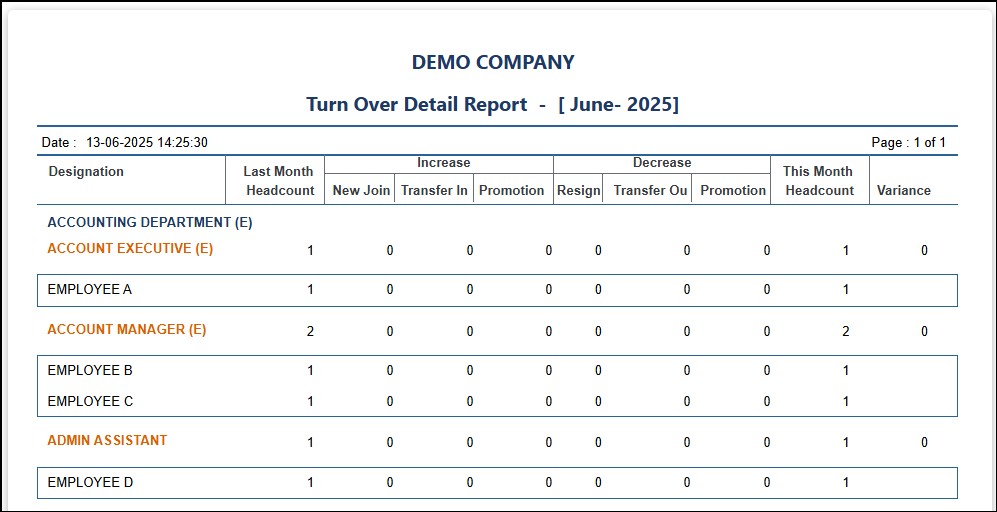
Summary Report
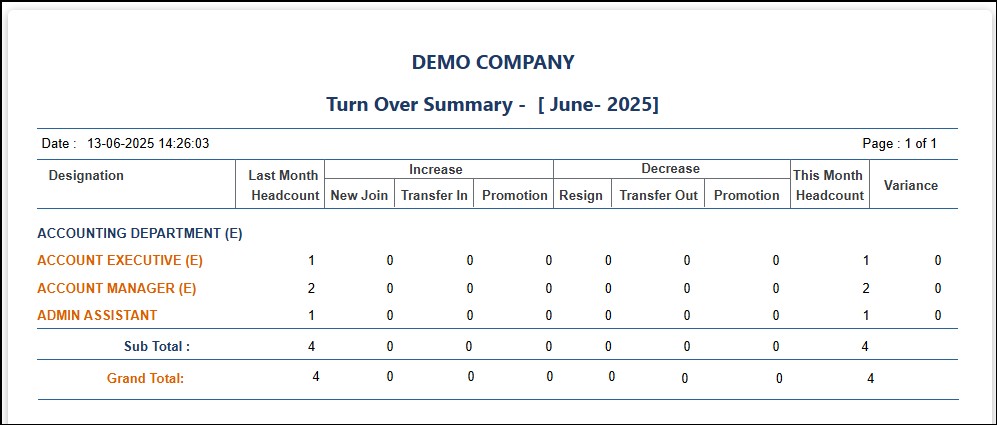
This report is designed to list the number of employees based on the Employment Type assigned to the employee in the Employee Basic Details.
Step 1: Go to Reports > Head Count Report.
Step 2: Select the Employee from the list.
Step 3: Select to include Salary Details by Summary or Detail.
Step
6: Click
![]() to generate.
to generate.
Summary Report
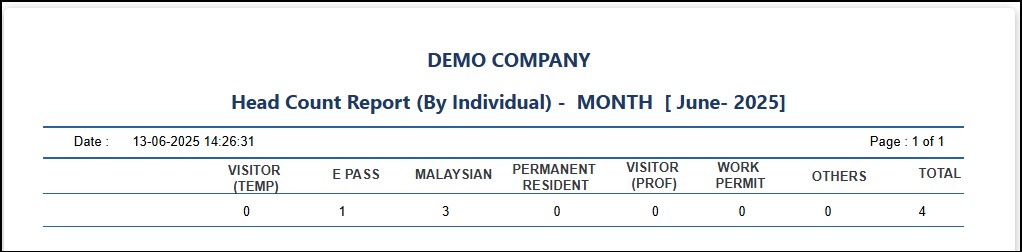
Detail Report
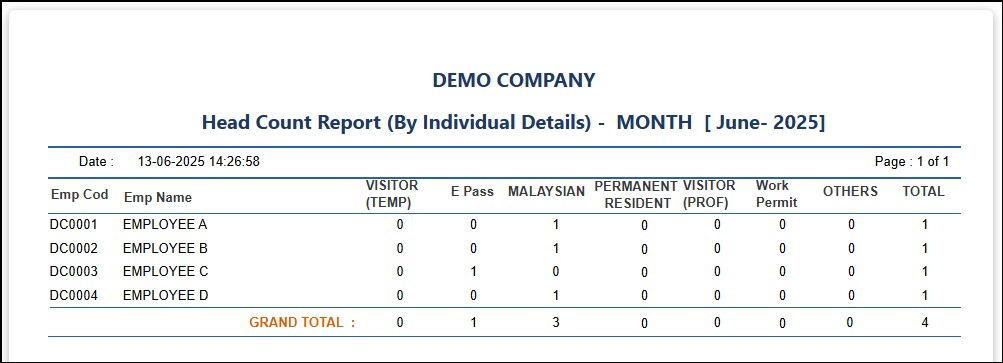
This is where you can design or customize a report according to your own required information.
Step 1: Go to Reports > Custom Report > New Report
Step 2: Enter the Report Title
Step 3: Select the Report Type: Master | Detail | Summary Report
Master Report – will provide detailed from Employee Basic Details & Employee Personal Details.
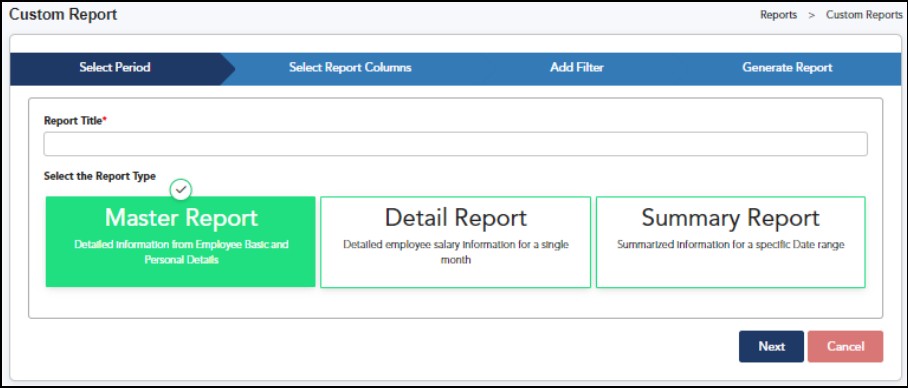
Detail Report – will provide detailed information of the employee’s salary on a single month.
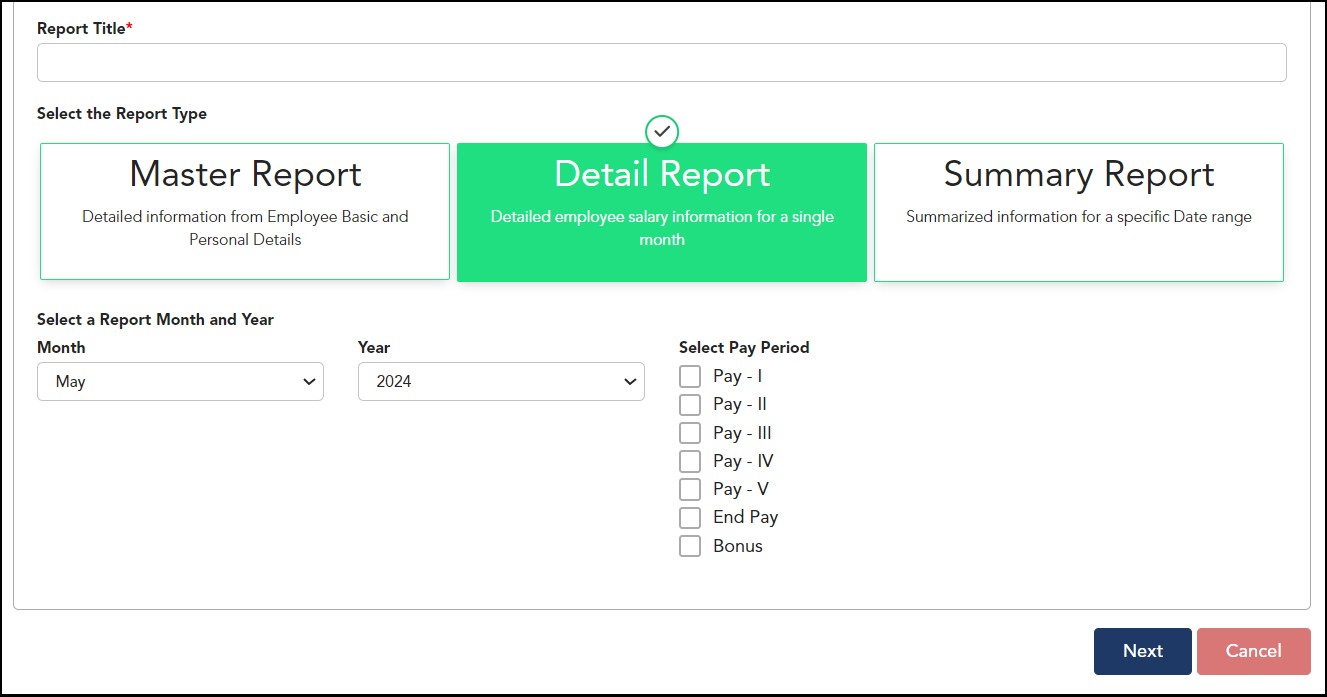
Summary Report – will provide summarized salary information by group.
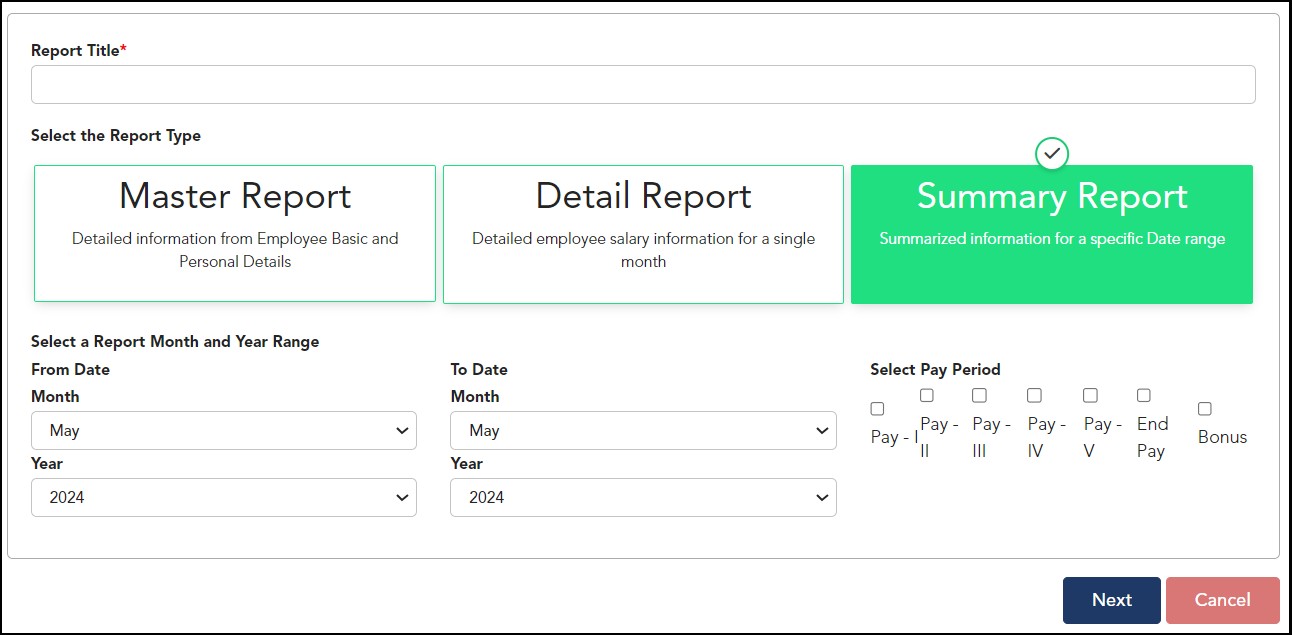
Step
4: Click
![]()
Step 5: Select the employee data (columns) that you want to include in the report from the Tables and Fields section.

Step
6: Click
![]() to
include the selected fields in the customized report; click
to
include the selected fields in the customized report; click
![]() to
exclude the selected fields
to
exclude the selected fields
Step
7: Click
![]()

Step 8: Optional – Add filters in the report by setting the criteria accordingly: -
Step
9: Click
![]()

Step
10: To generate the report, click
![]() to export to excel file.
to export to excel file.
![]() -
This is to save the report columns (fields) and the
conditions/criteria set and be able to use it again for future
reference.
-
This is to save the report columns (fields) and the
conditions/criteria set and be able to use it again for future
reference.
You may review back the saved report from Reports > Custom Report > Reports View
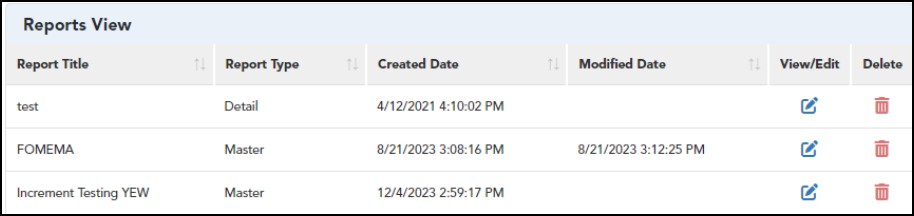
This report is designed to show in a report format the Employment History recorded in the Employee Basic Details. E.g., change in department | section | designation, increment, change of leave category.
Step 1 : Go to Reports > Employment History.
Step 2: Select the date range by entering the From and To dates.
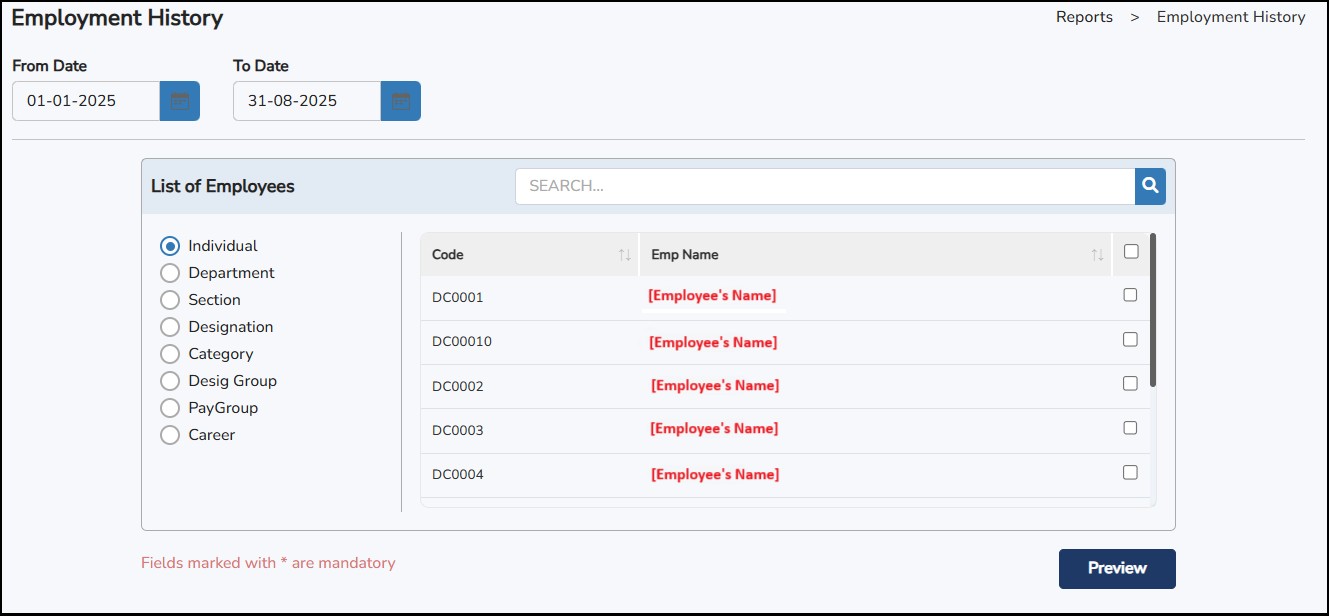
Step
3: Select the employee(s) > click
![]()
Employment History Report Sample
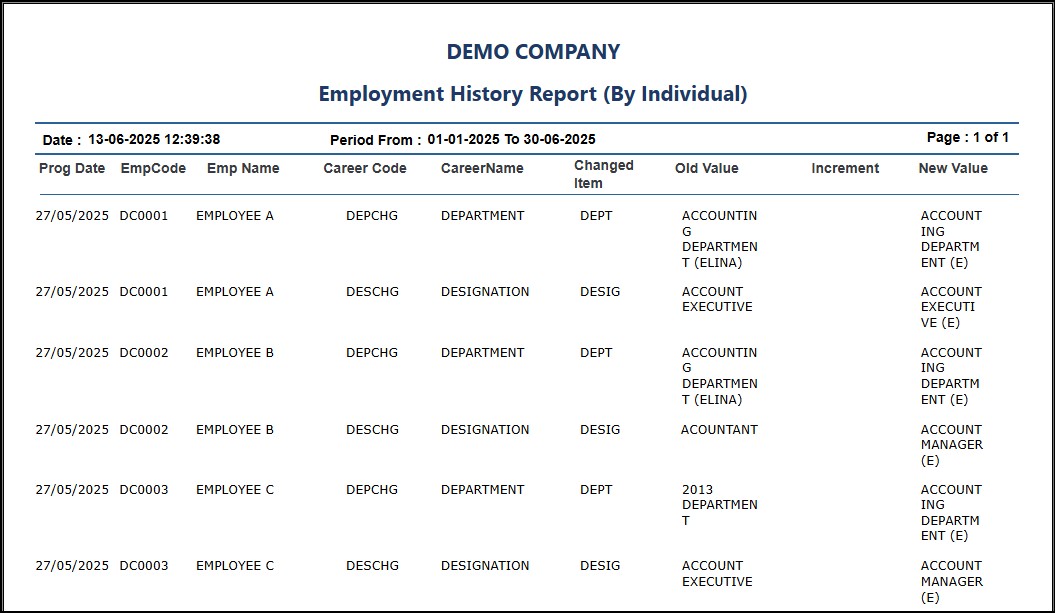
This report is designed to list down all employees with their birthdays for the specified month.
Step 1: Go to Reports > Employee Birthday List
Step 2: Select the Month
Step 3: Select the employee(s)
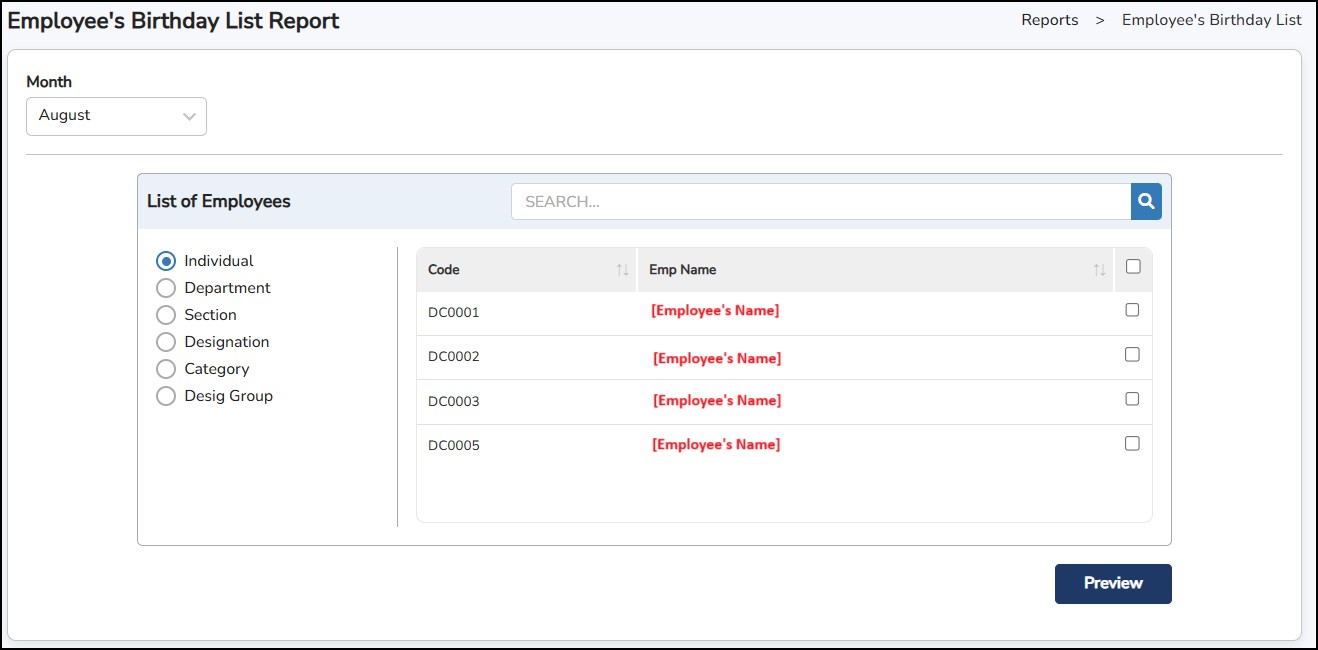
Step
4: Once done,
click
![]()
Employee's Birthday List Report Sample
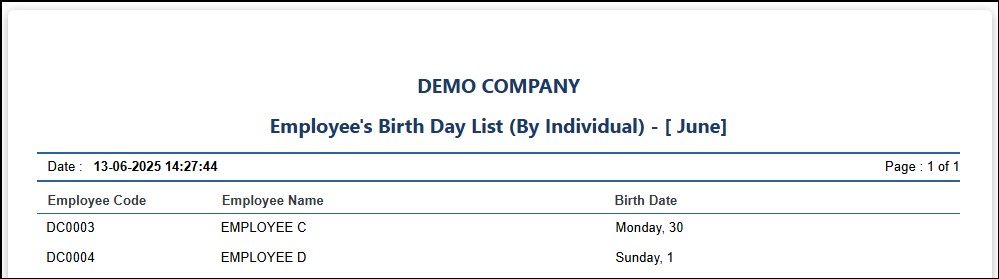
This Report is designed to assess employees with leave balances in the current year. Users will have the option to view all employees, or resigned employees leave encashment data, if any.
Step 1: Go to Reports > Leave Reports > Leave Encashment
Step 2: Select the Year and the Month
Step 3: Select the type of employees to generate: Active employee or Resigned employee only
Step 4: Select the employees from the list
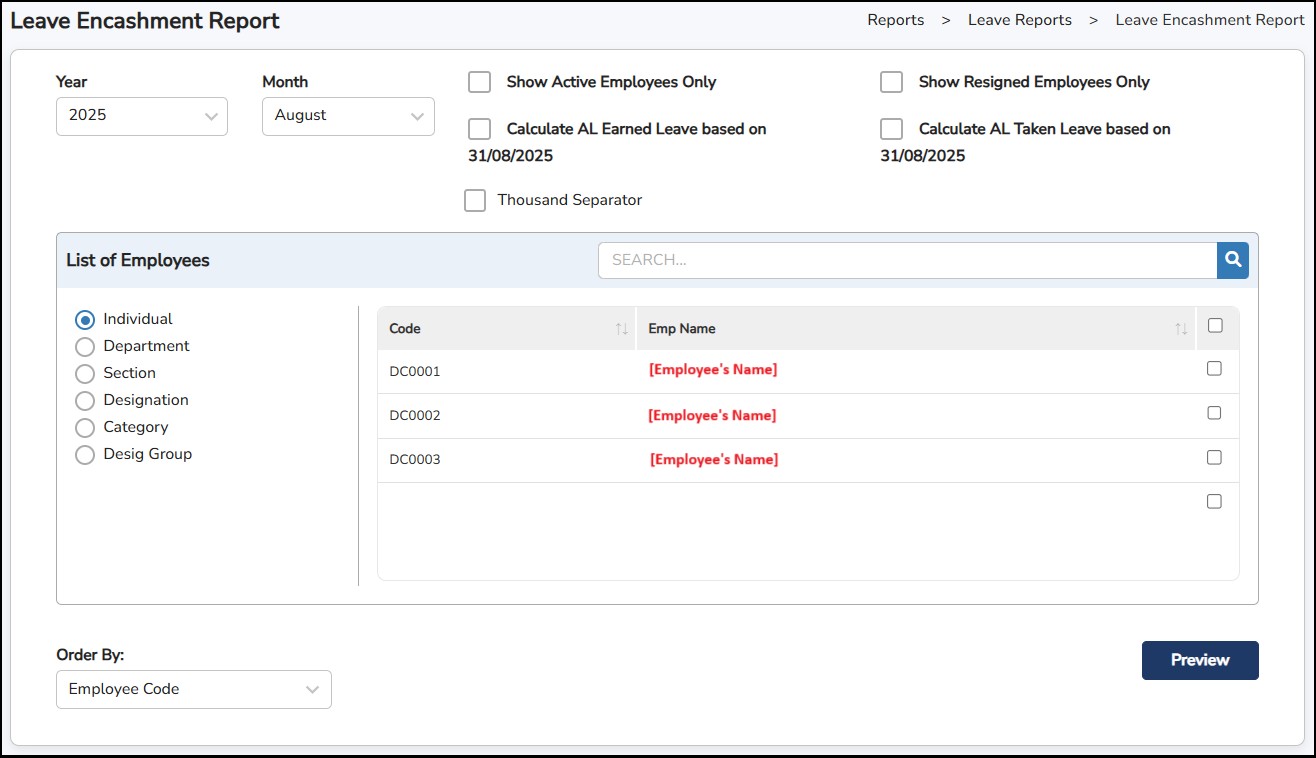
Step 5: Click
![]() to generate.
to generate.
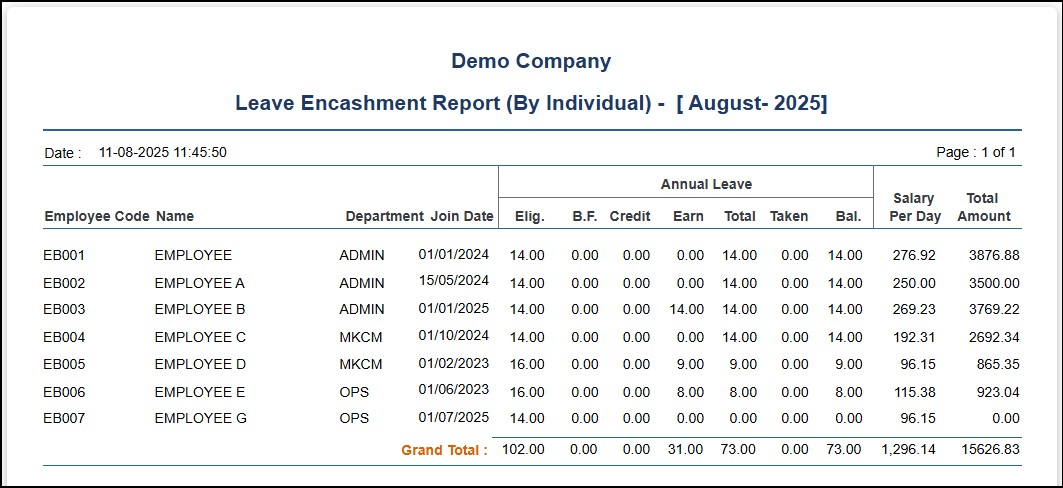
This is to generate the leave taken by the employees during the selected period.
Step 1: Go to Reports > Leave Reports > Leave History
Step 2: Enter the selected period in the "From" and "To" column
Step 3: Select the Leave Group names to be generated
Step 4: Select the employees to be in the report
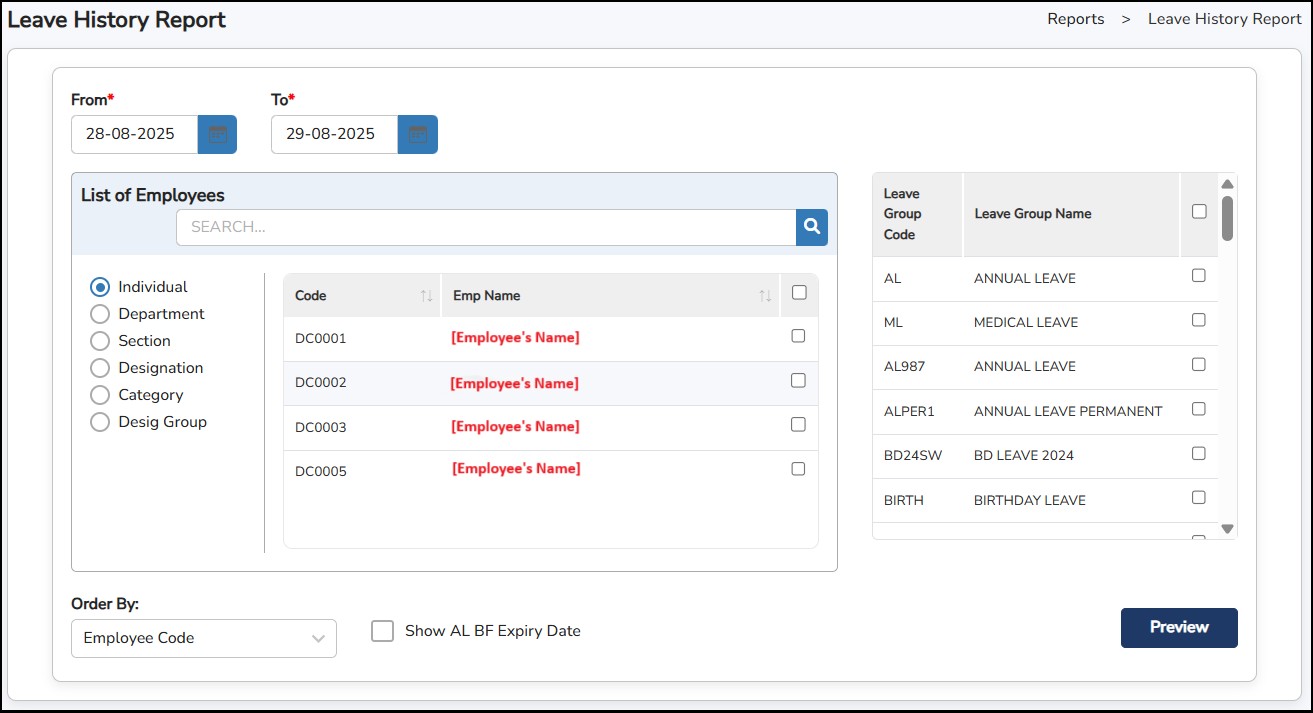
Step 5: Once done, click
![]() to view the report.
to view the report.
Leave History Report Sample
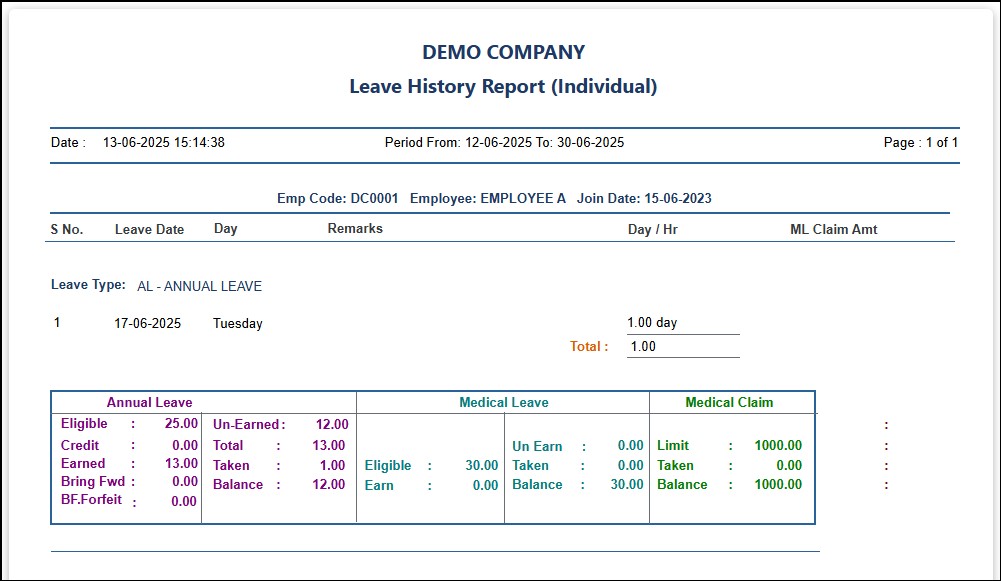
This report is to generate the total leave taken by the employees for Annual Leave and Medical Leave during the selected period.
Step 1: Go to Reports > Leave Reports > Leave Summary Report.
Step 2: Enter the selected period in the "From" and "To" column.
Step 3: Select the employees to be in the report
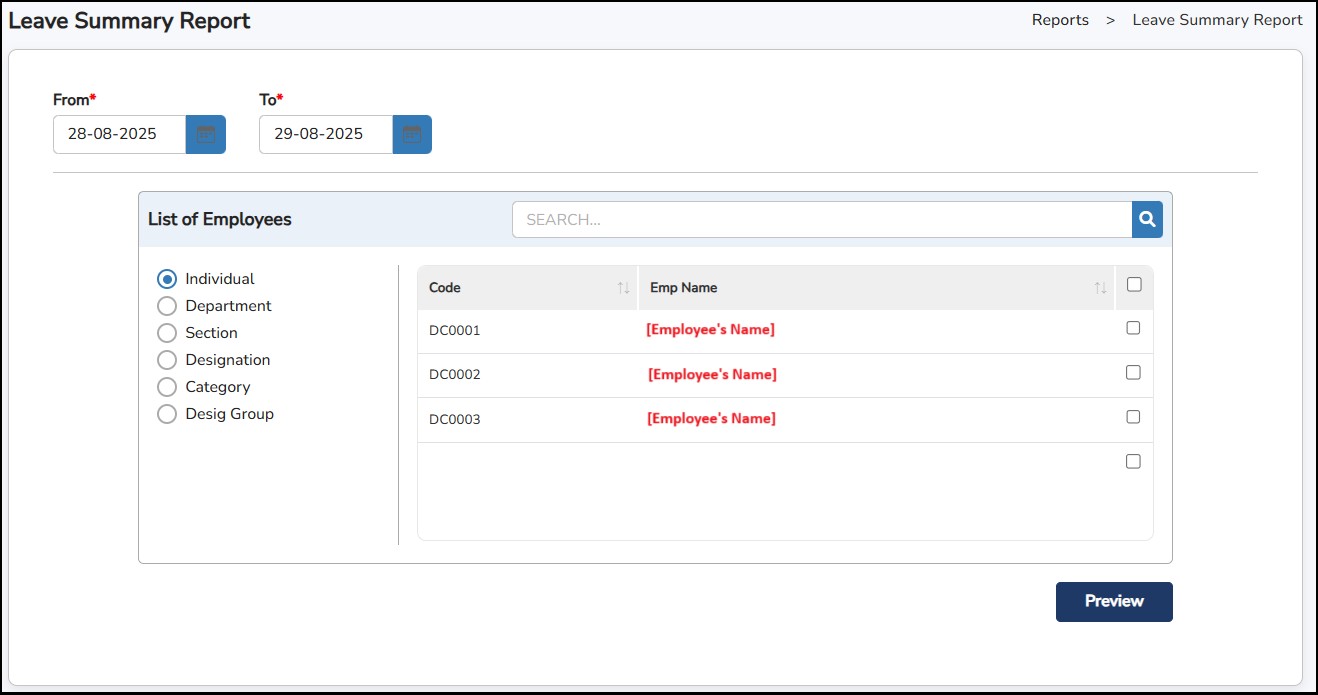
Step 4: Click
![]() to generate.
to generate.
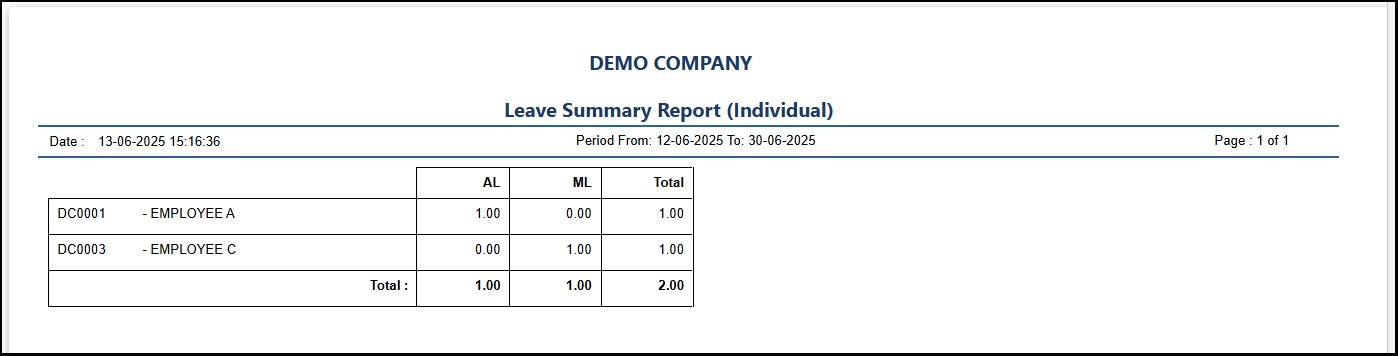
This report provides a consolidated view of each employee's annual leave records for a specific year. It helps to track leave entitlements, usage, and remaining balances for individual employees.
Step 1: Go to Reports > Leave Reports > Leave Consolidate Report (History).
Step 2: Enter the selected period in the "From Year" and "To Year" column.
Step 3: Select the Annual Leave or Medical Leave names to be generated.
Step 4: Select the employees to be in the report.
.jpg)
Step 5: Click
![]() to generate.
to generate.
Leave Consolidate Report (History) Sample
2.jpg)
This report provides a detailed summary of each employee's annual and medical leave records for the current year. It allows HR and managers to monitor leave entitlements, usage, and remaining balances in real time.
Step 1: Go to Reports > Leave Reports > Leave Consolidate Report (Current Year).
Step 2: Select the employees
Step 3: Tick to choose what report to generate: Preview AL, ML or Export All Leave Types. If "Export All Leave Types" is selected, the option to choose which leave types to include will appear.
Step 4: Click on Show AL BF Expiry Date to include the expiry date in the report.
.jpg)
Step 5: Click
![]() to generate.
to generate.
Leave Consolidate Report (Current Year) Sample
2.jpg)
This is to view applied leave by the employees. Users may filter the application by Department and Section to be displayed.
Step 1: Go to Reports > Leave Reports > Calendar Format Report.
Step 2: Select the filter by Department or Section if applicable
Step 3: Tick "Show Leave Code", "Show AM/PM for Day Leave", and "Show Employee Short Name" if applicable
Step 4: Click
![]() to refresh the calendar below after each of the options above have been enabled.
to refresh the calendar below after each of the options above have been enabled.
Step 5: Select which month to generate and the system will automatically display the information.
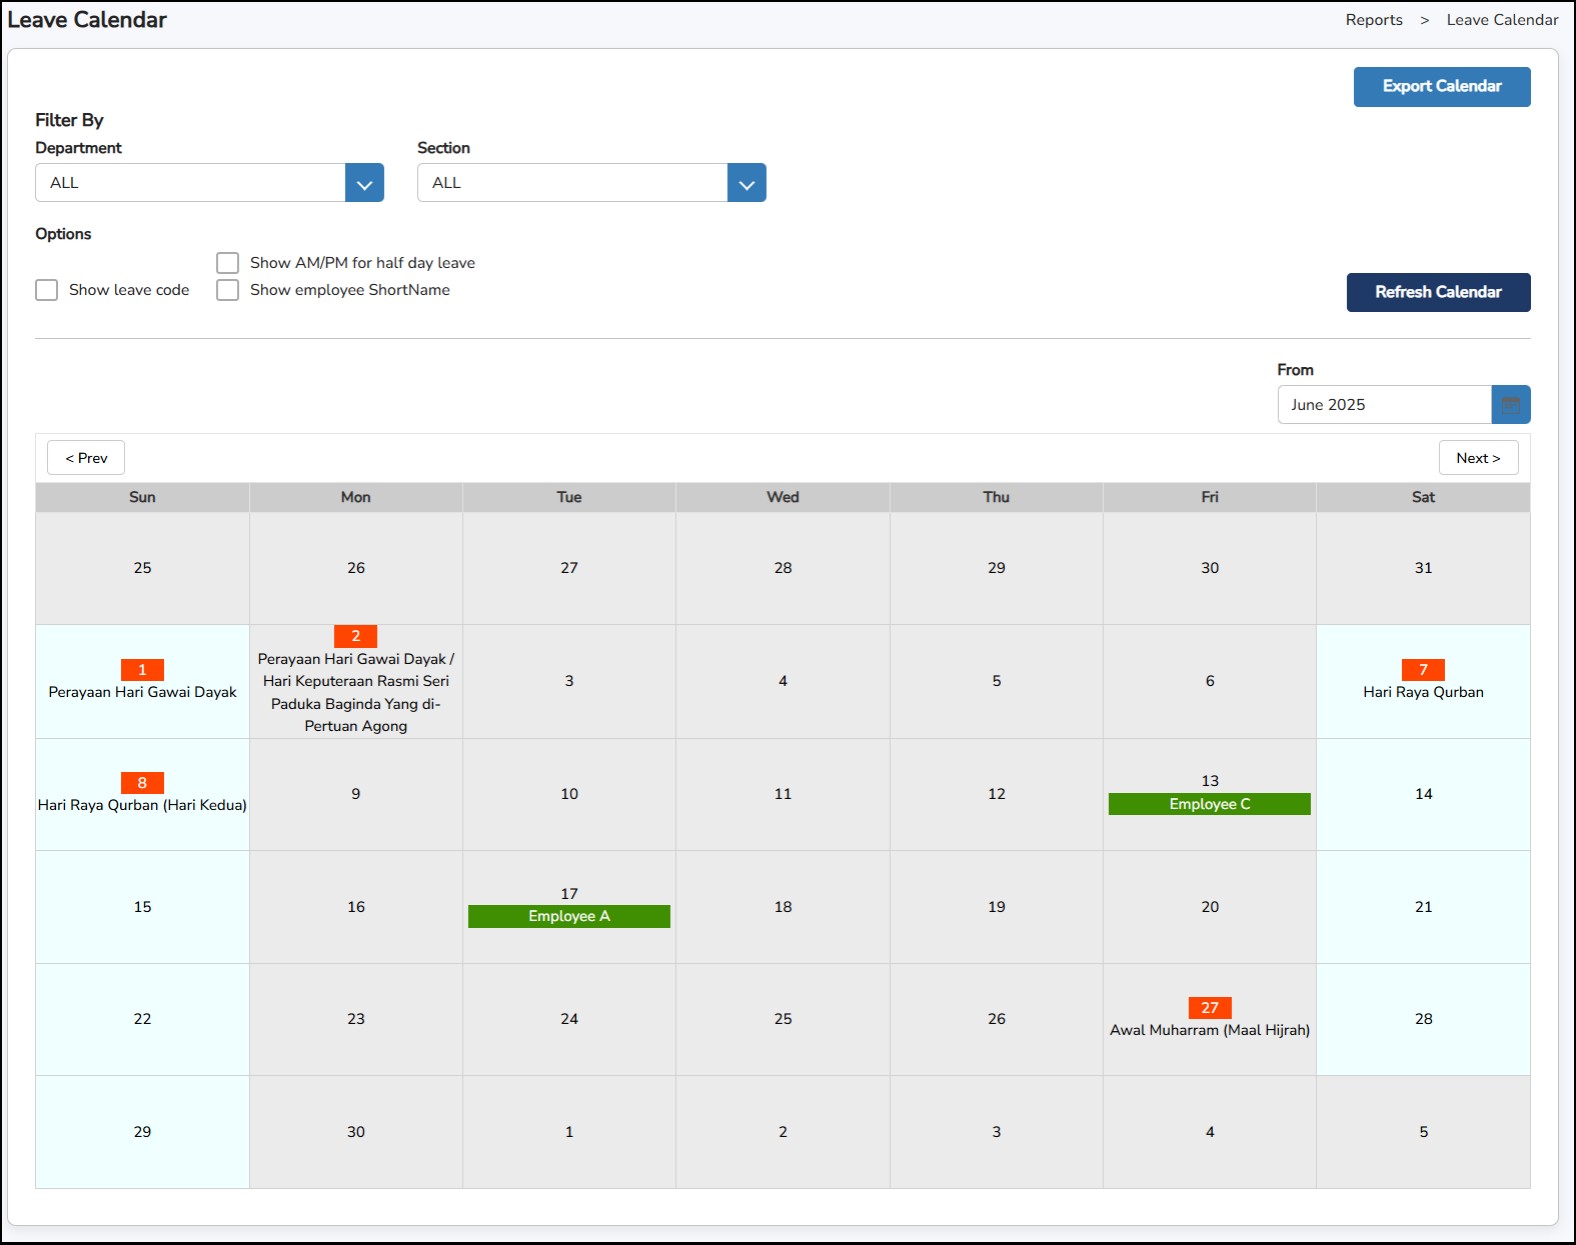
This report is to display the summarized Off-In-Lieu (Replacement Leave) credited to the employees during the selected period.
Step 1: Go to Report > Leave Reports > Off-In-Lieu Summary.
Step 2: Enter the From and To dates.
Step 3: Select the employees on the list
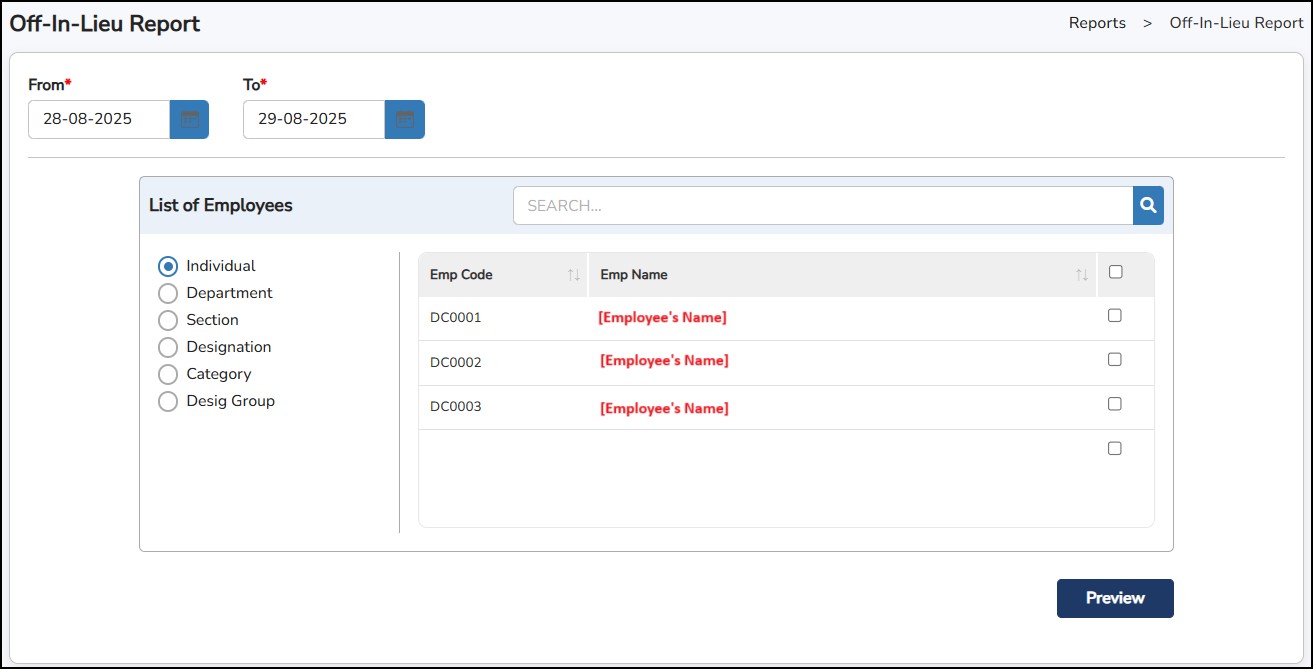
Step
4: Click
![]() to generate.
to generate.
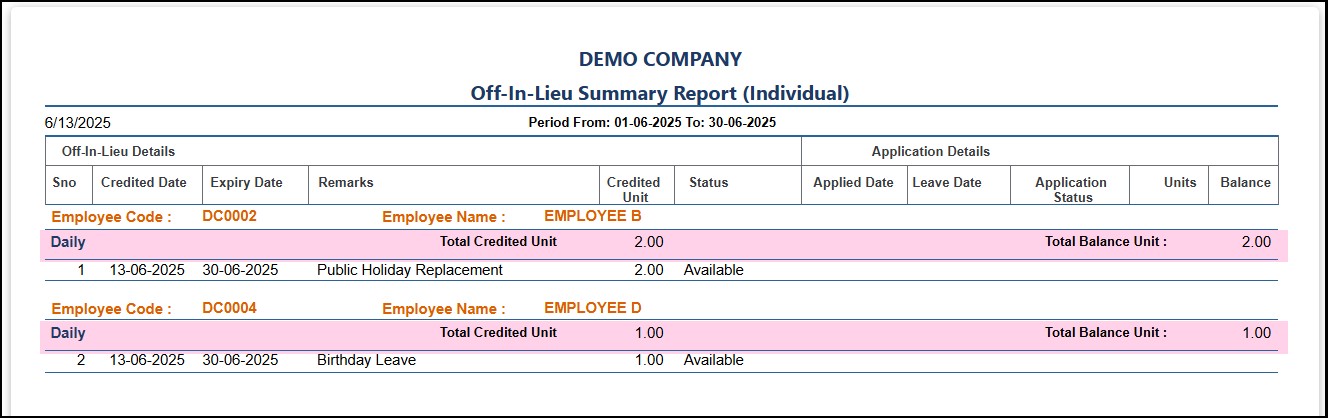
This report is to display the detailed report Off-In-Lieu (Replacement Leave) credited to the employees during the selected period including the credited date and the expiry date of the replacement leaves.
Step 1: Go to Report > Leave Reports > Off-In-Lieu Report.
Step 2: Enter the From and To dates.
Step 3: Select the employees on the list
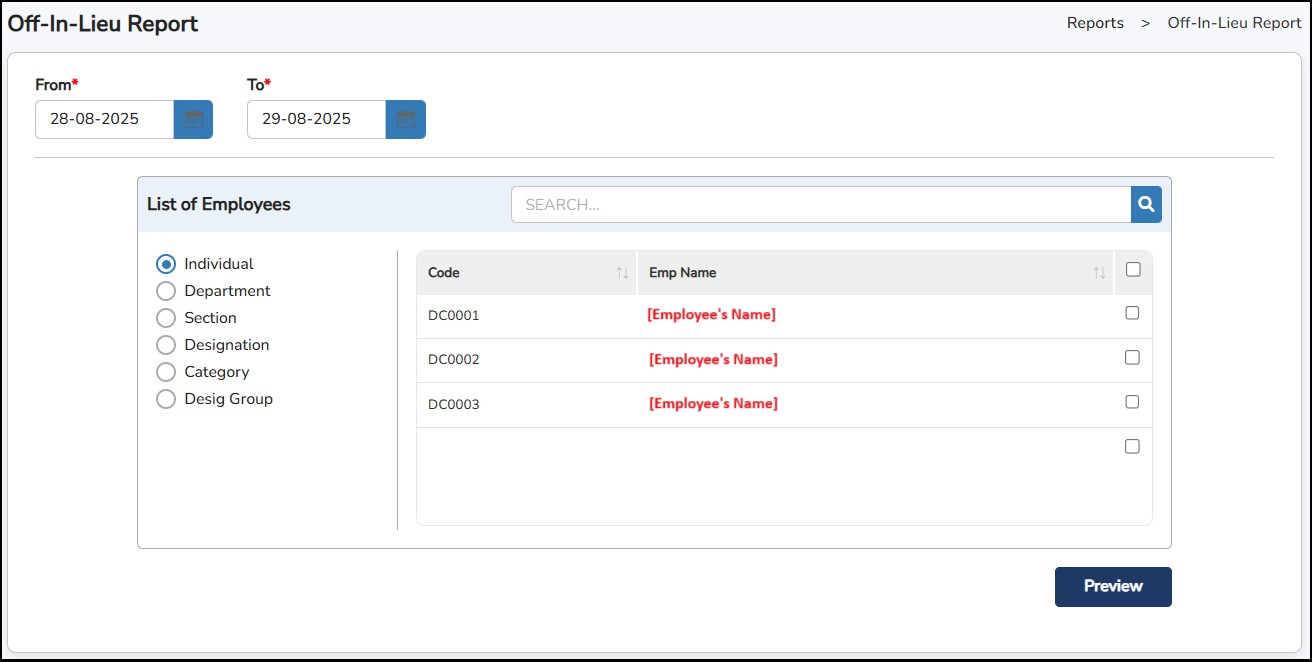
Step
4: Click
![]() to generate.
to generate.
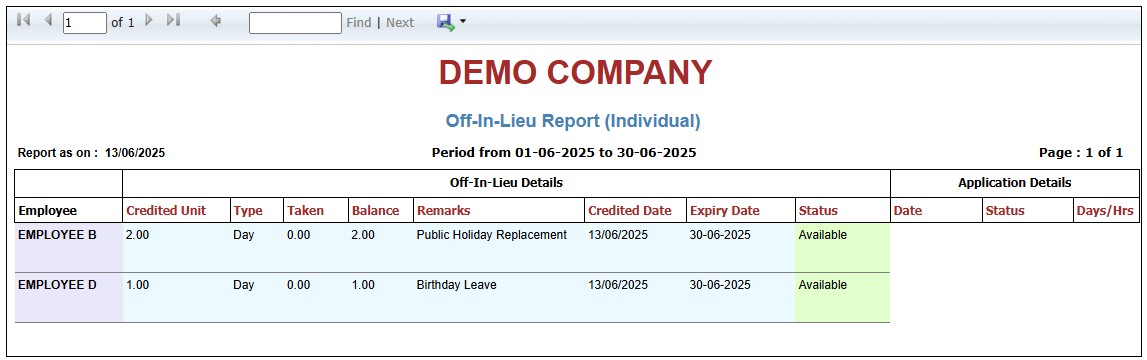
This report is to display the detailed report Annual Leave credited to the employees during the selected period including the remarks or reason given and the date created.
Step 1: Go to Report > Leave Reports > Credit Annual Leave Report.
Step 2: Enter the From and To dates.
Step 3: Select the employees on the list.
Step
4: Click
![]() to generate.
to generate.

This report is to generate any Medical or Dental Claim applied by the employees during the selected period.
Step 1: Go to Report > Leave Reports > Medical Claim
Step 2: Enter the From and To dates
Step 3: Select the employees on the list
Step 4: Select Medical or Dental Claim
Step
5: Click
![]() to generate.
to generate.
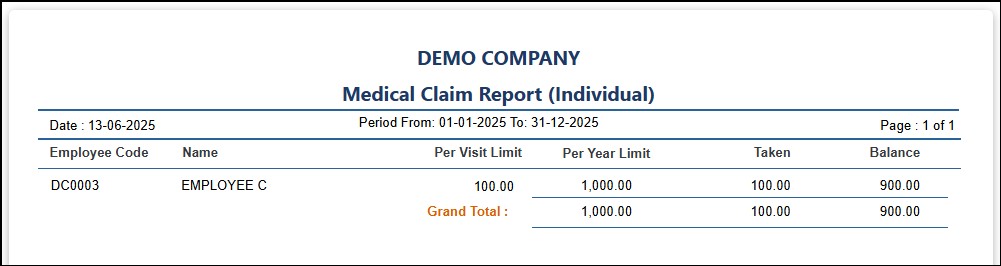
This report is to display the activity of the users using the system. Users can view by Employee or by Users.
Step 1: Go to Reports > Audit Log Report.
Step 2: Enter the From and To dates
Step 3: Select the filter type "Employee" or "User" to generate
Step 4: Select the employees or users
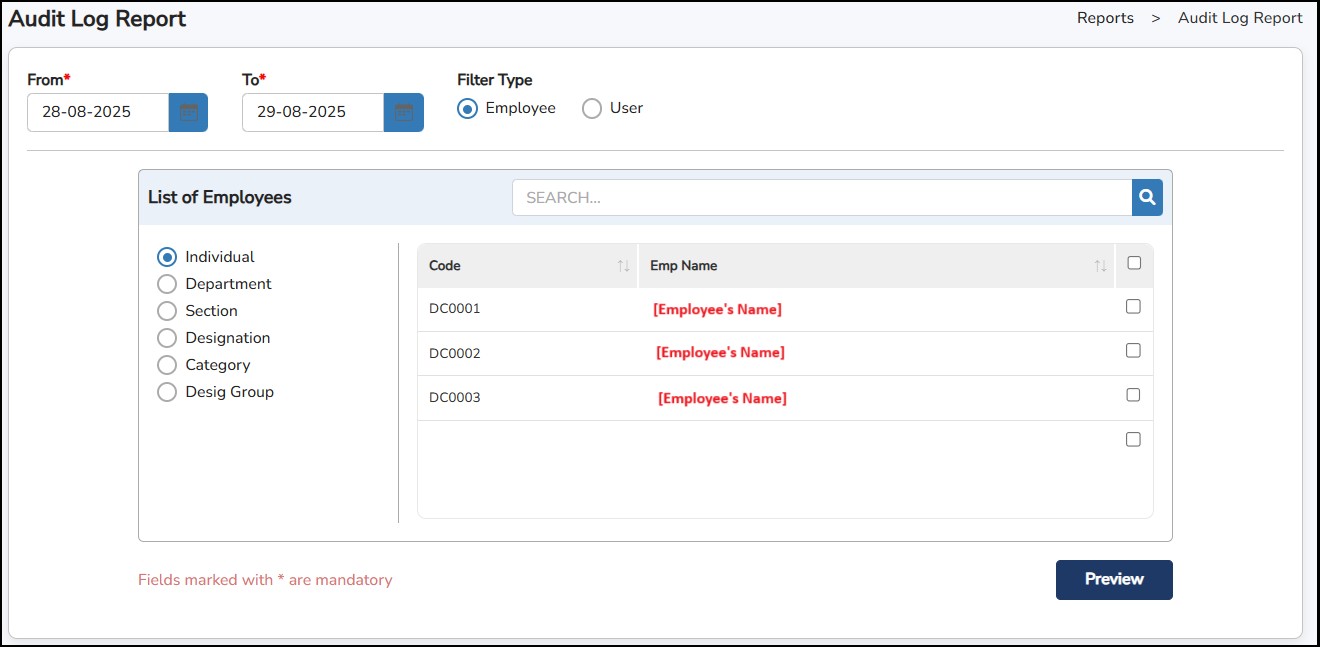
Step
5: Click
![]() to generate.
to generate.
Employee Audit Log Report
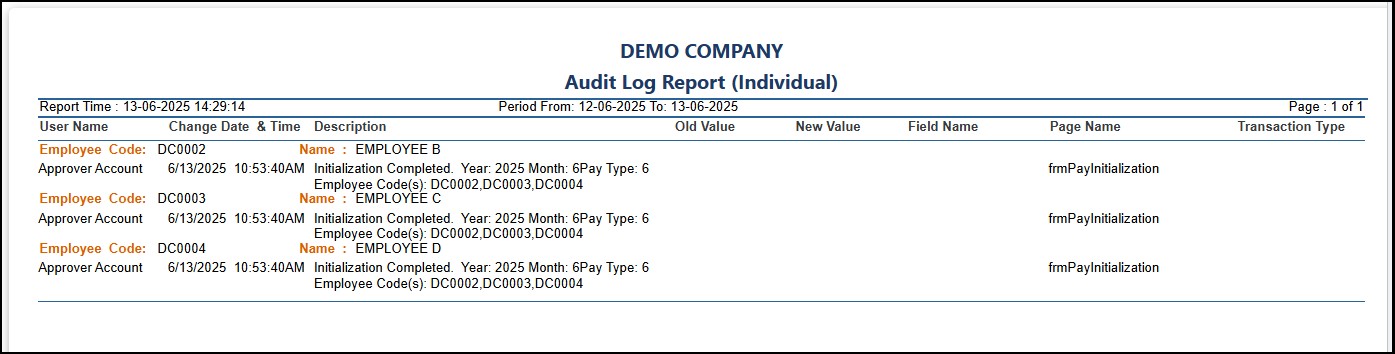
User Audit Log Report
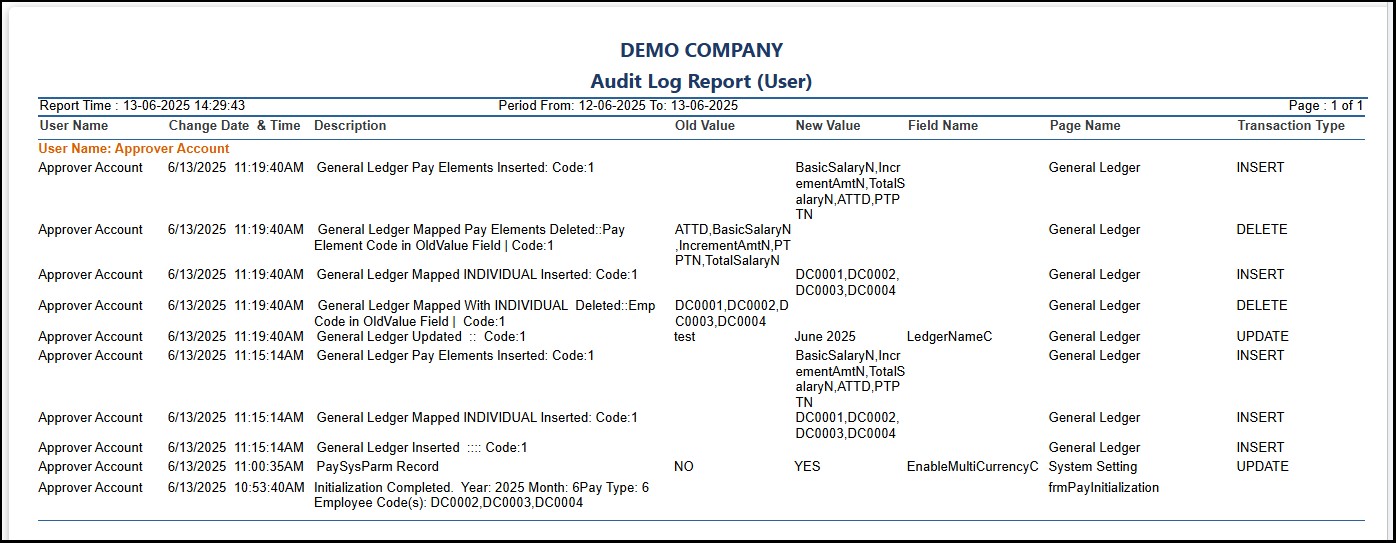
This report is to display the rights of users who can access the system. Users can view the report type by Access Report or Approver Report.
Step 1: Go to Reports > User Access Report
Step 2: Select the report type “Access Report” or "Approver Report".
Access Report : Generates a report indicating which applications each user has access to.
Approver Report : Provides a breakdown of approvers assigned to employees across different application modules
Step 3: Select the users.
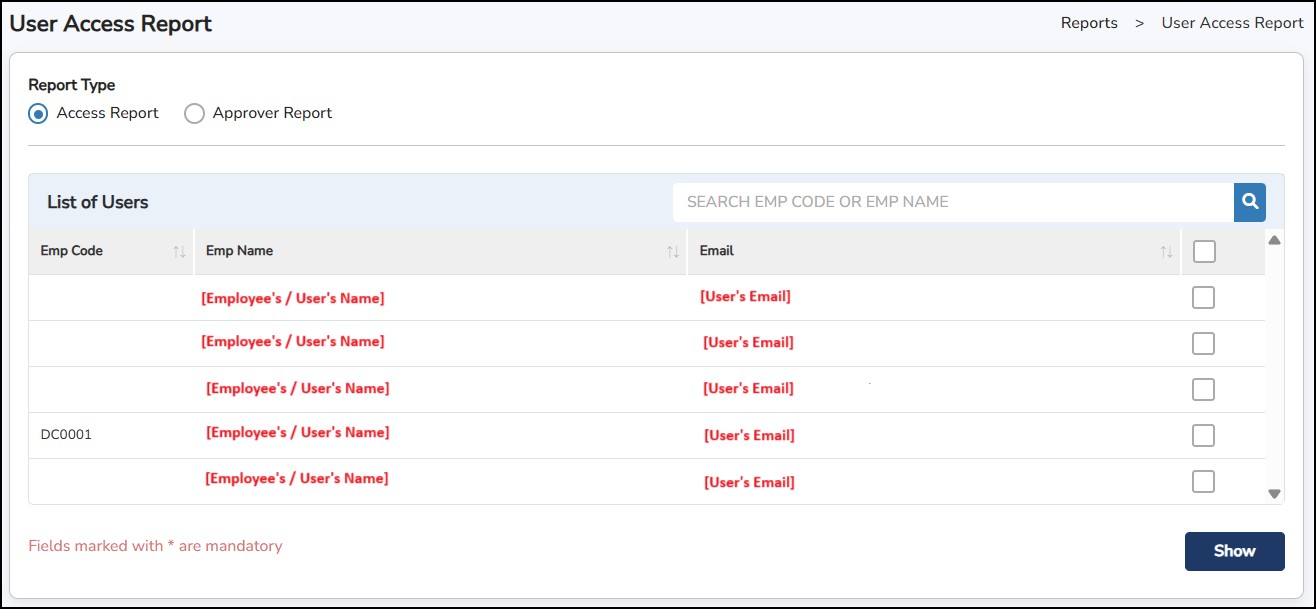
Step
5: Click
![]() to generate.
to generate.
User Access Report (Access Report)
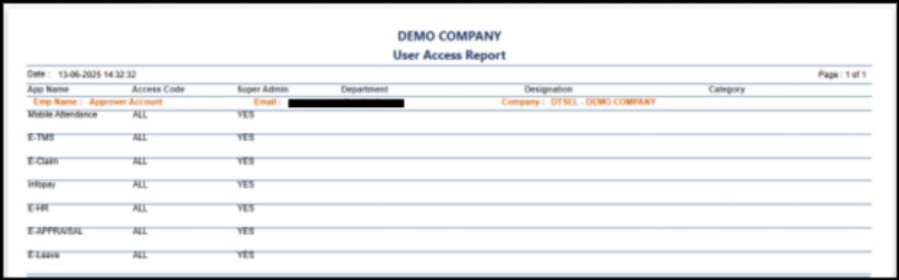
User Access Report (Approver Report)
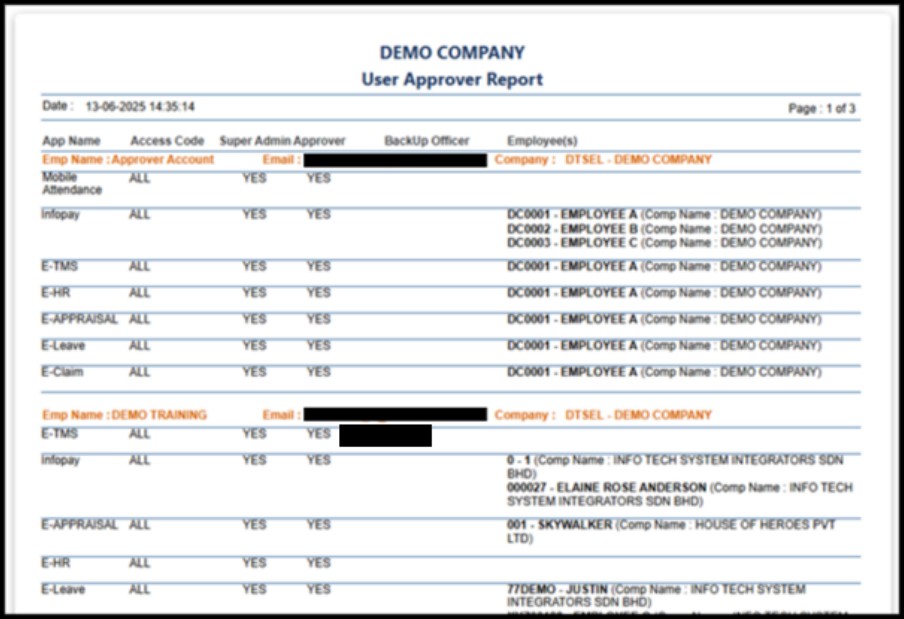
This section describes where the Employees can log in to view their appraisal templates assigned.
To log in, the user will be receiving an email indicating the username will be the Email ID and a link where they can set a password to login.
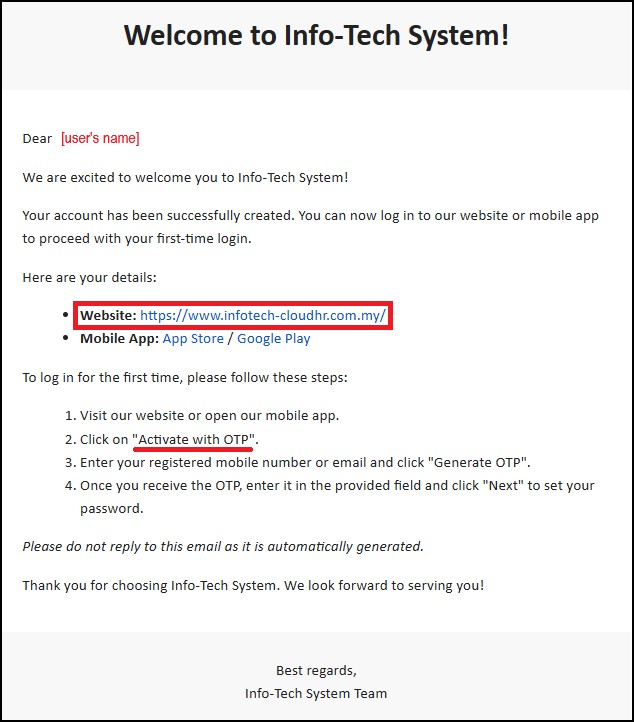
Employee may click the click here link to set their password and it will bring them to the Password Reset page.
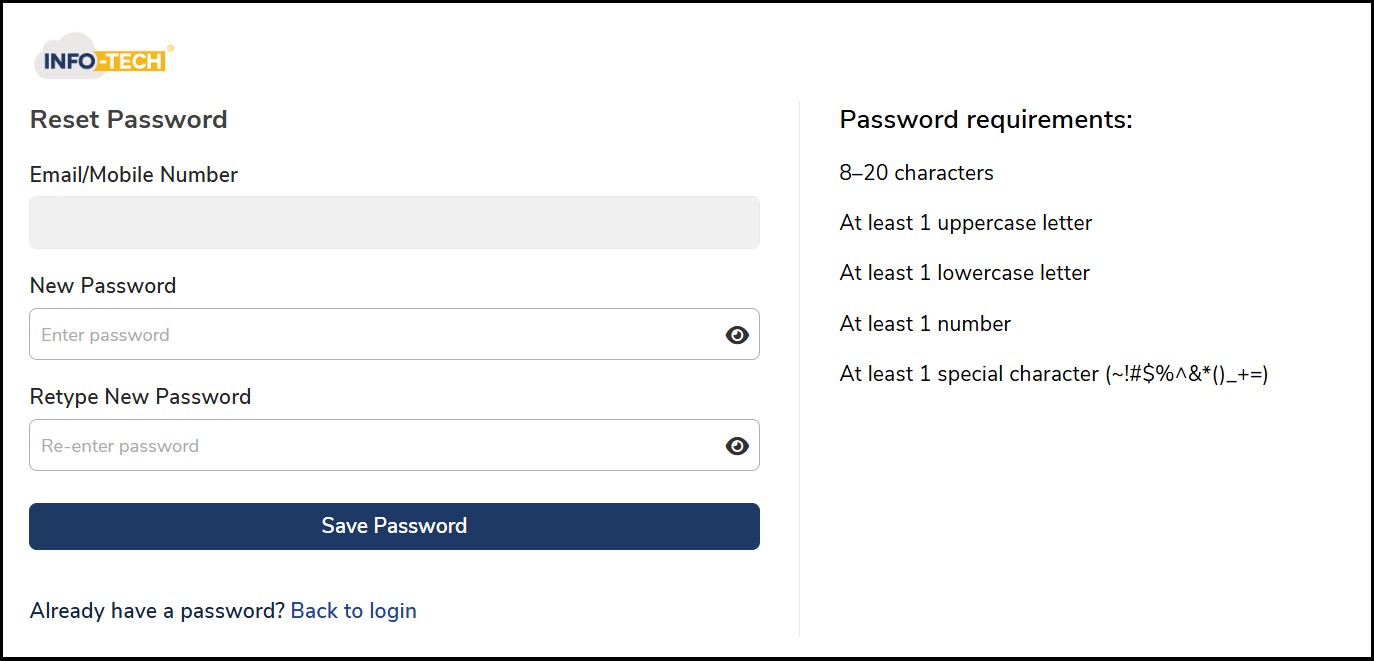
Once validated, the system will automatically redirect you to the web portal's login page.
These changes affect all scenarios where an employee receives a new password, including new employee or user creation, password resets, and the "Forgot Password" feature.
The password reset link, sent via a one-time password (OTP), is valid for a single use. The OTP code will expire five minutes after it is generated if it is not used.
Personal : -
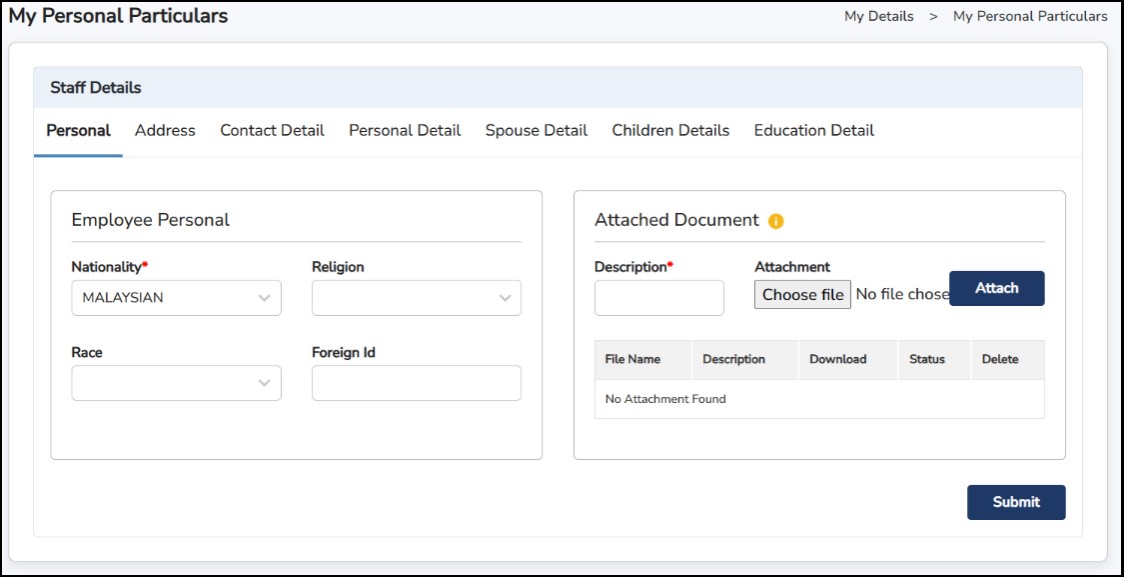
Address : -
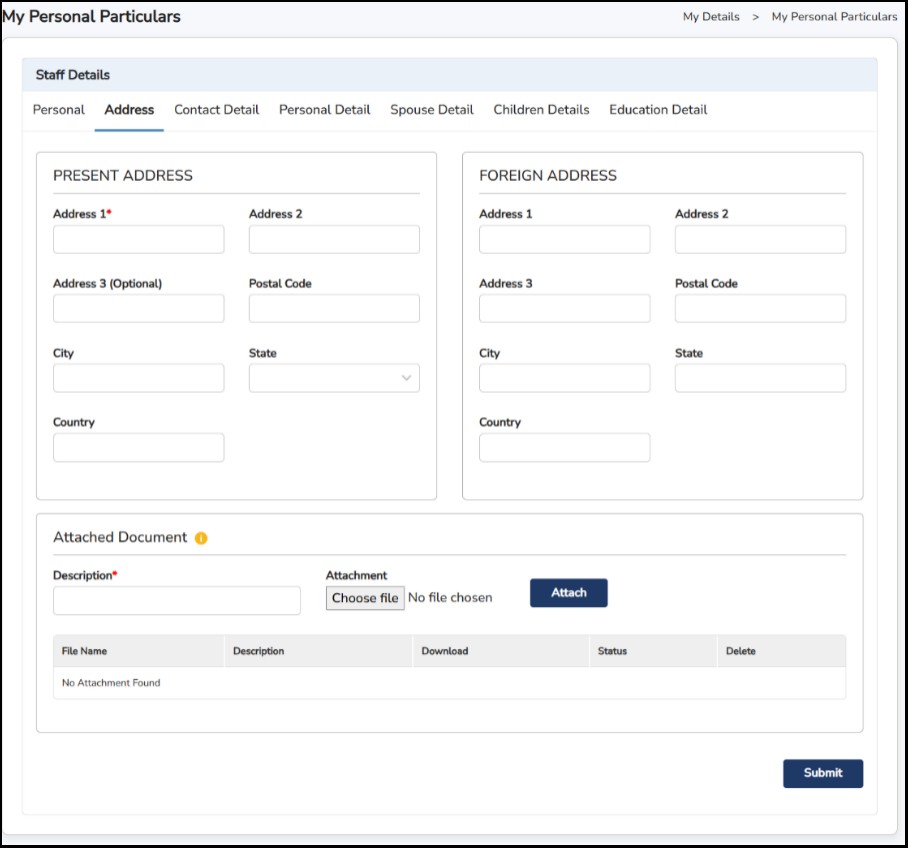
Contact Detail : -
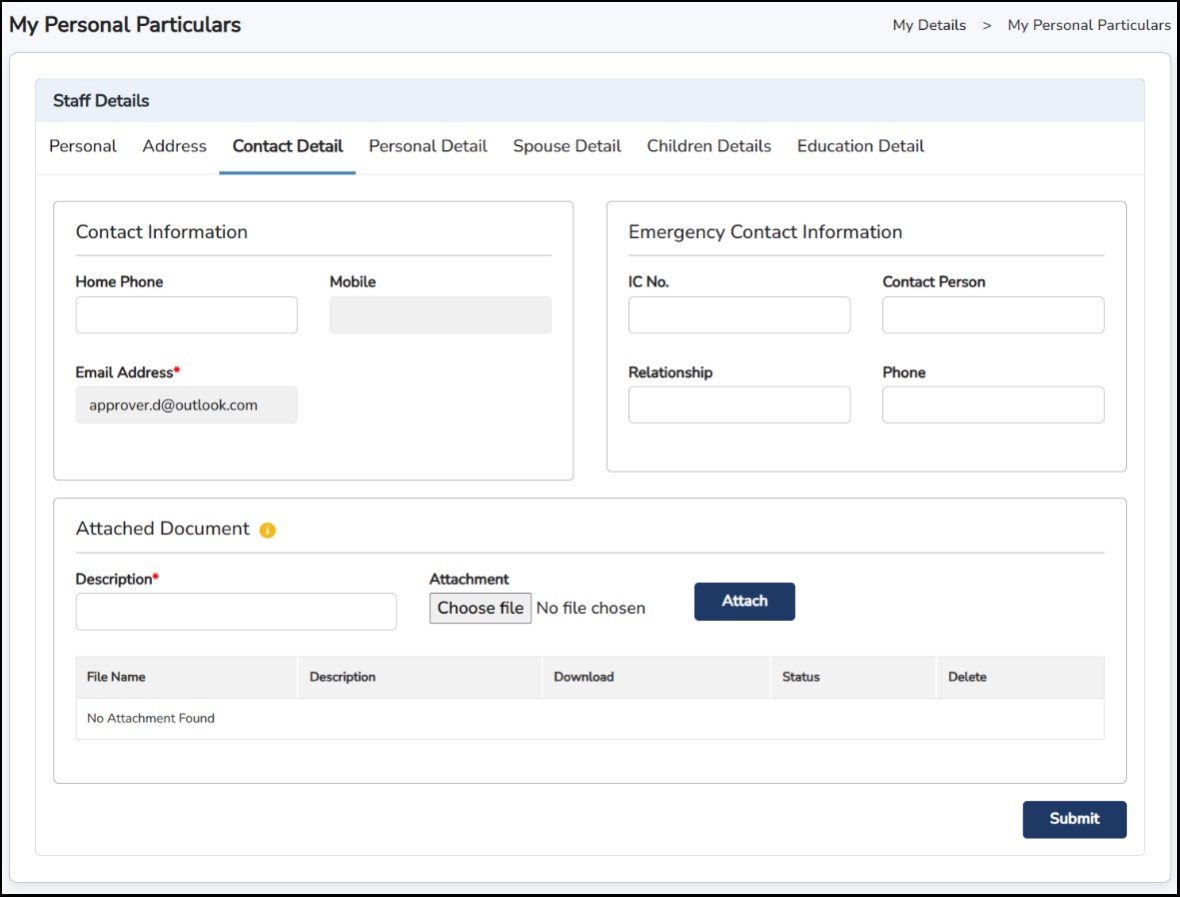
Personal Detail : -
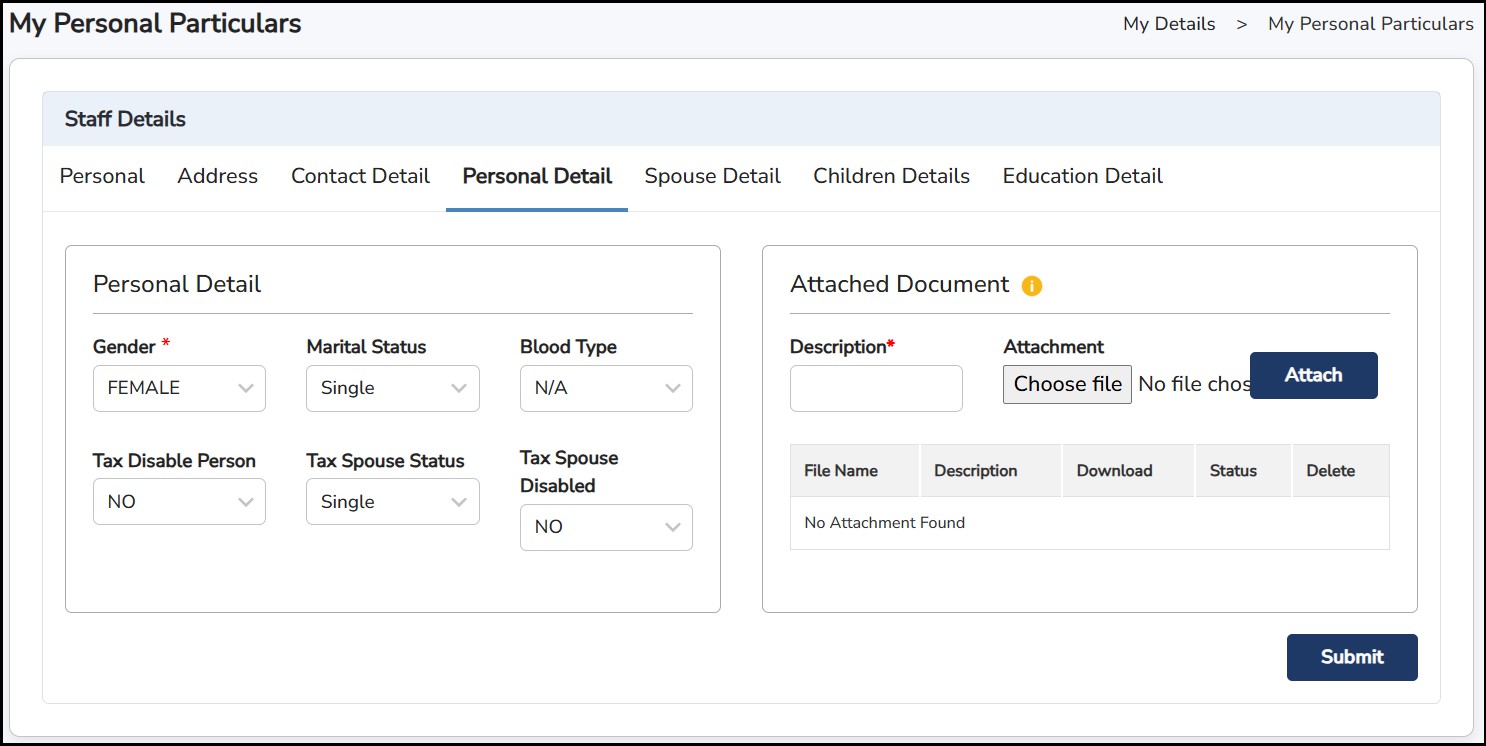
Spouse Detail : -
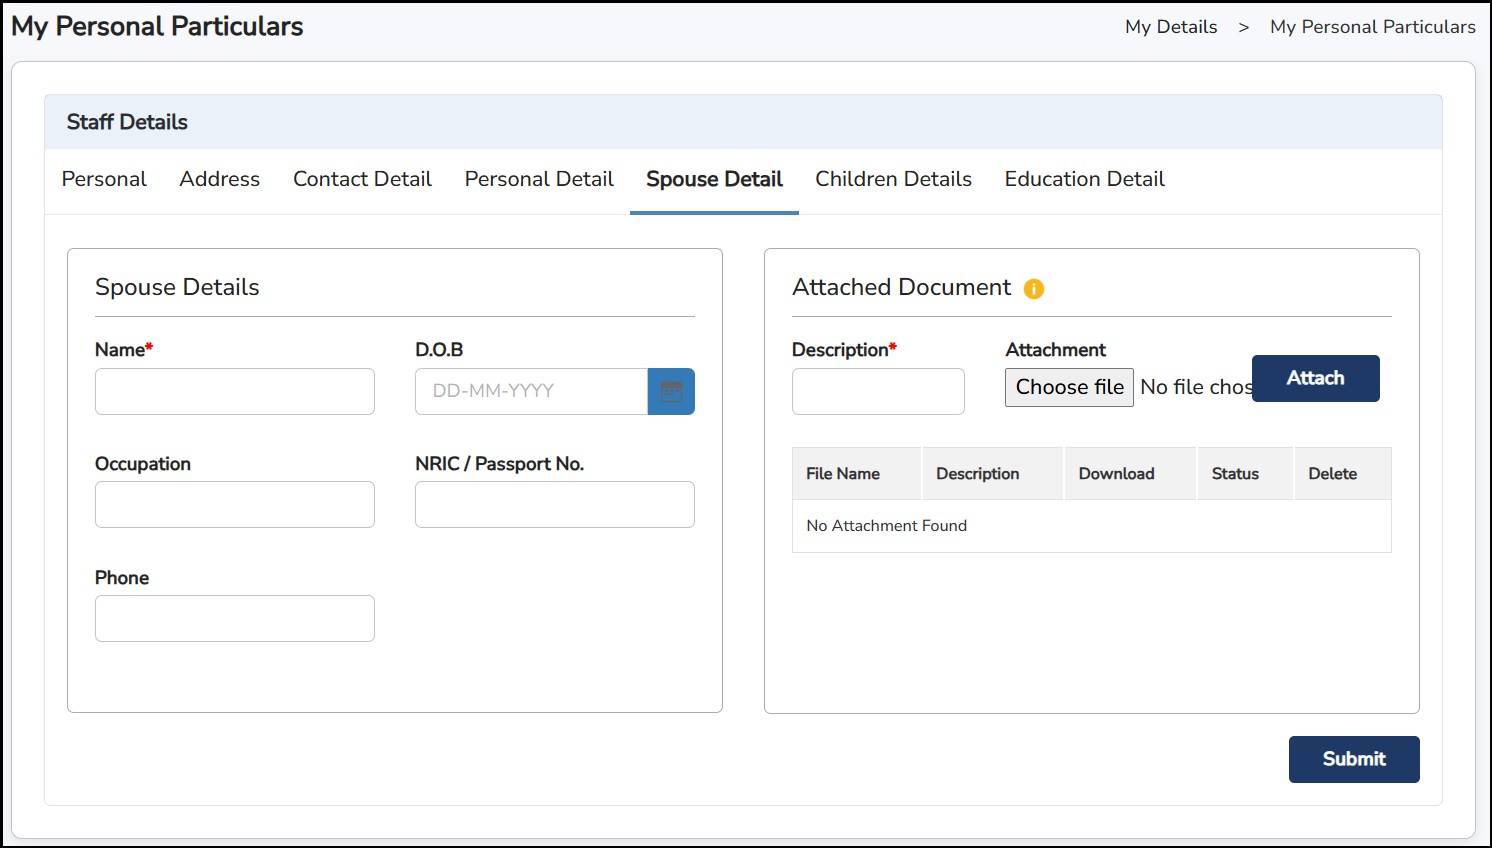
Children Details : -
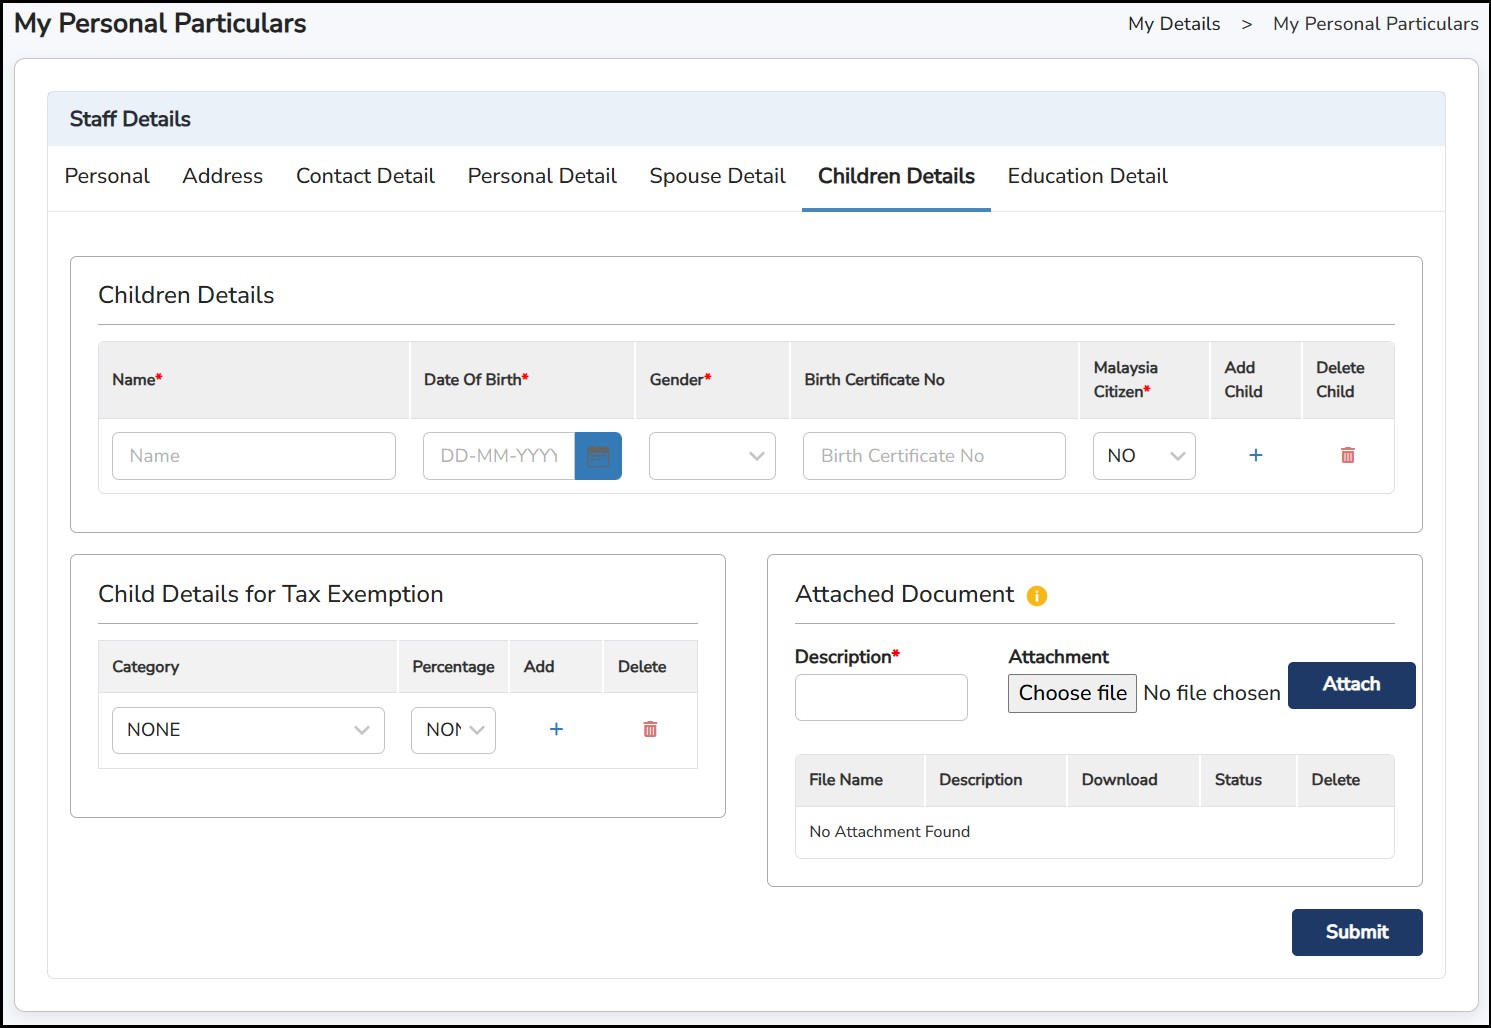
Education Detail: -
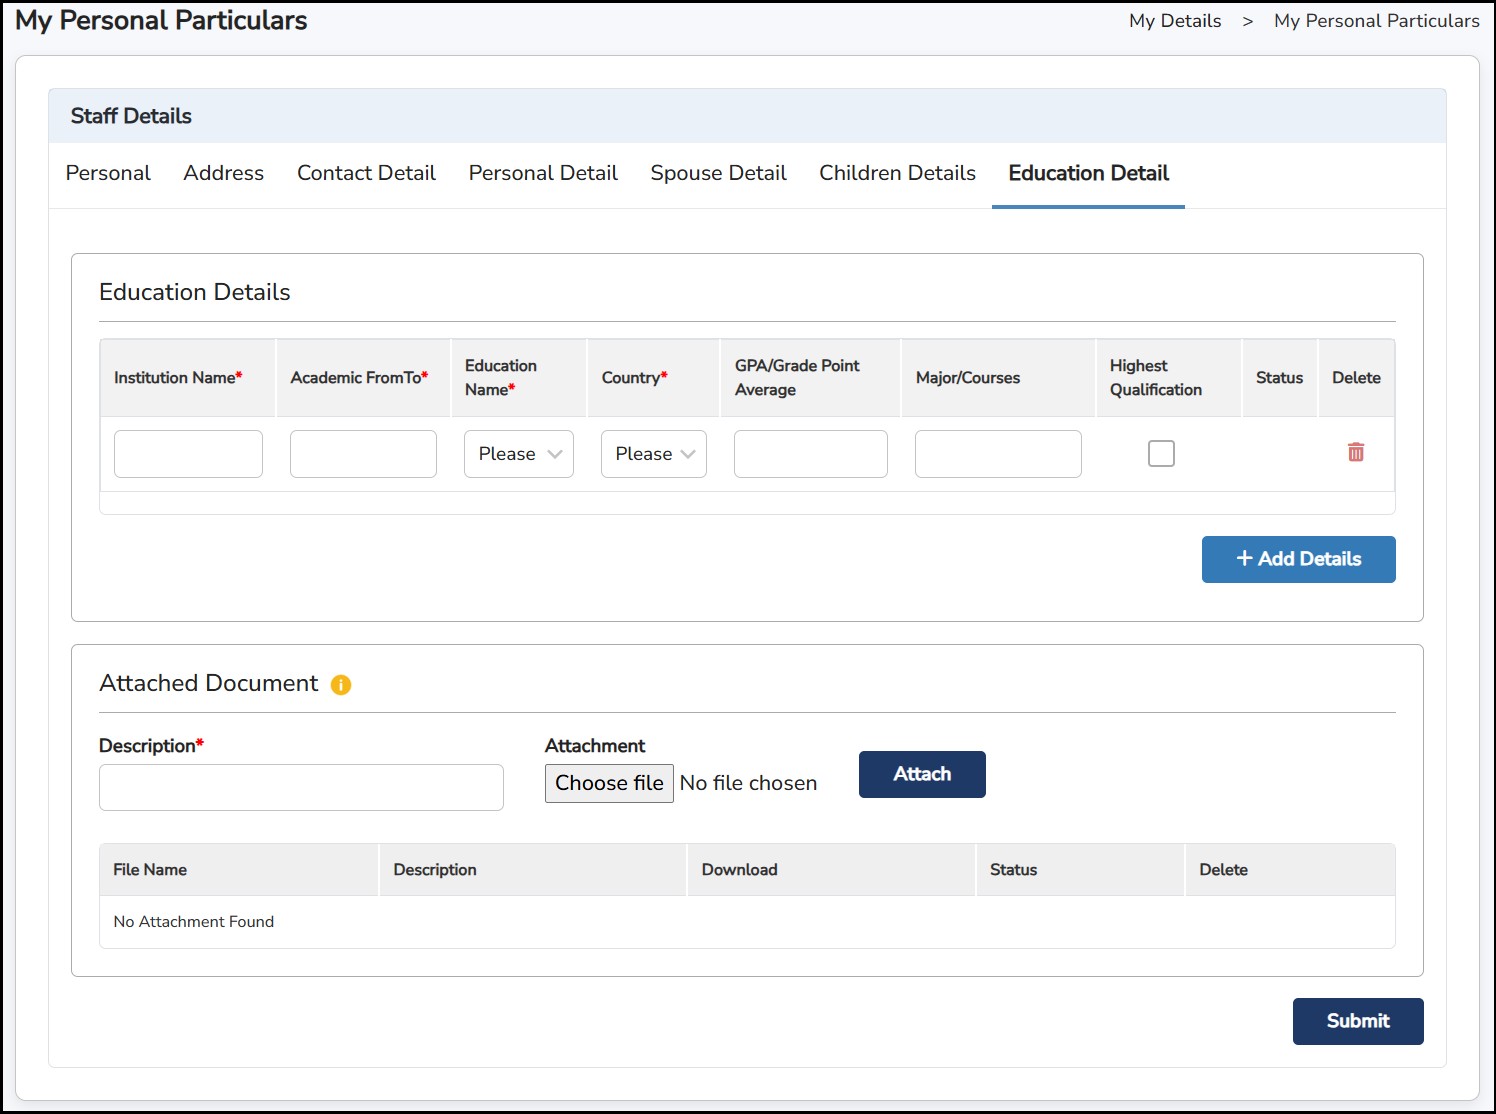
My Pay Slip
You may view your payslip by selecting the Year, Month and Pay Type and click
![]() to view the payslip.
to view the payslip.

Payslip Sample:
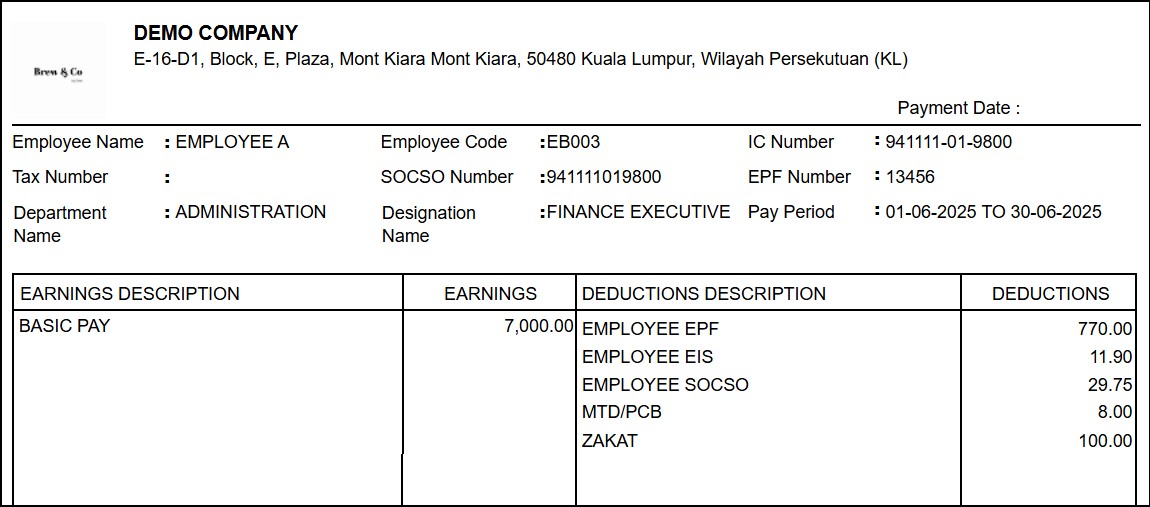
TP1 Relief Request
Use this function to request updates for any Tax Relief in the system. Once submitted, your HR/Admin will review and either approve or reject the request.
Step 1: Select the Month and the Year
Step 2: Select the Relief Type from the dropdown list
Step 3: Enter the amount of relief to request
Step 4: Enter the Reference Number of the relief
Step 5: Attach any supporting document of the relief for review and click
![]() to upload the attachment.
to upload the attachment.
Step 6: Once done, click
![]() or click
or click
![]() to redo the information.
to redo the information.
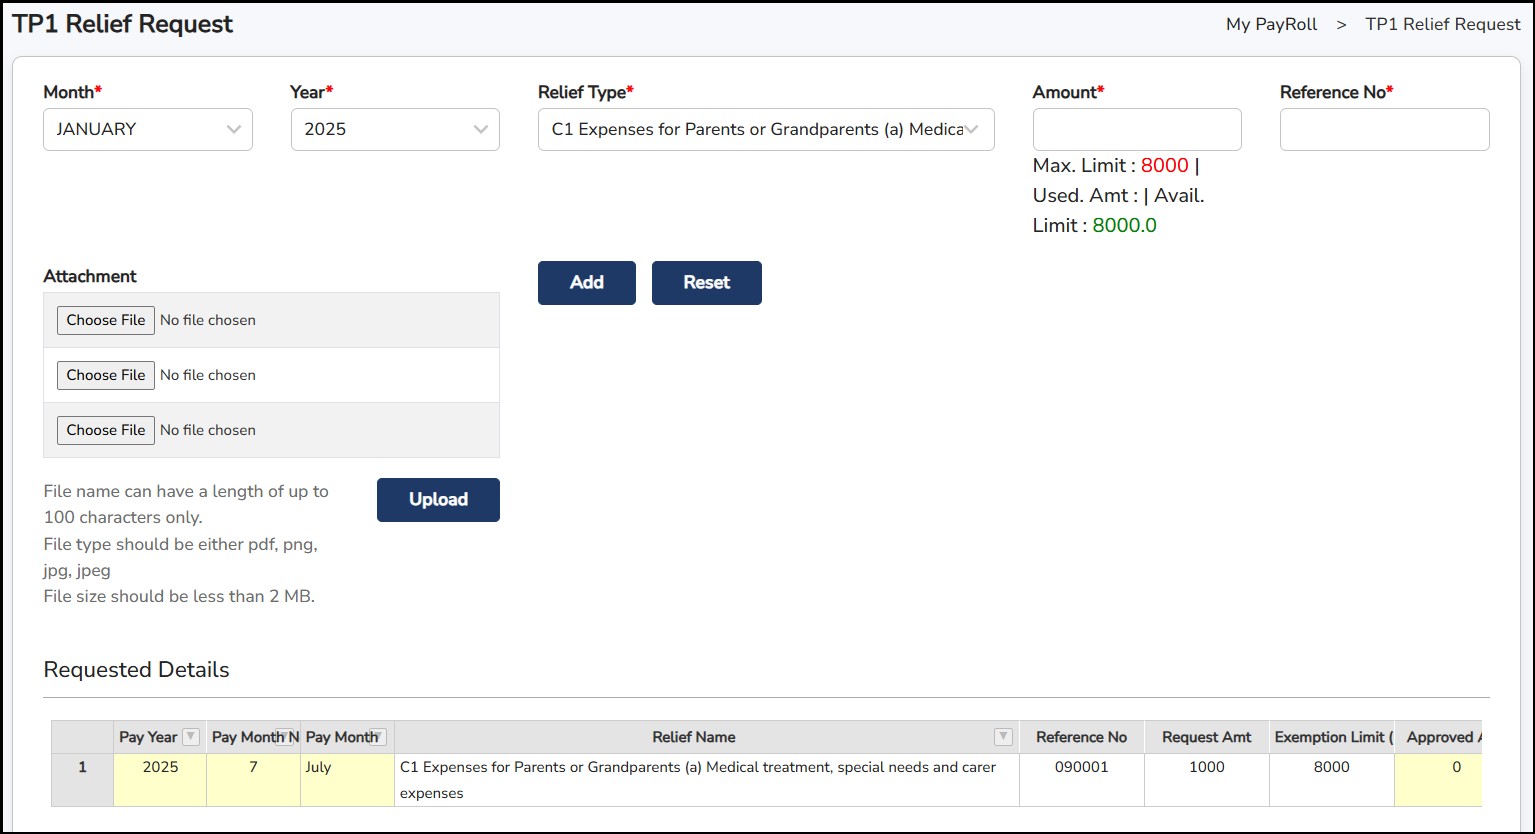
My EA Submission
This is to retrieve and download the EA Form file.
Step 1: Select the year from the column
Step
2: Click
![]() once done.
once done.

Portal will automatically download the file and will be saved as

My PCB II Submission
To view your PCB II Form generated by the system. Enter the Generate Date, select the year, and click
![]() to view the form.
to view the form.
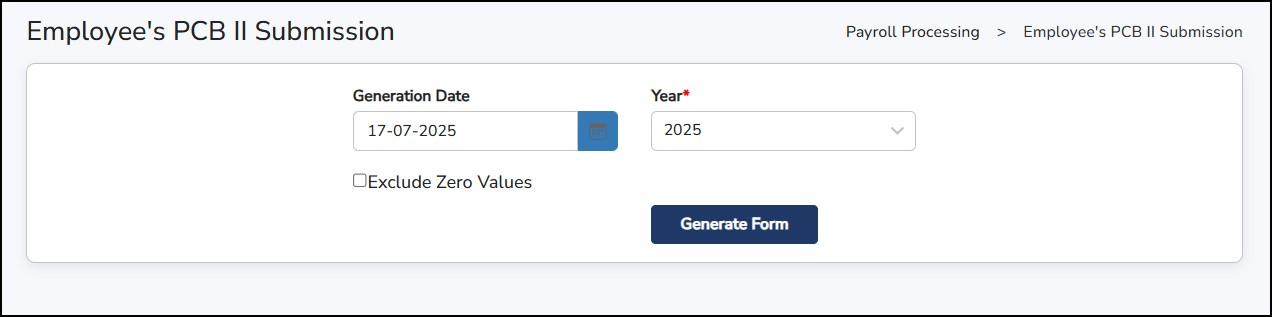
PCB II Form Sample
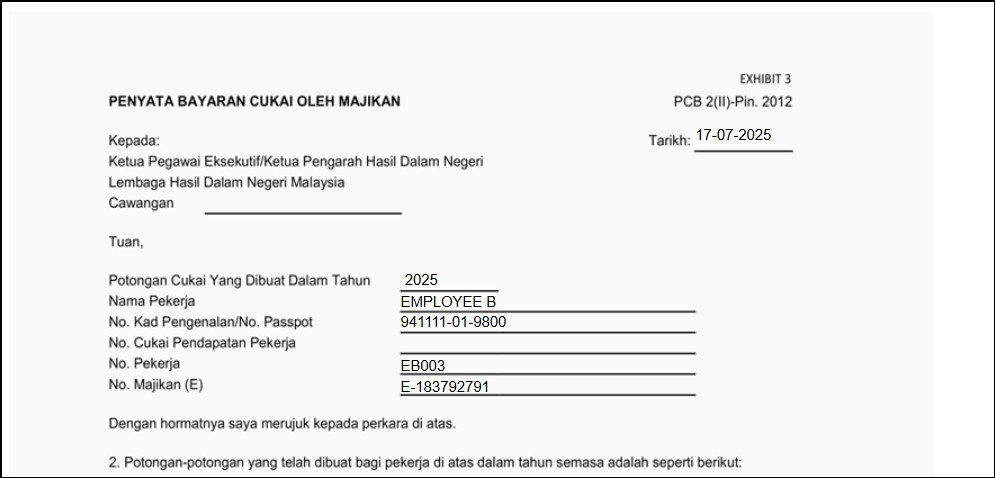
My CP58 Submission
To view CP58 Form given by the company.